Introduction
Photography enthusiasts often rely on digital photo editing software to enhance and optimize their images. Canon Digital Photo Professional 4 is a powerful and user-friendly tool specifically designed for Canon camera users. It provides a wide range of editing and organizing features to help photographers achieve their vision.
Whether you’re a professional photographer or a hobbyist, Canon Digital Photo Professional 4 can greatly enhance your post-processing workflow. From basic adjustments to advanced editing and batch processing, this software has everything you need to bring out the best in your photos.
In this article, we will guide you through the various functions and features of Canon Digital Photo Professional 4. We will explore how to import and organize your photos, as well as how to utilize the software’s editing tools to achieve stunning results. Additionally, we will provide some helpful tips and tricks to optimize your workflow and troubleshoot common issues.
Before we dive into the specifics, it’s important to note that Canon Digital Photo Professional 4 is available as a free download from the Canon website. It supports a wide range of Canon camera models, ensuring compatibility with your device.
Whether you’re shooting landscapes, portraits, or action scenes, Canon Digital Photo Professional 4 has the tools to elevate your photography to the next level. Let’s get started and explore the exciting possibilities that await!
Getting Started
To begin using Canon Digital Photo Professional 4, you’ll first need to download and install the software on your computer. Visit the Canon website and navigate to the support section to find the download link for your specific camera model.
Once you’ve successfully installed the software, connect your Canon camera to your computer using the provided USB cable. Turn on your camera and open Canon Digital Photo Professional 4. The software should automatically detect your camera and display the available photos for import.
Next, select the photos you wish to import by checking the boxes next to their thumbnails. You can choose individual photos or select multiple photos at once. Once you’ve made your selection, click on the “Import” button to transfer the photos from your camera to the software.
Canon Digital Photo Professional 4 also allows you to import photos from existing folders on your computer. To do this, click on the “File” tab in the software’s main menu and select “Open Folder.” Browse to the folder containing your photos and select the desired images for import.
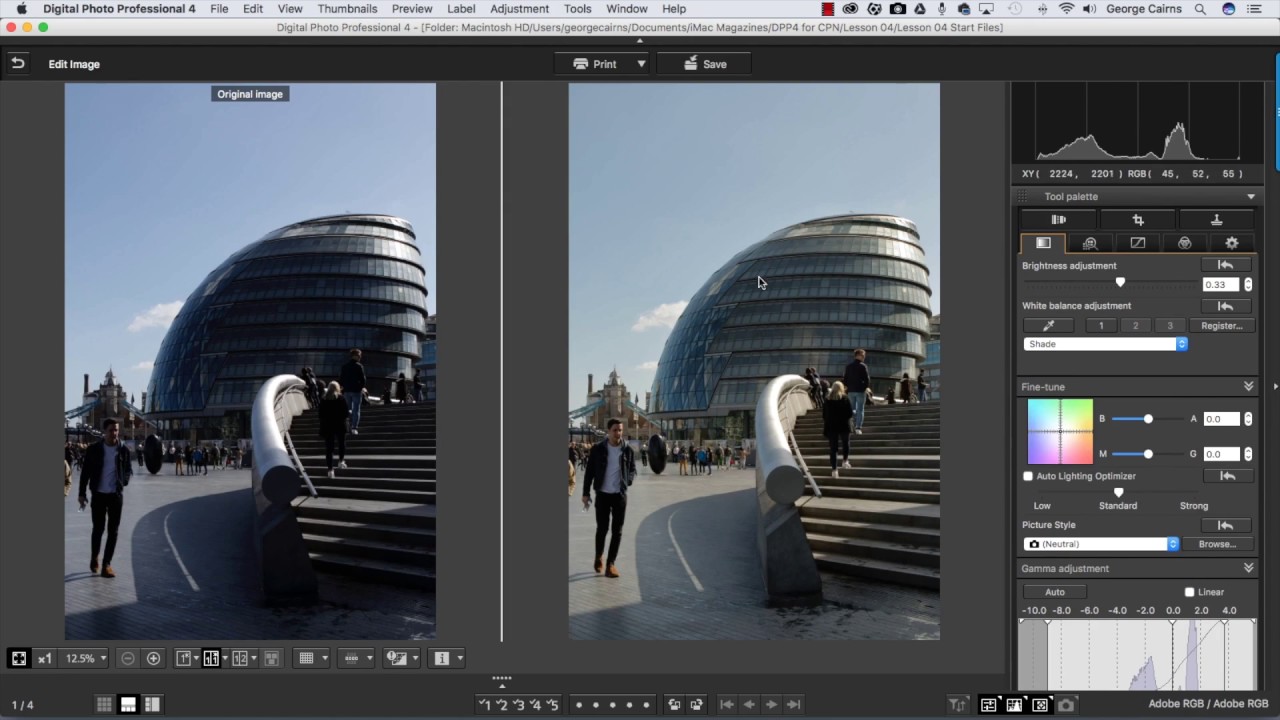
After importing your photos, you’ll be greeted with the software’s intuitive interface. The main window displays a thumbnail view of your imported images, along with several editing and organizing options.
Before diving into editing, it’s important to understand the various viewing modes available in Canon Digital Photo Professional 4. By default, the software displays your images in “Thumbnail” mode, which provides a quick overview of your photos. You can switch to “Preview” mode to view a larger version of an individual photo, or to “Compare” mode to compare multiple photos side by side and select the best one.
Now that you’re familiar with the basics of getting started with Canon Digital Photo Professional 4, let’s explore the various editing tools and features in the next section.
Adding Photos to Digital Photo Professional 4
One of the first steps in using Canon Digital Photo Professional 4 is importing your photos into the software for editing and organizing. Here are a few different methods you can use to add photos to the software:
- Direct Import from Camera: Connect your Canon camera to your computer using the USB cable, and open the software. It should automatically detect your camera, and you’ll be able to select and import the photos directly from your camera’s memory card.
- Import from Existing Folders: If you have already transferred your photos to a folder on your computer, you can import them by selecting “Open Folder” from the “File” tab in the software’s main menu. Navigate to the desired folder and select the images you want to import.
- Drag and Drop: Another easy way to add photos to Canon Digital Photo Professional 4 is by simply dragging and dropping them into the software’s main window. Open the folder containing your photos, select the desired images, and drag them into the software. They will be automatically imported.
Regardless of the method you choose, Canon Digital Photo Professional 4 offers a seamless process for adding photos to the software.
Once your photos are imported, you’ll be able to see thumbnail previews of each image in the main window. This allows for easy navigation and quick access to your photos for editing and organizing.
It’s worth mentioning that Canon Digital Photo Professional 4 supports various file formats, including RAW files, JPEGs, and TIFFs. This ensures compatibility with a wide range of Canon cameras and allows you to work with your preferred file type.
Adding photos to Canon Digital Photo Professional 4 is a straightforward process, providing you with a well-organized workspace to unleash your creativity and bring out the best in your images. In the next section, we will explore the basic editing tools available in the software.
Basic Editing Tools
Canon Digital Photo Professional 4 offers a comprehensive set of basic editing tools that allow you to make adjustments and enhancements to your photos. These tools are designed to be user-friendly and intuitive, making it easy for both beginners and advanced users to achieve the desired results.
One of the fundamental editing tools in Canon Digital Photo Professional 4 is the “Exposure” adjustment. This allows you to adjust the brightness and contrast of your photos, bringing out details in the shadows and highlights. You can fine-tune the exposure by using the slider or by manually entering specific values.
Another essential tool is the “White Balance” adjustment, which helps correct the color temperature of your photos. You can choose from preset white balance settings, such as Daylight or Tungsten, or use the eyedropper tool to select a neutral gray area in your image for accurate color representation.
To further enhance your photos, Canon Digital Photo Professional 4 provides “Sharpness” and “Noise Reduction” adjustments. The sharpness tool allows you to enhance the details and crispness of your images, while the noise reduction tool helps reduce the digital noise in your photos, particularly in low-light situations.
The “Crop” tool is also available for adjusting the composition of your photos or removing unwanted elements. You can select a specific aspect ratio or freely crop your image using the desired dimensions.
In addition to these basic adjustments, Canon Digital Photo Professional 4 offers tools for correcting lens distortion, adjusting color saturation and tone, and applying creative filters to add artistic effects to your images.
It’s important to note that Canon Digital Photo Professional 4 works with non-destructive editing, meaning that your original photo is preserved throughout the editing process. This allows you to experiment and make changes without permanently altering the original image.
Once you are satisfied with your edits, you can save your photo in various formats, including JPEG, TIFF, or even the original RAW format, if applicable. This ensures that you have flexibility when it comes to sharing, printing, or further editing your photos.
These basic editing tools in Canon Digital Photo Professional 4 provide a solid foundation for enhancing and improving your photos. In the next section, we will explore some of the advanced editing tools and features that will take your editing capabilities to the next level.
Advanced Editing Tools
Canon Digital Photo Professional 4 goes beyond basic adjustments and provides a range of advanced editing tools for photographers who want to take their images to new heights. These tools allow for more precise control and creative possibilities, giving you the freedom to transform your photos into stunning works of art.
One of the advanced editing features in Canon Digital Photo Professional 4 is the “Curves” adjustment. This tool enables you to fine-tune the tonal range of your image by adjusting the brightness and contrast in specific areas of the photo. By manipulating the curves, you can create unique and dramatic effects.
The “HSL” (Hue, Saturation, and Luminance) adjustment is another powerful tool that allows you to individually control the colors in your image. You can adjust the hue to change the color, increase or decrease the saturation for vibrant or more muted tones, and adjust the luminance to control the brightness of specific colors.
For photographers who want to achieve a specific look or mimic a particular film style, Canon Digital Photo Professional 4 offers “Picture Style Editor.” This tool allows you to create and customize your own picture styles by adjusting various parameters, including contrast, saturation, and color tone.
Canon Digital Photo Professional 4 also provides advanced retouching capabilities. The “Clone Stamp” tool allows you to remove unwanted elements by copying pixels from one area of the image to another seamlessly. The “Healing Brush” tool is useful for removing small imperfections or blemishes on your subjects’ skin.
In addition to these editing tools, Canon Digital Photo Professional 4 offers batch processing functionality. This feature allows you to make the same adjustments to multiple photos simultaneously, saving you valuable time and effort when editing large batches of images.
Moreover, the software provides advanced lens correction features that can automatically correct distortion, chromatic aberration, and vignetting based on your Canon lens profile. This ensures that your photos maintain optimal image quality and accuracy.
By utilizing these advanced editing tools in Canon Digital Photo Professional 4, you can unleash your creativity and elevate your photos to a whole new level. In the next section, we will explore how to output and export your edited images from the software.
Outputting and Exporting Images
Once you’re done editing your photos in Canon Digital Photo Professional 4, it’s time to output and export your final images. The software offers various options for saving and sharing your edited photos in different formats and resolutions.
To save your edited image within Canon Digital Photo Professional 4, you can choose the “Save” option under the “File” menu. This allows you to preserve your edits while retaining the original file format, such as RAW or TIFF.
If you prefer to save your image in a different format, such as JPEG for online sharing or printing, you can use the “Export” function. Under the “File” menu, select “Export” and choose your desired file format, along with the appropriate settings for resolution and quality.
Canon Digital Photo Professional 4 also provides the ability to create contact sheets and print layouts. With the “Print” option under the “File” menu, you can choose from various templates and customize the layout and options for printing multiple images on a single page.
Furthermore, if you are looking to showcase your edited images as a slideshow, the software allows you to create dynamic presentations. By selecting the “Slide Show” option under the “View” menu, you can customize the slideshow settings, including transitions, duration, and background music.
For photographers who prefer to share their images directly to social media platforms, Canon Digital Photo Professional 4 offers a convenient sharing feature. With the “Share” option under the “File” menu, you can easily upload your photos to popular platforms like Facebook, Flickr, and Twitter.
Additionally, if you’re working on a collaborative project or need to share your edited images with others, you can use the “Export with Edit Recipe” feature. This allows you to save your edits as a recipe file, which can be opened and applied in Canon Digital Photo Professional 4 by others.
By providing a range of output and exporting options, Canon Digital Photo Professional 4 ensures that you can save and share your edited photos in a format and resolution that suits your specific needs. In the next section, we will explore the batch processing function and how it can streamline your editing workflow.
Using the Batch Process Function
When dealing with a large number of photos, editing each one individually can be time-consuming and inefficient. Thankfully, Canon Digital Photo Professional 4 offers a batch process function that allows you to apply the same adjustments to multiple photos simultaneously, saving you valuable time and effort.
To use the batch process function, start by selecting the photos you want to edit in the software’s main window. You can hold down the Ctrl key (or Command key for Mac users) to select multiple photos at once. Alternatively, you can click on the first photo, hold down the Shift key, and click on the last photo in a consecutive series.
Once you’ve made your selection, go to the “Edit” menu and choose “Copy Recipe.” This will copy the adjustments and edits made to the currently selected photo.
Next, select the remaining photos you wish to apply the same adjustments to. Go to the “Edit” menu again and this time choose “Paste Recipe.” The software will automatically apply the previously copied edits to all selected photos.
If you want to make further adjustments to individual photos within the batch, you can do so without affecting the other images. Simply click on a specific photo and make the desired changes. The adjustments made to an individual photo will not affect the rest of the batch.
In addition to applying the same adjustments, Canon Digital Photo Professional 4’s batch process function also allows for automated tasks and renaming. For instance, you can resize the images, convert them to a specific file format, or add watermarks to protect your work.
To access these additional options, go to the “Tools” menu and choose “Batch Process.” From there, you can configure the desired settings and parameters for the batch process, such as output resolution, file format, and destination folder.
By utilizing the batch process function in Canon Digital Photo Professional 4, you can streamline your editing workflow and ensure consistency across a large number of photos. This feature is especially valuable when working on projects with similar editing requirements, such as event photography or product catalog creation.
In the next section, we will explore the management and organizing features in Canon Digital Photo Professional 4 to help you effectively manage your photo library.
Managing and Organizing Images
In addition to its powerful editing capabilities, Canon Digital Photo Professional 4 also provides robust features for managing and organizing your photo library. These tools allow you to efficiently navigate and categorize your photos, making it easier to locate specific images and maintain a well-organized workflow.
One of the key features for managing your images in Canon Digital Photo Professional 4 is the ability to create folders and subfolders. This allows you to organize your photos into logical categories, such as by date, location, or subject matter. You can simply right-click in the main window and select “New Folder” to create a new folder, and then drag and drop images into it.
To further streamline your organization process, you can assign star ratings and labels to your photos. Star ratings are a way to mark and rank your photos based on their quality or significance, while labels can be used to designate different stages of processing or categorize photos based on specific criteria. You can access these features by right-clicking on an image and selecting the appropriate option.
Canon Digital Photo Professional 4 also offers a search function, allowing you to quickly locate specific images based on keywords, file names, or metadata. The software scans your entire photo library and displays the relevant results, making it easy to find that elusive image you’re looking for.
In addition to organizing your photos within the software, Canon Digital Photo Professional 4 allows you to create virtual copies of your images. These virtual copies can be used to experiment with different edits or variations while keeping the original image intact. This feature is especially useful when you want to explore different creative possibilities without the fear of permanently altering your original photo.
Moreover, Canon Digital Photo Professional 4 supports the integration of IPTC (International Press Telecommunications Council) metadata. This allows you to add detailed information to your photos, including captions, keywords, and copyright details. Adding IPTC metadata not only helps you stay organized but also ensures that your images are properly credited and protected.
By utilizing the managing and organizing features in Canon Digital Photo Professional 4, you can effectively navigate and categorize your photo library, making it easier to locate and work with your images. In the next section, we will share some tips and tricks to help you work more efficiently in the software.
Tips and Tricks for Efficient Editing
Editing photos in Canon Digital Photo Professional 4 can be a smooth and seamless process with the right tips and tricks. Here are some valuable techniques to help you work more efficiently and make the most out of this powerful software:
- Keyboard Shortcuts: Familiarize yourself with the keyboard shortcuts in Canon Digital Photo Professional 4. These shortcuts can significantly speed up your editing workflow, allowing you to access various functions and tools with just a keystroke.
- Customize Your Workspace: Take advantage of the software’s customizable workspace. Arrange the different panels, tools, and windows in a way that suits your editing style and preferences. This will enable you to have quick access to the necessary tools and features as you work.
- Use Presets: Save time and achieve consistent results by creating and utilizing presets in Canon Digital Photo Professional 4. These presets allow you to apply a predefined set of adjustments and edits to your photos with a single click, eliminating the need for repetitive manual adjustments.
- Utilize Side-by-Side Comparison: When choosing the best photo from a series of shots, take advantage of the software’s side-by-side comparison view. This feature allows you to easily compare and analyze different images, helping you select the one that best captures your vision.
- Experiment with Different Versions: Don’t be afraid to create multiple versions of an edited photo in Canon Digital Photo Professional 4. By saving different versions, you can explore different editing techniques and styles without losing your original edits. This allows for greater creativity and flexibility in your editing process.
- Save and Reuse Edit Recipes: If you have a specific editing style or frequently use a particular set of adjustments, save them as an edit recipe in Canon Digital Photo Professional 4. This allows you to easily apply the same edits to future photos, maintaining consistency and efficiency in your editing workflow.
- Backup Your Images: It is always important to have backups of your edited photos. Regularly export and save your edited images in a separate location, such as an external hard drive or cloud storage. This will ensure the safety and preservation of your valuable photographs.
By implementing these tips and tricks, you can maximize your productivity and achieve polished results in Canon Digital Photo Professional 4. Remember to experiment, explore different techniques, and have fun while editing your photos!
Troubleshooting and FAQ
While using Canon Digital Photo Professional 4, you may encounter some challenges or have questions about certain features. Here are some common troubleshooting tips and frequently asked questions to help you overcome any issues:
Q: I am unable to open my RAW files in Canon Digital Photo Professional 4. What should I do?
A: Ensure that you have the latest version of Canon Digital Photo Professional 4 installed. If the issue persists, it may be due to compatibility issues with your camera model. Check the Canon website for any available firmware updates for your camera that may provide RAW file support.
Q: I accidentally deleted a photo. Can I recover it in Canon Digital Photo Professional 4?
A: Unfortunately, Canon Digital Photo Professional 4 does not have a built-in photo recovery feature. However, you may be able to recover deleted photos using specialized data recovery software. Stop using the storage device immediately and consult professional data recovery services for the best chance of recovering your deleted photos.
Q: The software is running slow and not responding. What can I do to improve performance?
A: Check your computer’s hardware specifications to ensure they meet the minimum requirements for running Canon Digital Photo Professional 4. Close any unnecessary programs or applications running in the background to free up system resources. Additionally, consider freeing up disk space and optimizing your computer’s performance using software utilities.
Q: Can I edit photos taken with cameras other than Canon in Canon Digital Photo Professional 4?
A: While Canon Digital Photo Professional 4 is specifically designed for Canon camera users, it may have limited capability to work with non-Canon RAW files. However, you may experience limitations or reduced functionality when editing photos taken with cameras from other manufacturers. It is recommended to use software that is specifically compatible with the camera brand you are using.
Q: How can I update Canon Digital Photo Professional 4 to the latest version?
A: Visit the Canon website and navigate to the support section. Look for the software updates or downloads page, and locate the latest version of Canon Digital Photo Professional 4. Follow the instructions provided to download and install the updated version of the software.
If you encounter any additional issues or have specific questions about Canon Digital Photo Professional 4, it is recommended to consult the official Canon support resources or reach out to their customer support for further assistance.
Now that we have addressed some common troubleshooting scenarios and frequently asked questions, let’s conclude our guide to Canon Digital Photo Professional 4 in the next section.
Conclusion
Canon Digital Photo Professional 4 is a versatile and user-friendly software that provides photographers with powerful editing and organizing tools. It allows you to bring out the best in your photos, from basic adjustments to advanced editing techniques. With its intuitive interface and extensive range of features, it offers a seamless editing workflow that caters to both beginners and professionals in the photography field.
In this guide, we covered the different aspects of using Canon Digital Photo Professional 4, including getting started with importing photos and navigating its interface. We explored the basic and advanced editing tools that help enhance the quality and visual appeal of your images. Additionally, we discussed the functions for outputting and exporting your edited photos, as well as managing and organizing your photo library efficiently.
We also provided valuable tips and tricks for optimizing your editing workflow and troubleshooting common issues that may arise. By implementing these techniques, you can streamline your editing process and achieve outstanding results in less time.
Canon Digital Photo Professional 4 is a valuable asset for photographers who want to unleash their creativity and take their images to new heights. Whether you’re a professional photographer or an amateur enthusiast, this software provides the tools and features necessary to bring your vision to life.
Remember to always keep your software up to date and explore the official Canon resources and support channels for additional information and assistance. Now, armed with your newfound knowledge, go forth and embark on a journey of creativity with Canon Digital Photo Professional 4!