Introduction
Have you ever come across a stunning photo on Smugmug and wished you could download and save it for your personal collection? Well, you’re in luck! In this article, we will guide you through the step-by-step process of downloading photos from Smugmug. Whether you’re a photography enthusiast looking to expand your inspiration board or simply want to preserve beautiful memories captured by someone else, this tutorial is for you!
Smugmug is a popular photo-sharing website that hosts a vast collection of high-quality images from photographers around the world. While the platform primarily serves as a way for photographers to showcase their work, Smugmug also allows users to download photos from albums they have access to. With a few simple clicks, you can have those awe-inspiring images right at your fingertips.
Before we jump into the steps to download photos from Smugmug, it’s important to note that the download availability and permissions may vary depending on the photographer’s settings. Some photographers may choose to restrict downloading for certain albums or specific photos, so keep that in mind as you explore their portfolios.
Now, without further delay, let’s dive into the process of downloading photos from Smugmug. The steps we will outline below are easy to follow and will ensure that you have those captivating images saved on your device in no time.
Step 1: Go to the Smugmug website
The first step to download photos from Smugmug is to navigate to the Smugmug website. Open your preferred web browser and enter “www.smugmug.com” in the address bar. Press Enter, and you will land on the Smugmug homepage.
If you already have a Smugmug account, you can proceed to Step 2. If not, you will need to create an account before you can access and download photos from the platform. Creating an account is quick and easy. Simply click on the “Sign Up” or “Join Smugmug” button on the homepage and follow the prompts to create your account. Once you have successfully registered, you can move on to the next step.
Alternatively, if you have a specific photographer’s Smugmug URL or album link, you can click on that link directly, which will take you to the photographer’s portfolio or the specific album you want to download photos from. This saves you the trouble of navigating through the homepage, especially if you have a direct link available.
It’s important to note that some photographers may have their own custom domain names or personal websites where they host their Smugmug galleries. In such cases, you may need to visit their website first and look for a link or button that leads you to their Smugmug gallery.
Now that you are on the Smugmug website and ready to download photos, let’s move on to the next step in the process.
Step 2: Login to your Smugmug account
In order to access and download photos from Smugmug, you will need to login to your Smugmug account. If you have already created an account, follow the instructions below to login:
1. On the Smugmug homepage, locate the “Login” button at the top right corner of the page. Click on it.
2. This will take you to the login page where you will be prompted to enter your email address or username, as well as your password.
3. Enter the required login credentials and click on the “Log in” button to proceed.
4. If you prefer a quicker login experience, you can also choose to login using your Google, Facebook, or Apple account. Simply click on the respective login option and follow the prompts to authorize the connection with your Smugmug account.
5. Once you have successfully logged in, you will be redirected to your Smugmug dashboard. Here, you can access your personal profile, view your galleries, and manage your account settings.
It’s important to keep your Smugmug login credentials secure. If you ever forget your password, you can click on the “Forgot your password?” link on the login page and follow the instructions to reset it.
Now that you are logged in to your Smugmug account, you are one step closer to downloading the photos you desire. In the next step, we will guide you on how to navigate to the desired album.
Step 3: Navigate to the desired album
Once you have successfully logged in to your Smugmug account, it’s time to navigate to the album from which you want to download photos. Follow the steps below:
1. From your Smugmug dashboard, click on the “Galleries” or “Albums” tab. This will take you to a page where you can view all the albums you have created or have access to.
2. If you know the name of the specific album you want to download photos from, use the search bar or scroll through the list of albums to find it. You can also use filters or sorting options to narrow down your search if you have a large number of albums.
3. Click on the album thumbnail or title to open the album’s page.
4. On the album page, you will find a collection of photos organized in a grid or slideshow format. Take a moment to browse through the album and find the specific photos you want to download.
5. If you are unable to find the desired album on your own Smugmug account and you have the direct link to the album, you can paste the link into your web browser’s address bar and press Enter. This will take you directly to the album page, bypassing the need to search for it manually.
Remember that the availability and accessibility of albums may vary depending on the photographer’s settings. You will need to have permission to access and download photos from a specific album in order to proceed with the next steps. If you encounter any issues or have trouble locating the desired album, you can reach out to the photographer for assistance.
Now that you have navigated to the desired album, let’s move on to the next step, where you will learn how to select the photos you want to download.
Step 4: Select the photos you want to download
Now that you have reached the album page on Smugmug where your desired photos are located, it’s time to select the specific photos you want to download. Follow the steps below:
1. On the album page, browse through the collection of photos and find the ones you wish to download. You can typically view the photos in a grid or slideshow format, depending on how the photographer has organized them.
2. To select a photo, simply click on it. You will notice that the selected photo may have a border or a checkmark to indicate that it has been chosen.
3. If you want to select multiple photos at once, you can hold down the Ctrl key (Windows) or Command key (Mac) while clicking on the photos you want to download. This allows you to select multiple photos simultaneously.
4. If you want to select all the photos in the album, there is usually an option to “Select All” or an icon that represents selecting all. By clicking on this option, all the photos in the album will be selected automatically.
5. Take your time to review your selection and ensure that you have chosen the correct photos. You can deselect a photo by simply clicking on it again to remove the selection.
6. If you are unsure about which photos to select, you can use the slideshow or full-screen view to get a better look at each photo before making your decision.
Remember that the ability to select and download photos may be restricted by the photographer. If you encounter any limitations or have trouble selecting the photos you want, it’s best to reach out to the photographer directly for clarification.
Now that you have selected the photos you want to download, let’s move on to the next step, where you will learn how to choose the download option.
Step 5: Choose the download option
After selecting the desired photos from the Smugmug album, the next step is to choose the download option. Smugmug offers different ways to download photos, ensuring that you can obtain the images in a format that suits your needs. Follow the steps below:
1. Look for the download icon or button on the album page. It is usually represented by an arrow pointing downward or a “Download” label. Click on this option to proceed.
2. Depending on the photographer’s settings, you may encounter different download options. Common choices include:
- Original Size: This option allows you to download the photos in their highest resolution and quality. If preserving the utmost detail and clarity is important to you, selecting the “Original Size” is recommended. Keep in mind that the file sizes may be larger, taking up more storage space on your device.
- Web Size: If you intend to use the photos for web purposes such as online sharing or social media posts, selecting the “Web Size” is a suitable option. These photos are usually downsized for web optimization, striking a balance between image quality and file size.
- Custom Size: In some cases, the photographer may offer a custom size option, allowing you to specify the desired dimensions or resolution for the downloaded photos. This can be handy if you have specific requirements for your intended use.
- Album Download: Some photographers provide the option to download the entire album at once. This is useful if you want to save time and effort by downloading all the photos in one go.
- Individual Photos: If you have selected multiple photos but want to download them individually instead of as a batch, look for an option to download each photo separately.
3. Click on the preferred download option that best suits your needs. This will initiate the download process, and the selected photos will start downloading to your device.
Now that you have chosen the download option, let’s proceed to the next step, where you will learn how to select the download size and format.
Step 6: Select the download size and format
Once you have chosen the desired photos and initiated the download process from the Smugmug album, the next step is to select the download size and format. This allows you to customize the specifications of the downloaded photos according to your preferences. Follow the steps below:
1. After clicking on the download option, you will typically be presented with a menu or dialogue box that allows you to select the download size and format.
2. Look for options such as:
- JPEG: This is the most common file format for photos. It provides a good balance between quality and file size. Choose this format if you plan to use the photos for general purposes.
- PNG: PNG files offer lossless compression, meaning that the quality of the photo is maintained without sacrificing any details. Select this format if you require higher quality images, such as for printing or graphic design purposes.
- TIFF: The TIFF format is known for its excellent image quality, making it ideal for professional use such as printing or editing in image editing software. Keep in mind that TIFF files are larger in size compared to JPEG and PNG formats.
- Other Formats: Depending on the photographer’s settings, you may also have additional format options available, such as RAW files for advanced editing or specific image formats required for certain applications.
3. Select the desired file format based on your intended use and preference.
4. You may also have the option to select the download size. Smugmug typically provides a range of sizes to choose from, ranging from small to large, or you may have the option to specify custom dimensions.
5. Consider your needs and the purpose of the downloaded photos when selecting the download size. If you plan to use the photos for web display or social media, a smaller size may be sufficient. However, if you require high-resolution images for printing or display on larger screens, opt for a larger size.
6. Once you have made your selections, click on the “Download” or “Save” button to proceed with the download process.
Now that you have selected the download size and format, let’s move on to the next step, where you will learn how to start the download process.
Step 7: Start the download process
Now that you have selected the download size and format for the photos from your Smugmug album, it’s time to start the download process. Follow the steps below to initiate the download:
1. After selecting the desired download size and format, you will typically be prompted to confirm your choices. Review the selected options once again and ensure they align with your preferences.
2. Once you are satisfied with the download settings, click on the “Download,” “Save,” or similar button to begin the download process.
3. Depending on the file size and your internet connection speed, the download may take a few moments to complete. You will usually see a progress bar or indicator that shows the download status.
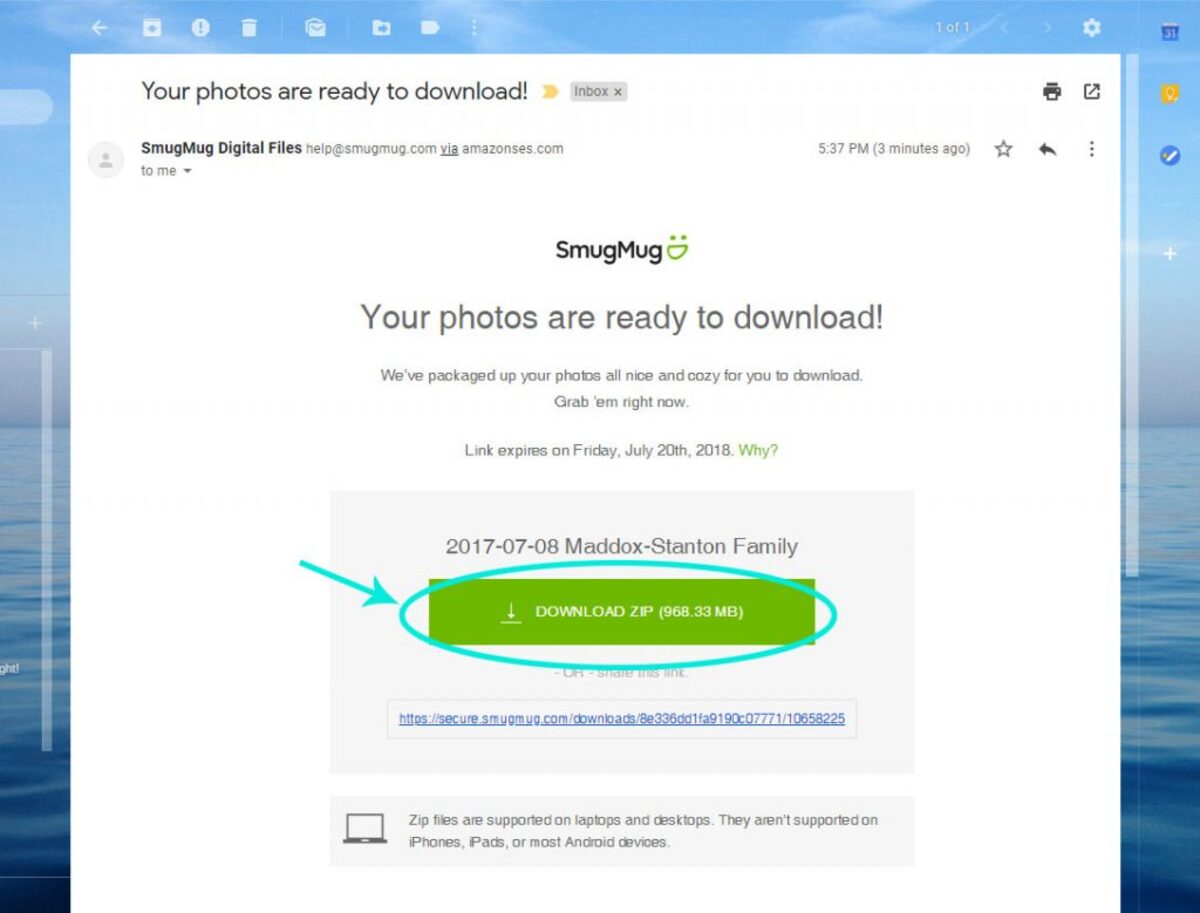
4. It’s important to note that some photographers may choose to compress the photos into a single ZIP file before downloading. If this is the case, the ZIP file will be downloaded instead of individual photo files. You will need to extract the photos from the ZIP file after the download is complete.
5. Keep in mind that the download speed may vary depending on various factors, such as the size of the photos, internet connection stability, and server load. Be patient and allow the download process to complete.
6. Once the download is finished, you will have the downloaded photos stored on your device. The specific location where the photos are saved depends on your browser settings and preferences.
7. It’s a good practice to verify the downloaded photos to ensure they match your expectations in terms of quality and integrity. Open the downloaded photos using image viewing software to confirm their authenticity and clarity.
Now that the download process is complete, you can proceed to the next and final step, where you will learn how to check the downloaded photos on your device.
Step 8: Check the downloaded photos on your device
After successfully downloading the photos from Smugmug, it’s important to check the downloaded files on your device to ensure they have been saved correctly. Follow the steps below to verify the downloaded photos:
1. Locate the folder or directory on your device where the downloaded photos have been saved. This location may vary depending on your browser settings or the default download location you have set.
2. Open the folder and visually inspect the downloaded photos. Check if the photos are named correctly and if they match the images you intended to download.
3. Double-click on a downloaded photo to open it in an image viewing software or application. This will allow you to examine the quality and clarity of the downloaded image in more detail.
4. Compare the downloaded photos with the ones you viewed on the Smugmug website. Ensure that there are no differences or discrepancies in terms of content and quality.
5. If you have downloaded multiple photos, go through each one individually to confirm that all the photos have been downloaded successfully and are intact.
6. In case you notice any issues or discrepancies with the downloaded photos, such as pixelation, blurriness, or missing content, it’s recommended to re-download the affected photos from Smugmug to ensure you have the correct and complete versions.
7. Once you have verified the downloaded photos and are satisfied with the quality and integrity, you can then organize them in your preferred photo management system or further edit them based on your needs.
Checking the downloaded photos on your device ensures that you have successfully obtained the desired images and that they are ready to be used for your intended purposes.
Congratulations! You have now completed all the steps to download and check photos from Smugmug. Enjoy your collection of stunning images!
Conclusion
Downloading photos from Smugmug is a straightforward process that allows you to gather a collection of inspiring and captivating images. By following the steps outlined in this guide, you can easily navigate the Smugmug website, login to your account, access and browse through albums, select the desired photos, choose the appropriate download options, and verify the downloaded files on your device.
It’s important to remember that download availability and permissions may vary depending on the photographer’s settings. Some photographers may choose to restrict downloading for certain albums or specific photos. If you encounter any limitations or difficulty accessing the desired photos, it’s best to reach out to the photographer directly for assistance.
By selecting the right download size and format, you can ensure that the downloaded photos meet your specific requirements, whether it’s for web sharing, printing, or further editing. Take advantage of the different download options available on Smugmug to tailor the downloaded photos to your preferences.
Once the download is complete, remember to check the downloaded photos on your device to ensure they have transferred successfully and match your expectations in terms of quality and content. If any issues arise, don’t hesitate to re-download the affected photos from Smugmug.
Now that you are well-equipped with the knowledge and steps to download photos from Smugmug, you can explore the vast world of stunning imagery captured and shared by talented photographers. Whether you’re seeking inspiration, building your own image library, or simply appreciating the beauty of visual art, Smugmug offers a wealth of photographic treasures waiting to be discovered.
Enjoy the process of downloading photos from Smugmug and create your own personalized collection of breathtaking visuals!