Introduction
Welcome to the world of MP4 players, where you can enjoy your favorite music on the go! Whether you’re a music enthusiast or someone who simply loves to groove to the rhythm, having an MP4 player allows you to carry your music library with you wherever you roam.
Downloading music onto your MP4 player may seem like a daunting task, but fear not! In this guide, we will walk you through the step-by-step process of how to easily and efficiently download music onto your MP4 player.
Before we dive into the nitty-gritty details, it’s essential to ensure that you have all the necessary equipment and software. You’ll need your MP4 player and a USB cable to connect it to your computer. Additionally, make sure you have a reliable internet connection. Finally, choose the right music downloading software that suits your needs.
With these basics covered, you’re ready to embark on your music downloading journey. So, let’s get started and bring the beats to your MP4 player!
Step 1: Connecting Your MP4 Player to Your Computer
The first step towards downloading music onto your MP4 player is to establish a connection between your device and your computer. Follow these simple steps to ensure a seamless connection:
- Locate the USB port on your MP4 player. It is usually located at the bottom or the side of the device.
- Using a USB cable, connect one end to the USB port on your MP4 player.
- Now, find a USB port on your computer. It is typically located on the side or back of your computer tower, or on the side or back of your laptop.
- Take the other end of the USB cable and plug it into the USB port on your computer.
- Once connected, you will see a notification on your MP4 player that it is connected to a computer. It may also display options for the connection type, such as “Charge Only” or “File Transfer”. Select the appropriate option to enable file transfer.
- Wait for your computer to recognize the MP4 player. This may take a few moments, as the computer installs the necessary drivers for your device.
Once the connection is established, you are ready to move on to the next step. Keep in mind that some MP4 players may have specific requirements or variations in the connection process, so it’s always a good idea to consult the user manual that came with your device for any device-specific instructions.
Step 2: Choosing the Right Music Downloading Software
Now that your MP4 player is connected to your computer, it’s time to choose the right music downloading software. This software will facilitate the process of finding and downloading your favorite songs onto your device. Here are some factors to consider when selecting the appropriate software:
- Compatibility: Ensure that the music downloading software you choose is compatible with your computer’s operating system. Most software options are available for both Windows and Mac systems.
- User-Friendliness: Look for software that has a user-friendly interface, making it easy to navigate and use, even for those who are not technologically inclined.
- Music Library: Check if the software has an extensive music library. A larger collection means more options for you to choose from.
- Legalities: It’s crucial to use a music downloading software that operates within legal boundaries. Make sure the software you choose respects copyright laws and provides licensed music for download.
- Additional Features: Consider the additional features that the software offers, such as the ability to create playlists, organize your music library, or even discover new artists or genres.
There are several popular music downloading software options available, such as iTunes, Spotify, Amazon Music, and Google Play Music. These platforms offer a wide range of songs, albums, and playlists to choose from.
Take some time to explore the various options available and read reviews to find the software that best suits your needs and preferences.
Once you have selected the music downloading software that meets your requirements, you are ready to move on to the next step of finding and downloading music files to transfer to your MP4 player.
Step 3: Finding and Downloading Music Files
Now that you have the appropriate music downloading software installed, it’s time to start finding and downloading music files to add to your MP4 player. Here’s how you can do it:
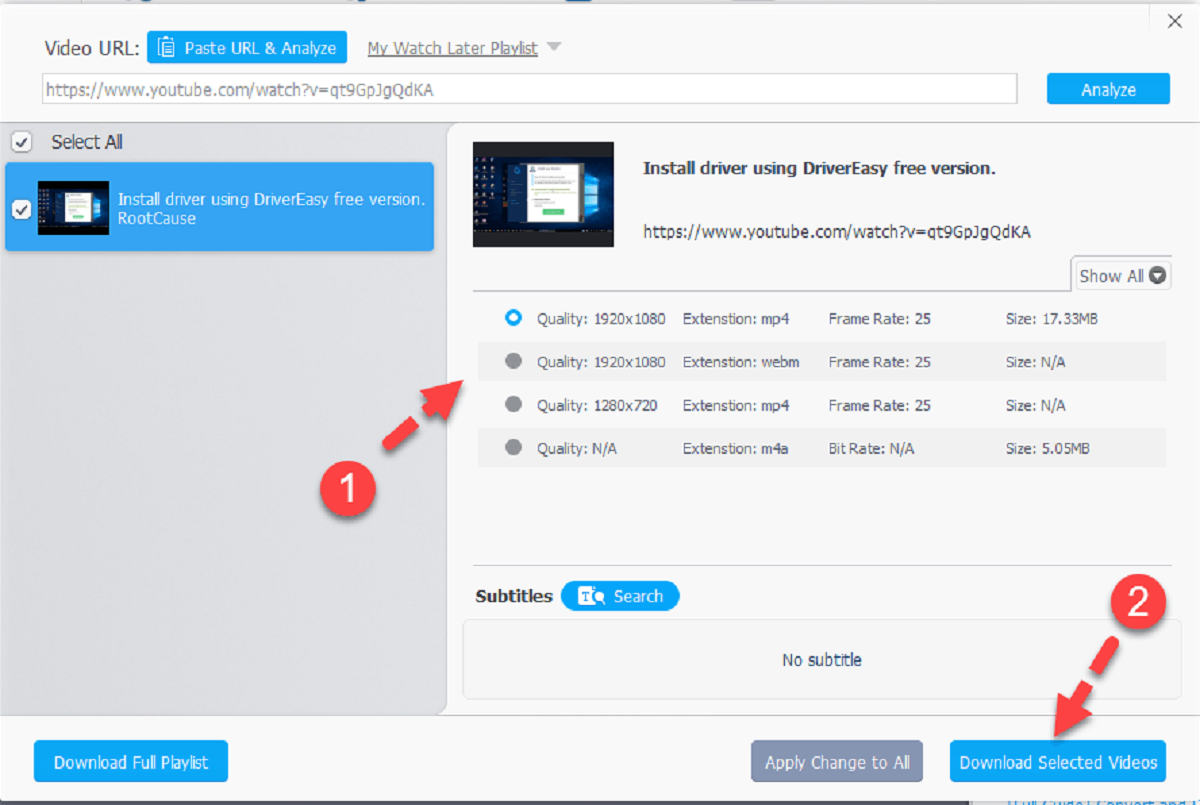
- Search for Songs: Use the search feature within the music downloading software to search for specific songs, artists, or albums that you want to download. You can browse through popular charts or explore different genres to discover new music.
- Preview and Select: Once you find a song or album you like, you can often preview a snippet of the song or listen to a sample before making a decision. This allows you to ensure that you are downloading the right version or mix of the song.
- Choose the Download Format: Before downloading, select the desired file format for the music file. MP3 is the most commonly supported format and is compatible with most MP4 players.
- Click on the Download Button: Once you have made your selections, click on the download button provided by the music downloading software. The software will begin the download process and save the music file to your computer.
- Monitor the Download Progress: The music downloading software usually displays a progress bar or indicator to show the download progress. Depending on the size of the file and your internet speed, it may take a few moments or longer to complete the download.
- Repeat for More Songs: Repeat the above steps to find and download more songs until you have built your desired music library.
It’s worth mentioning that there are legal restrictions and policies regarding music downloads, and it’s important to respect copyright laws. Make sure you are downloading music through authorized channels and not engaging in any illegal activities.
Now that you have successfully downloaded your desired music files, it’s time to move on to the next step – transferring the music files to your MP4 player.
Step 4: Transferring Music Files to Your MP4 Player
With your music files downloaded and saved on your computer, it’s time to transfer them to your MP4 player. Follow these simple steps to complete the transfer process:
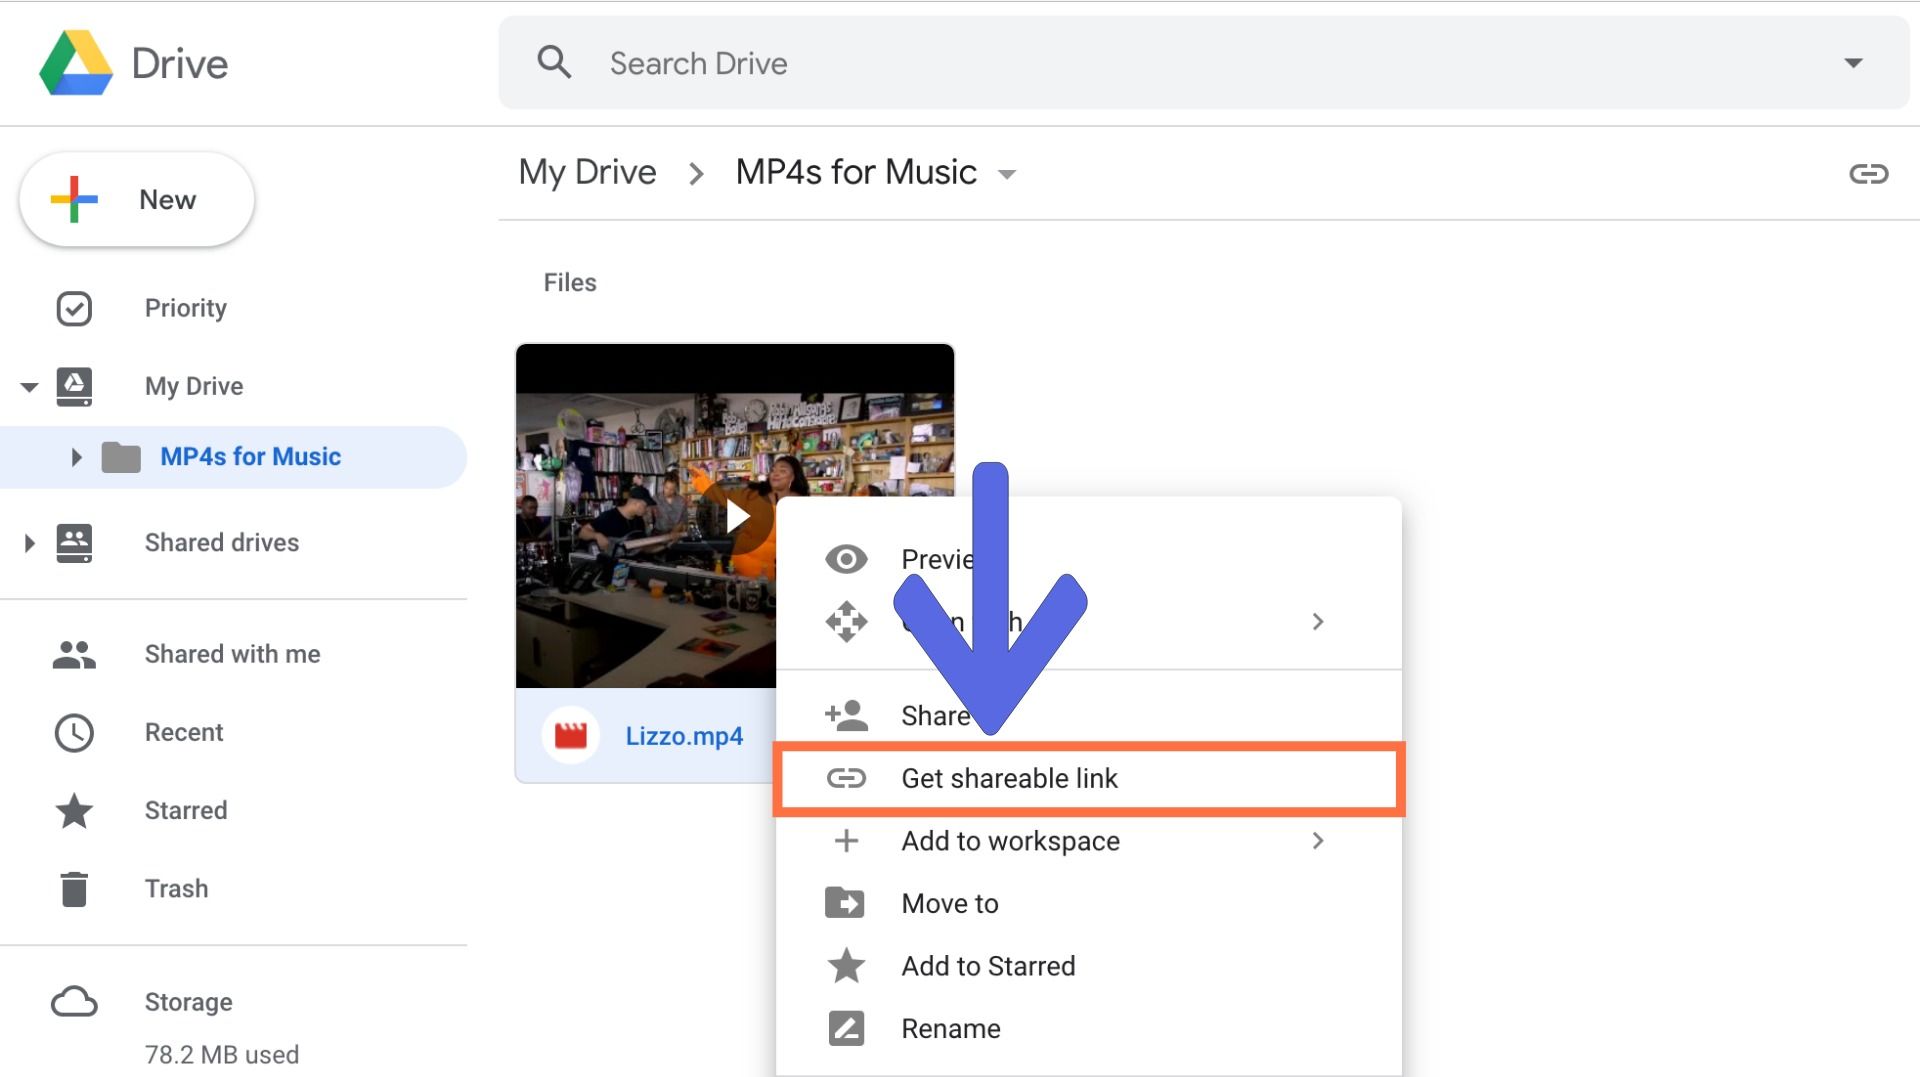
- Open Your MP4 Player’s Folder: Locate your MP4 player’s folder on your computer. This can usually be found under “My Computer” or “This PC” on Windows, or on the desktop if you’re using a Mac.
- Open the Music Folder: Within your MP4 player’s folder, look for a folder named “Music” or something similar. This is where you’ll be transferring the music files.
- Select Music Files: Go back to the folder or location where your downloaded music files are stored on your computer. Select the music files you want to transfer to your MP4 player. You can do this by clicking and dragging the files or using the copy and paste function.
- Transfer the Files: Once you have selected the music files, transfer them to the “Music” folder on your MP4 player. You can do this by dragging and dropping the files or using the copy and paste function.
- Wait for the Transfer to Complete: The transfer process may take some time, depending on the size of the music files and the speed of your computer. It’s important to ensure that the transfer process is complete before disconnecting your MP4 player.
Once the transfer is complete, you can safely disconnect your MP4 player from your computer and enjoy your favorite music on the go. Remember to follow the manufacturer’s instructions on how to safely remove your MP4 player from your computer to avoid any data loss or corruption.
By following these simple steps, you can easily transfer your downloaded music files onto your MP4 player and have your own portable music library.
Step 5: Organizing Your Music on the MP4 Player
Now that you have successfully transferred your music files to your MP4 player, it’s time to organize them to enhance your listening experience. Follow these steps to effectively organize your music:
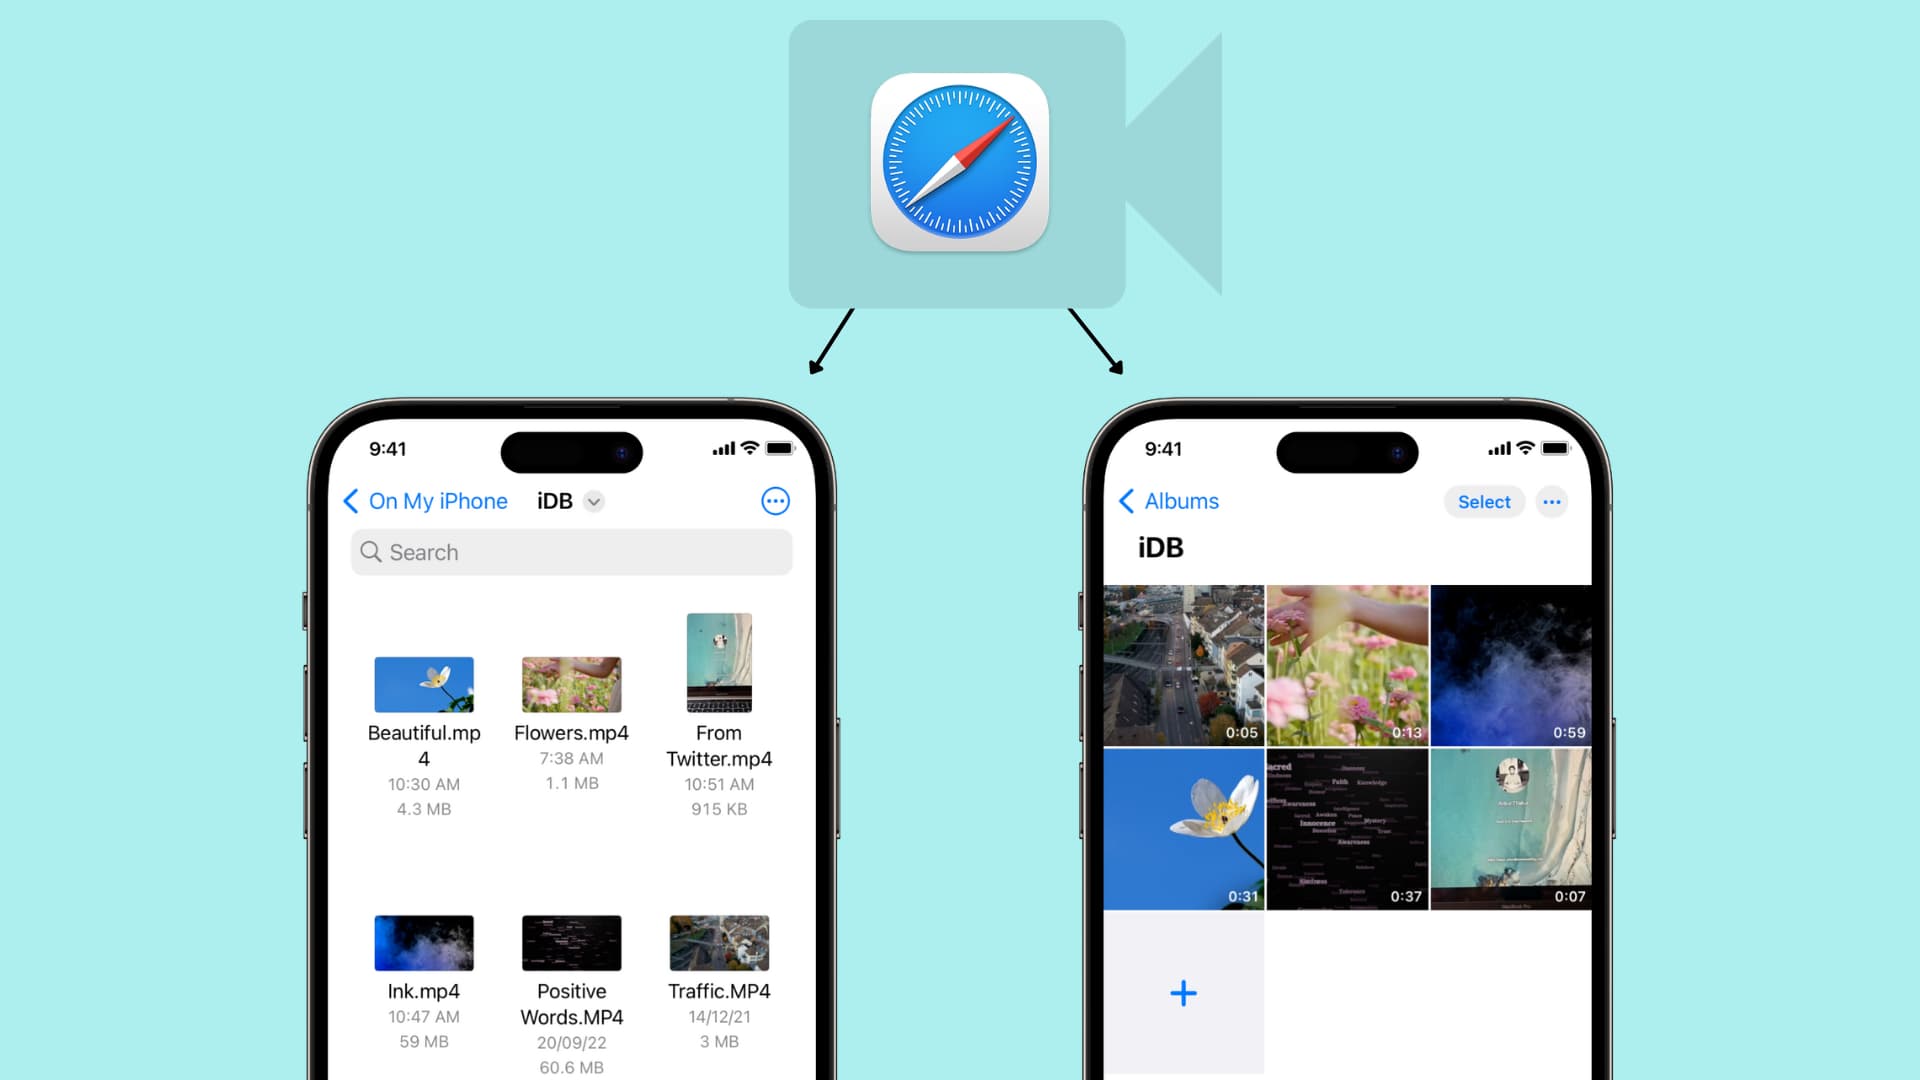
- Create Folders: Start by creating folders on your MP4 player to categorize your music. You can create folders based on genres, artists, or albums. This will make it easier for you to locate specific songs or albums when browsing through your collection.
- Move Music Files: Move the music files from the main “Music” folder to their respective folders. This will help keep your music library organized and avoid clutter.
- Edit File Names and Metadata: If necessary, you can edit the file names and metadata of your music files to ensure they are correctly labeled. This includes adding the artist’s name, song title, album name, and any other relevant information. Many music management software tools allow you to easily edit metadata and file properties.
- Arrange Music within Folders: Within each folder, arrange the music files in a way that suits your preference. You can sort them alphabetically, by release date, or any other criteria that makes it easier for you to find and enjoy your music.
- Create Playlists: Many MP4 players allow you to create playlists, which group together specific songs or genres. Take advantage of this feature to create playlists that match your mood or for different occasions. For example, you can have a workout playlist, a relaxing playlist, or a party playlist.
By organizing your music on your MP4 player, you will have a more enjoyable and hassle-free music experience. You’ll be able to find your favorite songs easily and curate playlists that suit your style and mood.
Remember to periodically review and update your music library to remove any duplicate files, outdated songs, or albums you no longer enjoy. This will help keep your MP4 player organized and make room for new additions.
Now that your music is organized, you’re ready to indulge in your favorite tunes wherever you go with your MP4 player.
Step 6: Safely Disconnecting Your MP4 Player from the Computer
Once you have organized your music on your MP4 player and are ready to disconnect it from your computer, it’s important to follow the proper steps to ensure the safe removal of your device. Here’s how you can safely disconnect your MP4 player:
- Check the Device Status: Before disconnecting, make sure that all file transfers to your MP4 player have completed. Look for any active file transfer indicators or progress bars to confirm that the process has finished.
- Close the Music Management Software: If you have been using any music management software to transfer or organize your music, make sure to close the program before disconnecting your MP4 player. This ensures that all pending operations are completed and prevents any data corruption.
- Eject or Safely Remove the MP4 Player: On your computer, locate the “Safely Remove Hardware” or “Eject” icon in the system tray or taskbar. Click on the icon to open the list of removable devices.
- Select Your MP4 Player: From the list of removable devices, select your MP4 player. This action prompts the computer to finish any ongoing processes and ensure that the device is ready to be disconnected.
- Wait for Confirmation: After selecting your MP4 player, wait for a confirmation message indicating that it is safe to disconnect the device. The message may vary depending on your operating system, but it will typically say something like “Safe to Remove Hardware” or “You can now safely remove the device.”
- Disconnect the USB Cable: Once you have received the confirmation message, gently unplug the USB cable from your MP4 player and then disconnect it from your computer’s USB port.
It’s important to follow these steps to prevent any potential data loss or damage to your MP4 player. Abruptly disconnecting the device without properly ejecting it may result in corrupted files or system errors.
By safely disconnecting your MP4 player, you ensure that all the changes made are saved and that the device remains in good working condition for future use.
Now that you have safely disconnected your MP4 player, you can enjoy your organized music collection while on the go or in any other setting you desire.
Conclusion
Congratulations! You have successfully learned the step-by-step process of downloading music onto your MP4 player. With these simple instructions, you can now enjoy your favorite songs on the go, transforming your MP4 player into a portable music library.
From connecting your MP4 player to your computer to safely disconnecting it, each step plays a crucial role in ensuring a smooth and hassle-free experience. Remember to choose the right music downloading software that meets your needs and preferences, and always respect copyright laws when downloading music.
By organizing your music files on your MP4 player, you can make it easier to navigate through your collection and create personalized playlists for any occasion. Take the time to categorize your music by genre, artist, or album, and enjoy a more organized and enjoyable listening experience.
Lastly, make sure to always follow the correct procedure for safely disconnecting your MP4 player from your computer. This will protect your music files and prevent any potential data loss or corruption.
Now that you’ve mastered the art of downloading music onto your MP4 player, it’s time to embark on your musical journey. So plug in your earphones, press play, and let the music transport you to a world filled with melody and rhythm!

![12 BEST Music Converter to Convert Music into All Formats [MP3, MP4]](https://robots.net/wp-content/uploads/2020/03/image1-3-300x202.jpg)