Introduction
Music is a universal language that has the power to touch our souls and evoke a range of emotions. Reverbnation is an online platform that provides a space for independent musicians to showcase their talent and connect with fans. If you’re a music enthusiast looking to download your favorite songs from Reverbnation, you might be wondering how to go about it. In this guide, we will walk you through the process of downloading music off of Reverbnation.
Whether you’re looking to discover new artists or simply want to listen to your favorite tracks offline, Reverbnation offers a vast library of music across different genres. From indie rock to hip-hop and everything in between, you’re sure to find something that resonates with your musical taste.
Before we dive into the step-by-step process, it’s important to note that Reverbnation provides artists with the option to make their music available for free download or for purchase. While many artists choose to offer their music as a free download to reach a wider audience, some may have certain songs or albums that are only available for purchase. With that in mind, let’s get started on how to download music off of Reverbnation.
Step 1: Create a Reverbnation account
To begin your journey into the world of Reverbnation and start downloading music, you’ll need to create an account. Follow these simple steps to create your Reverbnation account:
- Visit the Reverbnation website: Open your preferred web browser and go to www.reverbnation.com.
- Sign up as an artist or fan: On the homepage, you’ll see options to sign up as an artist or a fan. Since you’re looking to download music, click on the “Sign Up” button under the “Fan” category.
- Fill out the registration form: You’ll be directed to a registration form where you’ll need to provide some basic information. This may include your username, email address, password, and other optional details.
- Agree to the terms and conditions: Read through the terms and conditions and privacy policy, then check the box to indicate your agreement.
- Verify your email: After completing the registration form, Reverbnation will send a verification email to the address you provided. Go to your email inbox, open the email, and click on the verification link to confirm your account.
Once you’ve successfully created your Reverbnation account, you’ll have access to a world of music waiting to be explored. Now that you’re all set up, let’s move on to the next step and learn how to search for the music you want.
Step 2: Search for the desired music
With your Reverbnation account set up, you’re now ready to search for the music you want to download. Here’s how you can find your desired songs on Reverbnation:
- Log in to your Reverbnation account: Visit the Reverbnation website and login using the credentials you created during the registration process.
- Go to the search bar: Look for the search bar at the top of the page. It is usually prominently displayed for easy access.
- Enter your search terms: Type in the name of the artist, song, or genre you want to explore in the search bar. Reverbnation’s search function will suggest relevant results as you type, making it easier to find what you’re looking for.
- Refine your search: If you have specific criteria in mind, you can use the search filters provided by Reverbnation. These filters allow you to narrow down your search based on factors such as genre, location, popularity, and more.
- Browse the search results: Look through the search results to find the music that catches your interest. Take your time to explore different artists and songs to discover new favorites.
Reverbnation offers a vast selection of music from various artists, so you’re likely to find a wide range of options to choose from. Once you’ve found the music you want to download, it’s time to delve deeper into the artist’s profile. Follow along to the next step to learn how.
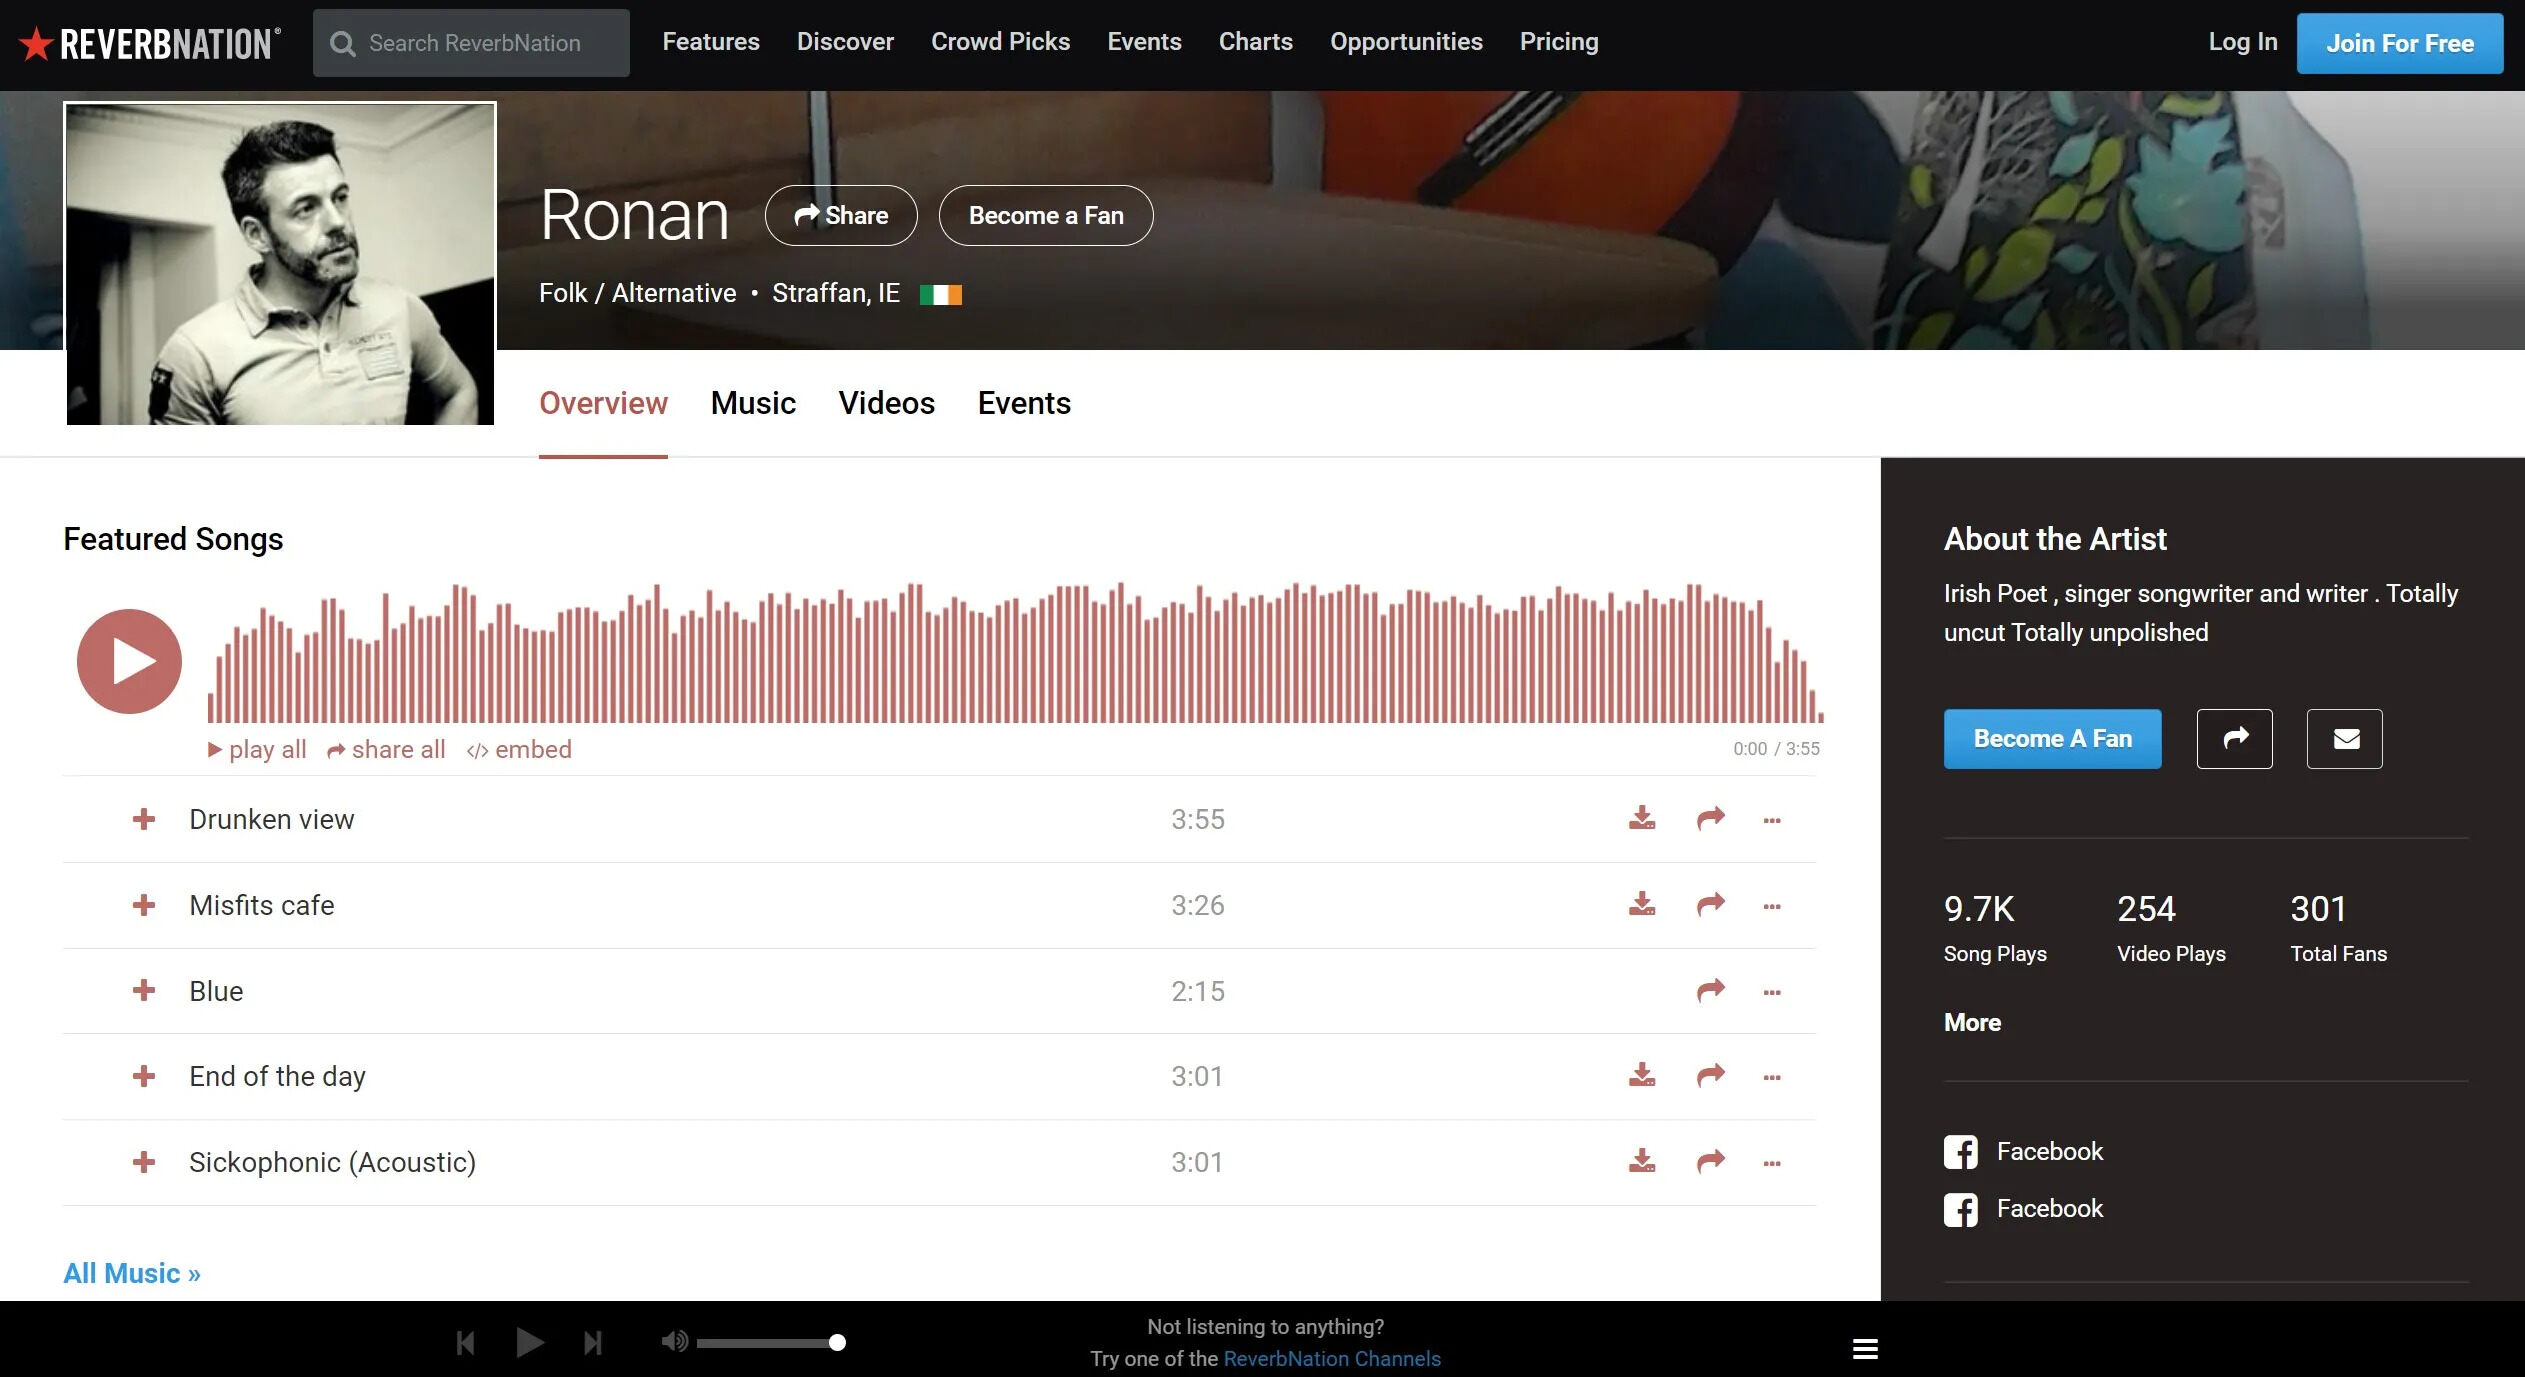
Step 3: Access the artist’s profile
After finding a song or artist that piques your interest, it’s time to dive deeper into their profile. Accessing the artist’s profile on Reverbnation allows you to get to know their music and explore their discography. Here’s how to access the artist’s profile:
- Click on the artist’s name or image: In the search results, click on the name or image of the artist whose profile you want to access. This will take you to their dedicated profile page.
- Explore the artist’s information: On the artist’s profile, you’ll find a wealth of information about their music and background. This may include their biography, photos, upcoming events, social media links, and more. Take some time to familiarize yourself with the artist and their work.
- Check for available downloads: Look for any indications of available downloads on the artist’s profile. Some artists may offer their music for free download, while others may have certain songs or albums that are available for purchase or streaming only.
- Listen to song previews: To get a taste of the artist’s music before downloading, you can often find song previews on their profile. This allows you to determine if their style and sound align with your preferences.
Exploring the artist’s profile not only enhances your connection with their music but also enables you to discover more about their creative journey. Once you’re ready to dive into the music, it’s time to move on to the next step and preview the available tracks.
Step 4: Explore and preview the available music
Now that you’re on the artist’s profile, it’s time to explore the available music and get a preview of what they have to offer. Here’s how you can navigate through the artist’s songs and listen to song previews on Reverbnation:
- Scroll through the artist’s discography: On the artist’s profile, you’ll typically find a section dedicated to their music or discography. This could be in the form of albums, singles, or a collection of their most popular tracks.
- Browse through the songs: Take your time to browse through the available songs and albums. You can usually see the song titles listed along with their duration and any accompanying artwork.
- Click on the song title to preview: When you come across a song that interests you, click on its title to initiate a preview. Reverbnation typically allows you to listen to a portion of the track, giving you a taste of the artist’s style and sound.
- Listen and evaluate the music: While listening to the song preview, pay attention to the artist’s unique sound, instrumentation, vocals, and overall quality. This will help you determine if the music resonates with your taste and if you want to download the full track.
- Repeat the process: Explore different songs and albums within the artist’s discography, listening to previews of each to get a better sense of their musical range and style.
By exploring and previewing the available music, you can make informed decisions about which tracks you’d like to download. Once you’ve found your desired songs, proceed to the next step to learn how to download them from Reverbnation.
Step 5: Download the desired songs
After discovering the music that resonates with you, it’s time to download the desired songs from Reverbnation. Here’s how you can proceed with downloading your chosen tracks:
- Click on the “Download” button: On the artist’s profile or the song page, there is usually a “Download” button displayed near the song or album. Click on this button to start the download process.
- Choose the desired file format: Reverbnation often provides multiple options for downloading, including different file formats such as MP3 or WAV. Select the format that suits your preferences. MP3 is the most common and widely compatible format for music.
- Wait for the download to complete: Once you’ve clicked on the “Download” button and selected the file format, the download will begin. Depending on the size of the file and your internet connection, it may take a few moments to complete. Be patient and ensure that the download is fully finished before moving on.
- Save the downloaded file: Once the download is finished, a prompt will appear asking you to choose a location on your computer or device to save the downloaded file. Select a destination that is easily accessible to you.
Repeat these steps for each song or album you wish to download from Reverbnation. Enjoy the process of building your music library with your favorite tracks.
Now that you have successfully downloaded the desired songs, it’s time to save them to your device for easy access. Follow the next step to learn how to save the downloaded music.
Step 6: Save the downloaded music to your device
Once you have downloaded your desired songs from Reverbnation, it’s essential to save them to your device for convenient access. Follow these steps to save the downloaded music:
- Open the folder where you saved the downloaded music: Locate the folder on your computer or device where you chose to save the downloaded files. This could be the default “Downloads” folder or a specific location you specified.
- Create a new folder for organization (optional): If you want to keep your Reverbnation downloads separate and organized, create a new folder within your music library specifically for Reverbnation downloads.
- Move or copy the downloaded songs to the designated folder: Select the downloaded music files and either move or copy them to the newly created folder or any other folder of your choice. This step ensures that your Reverbnation downloads are properly organized and easily accessible.
- Update your music library or media player: Depending on your preferred music library or media player, you may need to update the library or add the downloaded songs manually. Open your music library or media player application, locate the option to add songs or update the library, and follow the on-screen instructions.
By saving the downloaded music to your device and updating your music library, you can conveniently access and enjoy the Reverbnation tracks offline. Take pleasure in listening to your favorite songs whenever and wherever you desire.
With these steps, you have now successfully downloaded and saved music from Reverbnation to your device. Enjoy your collection of Reverbnation tracks and continue exploring the vast world of independent artists on this platform.
Conclusion
Downloading music off of Reverbnation opens up a world of opportunity to discover and enjoy the music of independent artists from various genres. By following the step-by-step guide outlined in this article, you can easily create a Reverbnation account, search for desired music, access artist profiles, explore and preview available songs, download your favorite tracks, and save them to your device for offline listening.
Reverbnation provides a platform for artists to showcase their talent, connect with fans, and share their music. As a music enthusiast, you have the chance to support these talented individuals by downloading their songs and adding them to your music library.
Remember to take the time to explore different artists, genres, and songs on Reverbnation. It’s an opportunity to broaden your musical horizons and discover hidden gems that may not be as widely known through commercial channels.
As you immerse yourself in the world of Reverbnation, you’ll find an abundance of creativity, passion, and authenticity. From capturing the unique sounds of emerging indie bands to experiencing the raw talent of aspiring singer-songwriters, Reverbnation offers a diverse range of musical experiences that cater to every taste.
So, don’t hesitate to begin your Reverbnation journey today. Create an account, start searching for the music that resonates with you, and support independent artists by downloading and enjoying their incredible creations. Let the power of music transport you to places you’ve never been before.