Introduction
Welcome to the exciting world of Sims 3 mods! If you’re a fan of the popular life simulation game, you’re probably already familiar with the vast array of customization options available. Mods, short for modifications, are player-created content that can enhance your Sims 3 gaming experience by adding new features, objects, characters, and more. They offer endless possibilities to personalize and expand the game beyond what the developers originally intended.
Finding and downloading mods for Sims 3 might seem like a daunting task, especially if you’re new to the world of modding. But fear not! This guide will walk you through the process step by step, ensuring that you can safely and successfully download and install mods.
In this article, we will cover everything you need to know about downloading mods for Sims 3. From researching and choosing the right mods to ensuring compatibility and managing your mod files, we’ve got you covered. By the end of this guide, you’ll be well-equipped to embark on your modding adventure and enjoy a whole new level of customization in Sims 3.
So, grab your virtual tool kit and let’s get started on this exciting journey into the world of Sims 3 mods!
Finding Mods for Sims 3
When it comes to finding mods for Sims 3, there are a few different avenues you can explore. From official mod websites to community forums and social media groups, there are plenty of resources available to help you discover and download exciting new mods for your game. Here are some effective methods for finding mods:
- Official Mod Websites: Start your search by visiting the official websites for Sims 3 mods. These websites often have curated collections of mods created by talented players and modders. Some popular official mod websites include Mod The Sims (modthesims.info) and The Sims Resource (thesimsresource.com).
- Community Forums and Websites: Joining Sims 3 fan communities and forums is another great way to find mods. These platforms allow players to share their creations and discuss different mods. Websites like Sims Forums (simsforums.com) and Sims Community (simscommunity.info) are excellent resources to connect with fellow mod enthusiasts and discover new mods.
- Social Media Groups: Social media platforms, such as Facebook and Reddit, have dedicated groups for Sims 3 modding. Joining these groups can give you direct access to modders and their latest creations. You can find groups by searching for “Sims 3 mods” or similar keywords on Facebook or exploring subreddits like r/thesims3mods on Reddit.
- YouTube and Mod Showcases: Many YouTubers and content creators produce showcases and reviews of Sims 3 mods. Watching these videos can give you a better understanding of what each mod offers and help you decide which ones to download. Some popular Sims 3 mod showcase channels include The Sim Supply and Iron Seagull.
Remember, it’s essential to choose mods that align with your personal preferences and gaming style. Take your time to explore different mods, read user reviews, and consider the features and functionalities they offer. By doing so, you can ensure that the mods you download will enhance your Sims 3 experience and provide hours of enjoyment.
Once you’ve identified the mods you want to download, it’s time to prepare your game for the installation process. The next section will guide you through the necessary steps to ensure compatibility and backup your game files.
Step 1: Research and Choose Mods
Researching and choosing the right mods for your Sims 3 game is an important first step. With thousands of mods available, it’s essential to select ones that align with your interests and preferences. Here are a few tips to help you during this process:
- Identify Your Preferences: Take a moment to think about what aspects of the game you want to enhance or modify. Are you looking for mods that add new objects, improve gameplay mechanics, or introduce new character traits? Understanding your preferences will help you narrow down your search.
- Read Mod Descriptions: When browsing mod websites or community forums, pay attention to the mod descriptions. Mod creators often provide details about the features, compatibility, and installation instructions. Make sure to read these descriptions thoroughly to gain a better understanding of what the mods offer.
- Check Ratings and Reviews: User ratings and reviews can provide valuable insight into the quality and functionality of a mod. Look for mods that have positive reviews and high ratings. However, keep in mind that individual preferences may vary, so take reviews as a guide rather than a definitive judgment.
- Consider Compatibility: Ensure that the mods you choose are compatible with your game version and any expansion packs you have installed. Mod descriptions usually include information about compatibility, so make sure to double-check before downloading.
- Explore Popular Mods: Popular mods are often popular for a reason. They are well-crafted, frequently updated, and have a dedicated user base. Exploring popular mods can give you a good starting point and introduce you to some of the best content created by the modding community.
Remember, modding is all about personalizing your gaming experience. Don’t be afraid to try out different mods and experiment until you find the ones that truly enhance your Sims 3 gameplay.
Once you have selected the mods you want to download, proceed to the next step to ensure compatibility with your game version.
Step 2: Ensure Compatibility with Your Game Version
Before downloading and installing mods for Sims 3, it’s crucial to ensure compatibility with your game version. Mods created for different versions of the game may not work correctly or could potentially cause conflicts. Follow these steps to ensure that the mods you choose are compatible:
- Check Mod Compatibility: When browsing for mods, read the mod description carefully to determine which game version the mod is designed for. Mod creators usually specify this information to help users determine compatibility. If the mod is not explicitly mentioned as compatible with your game version, it’s recommended to look for an alternative.
- Verify Expansion Pack Compatibility: If you have expansion packs installed, consider whether the mods you want to download are compatible with them. Some mods may require specific expansion packs or may not work correctly with certain ones. Check the mod descriptions for any information on expansion pack compatibility and ensure that your mods align with the expansion packs you have installed.
- Update Your Game: Ensure that your game is up to date with the latest patches and updates. Mod compatibility can vary depending on the game version, and updating your game can help minimize any potential issues. Launch the Sims 3 Launcher and check for available updates to keep your game current.
- Research Compatibility Issues: Some mods may have known compatibility issues with certain game versions or expansion packs. Before downloading, perform a quick online search to see if other players have reported any compatibility issues with the mods you’re interested in. This research can help you make an informed decision and avoid potential problems.
By ensuring compatibility with your game version and expansion packs, you can prevent any unforeseen issues or conflicts when installing mods. Taking the time to verify compatibility will contribute to a smooth and enjoyable modding experience.
Once you’ve confirmed compatibility, proceed to the next step to backup your game files before installing any mods.
Step 3: Backup Your Game Files
Before you start downloading and installing mods for Sims 3, it’s vital to create a backup of your game files. This precautionary step will help protect your game data in case anything goes wrong during the mod installation process. Follow these guidelines to back up your game files:
- Locate your Sims 3 Game Folder: Open the file explorer on your computer and navigate to the location where you have installed Sims 3. By default, the game is typically located in the C:\Program Files (x86)\Electronic Arts\The Sims 3 folder on Windows or the Applications folder on Mac. If you have installed the game in a different directory, locate that folder instead.
- Create a Backup Folder: Within your Sims 3 game folder, create a new folder named “Backup” or any other name that you prefer. This folder will serve as a safe storage space for your original game files.
- Copy Important Game Files: In the Sims 3 game folder, locate and copy the following folders and files into the newly created “Backup” folder:
- The “Mods” folder: This folder contains any mods or custom content you’ve previously installed.
- The “Saves” folder: This folder includes all of your saved game files.
- The “DCBackup” folder: This folder contains any downloaded content you’ve added to the game.
- The “Downloads” folder: This folder typically contains any additional content you’ve downloaded from official sources.
- The “Options.ini” file: This file includes your game settings and configurations.
By creating a backup of these essential game files, you can easily restore your game to its original state if you encounter any compatibility issues or unforeseen problems during the mod installation process. It’s always better to be safe than sorry when it comes to safeguarding your game data.
Once you’ve successfully backed up your game files, you can proceed to the next step, which involves downloading mods from trusted sources.
Step 4: Downloading Mods from Trusted Sources
When it comes to downloading mods for Sims 3, it’s crucial to use trusted sources to ensure the quality and safety of the content you’re downloading. Here are some guidelines for downloading mods from reliable sources:
- Official Mod Websites: Start by visiting the official mod websites such as Mod The Sims (modthesims.info) and The Sims Resource (thesimsresource.com). These websites have strict moderation policies and provide a secure platform for modders to share their creations. They often have user ratings and reviews, making it easier to evaluate the quality of the mods.
- Community Recommendations: Seek recommendations from reputable Sims 3 communities, forums, and social media groups. Engaging with fellow players and mod enthusiasts can help you discover trusted modders and reliable download sources. Be cautious of random download links from unverified sources.
- Scan Downloads for Viruses: Before installing any mod, it’s essential to scan the downloaded file for viruses or malware. Use a reliable antivirus software to ensure that the mod files are safe and free from potential threats. This step reduces the risk of compromising your computer’s security.
- Read User Feedback: Take the time to read user reviews and feedback on mods you plan to download. Reviews can provide insights into the mod’s functionality, compatibility, and overall user experience. Look for mods that have positive feedback from trusted sources.
By sticking to trusted sources, scanning downloads for viruses, and considering user feedback, you can download mods with confidence. These precautions will help ensure that you only download high-quality mods that enhance your Sims 3 gameplay without compromising your computer’s security.
Once you’ve downloaded the mods, it’s time to move on to the next step: installing them in your Sims 3 game. We’ll cover this process in the next section.
Step 5: Installing Mods in Sims 3
Installing mods in Sims 3 allows you to bring new content and features into your game. Follow these steps to properly install mods:
- Locate the Mods Folder: In your Sims 3 game folder, look for a folder named “Mods.” If the folder doesn’t exist, create a new folder named “Mods” in the root directory of your Sims 3 game folder.
- Organize Mods: Within the “Mods” folder, create two additional folders: “Packages” and “Overrides.” These folders will help you keep your installed mods organized.
- Install Mods: Locate the downloaded mod files (usually in .package or .sims3pack format) and move them into the “Packages” folder in your “Mods” directory. If the mod file is in .sims3pack format, you can install it directly from The Sims 3 Launcher by double-clicking the file.
- Clear Cache: To ensure that your Sims 3 game recognizes the newly installed mods, it’s recommended to clear the cache files. Delete the files located in the “WorldCaches” and “CASPartCache” folders within the Sims 3 game folder.
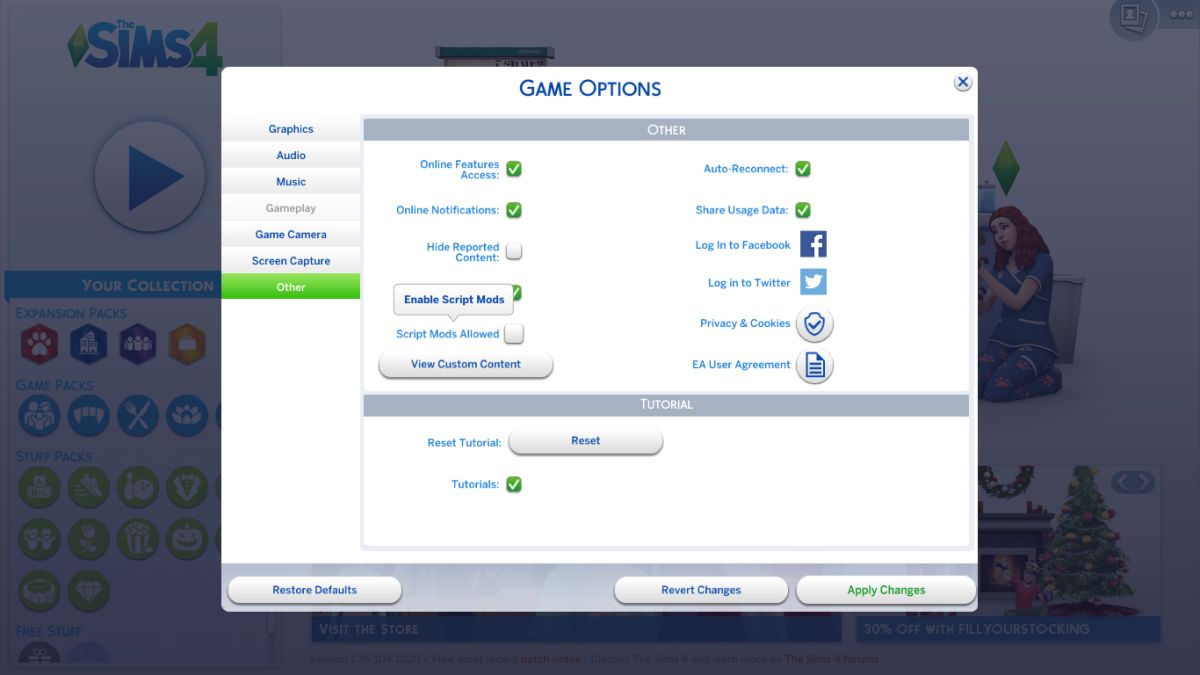
- Enable Custom Content: Launch the Sims 3 game and go to the Options menu. Under the “Other” tab, make sure the “Enable Custom Content” option is checked. This enables the game to load and use the installed mods properly.
By following these steps, you can successfully install mods in Sims 3 and start enjoying the exciting new content and features they bring to your game. Keep in mind that mods can sometimes conflict with each other or with the base game, so it’s important to periodically check for mod updates and remove any problematic mods if necessary.
Now that you have installed your mods, it’s time to move on to the next step: organizing and managing your mods for a smoother gameplay experience. We’ll dive into this topic in the next section.
Step 6: Organizing and Managing Your Mods
As you accumulate more mods for Sims 3, it’s essential to keep your mod library organized for easier management and troubleshooting. Follow these steps to effectively organize and manage your mods:
- Create Mod Categories: Consider creating different folders or categories within your “Packages” folder to organize your mods based on their type or function. For example, you could have separate folders for hair mods, furniture mods, and gameplay mods. This helps you locate specific mods quickly.
- Use Mod Organizer Tools: Utilize mod organizer tools like Mod Organizer 2 or Sims 3 Dashboard. These tools allow you to enable or disable specific mods, check for conflicts, and manage your mod library efficiently. They simplify the process of organizing your mods and troubleshooting any issues that may arise.
- Regularly Update Your Mods: As mod creators release updates or bug fixes for their mods, it’s important to stay up to date. Check the mod websites or community forums for updates and new versions of your installed mods. Keeping your mods updated ensures they work correctly with the latest game patches and reduces compatibility issues.
- Monitor Mod Compatibility: Some mods may become incompatible with new expansions or game updates. Keep an eye on compatibility information provided by the mod creators and the Sims 3 modding community. If a mod becomes outdated or causes issues with your game, consider removing it or finding an updated version.
- Remove Unwanted Mods: Periodically review your mods and remove any that are no longer necessary or don’t enhance your gameplay. This helps declutter your mod library and improves the game’s performance.
By implementing these organizing and management strategies, you can maintain a well-organized and functional mod library. It allows for a smoother gameplay experience and makes it easier to troubleshoot any mod-related issues that may arise.
Now that your mods are organized and managed, it’s time to move on to the final step: testing your mods in Sims 3 to ensure they are functioning as intended. We’ll explore this step in the next section.
Step 7: Testing Your Mods in Sims 3
After installing and organizing your mods in Sims 3, it’s crucial to test them to ensure they are working properly and not causing any conflicts or issues within your game. Follow these steps to effectively test your mods:
- Launch the Game: Start Sims 3 and load a saved game or start a new one. This allows you to test the mods within an actual gameplay environment.
- Observe Mod Functionality: Pay attention to the mods you have installed. Check if the added features, objects, or changes are functioning as expected. Test different aspects of the mods, such as new gameplay mechanics, object interactions, or character traits.
- Monitor Game Stability: While playing, keep an eye out for any signs of instability, crashes, or conflicts caused by the mods. If you encounter any issues, note which mods might be causing the problem and troubleshoot accordingly.
- Save and Test Multiple Times: Save your game frequently during testing to ensure that the mods are saving properly and not causing any corruption in your save files. Test your mods over multiple play sessions to validate their reliability and compatibility with different gameplay scenarios.
- Seek User Feedback: If you’re experiencing any issues or have questions about specific mods, don’t hesitate to reach out to the modding community for help. Many forums and online communities have dedicated sections for mod support where you can seek assistance or advice from experienced modders.
- Make Necessary Adjustments: Based on your testing and any feedback received, you may need to make adjustments to your mods or remove those that are causing conflicts or instability. Follow the mod creators’ guidelines and update or replace problematic mods as required.
Testing your mods ensures that they integrate seamlessly into your Sims 3 game without negatively impacting its stability or performance. By diligently testing your mods, you can enjoy a smooth, customized, and enhanced gaming experience.
Congratulations! You’ve now successfully completed the process of downloading, installing, managing, and testing mods in Sims 3. With a well-curated collection of mods, you can personalize and elevate your gameplay to new heights. Enjoy exploring the limitless possibilities that mods offer and have fun customizing your Sims 3 world!
Conclusion
Congratulations on completing this guide to downloading and installing mods for Sims 3! By following the steps outlined in this article, you now have the knowledge and tools to explore the vast world of mods and enhance your Sims 3 gameplay.
We started by understanding the importance of researching and choosing mods that align with your preferences. Next, we talked about the significance of ensuring compatibility with your game version and expansion packs, as well as the importance of backing up your game files before proceeding.
With that foundation, we delved into the process of downloading mods from trusted sources, highlighting the need to use reputable mod websites, check for user ratings and reviews, scan downloads for viruses, and always exercise caution when downloading from unverified or unreliable sources.
Once the mods were downloaded, we discussed the crucial step of installing them correctly, creating folders, and enabling custom content in the game. Then, we explored the importance of organizing and managing your mods to keep your mod library tidy, updated, and free from conflicts.
To ensure a smooth gameplay experience, we emphasized the value of testing your mods for functionality and stability, being mindful of any issues and seeking support from the modding community when needed.
Now, armed with the understanding of the entire modding process, you can confidently explore new levels of creativity, customization, and enjoyment in your Sims 3 game. Remember to regularly update your mods, remove any unwanted ones, and always stay informed about compatibility issues and updates from mod creators.
Enjoy your modding journey and have fun transforming your Sims 3 experience with a world of endless possibilities!