Introduction
Welcome to the exciting world of modding in Fallout 4 on Xbox One! Modding adds a whole new dimension to your gaming experience, allowing you to customize and enhance the game with user-created content. Whether you want to add new weapons, tweak the gameplay mechanics, or explore unique quests and locations, modding opens up endless possibilities for you to explore in the post-apocalyptic wasteland.
With the release of Fallout 4 for Xbox One, Bethesda Game Studios introduced mod support for console players. This means that you can now access and install mods directly from the Bethesda.net platform, right from your Xbox One dashboard. It’s a convenient and streamlined process that brings the vibrant modding community right to your fingertips.
Before we dive into the exciting world of modding, it’s important to note that modding is only available for the Xbox One version of Fallout 4. If you’re playing the game on a different platform, such as PlayStation 4 or PC, unfortunately, modding is not currently supported.
In this guide, we’ll walk you through the steps to choose a modding platform, create a Bethesda.net account, access mods in-game, browse and install mods, manage your mods, and troubleshoot any issues you may encounter along the way. Whether you’re new to modding or an experienced player looking to expand your Fallout 4 experience, this guide will provide you with all the information you need to successfully download and install mods on your Xbox One.
So, grab your Pip-Boy, load up your Xbox One, and get ready to enhance your Fallout 4 adventure with an array of incredible mods. The Commonwealth is yours to shape and customize to your heart’s content. Let’s dive in!
Choosing a Modding Platform
When it comes to modding Fallout 4 on Xbox One, you have a few different platforms to choose from. These platforms serve as hubs for the modding community, providing a space for creators to share their mods and for players to browse, download, and install them. Here are the two main platforms you can consider:
Bethesda.net: Bethesda’s official modding platform, Bethesda.net, is integrated directly into the Xbox One dashboard. It offers a user-friendly interface and a vast library of mods for all types of players. With Bethesda.net, you’ll find an ever-growing collection of mods to enhance your Fallout 4 experience.
Nexus Mods: Nexus Mods is a popular modding community that offers a wide range of mods for various games, including Fallout 4. While Nexus Mods is well-known among PC players, it also provides mod access for Xbox One users. To use Nexus Mods, you’ll need to create an account on their website and follow their instructions to install mods manually.
Both platforms have their advantages and disadvantages. Bethesda.net offers the convenience of in-game access to mods, making it easier for casual players to get started. On the other hand, Nexus Mods provides a larger and more diverse collection of mods, some of which may not be available on Bethesda.net. It ultimately comes down to personal preference and the specific mods you’re looking for.
For the purposes of this guide, we’ll focus on using Bethesda.net as the primary modding platform for Xbox One. However, if you’re interested in exploring Nexus Mods, you can find detailed tutorials on their website that will guide you through the process of installing mods manually.
Now that you have a general understanding of the modding platforms available, it’s time to move on to creating a Bethesda.net account and accessing mods in-game. So, let’s get started on your modding journey!
Creating a Bethesda.net Account
In order to access and download mods on your Xbox One for Fallout 4, you’ll need to create a Bethesda.net account. Creating an account is quick and easy, and it’ll give you access to the vast library of mods available on the platform.
To create your account, follow these simple steps:
- Turn on your Xbox One and launch Fallout 4.
- From the main menu, select “Mods”.
- You’ll be prompted to sign in to your Xbox Live account. If you’re not already signed in, enter your account credentials to proceed.
- Select “Create Account” on the Bethesda.net login screen.
- Follow the on-screen instructions to enter your email address, create a password, and complete the account creation process.
- Once your account is created, you’ll be able to access and download mods for Fallout 4 directly from the in-game menu.
It’s important to note that your Bethesda.net account is linked to your Xbox Live account, so all of your mod activity and progress will be synchronized across devices. This means that if you switch to a different Xbox One console, your mods will still be accessible as long as you sign in with your Bethesda.net account.
Additionally, creating a Bethesda.net account also allows you to participate in the modding community. You can rate and review mods, follow your favorite mod authors, and even upload your own mods if you’re feeling creative.
With your Bethesda.net account set up, you’re now ready to explore the world of mods available for Fallout 4. In the next section, we’ll guide you through accessing mods directly within the game. So, let’s dive in and see what awaits!
Accessing Mods in-game
Now that you have your Bethesda.net account set up, it’s time to learn how to access mods directly within the Fallout 4 game. Bethesda has made it incredibly convenient to browse, download, and install mods without ever having to leave the game.
Here’s how you can access mods in-game:
- Launch Fallout 4 on your Xbox One console.
- On the main menu, select “Mods”.
- A list of available mods will be displayed. You can use the provided filters and search bar to narrow down your options and find the mods that interest you.
- Select a mod to view more details including its description, screenshots, and user ratings.
- When you’ve found a mod you want to install, click on the “Download” button to start the installation process.
- Once the mod is finished downloading, it will be automatically enabled and ready to use in your game.
It’s essential to keep in mind that mods are created by the community, meaning they may vary in terms of quality and functionality. Before downloading a mod, take the time to read the description, check the user ratings and reviews, and view any available screenshots or videos. This will help you make informed decisions and ensure you’re getting mods that meet your expectations.
Furthermore, it’s crucial to understand that mods can sometimes conflict with each other or cause issues with your game. If you experience any problems after installing mods, you may need to disable or uninstall specific mods to resolve the issues. We’ll cover more on managing mods and troubleshooting in later sections of this guide.
Now that you know how to access mods in-game, it’s time to dive into the vast library of mods available on Bethesda.net. In the next section, we’ll show you how to browse and discover mods that suit your preferences. So, let’s continue our modding adventure!
Browsing Mods on Bethesda.net
Bethesda.net offers a user-friendly interface for browsing mods and discovering exciting new additions for your Fallout 4 game. With a wide range of categories and sorting options, you can easily find mods that match your preferences and enhance your gameplay experience. Here’s how to browse mods on Bethesda.net:
- Launch Fallout 4 on your Xbox One console and select “Mods” from the main menu.
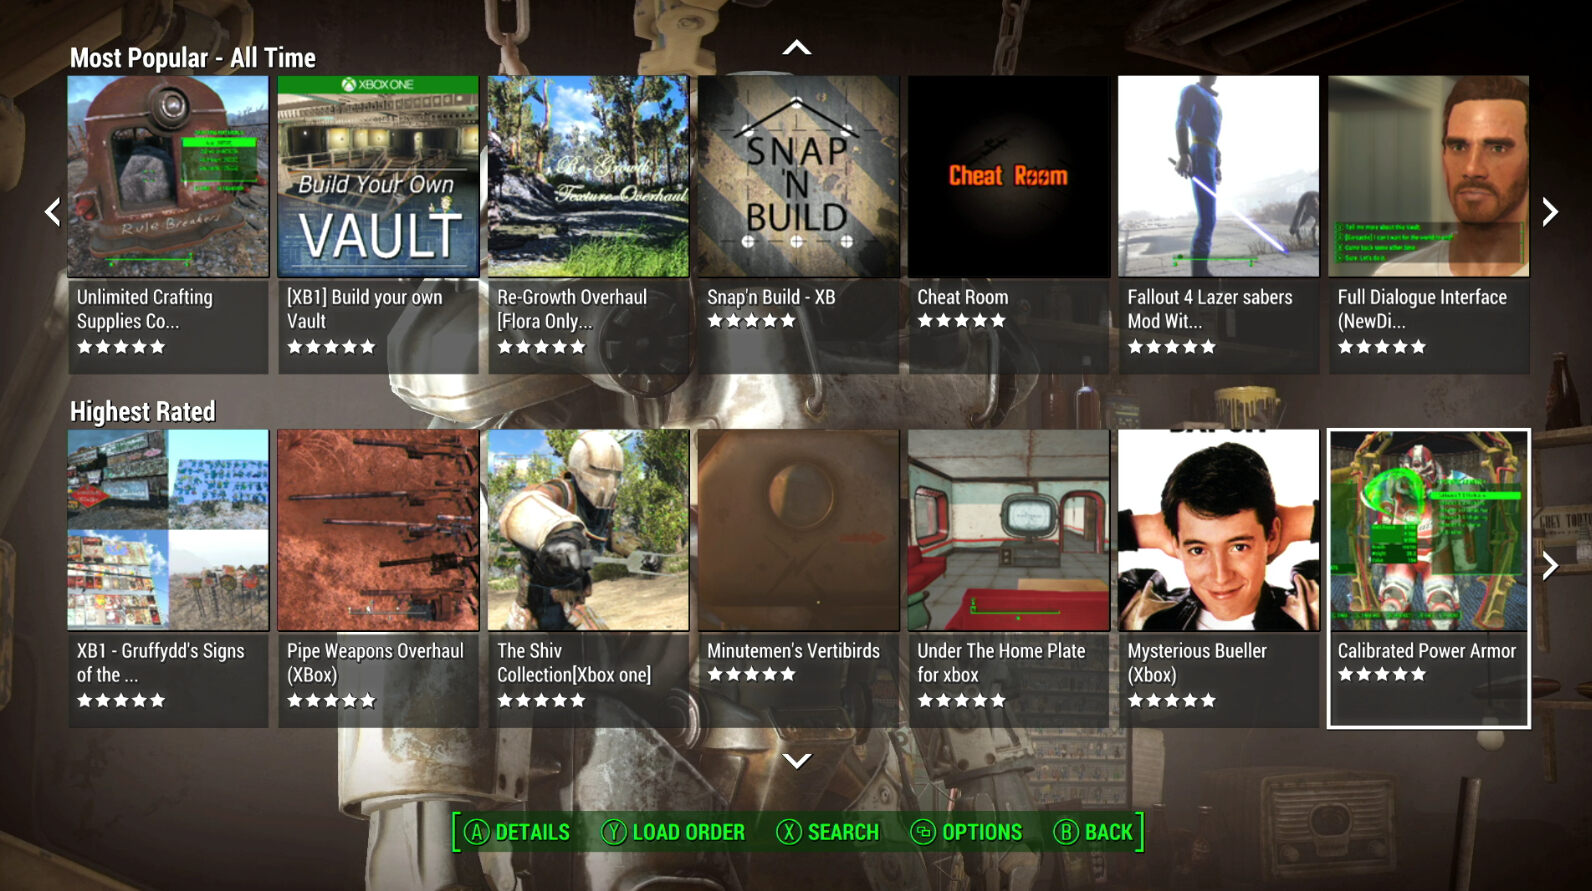
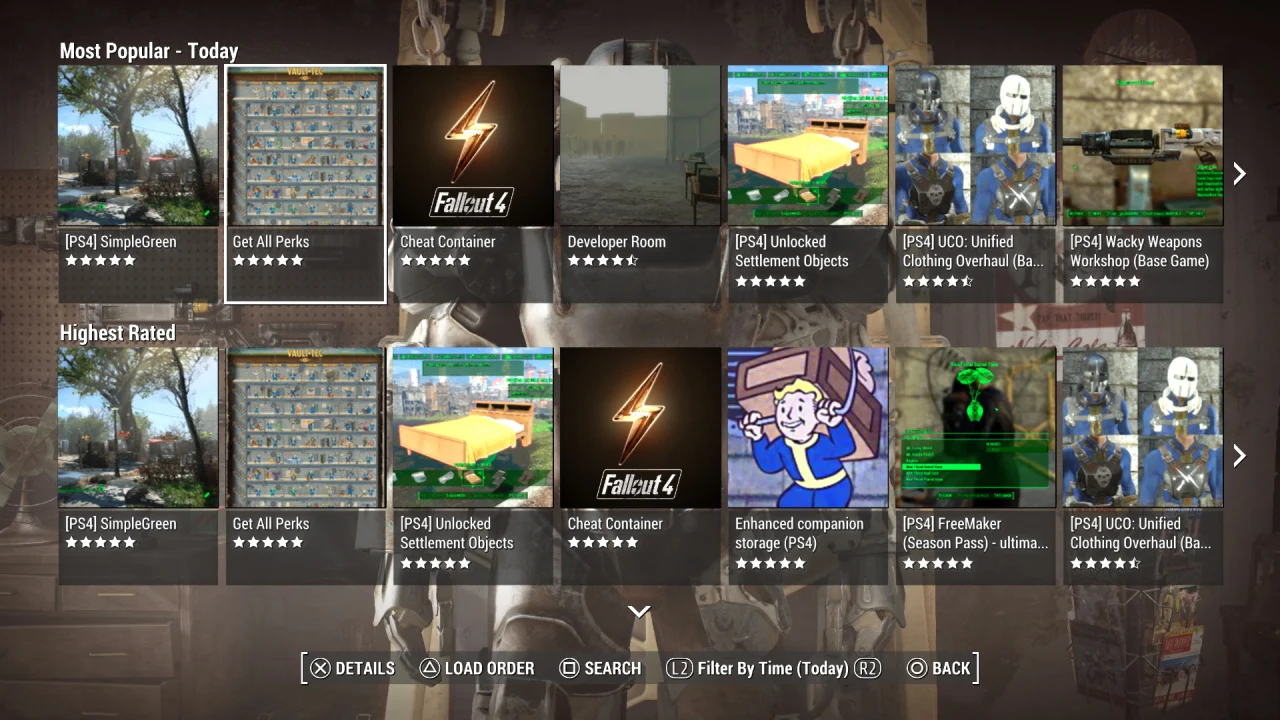
- In the mods menu, you’ll find various sorting options such as “Most Popular”, “Latest”, “Trending”, and more. Use these filters to see the top mods or the newest additions to the platform.
- Alternatively, you can use the search bar to look for specific mods or keywords.
- As you browse through the mod listings, you’ll see a preview image, the mod’s title, creator name, and a brief description. Click on a mod to view more details.
- Within the mod’s page, you’ll find additional information including detailed descriptions, screenshots, videos, and user ratings. Take the time to review this information to ensure the mod aligns with your preferences.
- If you’re interested in the mod, click on the “Download” button to add it to your mod list.
- Once downloaded, the mod will be automatically enabled and ready to use in your game.
Exploring the mod categories on Bethesda.net is also a great way to discover mods in specific areas of interest. Whether you’re looking for new weapons, character customization options, gameplay tweaks, or entirely new quests, the categorization system will help you narrow down your choices.
Remember, modding is a personal preference, so take your time to explore the available options and find the mods that resonate with your desired gameplay experience. Additionally, don’t forget to check for compatibility requirements or any additional instructions provided by the mod creator to ensure a smooth installation and integration into your game.
With the knowledge of how to browse mods on Bethesda.net, you’re now equipped to find and download exciting mods to enhance your Fallout 4 adventure. In the next section, we’ll guide you through the process of installing mods on Xbox One. So, let’s continue our modding journey!
Installing Mods on Xbox One
Installing mods on Xbox One is a straightforward process that can be done directly within the Fallout 4 game. Once you’ve found a mod that you want to add to your game, you can follow these steps to install it:
- Launch Fallout 4 on your Xbox One console.
- From the main menu, select “Mods”.
- Browse or search for the mod you want to install on Bethesda.net.
- Click on the mod to open its details page.
- On the mod’s page, you’ll find an “Add to Library” button. Click on it to add the mod to your library.
- Once the mod is added to your library, click on the “Enable” button to enable it for use in-game.
- The mod will start downloading and installing automatically. You can monitor the progress in the “Downloads” section of the mods menu.
- Once the download is complete, the mod will be enabled and ready to use in your game.
It’s important to note that some mods may have additional installation requirements or instructions provided by the mod creator. Make sure to read the description or any provided documentation to ensure a smooth installation process.
After you’ve installed a mod, it’s always a good idea to visit the “Load Order” section in the mods menu. The load order determines the order in which mods are loaded into the game and can affect compatibility and functionality. If you have multiple mods installed, you may need to adjust the load order to prevent conflicts. Simply drag and drop the mods in the desired order to make adjustments.
Remember to periodically check for updates to your installed mods. Mod creators often release updates to improve compatibility and fix any issues. You can easily update your mods by navigating to the “My Library” section in the mods menu and selecting the “Update” option for each mod that has an available update.
Congratulations! You have successfully installed a mod on your Xbox One for Fallout 4. Now it’s time to manage and organize your mods, which we’ll cover in the next section of this guide. So, let’s continue our modding adventure!
Managing Mods
Managing your mods is an essential aspect of the modding experience in Fallout 4 on Xbox One. As you continue to explore and install different mods, you may want to make adjustments, disable or remove certain mods, or organize your load order. Here are some key points to keep in mind when managing your mods:
- Load Order: The load order determines the order in which mods are loaded into the game. It’s crucial to have a proper load order, as conflicting mods can cause issues or prevent certain mods from functioning correctly. To manage your load order, visit the “Load Order” section in the mods menu and use the drag-and-drop feature to arrange the mods in the desired sequence.
- Disable or Remove Mods: If you encounter any compatibility issues or decide to no longer use a particular mod, you can disable or remove it from your game. From the mods menu, go to the “My Library” section, select the mod you want to manage, and choose the “Disable” or “Remove” option.
- Updates: Mod creators frequently release updates to improve compatibility and fix any issues. To update your installed mods, visit the “My Library” section in the mods menu and select the “Update” option for each mod that has an available update.
- Favorites and Ratings: You can mark mods as favorites and rate them to provide feedback to the modding community. This allows you to keep track of your preferred mods and help others discover popular or high-quality mods.
- Mod Dependencies: Some mods may have dependencies, meaning they require other mods to be installed in order to function properly. Pay attention to any provided documentation or mod descriptions to ensure you have all the necessary dependencies installed.
Regularly managing your mods will help keep your game stable and ensure an optimized modding experience. Remember to regularly check for updates, adjust your load order, and remove or disable any mods that are no longer needed.
If you encounter any issues with your mods or changes to your game after installing a mod, it’s recommended to disable or remove the mod and test the game without it. This troubleshooting step can help identify the source of the problem and allow you to continue enjoying your Fallout 4 experience.
Now that you’ve learned how to manage your mods, it’s time to address any potential issues you may encounter during the modding process. In the next section, we’ll explore some troubleshooting tips to help you resolve common mod-related problems. So, let’s dive in!
Troubleshooting Mod Issues
While modding can greatly enhance your Fallout 4 experience, it’s not uncommon to encounter issues or conflicts when using mods. Fortunately, there are troubleshooting steps you can take to identify and resolve mod-related problems. Here are some common mod issues and their possible solutions:
Game Crashes or Freezes: If your game crashes or freezes after installing a mod, it’s likely due to a conflict with another mod or an issue with the mod itself. To troubleshoot this, try disabling or removing the recently installed mod and see if the issue persists. You can also adjust your load order to ensure mods are loaded in the correct sequence.
Missing Items or Features: If you notice certain items or features are missing or not working as intended, it could be due to conflicts between mods or compatibility issues. Check the mod descriptions to see if there are any known conflicts or if specific instructions are provided to make the mod work properly. Additionally, ensure that you have all the necessary mod dependencies installed.
Performance Issues: Some mods can impact the performance of your game, causing frame rate drops or slowdowns. If you experience performance issues, try disabling or removing mods that may be causing the problem. Additionally, consider adjusting your graphics settings or using performance-enhancing mods to optimize your game’s performance.
Outdated Mods: Mod creators regularly release updates to improve compatibility and address issues. If you’re experiencing problems with a mod, make sure it’s up to date. Visit the “My Library” section in the mods menu and select the “Update” option for each mod that has an available update.
Save Game Corruption: In rare cases, certain mods may lead to save game corruption or instability. It’s always a good practice to make regular backups of your game saves so that you can revert back to a previous state if any issues occur. If you suspect a mod is causing save game issues, disable or remove it and test the game with a clean save file.
If you have tried the above troubleshooting steps and are still experiencing issues with your mods, it’s recommended to reach out to the mod creator or seek assistance from the modding community. They may be able to provide guidance or offer solutions to specific mod-related problems.
Remember, modding is a complex process and it’s natural to encounter some hiccups along the way. By following these troubleshooting steps, you can address most mod-related issues and continue enjoying your modded Fallout 4 experience.
Now that you’re equipped with troubleshooting knowledge, it’s time to wrap up our modding guide. In the final section, we’ll provide a brief recap of the modding process and encourage you to explore the vast world of mods available for Fallout 4 on Xbox One. So, let’s conclude our modding journey!
Conclusion
Congratulations! You’ve reached the end of our comprehensive guide on how to download mods for Fallout 4 on Xbox One. Modding allows you to personalize and enhance your gaming experience, giving you the freedom to add new content, tweak gameplay mechanics, and discover new adventures in the Commonwealth.
We started by discussing the importance of choosing a modding platform, with Bethesda.net being the primary focus in this guide. We then guided you through the process of creating a Bethesda.net account, accessing mods in-game, and browsing the extensive selection of mods available on the platform.
Installing mods on your Xbox One was made easy as we walked you through each step. We emphasized the significance of managing your mods, including adjusting the load order, disabling or removing mods, and staying up to date with mod updates.
Additionally, we provided troubleshooting tips to help you overcome common mod issues, ensuring a smooth and enjoyable modding experience. From game crashes to missing features, our troubleshooting section aimed to equip you with the knowledge to identify and address these issues.
Remember, modding is a creative endeavor, and it’s important to exercise caution and read mod descriptions, ratings, and reviews before downloading and installing mods. This will help you choose mods that align with your preferences and avoid any potential compatibility or functionality issues.
Now that you have the tools and knowledge to mod your game, we encourage you to unleash your creativity and explore the vast world of mods available for Fallout 4 on Xbox One. Personalize your game, embark on new quests, and uncover unique experiences in the post-apocalyptic wasteland.
Thank you for joining us on this modding journey. We hope that this guide has provided you with valuable insights and empowered you to take your Fallout 4 gameplay to new heights with mods. Enjoy your modding adventure and have a fantastic time exploring the Commonwealth!


![How To Get Out Of Power Armor In Fallout 4 [GUIDE]](https://robots.net/wp-content/uploads/2022/07/how-to-get-out-of-power-armor-fallout-4-featured-300x169.jpg)