Introduction
Are you an avid fan of Fallout 4 on your PlayStation 4 (PS4) and looking to enhance your gaming experience? Look no further! Mods, short for modifications, allow players to customize and add new features to their favorite games. In this guide, we will show you how to download mods for Fallout 4 on your PS4.
Fallout 4 is an open-world role-playing game developed by Bethesda Game Studios, known for its immersive gameplay and expansive post-apocalyptic world. With mods, you can breathe new life into the Commonwealth by adding new weapons, armors, quests, companions, graphics improvements, and much more.
While PC players have long enjoyed the flexibility of installing mods, console players can now join in the fun with mods available for Xbox One and PS4. With the help of the in-game Mod Browser, PS4 players can easily browse, download, and install mods directly from their console.
In this comprehensive guide, we will take you through the step-by-step process of downloading mods for Fallout 4 on your PS4. So, grab your Pip-Boy and let’s dive into the wasteland of modding!
Step 1: Setting up your PS4 for modding
Before you can start downloading mods for Fallout 4 on your PS4, you’ll need to make sure your console is prepared for modding. Here’s what you need to do:
- Update your PS4 firmware: Ensure that your PS4 is running the latest system software. To update, go to the Settings menu on your PS4 Dashboard, select “System Software Update,” and follow the instructions.
- Create a Bethesda.net account: To access and download mods, you will need a Bethesda.net account. Visit the official Bethesda website and create an account if you don’t already have one. Your Bethesda.net account will be used to link your PS4 to the modding community.
- Enable mods on your PS4: On your PS4 Dashboard, navigate to “Settings” > “Account Management” > “Privacy Settings” > “Games” > “Media” and make sure that both “Internet Connection Status” and “See Details” options are set to “Allow.”
- Ensure sufficient storage: Mods can take up a significant amount of storage space, so make sure your PS4 has enough free space to accommodate them. Consider deleting unnecessary game data or transferring files to an external storage device to free up some space.
- Connect your PS4 to the internet: Make sure your PS4 is connected to the internet either through a wired or wireless connection. Stable internet connectivity is crucial for accessing and downloading mods from the in-game Mod Browser.
Once you have completed these steps, your PS4 will be ready for modding. It’s important to note that modding Fallout 4 on the PS4 has some limitations compared to PC modding, due to Sony’s restrictions. These limitations include restrictions on mod file size and the inability to use external assets like scripts and textures. However, there are still a plethora of exciting mods available for you to explore and enhance your Fallout 4 experience on the PS4.
Step 2: Creating a Bethesda.net account
To access and download mods for Fallout 4 on your PS4, you will need to create a Bethesda.net account. Here’s how to do it:
- Visit the Bethesda.net website: Open your web browser and navigate to the official Bethesda.net website.
- Create an account: Look for the “Create Account” or “Sign Up” button on the homepage and click on it. Fill in the required information, such as your username, email address, and password.
- Verify your email: After completing the account creation process, you will receive an email verification link from Bethesda.net. Check your email inbox and click on the verification link to confirm your account.
- Link your Bethesda.net account to your PS4: On your PS4, launch Fallout 4 and navigate to the Mods menu. Select “Login to Bethesda.net” and enter your Bethesda.net account credentials. This step will link your PS4 to your Bethesda.net account, allowing you to access and download mods from the in-game Mod Browser.
Creating a Bethesda.net account is a simple and necessary step to connect with the vast modding community for Fallout 4. It allows you to keep track of your downloaded mods, engage with other players, and receive updates on new and popular mods.
If you already have a Bethesda.net account from playing other Bethesda games, you can use the same account for Fallout 4 modding. Just make sure to log in with the same account details on your PS4 to link it to your console.
With your Bethesda.net account set up and linked to your PS4, you’re now ready to dive into the world of modding in Fallout 4. In the next step, we will show you how to navigate the in-game Mod Browser to browse and select mods that pique your interest.
Step 3: Launching Fallout 4 and navigating to the Mods menu
Now that you have set up your PS4 and created a Bethesda.net account, it’s time to launch Fallout 4 and access the Mods menu. Follow these steps:
- Launch Fallout 4: Turn on your PS4 and insert the Fallout 4 disc (if you have a physical copy). Alternatively, select the Fallout 4 game icon from your digital library. Wait for the game to load.
- Logging in to your Bethesda.net account: Once in the Fallout 4 main menu, select “Mods” from the options. If you haven’t logged in to your Bethesda.net account yet, you will be prompted to do so. Enter your account details to sign in.
- Accessing the Mods menu: After successfully logging in, you will be taken to the in-game Mod Browser. Here, you can explore and download various mods for Fallout 4.
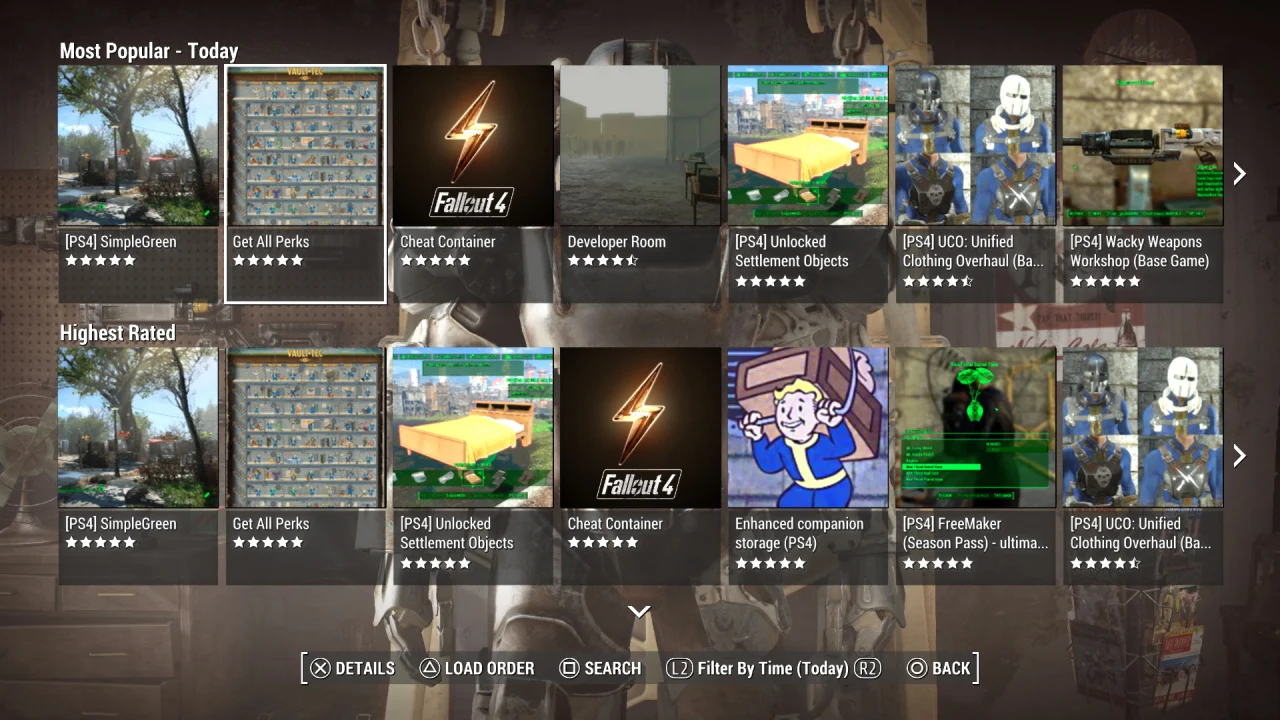
- Browsing through available mods: In the Mods menu, you’ll find different categories such as Featured, Most Popular, Highest Rated, and more. You can navigate through these categories to browse and discover the mods that catch your interest.
- Using search and filters: If you have a specific mod in mind or want to narrow down your options, you can utilize the search function or apply filters to refine your search results. This will help you find mods that align with your preferences.
- Viewing mod details: When you come across a mod that intrigues you, select it to view its details. Here, you will find information about the mod’s description, features, screenshots, and user ratings. Take your time to read through the details and ensure the mod suits your preferences.
Navigating to the Mods menu in Fallout 4 is the gateway to a world of customization and new adventures. Familiarize yourself with the different categories, search options, and filters to discover the perfect mods to enhance your Fallout 4 experience. In the next step, we will guide you through the process of downloading and installing mods on your PS4.
Step 4: Browsing and selecting mods from the in-game Mod Browser
With Fallout 4 launched and the Mods menu open, it’s time to delve into the world of mod selection. Follow these steps to browse and select mods from the in-game Mod Browser:
- Explore different mod categories: The in-game Mod Browser offers several categories to help you navigate through the diverse range of mods available. From graphics enhancements to new weapons and quests, you can find mods to suit your gameplay preferences.
- Browse featured mods: The “Featured” category showcases mods that have been handpicked by the modding community or Bethesda. These mods often represent the best and most popular options available, so be sure to check them out.
- Sort by popularity: If you’re looking for mods that have garnered a lot of attention and positive reviews, consider sorting the mods by popularity. This will highlight the most downloaded and highly rated mods.
- Read mod descriptions and details: When browsing through the available mods, make sure to read the mod descriptions and details carefully. Understand what the mod does, its compatibility, and any installation requirements or instructions provided by the mod author. This will help you make an informed decision.
- View mod screenshots and videos: Many mods feature screenshots or videos to showcase their visual effects or gameplay changes. Take the time to view these media assets to get a better idea of how the mod will impact your Fallout 4 experience.
- Check user ratings and reviews: User ratings and reviews can provide valuable insights into the quality and stability of a mod. Pay attention to the ratings and read the accompanying reviews to gauge the overall user satisfaction.
- Select and add mods to your library: Once you’ve found a mod that interests you, select it and choose the option to add it to your library. This will save the mod to your account, allowing you to track it and easily access it in the future.
Browsing and selecting mods from the in-game Mod Browser is an exciting and personalized process. Take your time, explore different categories, and carefully consider the details and user feedback before making your choices. In the next step, we will guide you through the process of downloading and installing mods to your PS4.
Step 5: Downloading and installing mods to your PS4
Once you’ve selected the mods you want to add to your library, it’s time to download and install them to your PS4. Follow these steps to successfully download and install mods:
- Access your mod library: In the Mods menu, navigate to the “Library” tab. Here, you’ll find a list of all the mods you have added to your library.
- Select a mod: Choose the mod you want to download and install from your library. This will take you to the mod’s details page.
- Download the mod: On the mod details page, select the “Download” button to initiate the download process. The size of the mod and your internet connection speed will determine how long the download takes.
- Wait for the download to complete: Once the download is in progress, you will see a progress bar indicating the download status. Allow the download to complete before proceeding.
- Install the mod: After the download is complete, select the “Install” button to install the mod onto your PS4. The mod will be added to your active mod list for use in your game.
- Enable the mod: In the Mods menu, go to the “Mods” tab and locate the mod you just installed. Ensure that the mod is enabled by selecting the checkbox next to its name. This will activate the mod in your game.
It’s important to note that some mods may require additional steps or instructions for proper installation. Be sure to read and follow any provided installation instructions or prerequisites mentioned by the mod author to ensure a smooth installation process.
When downloading and installing mods, it’s recommended to install them one at a time and test them in your game to ensure compatibility and stability. This way, you can easily identify and troubleshoot any issues that may arise.
With your chosen mods successfully downloaded and installed, you can now enjoy the new features and enhancements they bring to your Fallout 4 experience. In the next step, we will discuss how to manage and organize your mods on your PS4.
Step 6: Managing and organizing your mods
Managing and organizing your mods is crucial to ensure a smooth and enjoyable modding experience in Fallout 4. Follow these steps to effectively manage and organize your mods on your PS4:
- Enable or disable mods: In the Mods menu, you have control over which mods are active in your game. You can enable or disable mods by selecting or deselecting the checkboxes next to their names. This allows you to easily switch between different mods or disable them if you encounter any compatibility issues.
- Reorder your mods: If you have multiple mods installed, you can change their load order to prioritize certain mods over others. To do this, select the “Load Order” option in the Mods menu. From there, you can move mods up or down the list to modify their load order.
- Update your mods: Mod authors regularly update their mods to fix bugs or add new features. Keep an eye on any available updates for your installed mods in the “Updates” tab of the Mods menu. Select the mod, and if an update is available, choose the “Update” option to install the latest version.
- Delete unwanted mods: If you no longer wish to use a particular mod, you can remove it from your PS4. In the “Library” tab of the Mods menu, select the mod you want to remove and choose the “Delete” option. Confirm the deletion to remove the mod from your active mod list.
- Maintain a clean and organized mod library: As you continue to explore and install mods, it’s essential to maintain a well-organized mod library. Consider creating folders or categories within your library to group similar mods together. This can make it easier to find and manage your mods in the future.
- Stay informed about mod updates and news: Keep an eye on modding communities, forums, and official Bethesda channels to stay updated on new mods, modding news, and any important announcements related to modding in Fallout 4. This will allow you to stay ahead and discover exciting new mods for your game.
By effectively managing and organizing your mods, you can ensure a seamless and enjoyable modding experience in Fallout 4. Take the time to regularly update your mods, customize your load order, and keep your mod library organized to make the most out of your modded gameplay.
In the next step, we will help you troubleshoot common issues that you may encounter while modding Fallout 4 on your PS4.
Step 7: Troubleshooting common issues
While modding Fallout 4 on your PS4 can be an exciting and rewarding experience, it’s important to be aware of common issues that may arise. Here are some troubleshooting tips to help you address common modding issues:
- Mod conflicts: If you encounter issues such as crashes or unexpected behavior in your game, it’s possible that there may be conflicts between different mods. Try disabling mods one by one to identify the culprit and resolve any conflicts.
- Load order issues: The load order of your mods can affect their compatibility and functionality. If you experience issues with specific mods, try adjusting their load order. Experiment with different load orders to find the optimal configuration that minimizes conflicts and maximizes stability.
- Outdated mods: Mods that haven’t been updated to the latest version of Fallout 4 may cause compatibility issues. Check for updates regularly and make sure all your installed mods are up to date. Remove any outdated mods that are causing problems.
- Corrupted mod files: Sometimes, mod files can become corrupted during the download or installation process. If you suspect a mod file is causing issues, try deleting the mod and redownloading it from your library. Ensure a stable internet connection during the download process to minimize the risk of file corruption.
- Game updates: Sometimes, game updates can affect the compatibility of mods. If you’re experiencing issues after a game update, check if there are any mod updates available to address the compatibility issues. Alternatively, you may need to temporarily disable certain mods until they are updated by the mod author.
- Mod limitations: Keep in mind that PS4 mods have certain limitations due to Sony’s restrictions. Mods on PS4 cannot include external assets like scripts or textures, which may limit the functionality and scope of certain mods.
- Seek community help: If you’re facing persistent issues or need further assistance, consider reaching out to modding communities, forums, or official support channels. Other modders and players may have encountered similar issues and can provide valuable insights and solutions.
Remember, modding can sometimes be a trial-and-error process. If you encounter any issues, remain patient and systematic in your troubleshooting. With perseverance and the right approach, you can overcome common modding issues and enjoy a customized and immersive Fallout 4 experience on your PS4.
Now that you are equipped with troubleshooting tips, you can confidently navigate the world of modding and explore the vast possibilities in Fallout 4. Happy modding!
Conclusion
Congratulations! You have successfully learned how to download mods for Fallout 4 on your PS4. Modding brings a whole new level of customization and excitement to your gaming experience, allowing you to tailor Fallout 4 to your specific preferences.
In this guide, we covered the steps to set up your PS4 for modding, create a Bethesda.net account, and navigate the in-game Mod Browser to browse and select mods. We also discussed how to download, install, manage, and troubleshoot common issues with mods on your PS4.
Remember, modding is a creative and dynamic process. Don’t be afraid to experiment, but also be mindful of mod compatibility and load order to ensure a stable and enjoyable gameplay experience. Regularly check for updates and engage with the modding community to discover new mods and stay informed about the latest developments.
Whether you’re looking to enhance graphics, add new weapons and quests, or completely overhaul the gameplay, the world of Fallout 4 mods on your PS4 is full of possibilities. Embrace the creative freedom that modding offers and create your own unique wasteland adventure.
Now, it’s time to embark on your modded journey in Fallout 4. Grab your controller, load up the game, and immerse yourself in the wonders of modding. Enjoy the countless hours of entertainment and the enhanced gameplay experience that mods bring. Happy modding!