Introduction
Welcome to Midjourney, the online platform where you can browse and download stunning images for personal or commercial use. With a vast collection of high-quality photographs, Midjourney provides a visual treasure trove for photographers, designers, and anyone in need of captivating visuals.
Whether you are looking for breathtaking nature landscapes, vibrant cityscapes, or intimate portraits, Midjourney has an extensive library of images to suit your needs. From professional photographers to hobbyists and enthusiasts, the platform embraces a wide range of creative contributors, ensuring a diverse and captivating collection.
In this article, we will guide you through the process of downloading images from Midjourney. We will provide you with step-by-step instructions on how to navigate the website, locate the image you desire, and save it to your computer. By the end of this guide, you will be equipped with the knowledge to make the most of Midjourney and its incredible image repository.
So, whether you need an image to enhance your blog post, create an eye-catching website banner, or add visual appeal to a presentation, let’s dive into the process of downloading Midjourney images and unlock a world of artistic possibilities.
Step 1: Go to the Midjourney website
The first step in downloading images from Midjourney is to access their website. Open your preferred web browser and enter “www.midjourney.com” in the address bar. Hit the enter key, and the Midjourney homepage will load.
Once you land on the homepage, take a moment to explore the site’s layout and features. The well-designed and user-friendly interface will make your browsing experience effortless. The homepage showcases a curated selection of captivating images, giving you a taste of what you can expect from Midjourney’s extensive collection.
Take note of the various navigation options available. You can browse images by categories such as nature, travel, people, and more. Additionally, you can use the search bar at the top of the page to directly search for specific keywords related to the type of image you are looking for. This allows you to quickly find images that align with your vision.
Before moving on to the next step, it’s worth mentioning that Midjourney offers both free and premium images. While free images can be downloaded without any cost, premium images may require a subscription or purchase. Ensure you are aware of the licensing details associated with the image you wish to download to avoid any copyright issues or usage restrictions.
Now that you have successfully navigated to the Midjourney website, you are ready to embark on your image downloading journey. Let’s move on to the next step to find and select your desired image.
Step 2: Browse and find the desired image
With Midjourney’s vast collection of images at your fingertips, browsing and finding the perfect image is an exciting part of the process. Start by exploring the various categories available on the website. From breathtaking landscapes to stunning portraits, you’ll find a wide range of subjects to choose from.
Each category is further divided into subcategories, allowing you to narrow down your search even further. For instance, if you’re looking for nature images, you can explore subcategories like mountains, beaches, forests, or wildlife. This hierarchy helps streamline your search and ensures you find precisely what you’re looking for.
Alternatively, you can use the search bar located at the top of the page. Enter keywords related to your desired image, such as “sunset,” “city skyline,” or “family picnic.” Midjourney’s powerful search algorithm will present you with relevant results, saving you time and effort.
As you browse through the images, take advantage of the intuitive filtering options. You can customize your search results by factors like image orientation (horizontal, vertical, or square), color scheme, or even the photographer’s name. These filters allow you to refine your search and find images that align perfectly with your vision.
Once you find an image that catches your eye, click on it to open it in a larger view. Here, you’ll have the opportunity to review the image in more detail and assess if it suits your needs. Pay attention to factors such as composition, lighting, and overall aesthetic appeal to ensure it meets your requirements.
If the image doesn’t fully meet your expectations, simply go back and continue browsing until you find the perfect match. Midjourney’s collection is vast and continually updated, guaranteeing a wide selection of high-quality images to choose from.
Now that you have successfully found the desired image, it’s time to proceed to the next step, where you will learn how to save or download it to your computer.
Step 3: Click on the image to open it
Once you’ve found an image that piques your interest, it’s time to take a closer look. To do so, simply click on the image thumbnail. This will open the image in a larger view, allowing you to appreciate its details and quality.
When the image opens, you will notice various options and information displayed alongside it. Take a moment to explore these details. You may find the photographer’s name, image resolution, file type, and a brief description. These details can be valuable in making your final decision.
This larger view allows you to thoroughly assess the image’s quality, composition, and suitability for your project. Take your time to examine the image closely. Zoom in to see if it maintains its clarity and sharpness at a larger scale. Consider whether the colors, lighting, and overall aesthetics align with your creative vision.
If, upon closer inspection, the image doesn’t meet your requirements or if you decide to choose a different one, simply navigate back to the previous page or continue browsing through the collection until you find the perfect image.
However, if the image surpasses your expectations and you are ready to proceed with downloading it, then move on to the next step, where we will guide you through the process of saving or downloading the image to your computer.
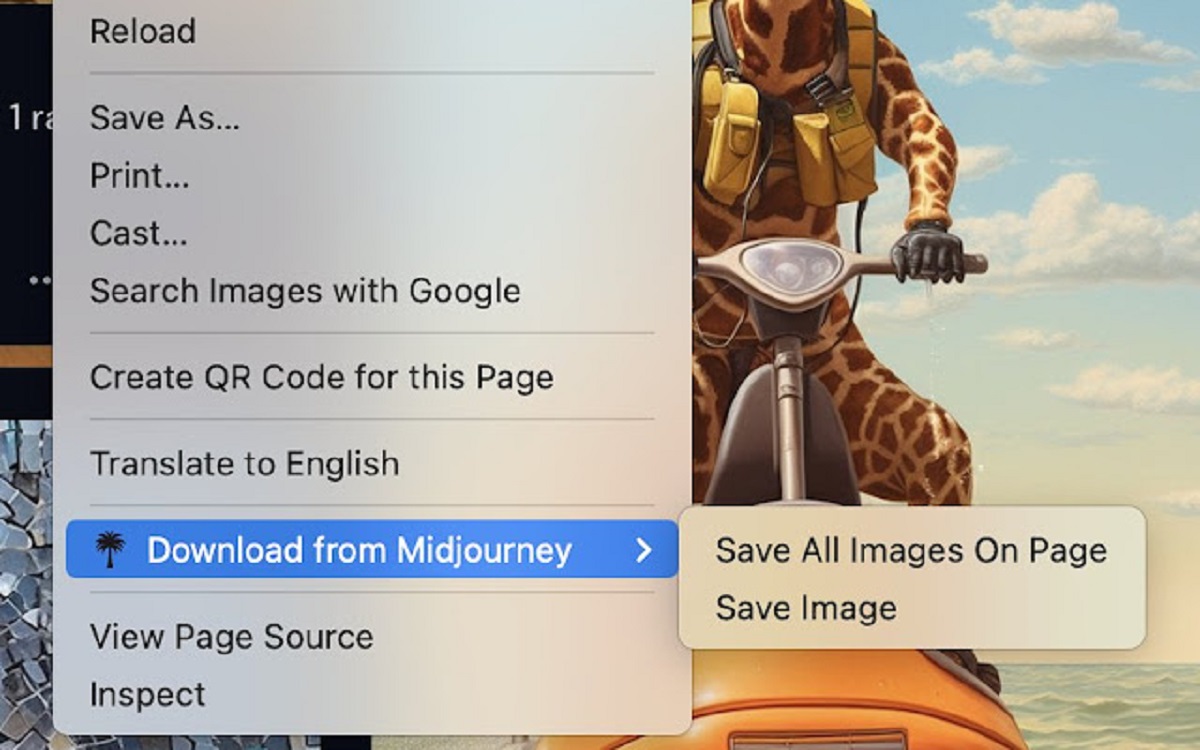
Step 4: Right-click on the image
Once you have selected the image you wish to download, the next step is to right-click on the image. When you right-click, a context menu will appear, providing you with several options.
Locate the option that says “Save Image As” or “Download Image. The specific wording may vary depending on your web browser, but the functionality remains the same. Click on this option to initiate the downloading process.
When you click on “Save Image As” or “Download Image”, a dialog box will appear, prompting you to choose the destination folder on your computer where you want the image to be saved. This allows you to decide where the downloaded image will be stored for easy access.
Take a moment to navigate through your computer’s directory and select the appropriate folder. You can create a new folder specifically for your Midjourney downloads or choose an existing folder that makes sense for your organizational system.
It’s important to give some thought to how you name the file as well. Consider using descriptive and relevant keywords so that the image is easily recognizable later on. This will save you time in the future when searching for specific images.
Once you have selected the destination folder and provided a suitable file name, click on the “Save” or “Download” button to initiate the download. Depending on the size of the image and your internet connection speed, the download may take a few seconds or minutes.
Once the download is complete, a notification will appear confirming its success. You can now navigate to the destination folder on your computer and find the downloaded image ready for use.
Congratulations! You have successfully downloaded the image from Midjourney to your computer. Now, you can incorporate it into your creative projects,
whether it’s a blog post, website design, social media content,
or any other endeavor that could benefit from a captivating visual.
Step 5: Select “Save Image As” or “Download Image”
After right-clicking on the image, a context menu will appear, offering you various options. Look for the option that says “Save Image As” or “Download Image”. This option allows you to save the image to your computer.
Clicking on “Save Image As” or “Download Image” will prompt a dialog box to appear, where you can specify the location on your computer where you want to save the image.
First, navigate to the folder or directory where you want to store the image. You can choose an existing folder or create a new one specifically for your Midjourney downloads. Consider organizing your files in a way that makes it easy for you to find and access them later.
Next, provide a suitable name for the image file. It’s helpful to use descriptive and relevant keywords to make it easier to identify the image later on. This is particularly useful when you have a large collection of downloaded images.
Once you have selected the folder and specified the file name, click on the “Save” or “Download” button to initiate the process. The image will then be downloaded and saved to your specified location on your computer.
Depending on the size of the image and the speed of your internet connection, the download may take a few moments. A progress indicator may appear, letting you know the status of the download.
Once the download is complete, you will receive a confirmation message or notification. At this point, you can navigate to the folder where you saved the image to verify that it has been successfully downloaded.
Now that you have successfully saved the image to your computer, you can proceed to use it in your creative projects or any other purpose you had in mind when downloading it from Midjourney.
With the image safely stored on your computer, you have the freedom to edit, manipulate, or incorporate it into your designs, blog posts, social media content, or any other digital or print materials.
Step 6: Choose the destination folder on your computer
After selecting “Save Image As” or “Download Image,” a dialog box will appear, allowing you to choose the destination folder on your computer where you want to save the downloaded image.
Take a moment to navigate through your computer’s directory and select the appropriate folder to save the image. You can choose to save it in an existing folder or create a new folder specifically for your Midjourney downloads. Organizing your downloaded images in separate folders can make it easier to find and manage them later.
Consider the purpose of the image and how you plan to use it when deciding on the destination folder. If you are downloading images for a specific project, it may be helpful to create a folder dedicated to that project. This way, all the resources for that project will be easily accessible and organized.
Once you have chosen the destination folder, ensure that the correct folder path is displayed in the dialog box. This will help you avoid any confusion when searching for the image later.
It’s a good practice to give some thought to how you name the file as well. Use descriptive and relevant keywords in the file name to make it easier to identify and search for specific images in the future.
After you have selected the destination folder and provided an appropriate file name, click on the “Save” or “Download” button to save the image to the chosen location on your computer.
Depending on the size of the image and the speed of your internet connection, the download process may take a few seconds or minutes. During this time, you may see a progress indicator showing the status of the download.
Once the download is complete, the image will be saved in the chosen folder on your computer. You can now navigate to that folder to locate the downloaded image and use it for your desired purpose, whether it’s for graphic design, website development, or any other creative project.
Congratulations! You have successfully chosen the destination folder for the downloaded image, ensuring quick and easy access to it whenever you need it.
Step 7: Click “Save” or “Download”
After selecting the destination folder and providing an appropriate file name for the image, the final step is to click on the “Save” or “Download” button. This will initiate the process of saving or downloading the image to your computer.
Take a moment to review your selection and ensure that the correct folder path and file name are displayed. Double-checking these details will help prevent any potential errors or confusion in locating the image later.
Once you are confident with your choices, click on the “Save” or “Download” button to start the process. The time it takes to complete the download will depend on the size of the image and the speed of your internet connection.
While the download is in progress, you may see a progress bar or indicator showing the status of the download. This can give you an idea of how much time is remaining until the download is complete.
Once the download is finished, you will receive a notification or confirmation message indicating the success of the process. The image has now been saved in the destination folder you chose, ready for you to access and use.
To verify that the image has indeed been saved, navigate to the destination folder on your computer. Here, you should find the downloaded image file with the specified name. Take a moment to open the file and verify that it is the image you intended to download.
Congratulations! You have successfully saved or downloaded the image from Midjourney to your computer. It is now ready to be utilized in your creative projects, whether it’s for personal use or commercial purposes.
With the image securely stored on your computer, you have the freedom to edit, manipulate, or incorporate it into your designs, blog posts, social media content, or any other digital or print materials. Enjoy the creative possibilities that the downloaded image provides!
Conclusion
Congratulations! You have reached the end of this guide on how to download images from Midjourney. By following the step-by-step process outlined in this article, you now have the knowledge and skills to browse, find, and save high-quality images from the Midjourney website.
Midjourney offers a vast collection of stunning visuals, making it a valuable resource for photographers, designers, and creatives alike. Whether you need images for personal projects, blog posts, social media content, or commercial ventures, Midjourney has you covered.
Remember to explore the various categories and subcategories, use the search function, and take advantage of the intuitive filtering options to fine-tune your search and find the perfect image. Take your time to review the images in detail and ensure they meet your requirements before proceeding with the download.
Once you have found your desired image, right-click on it, select “Save Image As” or “Download Image,” choose the destination folder on your computer, and click “Save” or “Download” to save the image. Remember to provide a descriptive and relevant file name to make it easier to locate later.
With the image successfully downloaded, you now have the flexibility to edit, manipulate, and incorporate it into your creative projects. Let your imagination run wild as you utilize these stunning visuals to enhance your designs, communicate your message, and captivate your audience.
Keep in mind that while Midjourney offers a wide range of free images, some may require a subscription or purchase for full access. Therefore, it is crucial to understand and adhere to the licensing terms and restrictions associated with the image you download.
Thank you for joining us on this journey to download images from Midjourney. We hope this guide has been helpful and has empowered you to make the most of this incredible platform. Enjoy exploring the vast collection of captivating visuals and unleash your creativity!