Introduction
Are you eager to get your hands on the latest macOS? Updating your operating system can bring new features, improved performance, and enhanced security to your Mac. Whether you’re a long-time Mac user or new to the platform, this article will guide you through the process of downloading and installing the latest version of macOS.
Apple regularly releases updates to its macOS, introducing exciting new features and improvements. However, it’s important to note that upgrading your operating system is a significant change that requires careful planning and preparation. In this guide, we will outline the steps you need to follow before you begin the update process, ensuring a smooth transition to the latest version of macOS.
Before diving into the steps, it’s important to highlight the benefits of updating your macOS. Along with enhanced functionality, you’ll gain access to the latest security patches, protecting your Mac from potential vulnerabilities. Additionally, new features and optimizations can boost your productivity and overall user experience.
Now, let’s explore the necessary steps to download and install the latest macOS, ensuring a seamless transition to the newest version of Apple’s operating system.
Before You Begin
Before diving into the macOS upgrade process, it’s essential to perform a few essential preparatory steps. These steps will help ensure that your upgrade goes smoothly without any data loss or interruptions. Here’s what you need to do:
- Check Compatibility: Before proceeding with the macOS upgrade, verify that your Mac is compatible with the latest version. Apple typically provides a list of supported models on their website. Ensure that your Mac meets the minimum requirements to prevent any potential issues during the upgrade process.
- Create a Backup: It’s always wise to create a backup of your important files and documents before proceeding with any major update. This precautionary measure will safeguard your data in case anything goes wrong during the installation process. You can use the built-in Time Machine feature on your Mac to create a comprehensive backup.
- Free Up Storage Space: Upgrading your macOS requires a sufficient amount of free storage space. Clean up your Mac by deleting unnecessary files, archiving old documents, and removing unused applications. This will help ensure a smooth and error-free upgrade.
- Update Apps: Take the time to update your applications to their latest versions. Some older versions may not be compatible with the new macOS, and updating them beforehand will help eliminate any potential compatibility issues down the line.
- Check Internet Connection: A stable and reliable internet connection is crucial for downloading the latest macOS. Make sure your Mac is connected to a network with a good speed and uninterrupted connectivity. This will prevent any interruptions during the download process.
By following these pre-upgrade steps, you’re setting yourself up for a successful and hassle-free macOS update. Now that you have checked compatibility, backed up your data, created sufficient free space, updated your apps, and ensured a stable internet connection, you’re ready to move on to the next steps in the upgrade process.
Step 1: Check Compatibility
Before proceeding with the macOS upgrade, it’s crucial to ensure that your Mac is compatible with the latest version of the operating system. Apple regularly updates its compatibility list, so it’s essential to check if your Mac meets the minimum requirements. Here’s how you can check the compatibility:
- Visit Apple’s Website: Start by visiting the Apple website and navigating to the section dedicated to macOS. Here, you’ll find information about the latest version of macOS and its compatibility with different Mac models.
- Check System Requirements: Look for the system requirements for the latest macOS version. These requirements specify the minimum hardware and software configurations necessary for the upgrade. Pay attention to processor speed, memory (RAM), available storage, and other specifications outlined by Apple.
- Identify Your Mac Model: Determine your Mac model by clicking on the Apple logo in the top-left corner of your Mac’s screen and selecting “About This Mac.” Note down the model and year of your Mac, as this information will help you verify compatibility.
- Compare Specifications: Compare the system requirements of the latest macOS version with the specifications of your Mac model. If your Mac meets or exceeds the stated requirements, it is compatible with the new macOS version. However, if your Mac falls short of the minimum requirements, it may not be able to run the latest version of macOS smoothly or at all.
Checking compatibility is a critical first step to ensure a successful upgrade without any compatibility issues. If your Mac meets the system requirements, you can proceed with confidence to the next steps in the macOS upgrade process.
Step 2: Create a Backup
Before proceeding with any major update, it is crucial to create a backup of your important files and data. This precautionary step will ensure that you have a copy of your valuable information in case anything goes wrong during the macOS upgrade process. Here’s how you can create a backup:
- Use Time Machine: Time Machine is a built-in backup feature available on macOS that allows you to create automated backups. Connect an external hard drive or a Time Capsule to your Mac and set up Time Machine. Follow the on-screen instructions to choose the drive you want to use for backup and enable automatic backups. Time Machine will save regular snapshots of your files, ensuring that you have a recent backup in case of any mishaps.
- Select Backup Contents: Time Machine gives you the option to select the files and folders you want to include in the backup. If you have specific documents or directories that are essential to you, make sure to select them to be included in the backup. This will ensure that your most important data is safeguarded.
- Verify the Backup: After setting up Time Machine, it is essential to test the backup process to ensure its functionality. Verify that Time Machine is regularly creating backups and that you can access and restore files from previous backups if needed. This step will give you peace of mind, knowing that your data is safe and accessible.
- Consider Cloud Backup: Apart from using Time Machine, you might want to explore cloud-based backups as an additional layer of protection. Services such as iCloud, Dropbox, or Google Drive offer cloud storage options that automatically sync and backup your files. Consider utilizing these services to ensure your data is securely stored in the cloud.
By creating a backup before updating your macOS, you are taking a proactive measure to protect your valuable files and data. In case anything goes wrong during the upgrade, you can easily restore your data and continue working without any major setbacks.
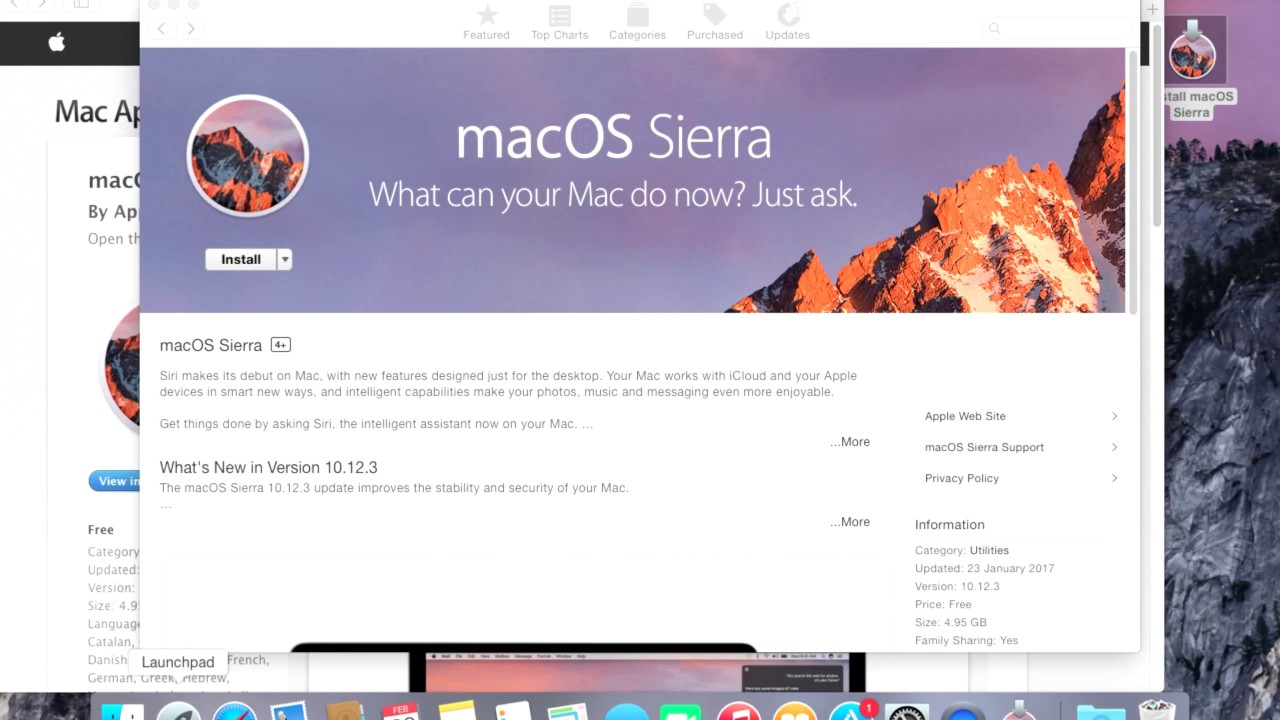
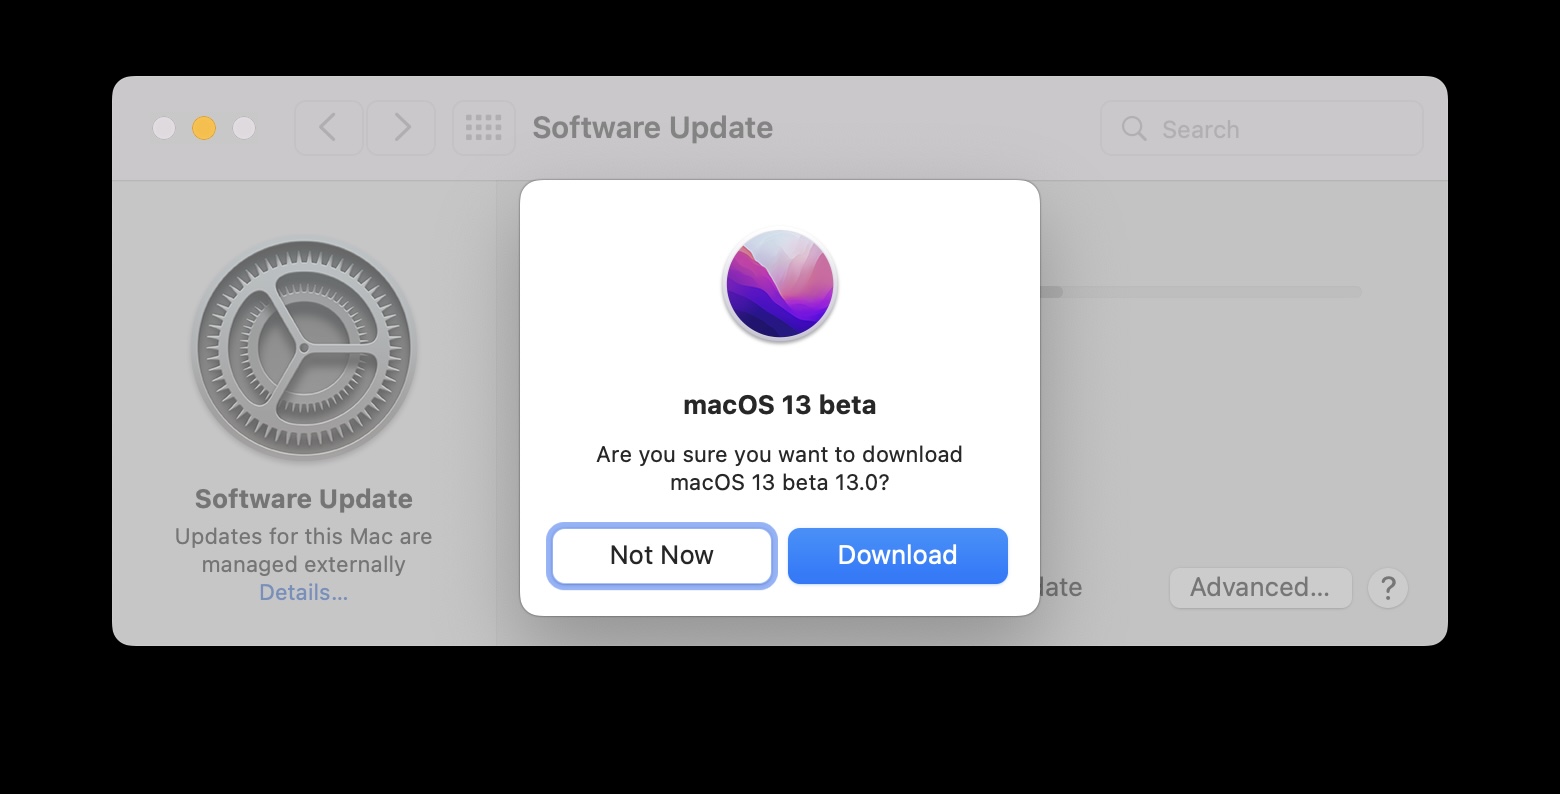
Step 3: Download from the App Store
Once you have checked compatibility and created a backup of your important files, you are ready to download the latest version of macOS from the App Store. Follow these steps to begin the download process:
- Launch the App Store: Click on the Apple menu in the top-left corner of your screen and select “App Store” from the dropdown menu. This will open the App Store application on your Mac.
- Navigate to the macOS Update: In the App Store, click on the “Updates” tab located at the top of the App Store window. This will display all available updates for your installed applications.
- Search for macOS: In the list of updates, you should see the latest version of macOS if it is available for your Mac model. Look for the macOS update and click on the “Update” button next to it.
- Enter your Apple ID: If prompted, enter your Apple ID and password to authenticate the download. This step is necessary to ensure that you have the authorization to download and install the macOS update.
- Wait for the Download: The download process will begin, and you can monitor the progress in the “Downloading” section of the App Store. Depending on your internet speed, the download may take some time, so be patient and avoid interrupting the process.
- Allow the Download to Complete: Ensure that your Mac stays connected to the internet until the download is complete. Interrupting the download may result in an incomplete installation, which can cause issues during the macOS upgrade.
By following these steps, you will successfully download the latest version of macOS from the App Store. Make sure to wait for the download to complete fully before moving on to the next step in the upgrade process.
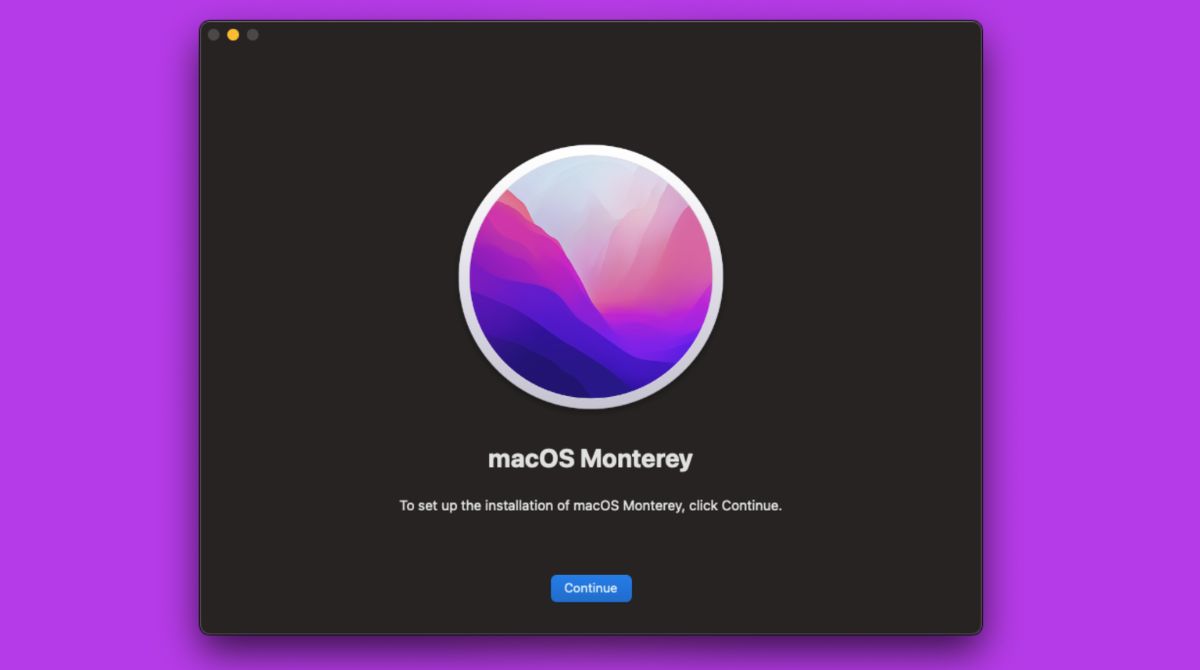
Step 4: Install macOS
Once you have successfully downloaded the latest version of macOS from the App Store, you are ready to install it on your Mac. Follow these steps to begin the installation process:
- Launch the Installer: After the download is complete, the macOS installer will launch automatically. If it doesn’t, go to your Applications folder and look for the installer file, usually named something like “Install macOS [Version].app”. Double-click on the installer to launch it.
- Follow the On-Screen Instructions: The installer will guide you through the installation process. Pay close attention to the prompts and follow the instructions provided. You may be asked to agree to the terms and conditions, select the installation destination, or enter your administrator password.
- Choose an Installation Method: The installer may give you options for installing macOS. The most common options are a clean install or an upgrade installation. A clean install erases your existing system and starts fresh, while an upgrade installation keeps your files and applications intact while updating the system. Choose the method that suits your preferences and needs.
- Wait for the Installation: Once you have made your selections, the installation process will begin. It may take some time, so be patient and avoid interrupting the process. Your Mac may restart multiple times during the installation. This is normal, so allow the process to complete without interfering.
- Set Up Your Mac: After the installation is complete, your Mac will restart, and you will be greeted with the setup assistant. Follow the on-screen instructions to set up your Mac with your preferred language, location, Apple ID, and other configuration settings.
By following these steps, you will successfully install the latest version of macOS on your Mac. Make sure to carefully read and follow the on-screen instructions to ensure a smooth installation process. Once the installation is complete, you can move on to the final step of setting up your Mac.
Step 5: Set Up Your Mac
After successfully installing the latest version of macOS, it’s time to set up your Mac and personalize it to your preferences. Follow these steps to complete the setup process:
- Select Your Preferences: During the setup assistant, you will be prompted to choose your preferred language, region, and keyboard layout. Select the options that best suit your needs and click “Continue” to proceed.
- Sign in with your Apple ID: If you have an Apple ID, use it to sign in. This will allow you to access various Apple services, such as iCloud and the App Store, with your existing account. If you don’t have an Apple ID, you can create one during this step.
- Enable Data and Privacy Settings: macOS includes various data and privacy options that allow you to customize how your Mac handles your information. Review the settings carefully and configure them according to your preferences to ensure the right balance between functionality and privacy.
- Migrate Data (Optional): If you performed a clean installation of macOS and have a Time Machine backup or another external storage device with your data, you can choose to migrate your data and applications to your Mac during this step. Follow the prompts to initiate the migration process if desired.
- Customize System Preferences: Once the initial setup is complete, explore the System Preferences menu to further personalize your Mac. Adjust settings for display, sound, notifications, energy-saving, and more to make your Mac work the way you want it to.
By following these steps, you will complete the setup process of your Mac after installing the latest version of macOS. Take your time to ensure that the preferences, accounts, and privacy settings are configured according to your needs. This will provide you with a smooth and personalized Mac experience as you start using the new version of macOS.
Conclusion
Congratulations! You have successfully learned how to download and install the latest version of macOS. By following the steps outlined in this guide, you can ensure a smooth and seamless upgrade process for your Mac.
Checking compatibility, creating a backup, downloading from the App Store, installing macOS, and setting up your Mac are the key steps to upgrading your operating system. It is crucial to follow these steps diligently to avoid any data loss or complications during the upgrade.
Remember to check the compatibility of your Mac before starting the upgrade process. Creating a backup of your important files is essential to safeguard your data in case anything goes wrong during the installation. Downloading the latest version of macOS from the App Store ensures that you acquire the most recent and secure software for your Mac.
Once the installation is complete, take the time to set up your Mac according to your needs and preferences. Personalize your settings, sign in with your Apple ID, and configure your data and privacy options to optimize your Mac experience.
Now that you have successfully upgraded your macOS, you can take advantage of new features, improved performance, and enhanced security. Enjoy exploring the new functionalities and leveraging the power of the latest macOS to enhance your productivity and creativity.
Remember to keep your Mac updated regularly to enjoy the latest enhancements and security patches released by Apple. Stay informed about future macOS updates and be proactive in keeping your system up-to-date.
Thank you for following this guide, and we hope you enjoy using the latest version of macOS on your Mac!