Introduction
Welcome to this guide on how to download Java on your Mac. Java is a widely-used programming language that allows you to run applications and applets on your computer. Whether you are a developer or an end user, having Java installed on your Mac is essential for accessing various applications and websites that rely on it.
In this tutorial, we will walk you through the step-by-step process of downloading and installing Java on your Mac. We will also show you how to verify the installation and configure Java settings if needed. Rest assured, the process is straightforward and can be completed in just a few minutes.
Before we dive into the steps, it is always a good idea to double-check if Java is already installed on your Mac. Macs usually come with a pre-installed version of Java, but it may not be the latest version. Checking the existing installation will help you determine if you need to download and install the latest version or simply update the current one.
Now that you have a brief background on why having Java on your Mac is important and the importance of checking for existing installations, let’s start with the first step: checking if Java is already installed on your Mac.
Step 1: Check if Java is already installed on your Mac
Before proceeding with the installation process, it’s essential to determine if Java is already installed on your Mac. Here’s a simple method to check:
-
Open the “Finder” application on your Mac by clicking on the magnifying glass icon located in the top-right corner of the menu bar. Alternatively, you can press the Command (⌘) and Spacebar keys simultaneously to open the Spotlight search.
-
In the search field, type “Terminal” and press Enter to open the Terminal application.
-
Once the Terminal window appears, enter the following command:
java -version -
Press Enter to execute the command.
If Java is already installed on your Mac, the Terminal will display the version number. This confirms the presence of Java on your system. However, if you receive an error message stating that Java is not installed, proceed to the next step to download and install it.
Keep in mind that the absence of Java on your Mac doesn’t necessarily mean that you cannot use any Java applications or websites, but it does limit your access to certain functionalities. Therefore, it’s recommended to have the latest version of Java installed to ensure compatibility and security.
Now that you know how to check if Java is already installed on your Mac, let’s move on to the next step: downloading Java from the official website.
Step 2: Download Java from the official website
Once you have confirmed that Java is not installed on your Mac or if you need to update to the latest version, you can proceed with downloading Java from the official website. Follow these steps:
-
Open your web browser and navigate to the official Java website, which is java.com.
-
On the homepage, you will see a prominent button that says “Java Download.” Click on this button to initiate the download process.
-
After clicking on the “Java Download” button, you will be redirected to the download page, where you will find additional information about the latest version of Java and its features.
-
Scroll down the page until you see a section titled “Java SE Development Kit.” Click on the “Download” button next to the version appropriate for your Mac operating system.
-
The download will start automatically, and you will be prompted to save the installation file. Choose a location on your Mac where you want to save the file and click “Save.”
-
Wait for the download to complete. The time it takes to download may vary depending on your internet connection speed.
Congratulations! You have successfully downloaded the Java installation file onto your Mac. Once the download is complete, you are ready to move on to the next step: installing Java on your Mac.
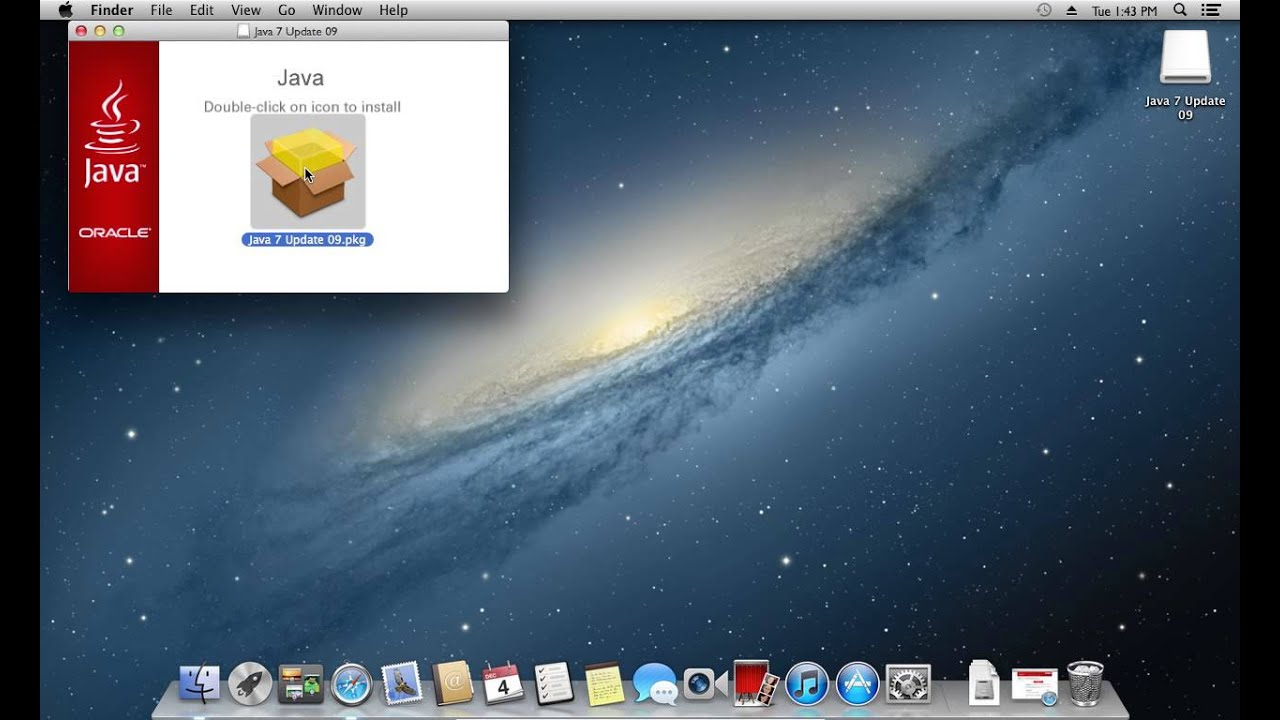
Step 3: Install Java on your Mac
After downloading the Java installation file onto your Mac, it’s time to proceed with the installation process. Follow these steps:
-
Navigate to the location where you saved the Java installation file. By default, it should be in your Downloads folder or the specified location you chose during the download.
-
Double-click the installation file to start the installation process. A new window will appear, guiding you through the installation steps.
-
Follow the on-screen instructions, carefully reading each step to ensure proper installation. You may be prompted to enter your administrator password to authorize the installation.
-
During the installation, you will have the option to customize the installation settings. It is recommended to keep the default settings unless you have a specific reason to customize them.
-
Wait for the installation to complete. The duration of the installation process will depend on your Mac’s performance and the version of Java being installed.
-
Once the installation is finished, you will receive a confirmation message indicating that Java has been successfully installed on your Mac.
That’s it! You have now successfully installed Java on your Mac. The latest version of Java is now ready for use, allowing you to run Java applications and access Java-based websites. However, before you start using Java, it’s essential to verify the installation, which we will cover in the next step.
Step 4: Verify the Java installation
After installing Java on your Mac, it’s important to verify that the installation was successful. This ensures that everything is functioning as expected and allows you to confirm that Java is ready to be used on your system. Follow these steps to verify the Java installation:
-
Open the Terminal application on your Mac. You can do this by searching for “Terminal” in the Spotlight search or navigating to Applications > Utilities > Terminal.
-
Once the Terminal window opens, enter the following command:
java -version -
Press Enter to execute the command. The Terminal will display the version number of Java installed on your Mac, along with additional information, if applicable.
If you see the Java version information displayed in the Terminal, congratulations! The installation was successful, and Java is now ready to be used on your Mac. You can now proceed with running Java applications or accessing Java-based websites without any issues.
However, if you receive an error message or if the Terminal does not display any Java version information, there may have been a problem with the installation. In such cases, it is recommended to repeat the installation process, ensuring that you follow each step accurately. If the issue persists, you can seek assistance from the Java community or the official Java support channels.
By verifying the Java installation, you can have peace of mind, knowing that everything is set up correctly and that you can make the most of the Java programming language on your Mac.
Step 5: Configure Java on your Mac, if needed
After verifying the Java installation on your Mac, you may need to configure certain settings based on your preferences or specific requirements. While the default configuration should work for most users, there are instances where customizing Java settings can enhance your experience or resolve compatibility issues. Follow these steps to configure Java on your Mac:
-
Open the “Finder” application on your Mac by clicking on the magnifying glass icon located in the top-right corner of the menu bar. Alternatively, you can press the Command (⌘) and Spacebar keys simultaneously to open the Spotlight search.
-
In the search field, type “Java Preferences” and press Enter to open the Java Preferences utility.
-
The Java Preferences window will now appear, displaying various tabs that allow you to configure Java settings.
-
Depending on your requirements, you can make adjustments to the following settings:
-
General: This tab allows you to manage the preferred order of Java versions, enable or disable Java in web browsers, and adjust network settings, among other options.
-
Security: This tab allows you to specify the security level for Java applets and applications, manage certificate authorities, and customize other security-related settings.
-
Java: This tab provides options to manage different Java runtime environments and their related settings.
-
-
Make the necessary changes based on your requirements by selecting the appropriate options or adjusting the sliders.
-
Once you have configured the settings to your satisfaction, close the Java Preferences window.
It’s important to note that modifying Java settings should be done with caution and only if there is a specific need. Changing these settings without proper understanding may lead to undesired consequences or security risks.
With the necessary configurations in place, you can now make the most of Java on your Mac, ensuring optimal performance and compatibility with Java applications and websites.
Conclusion
Congratulations! You have successfully learned how to download and install Java on your Mac. By following the step-by-step guide provided in this tutorial, you have set up the necessary foundation to run Java applications and access Java-based websites on your Mac.
We began by checking if Java was already installed on your Mac and guided you through the process of downloading Java from the official website. After that, we covered the steps to install Java on your Mac and verify the installation using the Terminal. Finally, we discussed the option to configure Java on your Mac, if needed, by accessing the Java Preferences utility.
Having Java installed on your Mac opens up a world of possibilities, allowing you to use a wide range of applications and services that rely on the Java programming language. Whether you are a developer working on Java-based projects or an end user accessing Java-powered websites, having Java at your disposal enhances your computing experience.
Remember, it’s important to keep Java up-to-date to ensure compatibility and to benefit from the latest security patches and bug fixes. Regularly check for updates and install them as they become available to maintain a secure and efficient Java environment on your Mac.
Thank you for following this guide on how to download Java on your Mac. We hope it has proven helpful in getting you started with Java on your Mac. Now, go ahead and explore the vast ecosystem of Java applications and websites that await you!