Introduction
Downloading a directory from GitHub can be a useful task when you want to access a specific set of files or folders from a repository. GitHub, a popular platform for version control and collaboration, allows users to share and store code. While downloading individual files from GitHub is straightforward, downloading an entire directory requires a slightly different approach.
In this article, we will guide you through the steps to download a directory from GitHub. Whether you need to access a collection of code files, documentation, or any other type of resource, we’ve got you covered. By following the instructions outlined below, you’ll be able to quickly and effortlessly obtain the desired directory from GitHub.
We will assume that you have a basic understanding of GitHub and are familiar with its user interface. If you haven’t used GitHub before, don’t worry – we’ll provide explanations and guidance along the way.
In the following sections, you will learn how to:
- Access the repository containing the directory you wish to download
- Navigate to the desired directory within the repository
- Download the directory to your local machine
- Extract the downloaded files to view and use them
By the end of this article, you will have the knowledge and confidence to successfully download directories from GitHub and leverage the power of the platform for your own projects and collaborations. Without further ado, let’s get started with the first step: accessing the repository.
Step 1: Accessing the Repository
The first step in downloading a directory from GitHub is to access the repository that contains the desired files. To do this, you’ll need to have a GitHub account and be logged in. If you don’t have an account, you can easily create one by visiting the GitHub website and following the signup process.
Once you’re logged in, navigate to the GitHub homepage. On the homepage, you’ll find a search bar where you can enter the name of the repository you’re looking for. Alternatively, you can browse through your own repositories or explore popular repositories using the “Explore” feature.
After locating the repository, click on its name to access its main page. Here, you’ll find valuable information such as the repository’s description, the number of stars it has received, and the most recent commit activity. Take a moment to familiarize yourself with the repository’s content and any relevant details provided by the repository owner.
At this point, you can explore the repository’s file structure by clicking on the “Code” tab. This will allow you to see the various folders and files within the repository. If the desired directory is at the root level of the repository, you can proceed to the next step. However, if the directory is nested within other folders, you’ll need to navigate to it in order to download it.
To navigate to the desired directory, simply click on the folders within the file structure displayed on the “Code” tab. This will open the folder and show its contents. Repeat this process as needed until you reach the target directory.
Once you are within the desired directory, you are ready to move on to the next step: downloading the directory. Proceed to the following section to learn how to accomplish this.
Step 2: Navigating to the Desired Directory
Now that you have accessed the repository containing the directory you wish to download, the next step is to navigate to the specific directory within the repository. This step is crucial as it ensures that you only download the relevant files and folders you need.
Once you are on the repository’s main page, click on the “Code” tab. Here, you will see the file structure of the repository, including all the folders and files it contains. Take a moment to familiarize yourself with the structure to locate the desired directory.
If the directory is located at the root level of the repository, you can simply click on it to access its contents. However, if the directory is nested within other folders, you will need to navigate through the file structure to find it.
To navigate to the desired directory:
- Click on the folders that lead to the desired directory.
- Each time you click on a folder, GitHub will update the file path displayed at the top of the file structure.
- Continue clicking on the necessary folders until you reach the target directory.
As you navigate through the file structure, keep an eye on the file path at the top of the page. This will help you keep track of your location within the repository and ensure you are on the right path to the desired directory.
It’s important to note that the file path will be different depending on whether you are on the repository’s main page or within a specific folder. This visual cue will help you confirm that you are within the correct directory before proceeding to download it.
Once you have successfully navigated to the desired directory, it’s time to move on to the next step: downloading the directory. We’ll cover this in detail in the following section.
Step 3: Downloading the Directory
After accessing and navigating to the desired directory within the GitHub repository, the next step is to download the directory to your local machine. GitHub provides a straightforward method for downloading directories, allowing you to obtain all the files and folders within the directory effortlessly.
To download the directory, follow these steps:
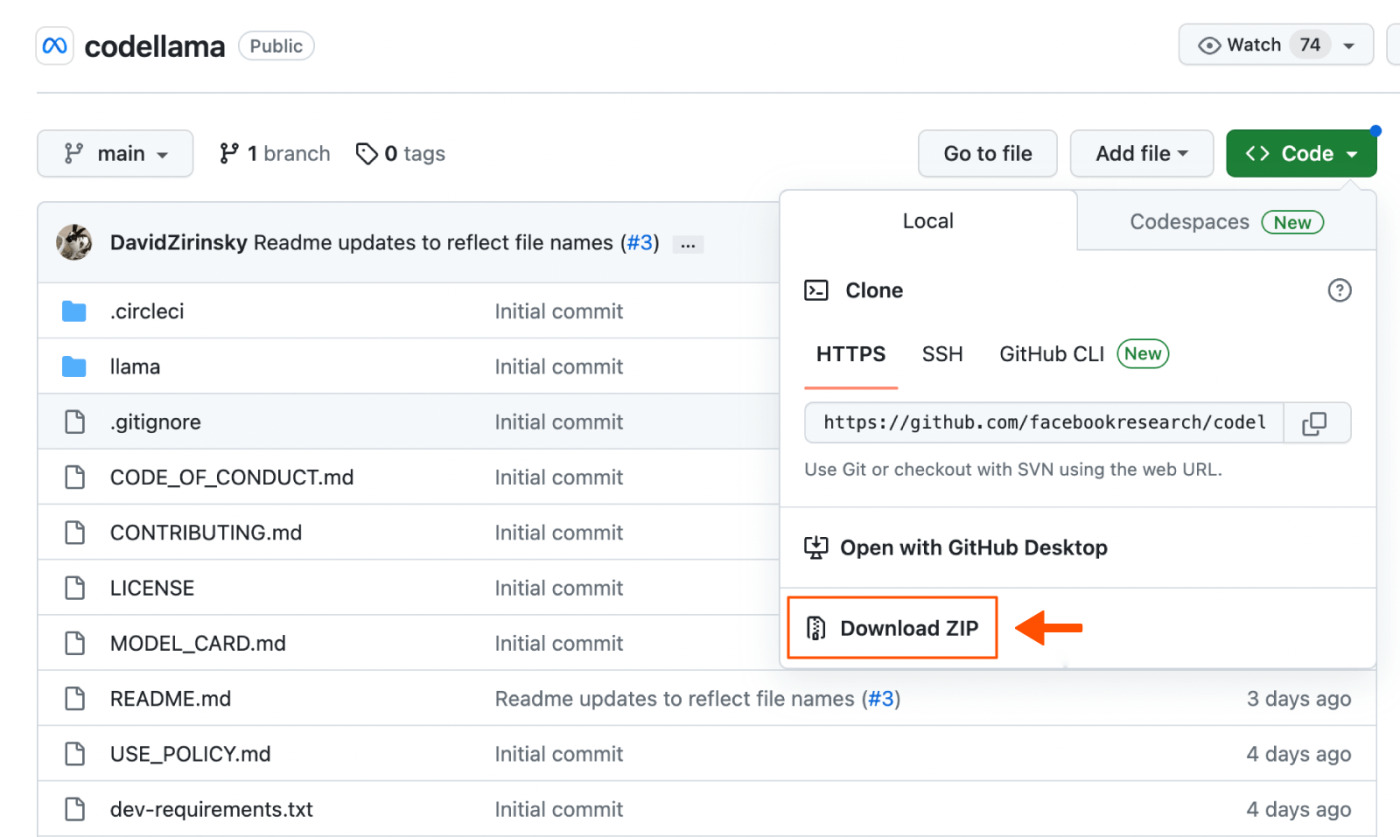
- Click on the green “Code” button located towards the top right of the file structure.
- A dropdown menu will appear, providing various options for cloning or downloading the repository.
- Click on the “Download ZIP” option from the dropdown menu.
GitHub will then generate a ZIP file containing the entire directory you’re downloading. This file will include all the files and subdirectories within the desired directory.
Once the ZIP file has been generated, your browser will prompt you to save the file to a specific location on your computer. Choose a suitable location and click “Save” to begin the download process.
Depending on the size of the directory and your internet connection speed, the download may take a few moments to complete. Once the download finishes, you will have a local copy of the directory on your machine.
It’s important to note that the downloaded ZIP file will retain the same structure as the original directory on GitHub. This means that all the files and subdirectories within the directory will be organized in the same way on your local machine.
With the directory successfully downloaded, it’s time to move on to the final step: extracting the downloaded files. In the next section, we’ll guide you through the process of extracting the files from the downloaded ZIP archive.
Step 4: Extracting the Downloaded Files
Now that you have downloaded the directory from GitHub to your local machine, the final step is to extract the files and folders from the downloaded ZIP archive. This process will allow you to access and work with the individual files within the directory.
To extract the downloaded files, follow these steps:
- Locate the downloaded ZIP archive on your computer. By default, the file will be saved in your computer’s “Downloads” folder or the location you specified during the download process.
- Right-click on the ZIP archive file.
- A menu will appear with various options. Select the option that says “Extract” or “Extract Here.” This will initiate the extraction process.
Depending on your operating system and the software you use for extracting ZIP archives, a new folder will be created containing the extracted files and folders from the directory.
Once the extraction is complete, you can open the newly created folder to view and interact with the files. From here, you can edit, compile, or use these files for any other purposes as needed.
It’s important to note that the extracted files will mirror the structure of the original directory on GitHub. Therefore, if the directory had subdirectories and nested files, these will be preserved in the extracted folder structure.
Now that you have successfully extracted the downloaded files, you can make use of them in your local environment. Whether it’s editing code, reviewing documentation, or any other purpose, the extracted files are now readily available for you to work with.
Congratulations! You have completed all the necessary steps to download a directory from GitHub and extract the contents on your local machine. With this knowledge, you can now easily access and utilize directories from GitHub repositories for your development or collaboration needs.
Conclusion
Downloading a directory from GitHub might seem like a complex task at first, but by following the steps outlined in this article, you can easily obtain the files and folders you need. GitHub provides a user-friendly interface that allows you to navigate repositories, locate the desired directory, and download it to your local machine.
In summary, the process involves:
- Accessing the repository that contains the directory you wish to download.
- Navigating through the repository’s file structure to find the specific directory.
- Downloading the directory as a ZIP file from the GitHub interface.
- Extracting the downloaded ZIP archive to access the individual files and folders.
By following these steps, you can efficiently retrieve directories from GitHub and leverage the resources within them for your own projects, collaborations, or learning purposes.
GitHub provides a rich ecosystem for version control and collaboration, allowing developers and individuals to work on projects more effectively. Being able to download directories from GitHub expands your access to valuable code, documentation, and other resources shared by the community.
Now that you have a clear understanding of the process, you can confidently download directories from GitHub and incorporate this valuable feature into your own workflow. Whether you are a beginner navigating through repositories or an experienced developer seeking specific files, this knowledge will save you time and effort.
Keep exploring and learning from the vast collection of resources available on GitHub, and enjoy the benefits of collaboration and open-source development!