Introduction
Welcome to the world of Garry’s Mod (Gmod), a sandbox game that enables players to create and manipulate virtual environments using a wide range of objects and tools. Gmod’s flexibility and endless possibilities have made it a favorite among gamers and content creators alike. However, one common challenge that Gmod players face is the lack of high-quality textures and models, which can greatly enhance the visual experience.
If you’re looking to take your Gmod creations to the next level, you’ve come to the right place. In this guide, we will show you how to download Counter-Strike: Source (CS Source) textures and incorporate them into your Gmod projects. By leveraging CS Source textures, you will gain access to a vast library of visually-stunning content that will elevate your Gmod scenes to new heights.
So why do you need CS Source textures for Gmod? The primary reason is that Gmod relies on the textures and models from other Source Engine games. CS Source is one such game that provides an extensive collection of high-definition textures, which can significantly enhance the visual fidelity of your Gmod creations. By downloading CS Source textures, you’ll have access to realistic surfaces, detailed objects, and immersive environments that can bring your Gmod scenes to life.
Whether you’re planning to build a realistic cityscape, create a post-apocalyptic wasteland, or design your dream house, having access to the CS Source textures will give you an edge in bringing your vision to reality. So, without further ado, let’s dive into the step-by-step process of downloading CS Source textures for Gmod.
Why download CS Source textures for Gmod?
Gmod is a fantastic game that offers endless possibilities for creativity and exploration. However, its default textures and models may not always provide the level of visual detail and realism that many players desire. This is where CS Source textures come in. Here are a few compelling reasons why you should consider downloading CS Source textures for Gmod:
1. Enhanced Visual Experience: CS Source textures offer a significant upgrade in terms of visual fidelity. With their detailed surfaces, realistic lighting, and intricate object designs, CS Source textures can make your Gmod world come to life with stunning realism. Whether you’re building a sprawling city, crafting a sci-fi environment, or constructing a cozy home, these textures will add a new level of immersion to your creations.
2. Access to a Vast Library of Textures: Counter-Strike: Source is known for its wide range of textures, covering various themes and settings. From urban landscapes and natural environments to industrial zones and futuristic settings, CS Source textures provide you with an extensive library of textures to choose from. This variety allows you to customize your Gmod scenes to match your creative vision.
3. Compatibility with Other Source Engine Games: Gmod is built on Valve’s Source Engine, and it shares many assets and resources with other Source Engine games. CS Source is one such game that utilizes the same engine, making its textures and models seamlessly compatible with Gmod. By downloading CS Source textures, you gain access not only to the CS Source content but also to a plethora of other Source Engine games’ textures that can be imported into Gmod.
4. Community Support and Customization: The Gmod community is vast and passionate, with many creators developing custom content for others to enjoy. By downloading CS Source textures, you align yourself with a community that frequently uses and shares these textures. This means that tutorials, add-ons, and resources related to CS Source textures are abundant, allowing you to expand your knowledge, learn new techniques, and enhance your Gmod creations even further.
5. Future-Proof Your Creations: Gmod is an evolving game, and as updates and new features are introduced, older textures and models may become outdated or unsupported. By incorporating CS Source textures into your Gmod projects, you future-proof your creations by utilizing high-quality assets that are less likely to be affected by updates and changes in the game.
With these compelling reasons in mind, it’s clear why downloading CS Source textures for Gmod is a worthwhile endeavor. Not only do they enhance the visual experience, but they also offer access to a vast library of textures, compatibility with other Source Engine games, community support, and future-proofing for your creations. So, let’s proceed to the step-by-step process of obtaining and integrating CS Source textures into your Gmod environment.
Step 1: Installing Counter-Strike: Source
The first step in obtaining CS Source textures for Gmod is to install Counter-Strike: Source on your computer. Counter-Strike: Source is a first-person shooter game developed by Valve Corporation, and it serves as the primary source of textures and models for Gmod.
If you already own a copy of Counter-Strike: Source, you can skip this step. However, if you don’t have the game, you will need to purchase it from a reputable online game store such as Steam. Counter-Strike: Source is often available as a standalone game or as part of Valve’s game bundle.
Once you have acquired Counter-Strike: Source, follow these steps to install it:
- Launch the Steam application on your computer and log in to your Steam account. If you don’t have a Steam account, you will need to create one.
- Click on the “Store” tab in the top navigation bar of the Steam application.
- In the search bar, type “Counter-Strike: Source” and press enter.
- From the search results, click on “Counter-Strike: Source” to access its store page.
- On the store page, click on the “Add to Cart” button and follow the prompts to complete the purchase.
- After successful purchase, go to the “Library” tab in the Steam application and locate “Counter-Strike: Source” in the list of games.
- Click on “Counter-Strike: Source” and then click the “Install” button to begin the installation process.
- Follow the on-screen instructions to complete the installation. This may take some time depending on your internet speed.
- Once the installation is complete, you will be able to launch Counter-Strike: Source from your Steam library.
With Counter-Strike: Source installed on your computer, you are now ready to proceed to the next step of downloading the CS Source textures for Gmod. Ensure that you have enough storage space on your computer, as the game installation will require several gigabytes of space.
Step 2: Searching and Downloading CS Source Textures
Once you have successfully installed Counter-Strike: Source, you can now search for and download the CS Source textures that you want to incorporate into your Gmod environment. To do this, follow the steps below:
- Launch your preferred web browser and search for “CS Source textures for Gmod” or similar keywords. This will provide you with a list of websites and forums that offer CS Source texture packs for Gmod.
- Explore the search results and visit reputable sources such as official Gmod forums, community websites, or trusted modding platforms. These sources often provide reliable and curated texture packs that have been tested by the community.
- Look for texture packs that are specifically labeled for Gmod compatibility. These packs have been modified and optimized for seamless integration into the Gmod environment.
- When you find a texture pack that suits your preferences, click on the download link provided. Ensure that the download source is reliable and free from any malware or malicious content. It’s always a good practice to have an updated antivirus software running on your computer.
- Depending on the website or platform, you may be redirected to a download page. Follow the instructions on the page to initiate the download. Some websites may require you to register an account or participate in their community before accessing the download link.
- Once the download is complete, locate the downloaded file on your computer. It is typically in a compressed (ZIP) format.
- Extract the contents of the ZIP file using a file extraction tool such as WinRAR or 7-Zip. This will create a folder containing all the CS Source texture files.
- Before proceeding, take note of the folder location where you extracted the CS Source texture files. You will need this information for the next step.
Remember, when downloading CS Source textures for Gmod, it’s crucial to ensure that you are obtaining the textures from reputable sources to avoid any potential issues or copyright violations. Always read user reviews and check the legitimacy of the sources before downloading any files.
Now that you have downloaded the CS Source textures, it’s time to organize and prepare them for integration into Gmod. Proceed to the next step to learn how to extract and organize the textures within your Gmod environment.
Step 3: Extracting and Organizing the Textures
After successfully downloading the CS Source textures for Gmod, the next step is to extract and organize them within your Gmod environment. Follow these steps to ensure that the textures are easily accessible and ready to be integrated:
- Locate the folder where you extracted the downloaded CS Source texture files.
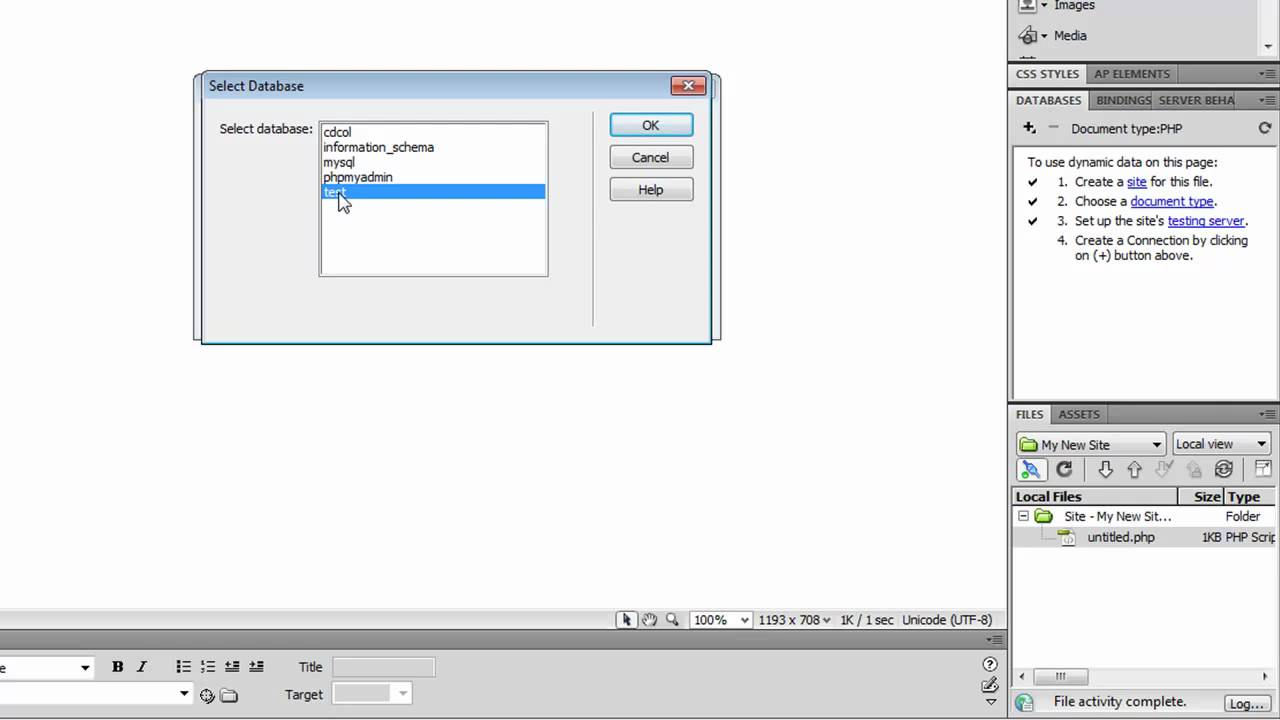
- Open another file explorer window and navigate to the directory where Gmod is installed. This is usually located in the “Steam\steamapps\common\GarrysMod” folder. If you have a different installation directory, adjust the path accordingly.
- Inside the Gmod folder, locate the “garrysmod” folder and open it.
- Within the “garrysmod” folder, you should see several subfolders such as “addons,” “materials,” and “models.” These folders store various resources for Gmod.
- Copy the extracted CS Source texture files from the folder you located in step 1.
- Paste the copied texture files into the “materials” folder within the “garrysmod” directory. This ensures that Gmod can access the textures properly.
- Take note that some texture packs may have additional instructions or specific folder structures. If provided, follow the instructions provided with the texture pack, placing the files in the correct locations accordingly.
- Once the files are successfully copied into the “materials” folder, you have completed the extraction and organization process.
By following these steps, you have now placed the CS Source textures in the appropriate location within your Gmod environment. This ensures that Gmod can access and utilize these textures when creating or modifying your scenes. With the textures properly organized, you are ready to proceed to the next step of transferring the textures to Gmod.
Step 4: Transferring Textures to Gmod
With the CS Source textures successfully extracted and organized within your Gmod environment, it’s time to transfer them to Gmod so that they can be utilized in your creations. Follow these steps to ensure a seamless transfer of textures:
- Launch the Steam application on your computer and log in to your Steam account.
- Click on the “Library” tab in the top navigation bar of the Steam application.
- Locate and right-click on “Garry’s Mod” in your game library.
- From the context menu, select “Properties.”
- In the Properties window, click on the “Local Files” tab.
- Within the Local Files tab, click on the “Browse Local Files” button. This will open the directory where Gmod is installed.
- Inside the Gmod installation folder, locate the “garrysmod” folder.
- Ensure that the “materials” folder within the “garrysmod” directory contains the CS Source texture files you previously organized.
- Close the file explorer window and return to the Steam application.
- Launch Gmod from your Steam library by clicking on the “Play” button.
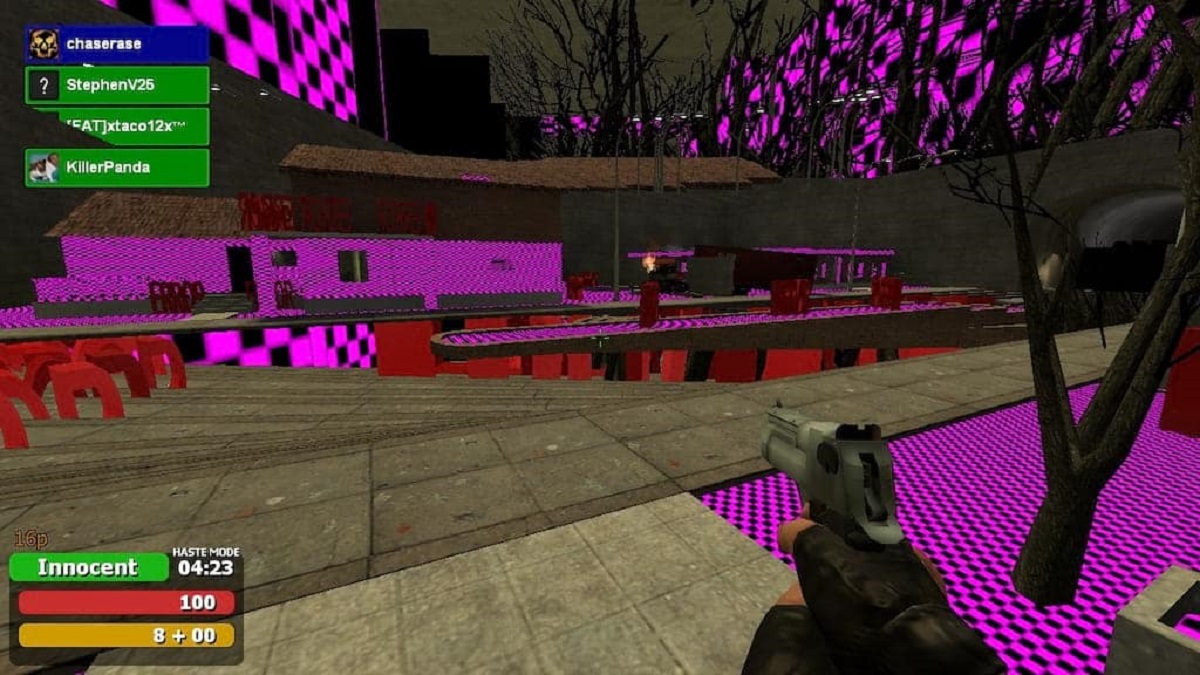
Once Gmod has launched, it should now recognize and utilize the CS Source textures you transferred. To test if the textures are successfully integrated, you can load a previously created scene or start a new one. Place objects or structures within the scene and observe if the textures appear as intended. If the textures do not appear, ensure that you correctly followed the previous steps and that the files are placed in the correct folders.
It’s important to note that occasionally, certain CS Source texture packs may require additional configuration or compatibility checks. Make sure to read any documentation or instructions that came with the texture pack to ensure proper integration with Gmod.
By following these steps, you have now successfully transferred the CS Source textures into your Gmod environment. You are now ready to test and refine your creations using the new set of high-quality textures.
Step 5: Testing and Troubleshooting
After transferring the CS Source textures to your Gmod environment, it’s essential to test and troubleshoot to ensure that the textures are working correctly. This final step ensures that your creations in Gmod showcase the desired visual enhancements. Follow these steps to test and troubleshoot your CS Source textures:
- Launch Gmod from your Steam library and load a scene or start a new one.
- Place objects or structures within the scene that utilize the CS Source textures. Pay attention to the details and visual quality of the textures.
- Move around the scene and observe how the textures react to lighting and shadows. Check if they appear realistic and seamless within the Gmod environment.
- If you encounter any issues or inconsistencies with the CS Source textures, such as missing textures, broken materials, or rendering errors, try the following troubleshooting steps:
- Ensure that you have placed the CS Source texture files in the correct folder within the Gmod directory (
garrysmod/materials) as outlined in the previous steps. - Check if the CS Source texture files have been extracted properly and are not corrupted or missing any necessary files. Re-extract the files if needed.
- Make sure that you have installed the latest updates for both Gmod and Counter-Strike: Source. Compatibility issues can sometimes arise with outdated versions.
- Verify that the CS Source texture files are compatible with the version of Gmod you are using. Some texture packs may be designed for specific Gmod versions.
- If the issues persist, consider checking for any conflicts with other mods or addons that you have installed in Gmod. Disable or remove conflicting modifications and test the CS Source textures again.
- Consult the Gmod community forums, websites, or social media groups for any reported issues or known fixes related to CS Source textures. Community support can often provide valuable insights and solutions.
- Continue testing your Gmod creations, paying attention to the textures’ performance, appearance, and integration with other elements within the scene.
By thoroughly testing and troubleshooting your CS Source textures in Gmod, you can ensure that your creations benefit from the enhanced visual experience provided by these textures. Don’t hesitate to reach out for support from the Gmod community if you encounter any persistent issues, as they can often provide helpful advice and solutions.
Conclusion
Congratulations! You have successfully learned how to download and integrate CS Source textures into your Gmod environment. By following the step-by-step process outlined in this guide, you now have access to a vast library of high-quality textures that can elevate the visual experience of your Gmod creations.
CS Source textures bring a new level of realism, detail, and immersion to your Gmod scenes. From realistic surfaces and intricate object designs to immersive environments, these textures allow you to unleash your creativity and bring your ideas to life. With the enhanced visual experience provided by CS Source textures, you can create stunning landscapes, detailed structures, and captivating scenes that will leave a lasting impression on your audience.
Remember to ensure that you download CS Source textures from reputable sources and follow any specific instructions provided with the texture packs. This will help you avoid any potential issues or copyright infringements while maintaining a high-quality and enjoyable Gmod experience.
Continue to explore and experiment with different CS Source texture packs, as well as other community-created addons, to further expand your creative possibilities in Gmod. Engage with the Gmod community, exchange ideas, and learn from others to enhance your skills and inspire new creations.
Now, armed with the knowledge of downloading and integrating CS Source textures, go forth and unleash your creativity in Gmod. Create breathtaking scenes, construct elaborate structures, and craft immersive worlds that will captivate and inspire players from around the globe. Let your imagination run wild and let the CS Source textures be the foundation of your visual masterpiece in the sandbox world of Garry’s Mod.