Introduction
Welcome to our guide on how to download an Amazon receipt. Whether you need to keep track of your purchases for personal records or for expense purposes, having a copy of your Amazon receipt can be incredibly useful. By following a few simple steps, you can easily access and download your receipt from your Amazon account, ensuring that you have a digital copy for your records.
Amazon is one of the most popular online marketplaces, offering a wide range of products, from electronics and household items to books and clothing. Whenever you make a purchase on Amazon, a receipt is generated, detailing the items you bought, the cost, and other relevant information. This receipt serves as proof of purchase and can be accessed from your account at any time.
In this guide, we will walk you through the step-by-step process of accessing and downloading your Amazon receipt. Whether you’re a regular Amazon shopper or just made a single purchase, retrieving your receipt is a straightforward process that can be completed in just a few minutes. So, let’s get started and learn how you can easily download your Amazon receipt!
Step 1: Log in to Your Amazon Account
The first step to downloading your Amazon receipt is to log in to your Amazon account. Open your preferred web browser and visit the Amazon website. If you don’t have an account yet, you will need to create one by clicking on the “New Customer? Start Here” link and following the prompts to set up your account.
Once you’re on the Amazon homepage, locate the “Sign In” button, usually found in the top right corner of the page. Click on it, and a login screen will appear. Enter your email address or phone number, as well as your password, and click on the “Sign In” button to access your account.
If you have trouble remembering your password, you can click on the “Forgot your password?” link on the login screen. Amazon will guide you through the process of resetting your password so that you can gain access to your account.
By logging in to your Amazon account, you will have access to all the features and settings necessary to download your receipt. Once you’re signed in, you can proceed to the next step in our guide.
Step 2: Go to Your Account Settings
After logging in to your Amazon account, the next step is to navigate to your account settings. To do this, look for the “Account & Lists” tab located at the top right corner of the Amazon homepage. Click on it, and a dropdown menu will appear.
In the dropdown menu, you will see various options related to your account. Look for and click on the “Your Account” option. This will take you to a new page where you can access and manage various settings and information related to your Amazon account.
On the “Your Account” page, you will find a list of different sections. Scroll down until you find the section labeled “Ordering and shopping preferences.” Under this section, you will see a link titled “Your Orders.” Click on this link to proceed to the next step.
If you’re having trouble locating the “Account & Lists” tab or navigating to the “Your Account” page, you can also try using the search bar on the Amazon homepage. Simply type in “Account Settings” or “Your Account,” and Amazon will provide you with relevant search results that will direct you to the desired page.
By reaching your account settings, you’re one step closer to accessing your Amazon receipt. Continue following our guide to learn how to find and download your receipt from your account.
Step 3: Access Your Orders
Once you’re on the “Your Account” page, it’s time to access your orders. Finding your orders will allow you to locate the specific purchase for which you need the receipt. There are a couple of ways to access your orders, depending on the layout of your account settings page.
If you are using the newer layout, you will find an “Orders” tab located near the top of the page. Click on this tab, and it will take you directly to your orders summary. Here, you will be able to see a list of your recent orders, sorted by date, along with order details such as the purchase date, items ordered, and the total amount.
For users with the older layout, look for the “Order History” section or a similar option on the “Your Account” page. Clicking on this section will take you to a page where you can view your order history and access individual order details.
Regardless of the layout, once you have accessed your orders, take a moment to locate the specific purchase for which you need the receipt. You can scroll through the list, use the search bar to search for specific keywords, or use the provided filters to narrow down your search based on date or other criteria.
By accessing your orders, you have identified the specific purchase for which you need the receipt. The next step is to open the order details to proceed with downloading your Amazon receipt.
Step 4: Locate the Order
After accessing your orders, the next step is to locate the specific order for which you need the receipt. This may be a recent purchase or one from your order history. Depending on the number of orders you have made, locating a specific order can be done using various methods.
If you remember the date of the purchase or have an idea of when it was made, you can scroll through the list of orders and locate it manually. The orders are typically listed in chronological order, with the most recent ones appearing at the top. As you scroll, keep an eye out for the order details or a brief summary of the items purchased.
If you have many orders and finding the specific one is proving challenging, you can use the search bar or filters available on the orders page. The search bar allows you to enter specific keywords related to the order, such as the product name, seller, or any unique identifier you may have. Amazon will then display the relevant orders based on your search query.
Alternatively, the filters on the orders page can help narrow down your search by criteria such as date, order status, or specific product categories. By applying filters, you can quickly locate the order you need without scrolling through a long list of purchases.
Remember to take your time and double-check the order details to ensure you have located the correct purchase. Once you have identified the order, proceed to the next step to open the order details and access your Amazon receipt.
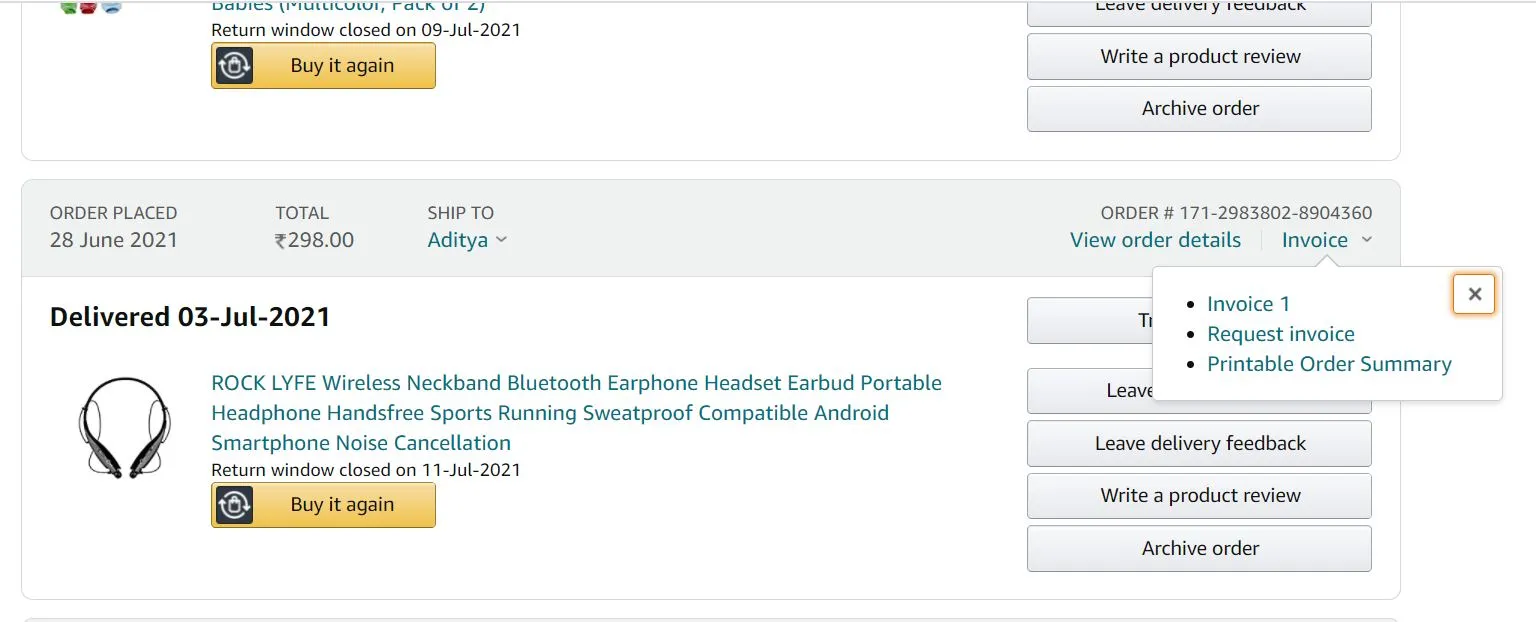
Step 5: Open the Order Details
Once you have located the specific order for which you need the receipt, the next step is to open the order details. Opening the order details will provide you with a comprehensive overview of your purchase, including the items ordered, shipping information, and payment details.
To open the order details, look for a clickable link associated with the order. This may be a link with the order number, the product name, or a button that says “Order Details” or something similar. Clicking on this link will take you to a new page or expand a section to display the order details.
On the order details page, you will find a summary of the order, usually including the order date, shipping address, and payment method. Below the summary, you will see a list of the items ordered, along with their prices and quantities. The order details page may also display additional information such as estimated delivery dates, tracking numbers, and any notes or messages related to the order.
It’s important to review the order details carefully to ensure that you have opened the correct order. Confirm that the items listed and the associated prices match what you intended to retrieve the receipt for. If everything looks correct, proceed to the next step to download your Amazon receipt.
Step 6: Download the Receipt
Now that you have opened the order details, you are ready to download your Amazon receipt. Downloading the receipt will provide you with a digital copy that you can save for your records or use for any necessary documentation.
On the order details page, look for a button or link that indicates the option to download or print the receipt. The wording may vary depending on the layout of the page, but it is typically labeled as “Download Receipt,” “Print Receipt,” or something similar. Click on this button or link to initiate the download process.
After clicking on the download or print option, your browser may prompt you to choose a location on your device to save the receipt. Select a suitable folder or directory on your computer, and click on the “Save” button to save the receipt in that location.
Alternatively, some browsers may automatically download the receipt to a default location, such as the “Downloads” folder on your computer. In such cases, check your downloads folder or the designated location where your browser saves downloaded files to find the receipt.
Once the download is complete, you now have a digital copy of your Amazon receipt. You can access it at any time from the saved location on your device, and you can also print a physical copy if needed for your records.
Make sure to double-check the downloaded receipt to ensure that all the necessary information is present and legible. If you encounter any issues with the download or need further assistance, Amazon’s customer support is available to help you resolve any concerns.
Step 7: Save the Receipt
After downloading your Amazon receipt, it is crucial to save it in a secure and easily accessible location. Saving the receipt ensures that you have a backup copy and can retrieve it whenever needed, whether for personal record-keeping or for expense reimbursement.
Start by choosing a suitable folder or directory on your device to store the receipt. It’s recommended to create a dedicated folder specifically for your Amazon receipts, making it easier to locate them in the future. You can name the folder something like “Amazon Receipts” or “Purchase Records.”
Next, move the downloaded receipt file into the designated folder. You can simply drag and drop the file into the folder, or use the “Cut” and “Paste” commands to move it. This ensures that the receipt is organized and stored in a unified location.
Consider using a cloud storage service like Dropbox, Google Drive, or iCloud to store your receipts. Uploading the receipt file to the cloud provides an additional layer of security and allows you to access it from different devices and locations. This can be particularly useful if you need to access your receipts while on the go.
Additionally, if you prefer physical copies or need to submit the receipt in hard copy format, consider printing out a version of the receipt. Ensure that your printer is calibrated correctly and that the receipt is printed clearly and legibly.
Remember to keep your saved receipts organized, especially if you make frequent purchases on Amazon. You can create sub-folders within your main “Amazon Receipts” folder to categorize receipts based on date, month, or other relevant criteria.
Saving your Amazon receipts in a secure and organized manner ensures that you have easy access to them when needed. It also helps maintain accurate financial records and streamlines the reimbursement process, if applicable.
By completing this final step, you have successfully downloaded and saved your Amazon receipt. Congratulations – you now have a digital copy at your fingertips, ready to be utilized whenever necessary!
Conclusion
Congratulations, you have successfully learned how to download an Amazon receipt! By following the step-by-step guide outlined above, you can easily access and save your purchase receipts from your Amazon account.
Remember, having a copy of your Amazon receipt is important for various reasons. It serves as proof of purchase, allows you to track your expenses, and is necessary for returns, refunds, or warranties. By knowing how to download and save your receipts, you can effortlessly maintain a record of your online purchases.
Throughout this guide, we walked you through the process of logging in to your Amazon account, accessing your account settings, locating and opening your orders, downloading the receipt, and saving it in a secure location. Following these steps ensures that you have a digital copy of your Amazon receipt readily available.
It’s important to note that downloading and saving your receipt should be done as soon as possible after making a purchase. This ensures that you have the necessary documentation in case of any issues or queries that may arise later on.
By staying organized and keeping your receipts in a dedicated folder or cloud storage, you can easily retrieve them when needed. This is especially useful when managing personal finances or if you need to reference a specific purchase in the future.
Now that you have mastered the process of downloading an Amazon receipt, you can confidently manage your account and keep track of your online purchases with ease. Remember to regularly update and backup your saved receipts to ensure their long-term accessibility.
Thank you for following this guide, and happy shopping on Amazon!