Introduction
Downloading your Amazon receipt is a simple process that allows you to keep a record of your purchases for personal or business purposes. Whether you need to track your expenses, file for reimbursement, or simply have a copy of your purchase details, having access to your receipts is essential.
In this guide, we will walk you through the step-by-step process of how to download your Amazon receipt. You don’t need to be a tech expert to follow along; the steps are straightforward and easy to understand. By the end of this guide, you’ll have all the necessary information to retrieve and save your Amazon receipts hassle-free.
Before we dive into the steps, it’s important to note that you will need an Amazon account and login credentials. If you don’t have an account yet, you can easily create one by visiting the Amazon website and following their sign-up process. Now, let’s get started on downloading your Amazon receipts!
Step 1: Go to the Amazon website
The first step to downloading your Amazon receipt is to visit the official Amazon website. Open your preferred web browser and type in “www.amazon.com” in the address bar. Alternatively, you can use your preferred search engine and search for “Amazon” to find the website.
Once the website is loaded, you will be greeted with the Amazon homepage. Take a moment to familiarize yourself with the layout and the various options available. The Amazon homepage is where you can access all the features, including your orders and receipts.
Now that you’re on the Amazon website, you’re ready to move on to the next step and log into your Amazon account. If you’re not logged in already, look for the “Sign In” button located at the top right corner of the page. Click on it to proceed.
Remember, if you don’t have an Amazon account yet, you’ll need to create one before you can download your receipt. Thankfully, setting up an account is quick and easy, and you’ll be able to access all the benefits of being an Amazon customer.
With Step 1 complete, you’re well on your way to downloading your Amazon receipt. Let’s continue to the next step and log into your Amazon account in Step 2.
Step 2: Log into your Amazon account
Logging into your Amazon account is essential in order to access your order history and retrieve your receipts. If you haven’t already, click on the “Sign In” button located at the top right corner of the Amazon homepage.
You will be redirected to the Amazon Sign-In page, where you can enter your email address or mobile phone number associated with your Amazon account. After entering your login information, click on the “Continue” button to proceed.
If you have an Amazon Prime account, you can click on the “Prime” button to access your Prime benefits and enjoy free, expedited shipping on eligible items. However, for the purpose of this guide, we will focus on accessing your receipts through a regular Amazon account.
If you’re logging in from a public or shared computer, make sure to uncheck the “Keep me signed in” box to ensure the security of your account. On your personal devices, you can check this box to stay signed in, making future logins quicker and more convenient.
Once you have entered your login credentials and clicked on “Continue,” Amazon will verify your account information. If everything is correct, you will be logged into your Amazon account, and you’ll be ready to proceed to the next step to access your order history and find your receipt.
With Step 2 completed, you’re now successfully logged into your Amazon account. Let’s move on to Step 3, where we will explore how to access your orders.
Step 3: Go to Your Orders
Once you are logged into your Amazon account, it’s time to navigate to the “Your Orders” section. This is where you can find a comprehensive list of all your past purchases, including the receipts.
To access your orders, hover your cursor over the “Account & Lists” option located at the top right corner of the Amazon homepage. A drop-down menu will appear, and you need to click on “Your Orders” from the available options.
Upon clicking “Your Orders,” you will be redirected to the Orders page, which displays a list of all your recent purchases. The most recent order will be displayed at the top, with previous orders listed chronologically below.
If you have numerous orders, you can use the search bar at the top of the page to quickly find a specific order. Simply enter keywords related to the item, order number, or any other relevant details to filter your search results.
It’s important to note that if you have multiple Amazon accounts, you need to make sure you are accessing the correct account to ensure you can find the receipt you’re looking for.
Now that you’ve successfully reached the “Your Orders” page, you’re ready to move on to the next step and locate the specific order for which you need the receipt. Let’s proceed to Step 4.
Step 4: Locate the order you need the receipt for
Now that you’re on the “Your Orders” page, it’s time to locate the specific order for which you need the receipt. This is crucial, as Amazon provides receipts for each individual order.
The “Your Orders” page will display a list of your recent purchases, with the most recent order at the top. Scan through the list and visually locate the order you need the receipt for. You can look for specific details like the item name, order date, or order number to identify the correct order.
If you have a long list of orders and are having trouble finding the right one, you can use the search bar at the top of the page to filter the results. Enter keywords related to the item or any relevant details to narrow down your search and quickly locate the desired order.
Once you have successfully identified the order you need the receipt for, you’re ready to move on to the next step and access the invoice or order details, which will allow you to download the receipt. Let’s proceed to Step 5.
Step 5: Click on “Invoice” or “Order Details”
After locating the specific order you need the receipt for, it’s time to access the invoice or order details page, where you can find the option to download the receipt.
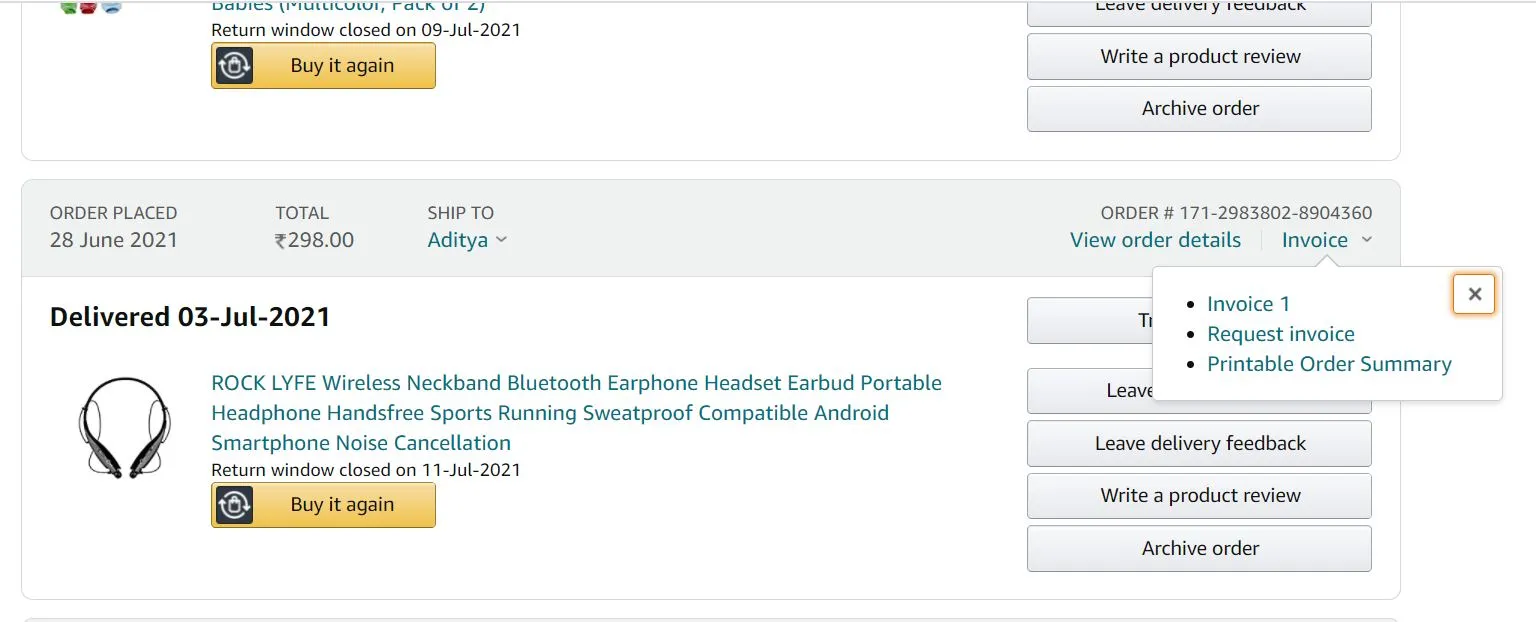
On the “Your Orders” page, find the order you want the receipt for and look for the options next to it. Depending on the order status and the specific details provided by the seller, you will see either an “Invoice” button or an “Order Details” button.
If you see an “Invoice” button, click on it to proceed. This will directly take you to the invoice page, where you can view and download the receipt for the selected order.
If there is no “Invoice” button, look for the “Order Details” button instead. Clicking on this button will redirect you to the order details page, which contains comprehensive information about your purchase. On this page, you will find the option to download the receipt.
It’s worth noting that some orders may not have the option to download an invoice or receipt. This can occur for various reasons, such as the item being a digital product or the seller not providing formal invoices.
After clicking on the appropriate button, wait a moment for the page to load. Once it loads, you will have access to the invoice or order details with the option to download the receipt. In the next step, we’ll show you how to download the receipt for your records.
Step 6: Download the receipt
Now that you have accessed the invoice or order details page, it’s time to download the receipt for your selected order. The process may vary slightly depending on whether you are viewing the invoice or the order details.
If you are on the invoice page, look for the option to download the receipt. It is usually located at the top or bottom of the page, labeled as “Download” or “Print.” Click on this option to initiate the download process.
If you are on the order details page, scroll down until you find the section that contains the receipt information. Look for a similar option to download or print the receipt. Click on this option to begin the download.
Once you click on the download or print option, your browser will prompt you to choose the download location on your device. Select a suitable location where you can easily find the receipt later, such as your desktop or a designated folder.
After selecting the download location, click “Save” or “Download” to initiate the actual download process. Depending on the size of the file and your internet connection speed, the download may take a few seconds to complete.
Once the download is finished, navigate to the download location you selected earlier. You will find the receipt file saved in PDF format. You can now access, view, and print the receipt as needed.
With Step 6 complete, you have successfully downloaded the receipt for your selected order. In the next step, let’s ensure you save the receipt for your records.
Step 7: Save the receipt for your records
After downloading the receipt, it’s important to save it for your records to ensure easy access and organization. By keeping your receipts neatly organized, you can easily refer back to them whenever necessary, whether for personal budgeting, expense tracking, or tax purposes.
Start by creating a dedicated folder on your computer or cloud storage platform specifically for your Amazon receipts. This will help you keep them separate from other documents and easily locate them when needed.
Once you have created the folder, move the downloaded receipt file into it. If you prefer a physical copy, you can also print the receipt and store it in a designated file or binder along with other important documents.
To further streamline the process, consider renaming the receipt file with a descriptive name that includes the order number, item name, and date. This will make it easier to identify the receipt at a glance, especially if you have multiple receipts to manage.
Additionally, if you use a cloud storage service like Google Drive or Dropbox, consider uploading a backup of your receipt to the cloud. This will provide an extra layer of security and accessibility, allowing you to access your receipts from anywhere with an internet connection.
Remember to periodically update your receipt folder and remove any outdated or unnecessary receipts. This will help you maintain a clutter-free record of your Amazon purchases.
By following these steps and saving your Amazon receipts in an organized manner, you can ensure that you have easy access to your purchase records whenever you need them.
Congratulations! You have successfully completed all the steps to download and save your Amazon receipt. By following this process, you can maintain a well-organized record of your purchases and easily access your receipts whenever required.
Conclusion
Downloading your Amazon receipt is a simple yet essential process that allows you to keep track of your purchases and maintain organized records. By following the step-by-step guide outlined in this article, you can easily access and download your receipts for personal or business purposes.
Starting with visiting the Amazon website and logging into your account, you can navigate to the “Your Orders” section to locate the specific order you need the receipt for. Clicking on the “Invoice” or “Order Details” button will then lead you to the page where you can download the receipt.
Once downloaded, it’s important to save the receipt in a dedicated folder on your computer or cloud storage platform. Creating an organized system will make it easier to access and manage your receipts in the future, ensuring that you have a well-maintained record of your purchases.
Remember that Amazon provides receipts for individual orders, and it’s a good practice to periodically review and remove any unnecessary or outdated receipts from your records. This will help you maintain a clutter-free collection of essential documents.
With this guide, you now have the knowledge and understanding to confidently download and save your Amazon receipts. Whether you need them for budgeting, tax purposes, or reimbursement, having organized receipts will prove invaluable.
So, the next time you make a purchase on Amazon, follow these steps to retrieve and save your receipt. By doing so, you’ll have peace of mind knowing that your purchase records are easily accessible and well-organized.
Happy shopping and organizing your Amazon receipts!