Introduction
When browsing the internet, you may come across captivating images on Google that you want to save for later use. Whether it’s a stunning landscape, a mouth-watering recipe, or an inspirational quote, downloading Google images is a quick and simple process. In this article, we will guide you through the steps to download images from Google with ease.
Utilizing the power of Google Images allows you to find a wide range of pictures and visuals, making it an invaluable resource for various purposes such as blog posts, presentations, or personal collections. Whether you’re a professional graphic designer or a casual internet user, knowing how to download Google images is a valuable skill.
By following the steps outlined in this guide, you’ll be able to save any image you find on Google and have it readily available for offline viewing or using in your own projects. The process is straightforward and doesn’t require any specialized software or technical knowledge. So let’s get started on learning how to download a Google image!
Step 1: Open Google Images
The first step in downloading a Google image is to open Google Images in your preferred web browser. To do this, open a new tab and type “Google Images” in the search bar. Press Enter or click on the search icon to proceed.
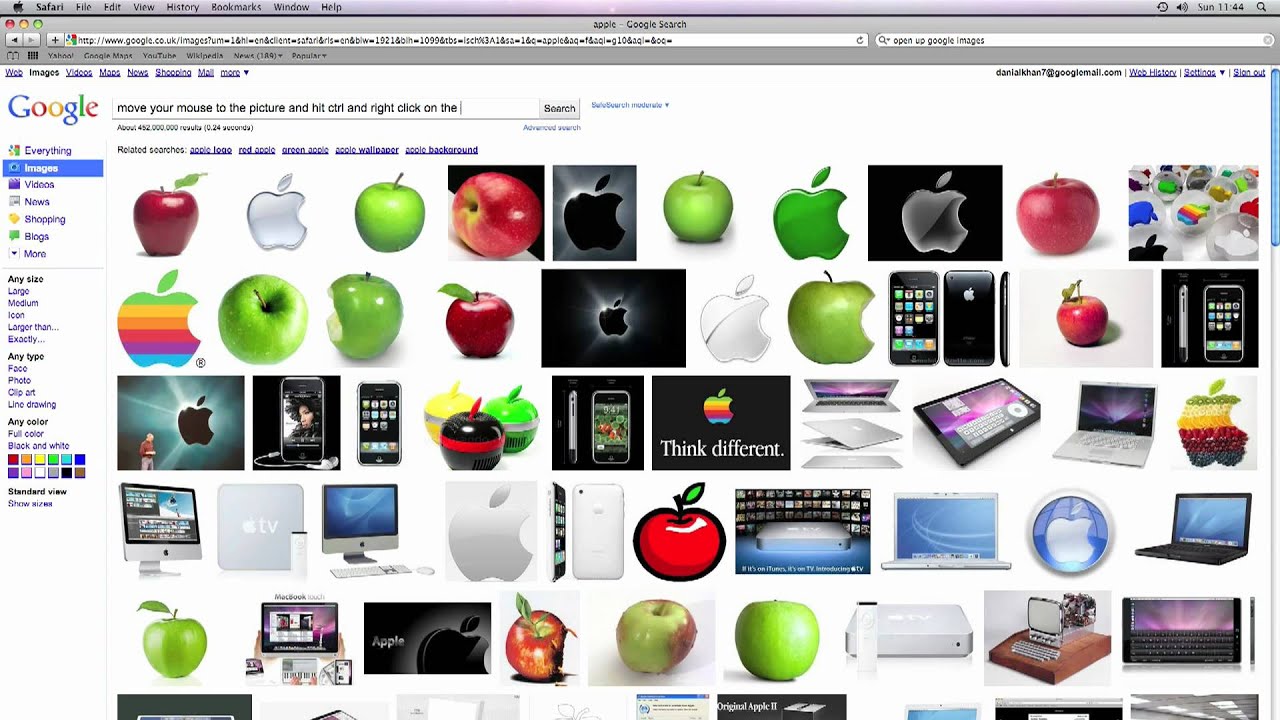
Once the Google Images page loads, you will see a search box with a magnifying glass icon at the top. This is where you can enter your search query to find the desired image. Google Images offers a vast collection of pictures from various sources, making it the go-to platform for finding high-quality images.
Google Images is designed to be user-friendly and intuitive, featuring a clean and simple interface. The search results page will display a grid of images related to your search query. You can scroll through the images and see a preview of each one.
In addition, Google Images provides various filtering options on the left-hand side of the page, allowing you to refine your search based on image size, color, type, and usage rights. These options can be helpful if you have specific criteria in mind for the image you’re looking for.
Once you have familiarized yourself with the Google Images interface, you are ready to move on to the next step and search for the specific image you want to download. Remember to use relevant keywords in your search to narrow down the results and find exactly what you’re looking for.
Now that we have successfully opened Google Images and are ready to search for our desired image, let’s move on to the next step.
Step 2: Search for the Desired Image
Now that Google Images is open, it’s time to search for the image you want to download. Using the search box at the top of the page, enter keywords or a specific description related to the image you’re looking for.
For example, if you’re searching for a picture of a beach sunset, you can type “beach sunset” into the search bar. Google Images will then display a grid of images that match your search query.
Take your time to browse through the search results and look for the image that catches your eye. You can scroll through the images, and Google Images will automatically load more images as you reach the bottom of the page.
If you have a specific image in mind or are looking for an image from a particular source, you can also include additional search parameters. For example, if you want to find a beach sunset image taken in Hawaii, you can search for “Hawaii beach sunset” to find more specific results.
Google Images also provides the option to filter your search results by size, color, type, and usage rights. These filters can help you find images that match your criteria and are suitable for your intended use.
Once you have found the desired image, you’re ready to proceed to the next step and enlarge the image for a closer look.
In the next step, we will learn how to click on the image to enlarge it for a better view.
Step 3: Click on the Image to Enlarge It
After finding the image you want to download, you will need to click on it to enlarge it for a closer look. This step allows you to view the image in a larger size and ensures that you are downloading the correct image.
To enlarge the image, simply click on it. Google Images will open a preview window or a new tab with the image displayed at a larger size. This preview window provides additional information about the image, such as its dimensions, file format, and the website it appears on.
By enlarging the image, you can carefully examine its details, check its quality, and make sure it meets your requirements. This step is particularly important if you plan to use the image for professional or commercial purposes.
As you view the enlarged image, you can use the scroll bars or the mouse scroll wheel to navigate through the image if it doesn’t fit entirely within the preview window. This allows you to explore different sections of the image and ensure that it meets your needs.
Additionally, the enlarged image may provide options for further actions, such as downloading or sharing the image directly from the preview window. These options can vary depending on the source of the image and the permissions associated with it.
Once you have confirmed that the enlarged image is the one you want to download, you’re ready to proceed to the next step and save it to your device or computer.
In the following step, we will guide you through the process of right-clicking on the image in order to access the download options.
Step 4: Right-click on the Image
After enlarging the image, the next step in downloading a Google image is to right-click on it. Right-clicking on the image will open a context menu that provides various options, including the ability to save the image to your device.
To right-click on an image, position your cursor over the enlarged image and press the right mouse button. This will trigger the context menu to appear, displaying a list of actions you can take related to the image.
When right-clicking on a Google image, you will notice different options in the context menu, depending on your web browser and operating system. However, in most cases, you will find an option similar to “Save Image As” or “Save Picture As.”
It’s important to note that some web pages and image sources may have disabled the right-click function to prevent users from downloading or saving their images. In such cases, you may need to explore alternative methods to download the image, such as using browser extensions or specialized software.
However, for the majority of images on Google, right-clicking will typically provide the option to save the image directly from the context menu without any additional steps.
In the next step, we will guide you through the process of choosing the “Save Image As” option and selecting the destination folder on your device.
Step 5: Choose “Save Image As”
After right-clicking on the image, a context menu will appear with a list of options. Look for the option that says “Save Image As” or a similar variation, such as “Save Picture As” or “Download Image.
Once you find the appropriate option, click on it to initiate the image download process. Choosing this option will prompt your web browser to open a file-saving dialog box.
The file-saving dialog box allows you to specify the location on your device where you want to save the image. By default, the dialog box will open to the last folder location where you saved a file, but you can navigate to a different folder if desired.
Before saving the image, it’s a good practice to rename the file to something descriptive and meaningful. The downloaded image may have a generic name, such as “image.jpg,” which can make it challenging to find later. Renaming the file to something relevant will help you locate it more easily in the future.
When choosing the name for the image file, ensure you use alphanumeric characters and avoid any special characters or symbols that may cause issues with file compatibility. Additionally, be mindful of the file format of the image, such as JPEG (jpg), PNG, or GIF, and choose an appropriate file extension.
Once you have selected the desired destination folder and renamed the image file (if desired), click the “Save” button to begin the download process. Your web browser will then start downloading the image and provide an indication of the download progress.
It’s important to note that the time it takes to download an image will depend on its size and the speed of your internet connection. Larger images may take longer to download, especially if you have a slower internet connection.
In the next step, we’ll discuss how to select the ideal destination folder for saving your downloaded Google image.
Step 6: Select the Destination Folder
After choosing “Save Image As” and initiating the download process, a file-saving dialog box will appear on your screen. In this step, you need to select the destination folder where you want to save the downloaded Google image.
The file-saving dialog box typically displays the current location, which is the last folder you saved a file in. However, you can navigate to a different folder by clicking on the folder icons or using the navigation bar at the top of the dialog box.
It is important to choose a destination folder that is easily accessible and organized. Consider creating a dedicated folder specifically for downloaded images if you frequently download images from the internet.
To create a new folder within the file-saving dialog box, click on the “New Folder” button or use the relevant option provided by your operating system. Give the new folder a descriptive name that reflects its purpose or content.
Furthermore, when selecting the destination folder, take into account the file management system on your device. It is wise to choose a location that you can remember and access conveniently later.
Keep in mind that if you already have images in the selected folder with the same name as the downloaded image, your operating system may prompt you to confirm whether you want to replace the existing file or keep both files with different names. Make sure to select the appropriate option based on your needs.
Once you have selected the destination folder, click the “Save” button to finalize the download process. The image will then be saved to the specified folder on your device.
Now that you have chosen the destination folder for your downloaded Google image, you’re ready to move on to the next step and consider renaming the image file, if necessary.
Step 7: Rename the Image (If Desired)
After selecting the destination folder for your downloaded Google image, you have the option to rename the image before saving it. Renaming the image file can help you easily identify and organize it later.
When you save an image from Google, it often comes with a default name, which may not accurately describe the content of the image. Renaming the file can make it more meaningful and memorable, especially if you plan to use it for a specific purpose.
To rename the image file, locate the downloaded file in the destination folder. Right-click on the file and select the “Rename” option from the context menu. Alternatively, you can click once on the file to select it and press the F2 key on your keyboard to enable renaming mode.
Type in a new name for the image file, ensuring it is descriptive and relevant. For example, if the image displays a beautiful sunset over a beach, you can rename it as “Beach_Sunset.jpg” to accurately represent its content.
It’s important to be mindful of any special characters or symbols that your operating system may not allow in file names. Stick to alphanumeric characters and underscores, avoiding spaces or other unusual characters that could potentially cause issues with compatibility or file management.
Renaming the image file also offers additional benefits, such as improved searchability and organization. By giving the image a specific name, you can easily locate it later using your device’s search functionality or through manual browsing.
Once you have entered the desired name for the image file, press Enter or click outside the file to save the new name. The image will now be saved in the destination folder with the updated file name.
In the next step, we will discuss the final action required to complete the image download process.
Step 8: Click “Save”
After selecting the destination folder and, if desired, renaming the image file, the final step to complete the download process is to click the “Save” button.
Located in the file-saving dialog box, the “Save” button confirms your selection and saves the image to the specified folder on your device.
Double-check that the destination folder and the image file name are correct before proceeding. If you need to make any changes, you can go back to the previous steps to adjust the folder location or rename the file.
Once you are confident in the selected folder and file name, click the “Save” button to initiate the image download. Your web browser will then start saving the image to the specified folder.
The time it takes to save the image will depend on the image size and the speed of your internet connection. Smaller files typically save quickly, while larger images may take more time.
As the image is being saved, you may see a progress indicator or a notification showing the download status. Once the download is complete, you can close the file-saving dialog box and access the downloaded image in the specified folder.
It is important to note that the image is now saved on your device, allowing you to use it for various purposes such as sharing, editing, or including it in your projects.
If you intend to use the downloaded image for commercial purposes or on a public platform, make sure to respect any copyright or licensing restrictions associated with the image. Always attribute the image to the appropriate source or obtain necessary permissions if required.
Congratulations! You have successfully downloaded a Google image by following these step-by-step instructions.
Conclusion
Downloading images from Google is a straightforward process that allows you to save captivating visuals for personal or professional use. By following the steps outlined in this guide, you can quickly and easily download Google images to your device.
We started by opening Google Images, a vast repository of images from various sources. Then, we learned how to search for the desired image by entering relevant keywords and utilizing the filtering options to narrow down the results.
After finding the image, we clicked on it to enlarge it and get a closer look. This step ensured that we were downloading the correct image that meets our requirements.
Next, we right-clicked on the image to initiate the download process. By choosing the “Save Image As” option from the context menu, we were able to select the destination folder where the image would be saved.
If desired, we had the option to rename the image file to make it more descriptive and easily identifiable later on. Renaming the file can help with organization and easier searchability.
Finally, we clicked the “Save” button to complete the download process. The image was then saved to the specified folder on our device, accessible for further use and manipulation.
Remember to always respect the copyright and licensing restrictions associated with the downloaded images. If you plan on using the image for commercial purposes or on public platforms, ensure proper attribution and permissions are obtained.
Now that you are equipped with the knowledge of how to download Google images, you can explore and collect a wide variety of visuals to enhance your projects, presentations, or personal collection.
So, go ahead and start downloading those stunning images from Google to bring your creative vision to life!


