Introduction
When working with Google Docs, you might come across the need to download an image that is embedded within the document. Whether it’s for personal use or to include in another project, downloading an image from a Google Doc is a straightforward process. In this article, we will guide you through the steps to download an image from a Google Doc, ensuring that you have a copy of the image saved to your device.
Google Docs is a web-based word processing tool that allows users to create, edit, and store documents online. It offers a user-friendly interface with a range of features for collaborative work. One feature that sets Google Docs apart is the ability to insert and manipulate images directly within the document. However, the process of downloading those images may not be immediately apparent to all users.
Downloading an image from a Google Doc becomes necessary when you want to use the image outside of the document itself. Perhaps you need the image for a presentation, a website, or simply want to have a local copy for safekeeping. Whatever the reason may be, we will walk you through the steps to save the image from the Google Doc.
Please note that you should only download images from Google Docs for personal or fair use, and not for any illegal or unethical purposes.
Step 1: Open the Google Doc
The first step in downloading an image from a Google Doc is to open the document. To do this, you will need to have access to the Google Doc either through your Google Drive or by using a shared link.
If the Google Doc is in your Google Drive, you can easily locate and open it by following these steps:
- Go to the Google Drive website (drive.google.com) and sign in to your Google account if prompted.
- Navigate to the folder where the Google Doc is located, or use the search bar at the top to search for the document by name.
- Once you have found the Google Doc, click on it to open it in a new browser tab.
If you have been given a shared link to the Google Doc, you can open it by following these steps:
- Click on the shared link provided to you, and a new browser tab will open.
- If you are not already signed in to your Google account, you may be prompted to do so.
- After signing in, the Google Doc will open in the new tab, and you can proceed to the next step.
Once the Google Doc is open, you will be able to view the contents of the document, including any embedded images. In the next step, we will guide you on how to locate the specific image that you want to download.
Step 2: Locate the image
Now that the Google Doc is open, you need to locate the image that you want to download. Google Docs allows you to insert images anywhere within the document, so it’s important to identify the specific image you wish to save.
To locate the image within the Google Doc, follow these steps:
- Scroll through the document and visually locate the image you want to download.
- If the image is not immediately visible, you may need to explore further within the document. Images can be placed within tables, paragraphs, or even floated alongside text.
- If the document is lengthy and contains multiple images, you may find it helpful to use the navigation panel on the left-hand side of the screen. This panel displays an overview of the document and allows you to quickly jump to different sections.
Keep in mind that the image within the Google Doc may be resized or adjusted to fit the document’s layout. As a result, the image may not appear in its original dimensions. However, when you download the image, it will be saved in its original form.
Take a moment to carefully examine the document and ensure that you have identified the correct image. Once you are confident that you have located the image you wish to download, proceed to the next step.
Step 3: Right-click on the image
Now that you have located the image you want to download from the Google Doc, the next step is to right-click on the image. By doing so, you will reveal a context menu that contains various options, including the option to save the image to your device.
To right-click on the image, follow these steps:
- Position your cursor over the image. The cursor should change to indicate that it is hovering over an image element.
- Once the cursor is positioned correctly, right-click on the image. If you are using a touchpad or a device with touch input, you may need to perform a long-press on the image instead of a right-click.
When you right-click on the image, a context menu will appear. The specific options in the menu may vary depending on the browser you are using and the device you are using it on. However, one common option you should see is “Save image as” or a similar prompt.
Proceed to the next step to learn how to save the image from the context menu.
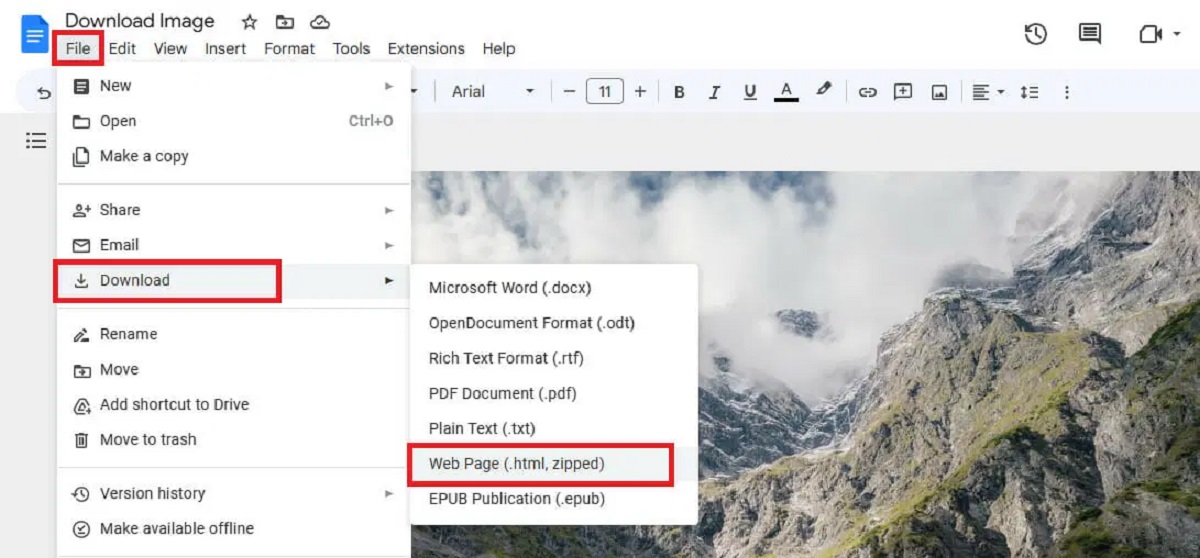
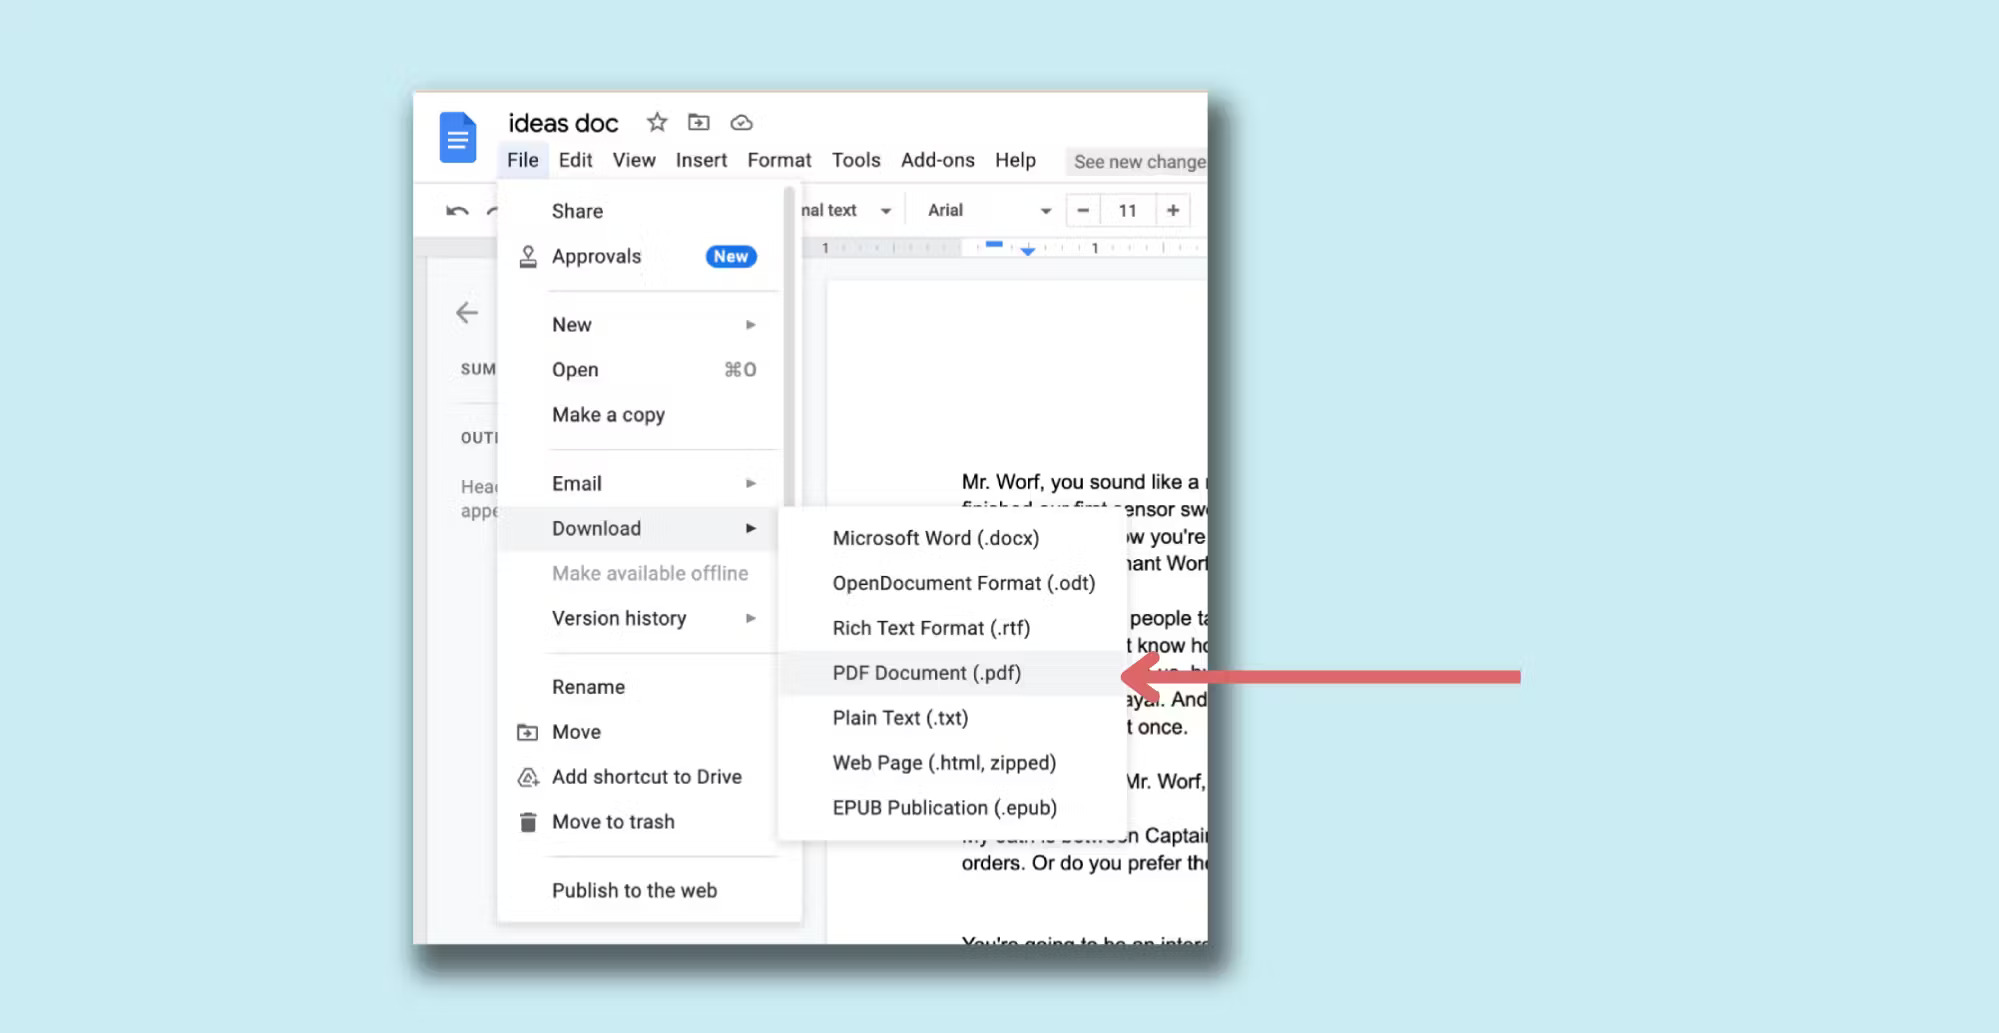
Step 4: Select ‘Save image as’
After right-clicking on the image in the Google Doc, a context menu will appear with several options. One of these options, typically towards the top of the menu, is “Save image as” or a similar prompt.
To save the image using the “Save image as” option, follow these steps:
- From the context menu that appears after right-clicking on the image, move your cursor over the “Save image as” option. This action will highlight the option, indicating that it is ready to be selected.
- Click on the “Save image as” option to initiate the saving process. Depending on your browser and device, you may also see a keyboard shortcut or alternative option to save the image.
By selecting the “Save image as” option, you instruct the browser to download and save the image file to your device. This action prompts a dialogue box, allowing you to specify a location on your computer or other device where you want to save the image.
Proceed to the next step to learn more about choosing the appropriate location to save the image.
Step 5: Choose the location to save the image
After selecting the “Save image as” option from the context menu, a dialogue box will appear, allowing you to choose the location on your device where you want to save the image. This step gives you the opportunity to organize your files and ensure that the image is easily accessible.
To choose the location to save the image, follow these steps:
- The dialogue box that appears after selecting “Save image as” typically displays your device’s file system, presenting a list of folders and directories.
- Navigate through the file system to find the desired location where you want to save the image.
- If you have a specific folder in mind, you can click on it to select it as the destination for the downloaded image.
- If you prefer to save the image to your device’s default download location, you can often accomplish this by simply clicking the “Save” or “OK” button in the dialogue box.
It’s worth noting that the specific options and interface of the dialogue box may vary depending on your operating system and web browser. However, the general process of choosing a location to save the image remains the same.
Once you have selected the desired location to save the image, proceed to the next step to decide whether you want to rename the image before saving it.
Step 6: Rename the image (optional)
When saving the image from the Google Doc to your device, you have the option to rename the image file. Renaming the image can be useful if you want to give it a more descriptive or meaningful name, or if you need to differentiate it from other files on your device.
To rename the image before saving it, follow these steps:
- In the dialogue box where you selected the location to save the image, you will typically see a text field with the current name of the image file.
- Click inside the text field to activate it. You should see a cursor appear, indicating that you can type in a new name.
- Type the new name for the image file. Make sure it is a unique and memorable name that accurately represents the image.
- If you are satisfied with the new name you entered, proceed to the next step to save the image. If you prefer to keep the original name, you can skip to Step 7.
Renaming the image is an optional step, so if you’re content with the original name, you can simply proceed to the next step without making any changes.
Remember that the specific interface and options for renaming the file may vary based on your operating system and web browser.
Once you have decided whether or not to rename the image, continue to the next step to save it to your chosen location.
Step 7: Click ‘Save’
After selecting the location and, optionally, renaming the image, the final step is to click the “Save” button to save the image to your chosen location on your device. This action will initiate the download process and store a copy of the image file on your device for future use.
To click “Save” and complete the download process, follow these steps:
- In the dialogue box where you selected the location and, if desired, renamed the image, look for the “Save” button.
- Position your cursor over the “Save” button and click on it. Alternatively, you may also have an “OK” or “Download” button to initiate the saving process.
Clicking “Save” will start the download process, and you will see a progress indicator showing the status of the download. The time it takes to download the image will depend on its file size and your internet connection speed.
Once the download is complete, you will find the saved image in the location you specified earlier. You can now access and use the image for your desired purposes, whether it’s incorporating it into a presentation, sharing it online, or simply storing it for future reference.
Congratulations! You have successfully downloaded an image from a Google Doc and saved it to your device.
Keep in mind that the steps outlined in this article may vary slightly based on the specific web browser, operating system, and device you are using. However, the general process described here should apply to most scenarios.
Please ensure that you only download and use images from Google Docs for personal or fair use, respecting copyright and intellectual property rights.
Conclusion
Downloading an image from a Google Doc is a simple process that allows you to save an image to your device for various purposes. By following the steps outlined in this article, you can successfully download and save an image from a Google Doc.
We began by opening the Google Doc, either through Google Drive or using a shared link. Then, we located the image within the document by scrolling through the content or using the navigation panel. Next, we right-clicked on the image to reveal a context menu and selected the “Save image as” option.
After selecting “Save image as,” we chose the location on our device to save the image and, optionally, renamed the file to reflect its content. Finally, we clicked “Save” to initiate the download process and successfully saved the image to our chosen location.
Remember to be mindful of copyright and intellectual property rights when downloading and using images from Google Docs. Ensure that you have the necessary permissions to use the image for your intended purposes.
Now that you’re equipped with the knowledge of how to download an image from a Google Doc, you can easily access and utilize the image outside of the document itself. Whether you’re incorporating it into a presentation, sharing it online, or storing it for later use, downloading an image from a Google Doc expands your possibilities.
Enjoy exploring and utilizing the images from your Google Docs!