The Ultimate Guide to Cancelling Dota Plus Subscription
Are you a passionate gamer who enjoys the exciting world of Dota? If so, then you might be familiar with the Dota Plus subscription service. While Dota Plus offers a range of exclusive features and benefits for players, there may come a time when you want to cancel your subscription. Whether you’re taking a break from gaming or looking to switch to a different subscription plan, we’ve got you covered. In this article, we’ll guide you step-by-step on how to cancel your Dota Plus subscription.
Key Takeaways:
- Cancelling your Dota Plus subscription is a straightforward process that can be completed within a few minutes.
- Make sure to cancel your subscription before the next billing cycle to avoid being charged for the upcoming month.
Step 1: Accessing Your Dota Plus Account
The first step in cancelling your Dota Plus subscription involves accessing your account. Follow these simple steps:
- Visit the official Dota Plus website and sign in using your account credentials.
- Once logged in, locate the account settings or subscription section.
Step 2: Navigating to Subscription Management
After accessing your account, you’ll need to navigate to the subscription management page. Here’s how:
- Look for a section titled “Subscription” or “Manage Subscription.” It is usually located under your account settings.
- Click on the subscription management section to proceed to the next step.
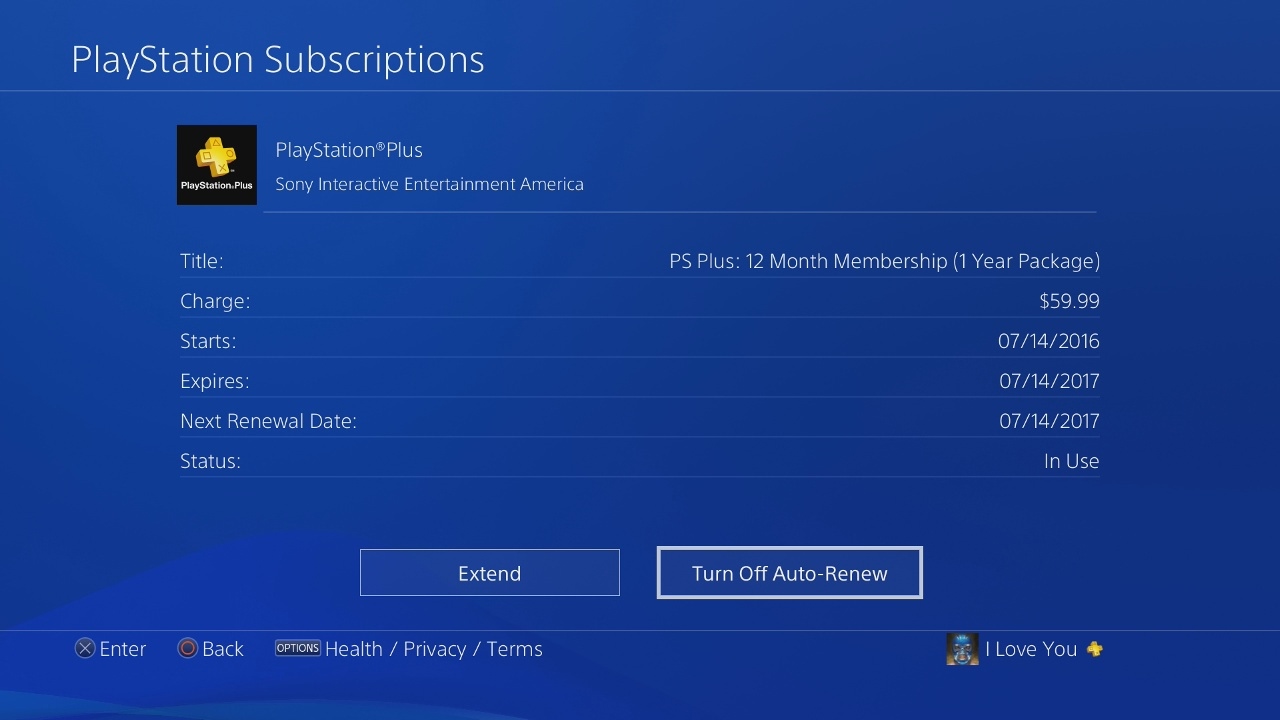
Step 3: Reviewing Your Subscription Details
Before cancelling your Dota Plus subscription, take a moment to review your subscription details. This step ensures that you have the correct information and helps prevent any unwanted disruptions. Here’s what you should do:
- Check the duration of your subscription and the date of the next billing cycle.
- Make a note of any additional features or benefits you’ll lose access to after cancellation.
Step 4: Cancelling Your Dota Plus Subscription
Now that you’ve reviewed your subscription details and are ready to proceed, it’s time to cancel your Dota Plus subscription:
- Look for a cancel or unsubscribe button within the subscription management section.
- Click on the button and follow any additional prompts or confirmations.
Remember: It’s important to cancel your Dota Plus subscription before the next billing cycle to avoid being charged for the upcoming month.
Step 5: Verifying Cancellation
After successfully cancelling your Dota Plus subscription, it’s a good idea to verify the cancellation to ensure it was processed correctly. Here’s how:
- Check for a confirmation email sent to your registered email address.
- If available, log back into your Dota Plus account and look for a confirmation message or notification.
By following these simple steps, you can easily cancel your Dota Plus subscription and regain control of your gaming subscription preferences.
Conclusion
Cancelling your Dota Plus subscription doesn’t have to be a complicated process. By following the steps outlined in this guide, you can easily cancel your subscription and get back to enjoying your gaming experience. Remember to review your subscription details, cancel before the next billing cycle, and verify the cancellation for peace of mind. If, at some point in the future, you decide to rejoin Dota Plus, you can always sign up again and resume the exciting benefits it offers. Happy gaming!


![How To Cancel PlayStation Plus Membership? [GUIDE]](https://robots.net/wp-content/uploads/2022/07/how-to-cancel-playstation-plus-featured-300x175.jpg)