Introduction
Are you tired of your mechanical keyboard switches? Do you wish to experience a different typing sensation or improve your gaming performance? If so, you're in luck! Changing mechanical keyboard switches can breathe new life into your beloved keyboard. Whether you're looking to upgrade to a different switch type or replace worn-out switches, this guide will walk you through the process step by step. With the right tools and a bit of patience, you can transform your keyboard into a customized typing or gaming powerhouse.
Mechanical keyboards have gained popularity due to their durability, tactile feedback, and customizable nature. However, not all switches are created equal, and personal preferences vary widely. Some users prefer the audible click of a Blue switch, while others favor the smooth and quiet actuation of a Red switch. Whatever your preference, changing the switches allows you to tailor the keyboard to your specific needs.
In this guide, we'll explore the process of changing mechanical keyboard switches, providing detailed steps and tips to ensure a smooth transition. From gathering the necessary tools to installing the new switches, you'll learn the ins and outs of this rewarding DIY project. So, grab your keyboard and let's dive into the world of mechanical switches!
Step 1: Gather the Necessary Tools
Before embarking on the journey of changing your mechanical keyboard switches, it’s crucial to gather the essential tools for a seamless transition. Here’s a list of items you’ll need:
- Keycap Puller: This tool is essential for safely removing the keycaps without damaging them or the switches underneath.
- Screwdriver Set: Depending on the keyboard model, you may need a Phillips or Torx screwdriver to open the keyboard housing.
- Tweezers: Precision tweezers can aid in removing and installing the tiny switch components.
- New Switches: Ensure you have the replacement switches of your choice, whether it’s the clicky Blue switches, linear Red switches, tactile Brown switches, or any other type.
- Work Surface: Prepare a clean and spacious work area to lay out the keyboard components and prevent any small parts from getting lost.
- Cleaning Supplies (Optional): While not mandatory, having compressed air and cleaning solution can help tidy up the keyboard and switches during the process.
By having these tools at your disposal, you’ll be well-equipped to tackle the switch replacement with confidence. Ensuring that you have everything ready before starting the process will streamline the experience and minimize any potential frustration.
Step 2: Remove the Keycaps
With the necessary tools at hand, the next step in the process of changing mechanical keyboard switches is to remove the keycaps. This step requires precision and care to avoid damaging the keycaps or the underlying switches. Here’s how to proceed:
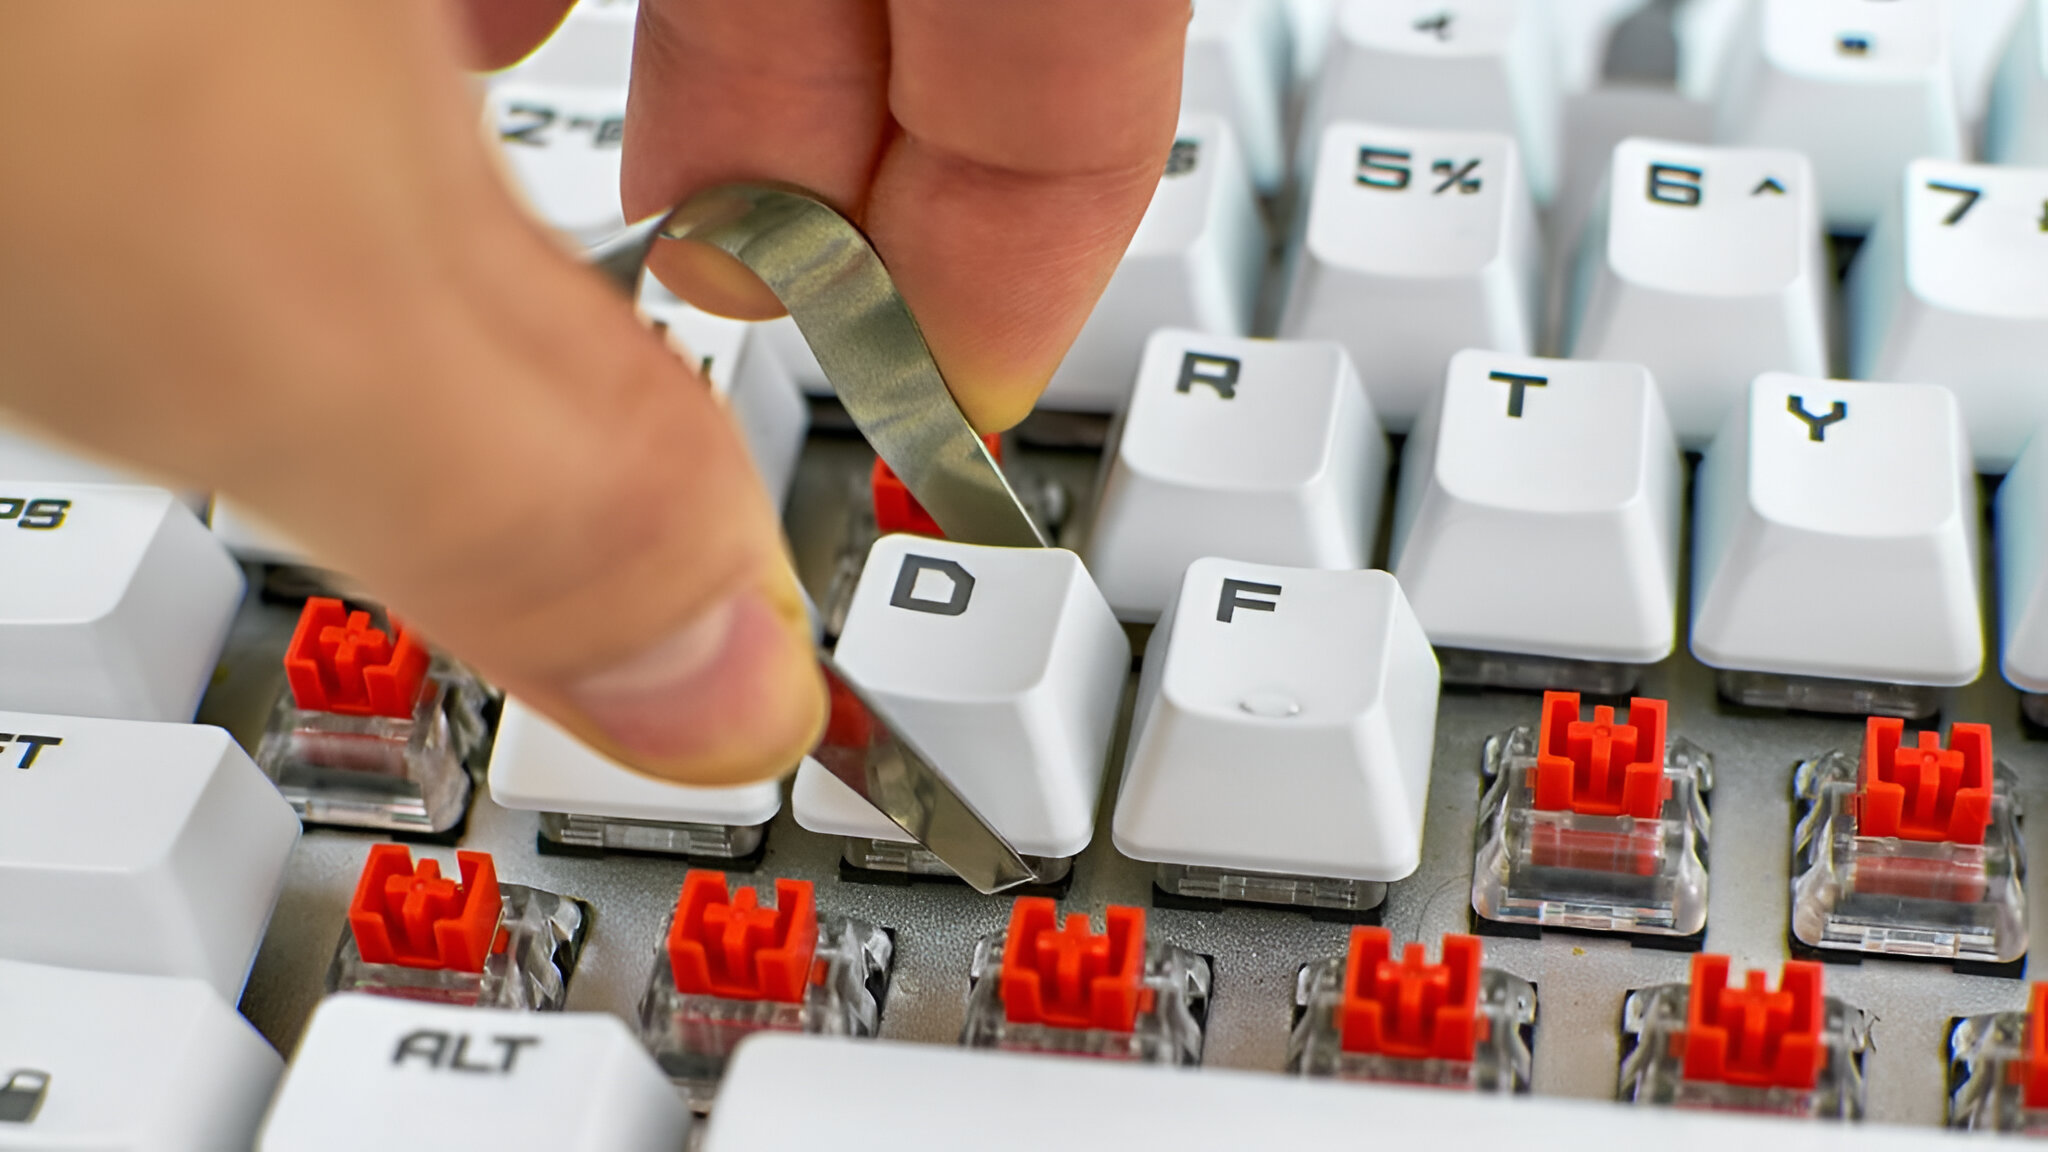
- Use the Keycap Puller: Begin by using the keycap puller to gently and evenly remove the keycaps from the switches. Position the keycap puller over the keycap and gently squeeze the handles to grasp the keycap. Apply even pressure and pull directly upward to detach the keycap from the switch stem. Repeat this process for all the keycaps on the keyboard.
- Organize the Keycaps: As you remove the keycaps, consider organizing them in a segmented container or layout to keep track of their positions. Some keycap sets have varying profiles to accommodate different rows on the keyboard, so keeping them organized will simplify the reassembly process.
- Inspect the Switches: Once the keycaps are removed, take a moment to inspect the switches and the exposed keyboard surface. This is an opportune time to clean any accumulated dust or debris from the keyboard, enhancing the overall maintenance of the device.
By delicately removing the keycaps and organizing them accordingly, you’re one step closer to accessing the switches for replacement. Taking the time to perform this step with care will ensure that the keycaps and switches remain in excellent condition throughout the process.
Step 3: Open the Keyboard
After successfully removing the keycaps, the next crucial step in the process of changing mechanical keyboard switches is to open the keyboard housing. This step may vary in complexity depending on the keyboard model, but the general approach involves accessing the internal components. Here’s how to proceed:
- Locate and Remove Screws: Most mechanical keyboards have screws securing the top and bottom housing together. Using the appropriate screwdriver from your set, carefully locate and remove the screws. Keep the screws organized in a separate container to prevent misplacement.
- Separate the Housing: Once the screws are removed, gently separate the top and bottom housing of the keyboard. Take note of any latches or clips that may be securing the housing and release them as needed. Exercise caution to avoid forcing the housing apart, as this could lead to damage.
- Handle with Care: During this process, be mindful of any cables or ribbons that connect the keyboard components. If necessary, carefully disconnect these cables according to the manufacturer’s instructions to fully access the keyboard’s internal assembly.
By opening the keyboard housing with precision and care, you’ll gain access to the internal components, including the switches that are ready for replacement. This step sets the stage for the subsequent removal and installation of the mechanical keyboard switches.
Step 4: Remove the Old Switches
With the keyboard housing open, the next pivotal step in the process of changing mechanical keyboard switches is to remove the old switches. This task requires precision and attention to detail to ensure a smooth transition to the new switches. Here’s how to proceed:
- Identify the Switches: Take a moment to familiarize yourself with the layout of the switches on the keyboard. Different keyboard models may have varying arrangements, and it’s essential to identify the specific switches requiring replacement.
- Desoldering (For Soldered Switches): If the old switches are soldered to the keyboard PCB (printed circuit board), you’ll need to desolder them using a soldering iron and desoldering pump or wick. Carefully heat the solder joints and remove the old switches, ensuring that the PCB is not damaged in the process.
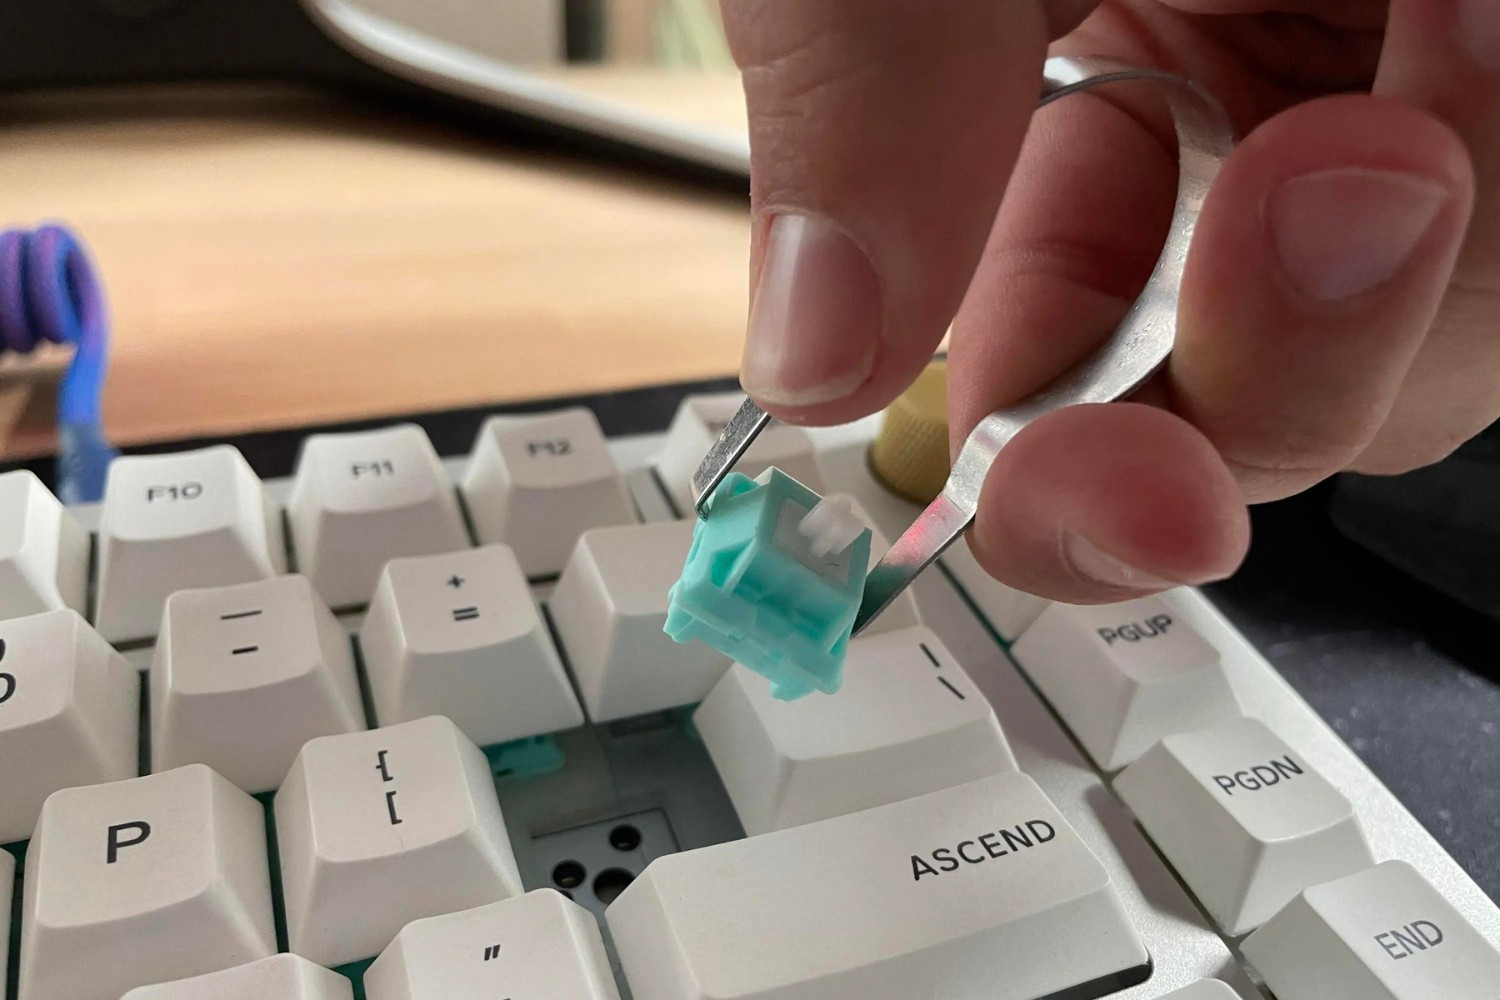
- Removing Hot-Swap Switches (If Applicable): For keyboards equipped with hot-swappable sockets, gently remove the old switches by pressing down on the switch while pulling it out from the hot-swappable socket. Exercise caution to prevent bending the switch pins or damaging the hot-swappable socket.
- Organize the Removed Switches: As you remove the old switches, consider organizing them in a designated container or layout. This organization will aid in keeping track of the switches and identifying any that may require cleaning or maintenance before disposal or storage.
By methodically removing the old switches, whether through desoldering or utilizing hot-swappable sockets, you’re paving the way for the installation of the new switches. This step is critical in ensuring that the keyboard is prepared for the upcoming switch replacement process.
Step 5: Install the New Switches
With the old switches successfully removed, it’s time to embark on the exciting phase of installing the new switches. This step is crucial in customizing the keyboard to your preferred typing or gaming experience. Here’s a detailed guide on how to install the new switches:
- Prepare the New Switches: Before installation, ensure that the new switches are clean and free from any debris or residue. Inspect the pins and housing of each switch to verify their pristine condition.
- Soldering New Switches (For Soldered Keyboards): If the keyboard requires soldering, carefully align the new switches with the corresponding positions on the PCB. Secure the switches in place and solder each switch’s pins to the PCB, ensuring a strong and reliable connection.
- Installing Hot-Swap Switches (If Applicable): For keyboards equipped with hot-swappable sockets, align the new switches with the hot-swappable sockets and gently press them into position. Ensure that the switch pins align correctly with the sockets to prevent any bending or misalignment.
- Test the Switches: Once the new switches are installed, perform a quick test by pressing each key to ensure that the switches register keystrokes accurately. This step is crucial in identifying any potential issues before proceeding to reassemble the keyboard.
By meticulously installing the new switches, you’re one step closer to revitalizing your mechanical keyboard with a fresh typing or gaming experience. Whether soldering the switches to the PCB or utilizing hot-swappable sockets, this step sets the stage for the keyboard’s transformation with the new switches in place.
Step 6: Close the Keyboard
After the successful installation of the new switches, it’s time to carefully close the keyboard housing, securing the internal components and ensuring a seamless transition. This step is vital in safeguarding the switches and restoring the keyboard to its fully assembled state. Here’s a guide on closing the keyboard:
- Reconnect Internal Cables (If Disconnected): If any cables or ribbons were disconnected during the opening process, carefully reconnect them according to the manufacturer’s instructions. Ensure that the connections are secure and aligned properly.
- Align and Secure the Housing: Position the top housing of the keyboard over the internal components, aligning it with the bottom housing. Take note of any latches or clips that secure the housing, ensuring that they engage properly. Once aligned, reinsert and tighten the screws to secure the housing together.
- Perform a Visual Inspection: Before proceeding, visually inspect the keyboard to ensure that all components are properly aligned and seated. Verify that the new switches, internal cables, and housing are in place and secure.
By meticulously closing the keyboard housing and ensuring that all internal components are secure, you’re completing the final step in the mechanical keyboard switch replacement process. This step sets the stage for the subsequent reassembly of the keycaps and the restoration of the keyboard to its fully functional state.
Step 7: Replace the Keycaps
With the keyboard housing securely closed and the new switches installed, the final step in the process of changing mechanical keyboard switches is to replace the keycaps. This step adds the finishing touch to the keyboard and allows for personalization and customization. Here’s a detailed guide on replacing the keycaps:
- Organize the Keycaps: If the keycaps were organized during the removal process, refer to the layout to ensure that each keycap is returned to its correct position. Different rows on the keyboard may require specific keycap profiles, so careful organization is essential.
- Align and Press the Keycaps: Align each keycap with its corresponding switch stem, ensuring that the keycap is oriented correctly. Apply gentle and even pressure to press the keycap onto the switch stem, ensuring that it is seated securely without tilting or misalignment.
- Test the Keys: Once all the keycaps are replaced, perform a comprehensive test by pressing each key to ensure that the keycaps register keystrokes accurately. This step is crucial in verifying that the keycaps are properly seated and functional.
By methodically replacing the keycaps and ensuring that each keycap is securely seated, you’re putting the final touches on the mechanical keyboard switch replacement process. This step allows for personalization and customization, culminating in a fully restored and customized mechanical keyboard.
Conclusion
Congratulations! You’ve successfully navigated the process of changing mechanical keyboard switches, transforming your beloved keyboard into a customized typing or gaming powerhouse. By following the detailed steps outlined in this guide, you’ve gained valuable insights into the intricacies of mechanical keyboard maintenance and customization. As you reflect on the journey, consider the following key takeaways:
- Personalization and Customization: The ability to change mechanical keyboard switches empowers you to tailor the keyboard to your specific preferences, whether it’s the tactile feedback for typing or the responsiveness for gaming.
- Attention to Detail: Throughout the process, attention to detail was paramount, from delicately removing keycaps to meticulously installing the new switches and ensuring that each component was properly aligned and secured.
- DIY Satisfaction: Engaging in the switch replacement process provided a sense of accomplishment and ownership, allowing you to actively participate in the maintenance and enhancement of your keyboard.
- Keyboard Maintenance: The process also shed light on the importance of keyboard maintenance, from cleaning the internal components to ensuring that the switches and keycaps are in optimal condition.
As you revel in the rejuvenated keyboard, take a moment to appreciate the newfound typing or gaming experience that the new switches have unlocked. The tactile feedback, actuation force, and overall responsiveness of the keyboard now align with your preferences, enhancing your overall computing or gaming endeavors.
Remember, the journey doesn’t end here. As you continue to immerse yourself in the world of mechanical keyboards, consider exploring other customization options, such as keycap sets, stabilizers, and switch lubrication, to further refine your keyboard to your exact specifications.
Embrace the satisfaction of a personalized and revitalized mechanical keyboard, and relish in the enhanced typing or gaming experience that awaits you. Your journey through the switch replacement process has not only honed your DIY skills but also deepened your appreciation for the intricacies of mechanical keyboards.