Introduction
Are you tired of constantly changing batteries on your DSLR camera during a shoot? Mounting a battery on your DSLR camera can provide a convenient and long-lasting power solution, allowing you to focus on capturing the perfect shot without interruptions. Whether you are a professional photographer, videographer, or an amateur enthusiast, having a reliable battery mount can significantly enhance your shooting experience.
In this comprehensive guide, you will learn the essential steps to mount a battery on your DSLR camera, ensuring a seamless power supply for extended shooting sessions. We will explore the process of selecting the right battery mount, the necessary tools and materials, and provide a detailed, step-by-step tutorial to successfully mount the battery. Additionally, we will share valuable tips for maintaining the battery mount, maximizing its lifespan, and optimizing its performance.
By mastering the art of mounting a battery on your DSLR camera, you can elevate your photography and videography endeavors to new heights. Say goodbye to frequent battery replacements and embrace the convenience and reliability of a securely mounted power source. Let's dive into the world of DSLR battery mounts and unlock the potential for uninterrupted creative expression.
Choosing the Right Battery Mount
When it comes to selecting the ideal battery mount for your DSLR camera, several factors should be taken into consideration to ensure compatibility, reliability, and efficiency. The market offers a diverse range of battery mounts, each designed to cater to specific camera models and shooting requirements. Here are the key aspects to consider when choosing the right battery mount:
- Compatibility: Prioritize battery mounts that are explicitly designed for your DSLR camera model. Compatibility is crucial to ensure a seamless fit and proper functionality.
- Power Capacity: Assess your typical shooting needs and select a battery mount with an adequate power capacity to sustain prolonged usage without frequent recharging or replacement.
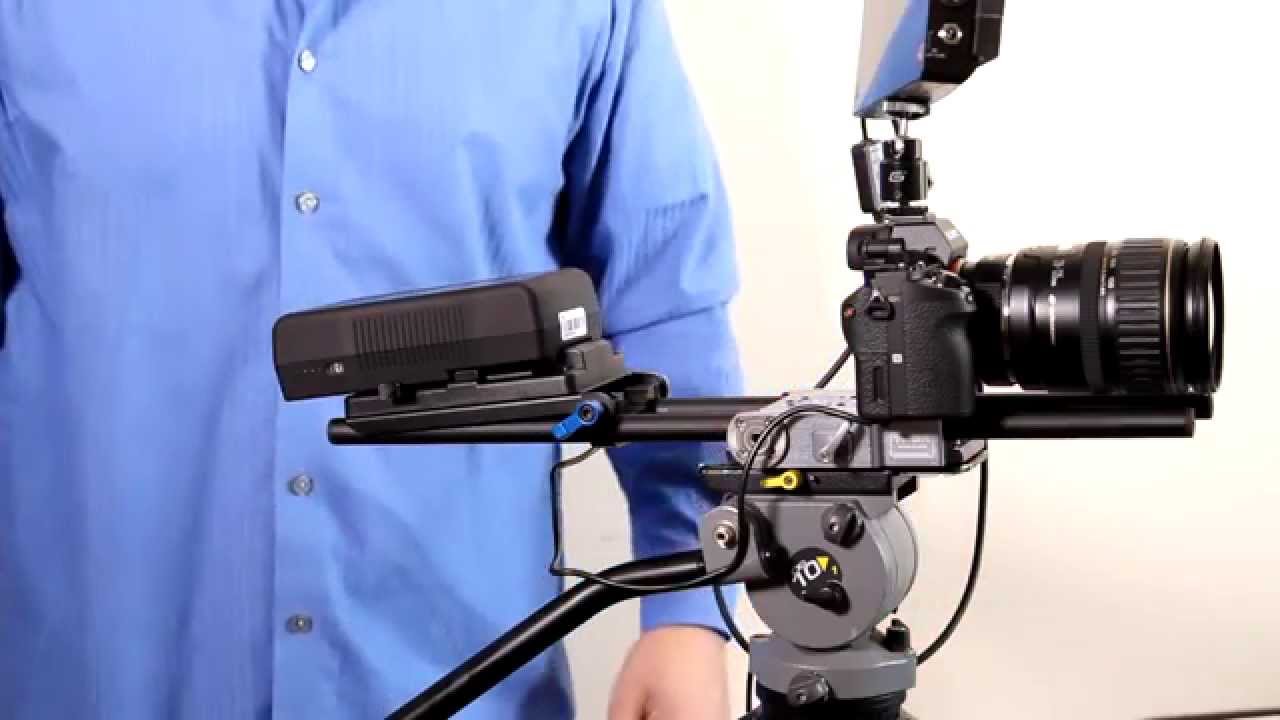
- Mounting Options: Consider the mounting options available for the battery, such as attaching it to the camera’s hot shoe, utilizing a dedicated battery grip, or employing a custom mounting bracket. Evaluate the convenience and stability of each option based on your shooting style.
- Additional Features: Some battery mounts offer supplementary features, such as USB power outputs for charging external devices, battery level indicators, and ergonomic designs for enhanced handling. Determine which features align with your workflow and shooting preferences.
- Brand Reputation: Research reputable brands known for producing high-quality battery mounts with reliable performance and durability. Customer reviews and professional recommendations can offer valuable insights into the best options available.
By carefully assessing these factors, you can make an informed decision when choosing a battery mount that seamlessly integrates with your DSLR camera, empowers your creative pursuits, and ensures uninterrupted power during your photographic and videographic endeavors.
Tools and Materials Needed
Before embarking on the process of mounting a battery on your DSLR camera, it is essential to gather the requisite tools and materials to facilitate a smooth and efficient installation. Here’s a comprehensive list of the essential items you will need:
- Battery Mount: Select the appropriate battery mount that is compatible with your DSLR camera model and meets your power capacity requirements.
- Camera Manual: Refer to your camera’s manual to understand the specific instructions and recommendations provided by the manufacturer regarding battery mounting and compatibility.
- Screwdriver: Depending on the type of battery mount and attachment mechanism, a screwdriver may be necessary for securing the mount to the camera or battery grip.
- Cleaning Cloth: Ensure the surface area where the battery mount will be attached is clean and free from dust or debris. A soft cleaning cloth can be used to prepare the mounting area.
- Battery Charger: If the battery mount requires separate batteries, ensure that you have a compatible charger to maintain a sufficient power supply for your shooting sessions.
- Optional Mounting Accessories: Depending on the specific mounting method, you may require additional accessories such as mounting brackets, hot shoe adapters, or battery grip attachments.
By assembling these tools and materials, you will be well-prepared to initiate the battery mounting process with confidence and precision. It is essential to work in a well-lit and organized environment to avoid misplacing small components and to ensure a successful installation.
Step-by-Step Guide to Mounting the Battery
Mounting a battery on your DSLR camera is a straightforward process that, when executed meticulously, can provide a reliable power source for your photography or videography endeavors. Follow this comprehensive step-by-step guide to seamlessly mount the battery onto your DSLR camera:
- Prepare the Camera: Before initiating the battery mounting process, ensure that your camera is powered off and any existing batteries are removed. This precautionary step prevents electrical mishaps during the installation.
- Select the Mounting Location: Depending on the type of battery mount and your camera model, identify the designated mounting location, which may include the camera’s battery compartment, a dedicated battery grip, or an external mounting bracket.
- Clean the Mounting Area: Use a soft cleaning cloth to gently remove any dust or debris from the chosen mounting area. A clean surface ensures a secure attachment and optimal contact between the battery and the camera.
- Attach the Battery Mount: Carefully align the battery mount with the designated mounting area on the camera. Follow the manufacturer’s instructions for securing the mount, whether it involves sliding it into the battery compartment, attaching it to a grip, or using a mounting bracket.
- Secure the Mounting Mechanism: If the battery mount utilizes screws or locking mechanisms, use the appropriate tools to securely fasten it to the camera. Ensure that the mount is firmly attached to prevent any movement or disconnection during use.
- Insert the Battery: If the battery mount requires separate batteries, insert them into the mount according to the prescribed orientation. Ensure that the batteries are fully seated and make proper contact with the camera’s power terminals.
- Power On and Test: Once the battery is securely mounted, power on your camera and verify that it recognizes the new power source. Check the battery level indicator to confirm the successful integration of the mounted battery.
By meticulously following these steps, you can effectively mount a battery on your DSLR camera, ensuring a reliable and uninterrupted power supply for your creative pursuits. Take your time to execute each step with precision, and enjoy the convenience of extended shooting sessions without the hassle of frequent battery replacements.
Tips for Maintaining the Battery Mount
After successfully mounting the battery on your DSLR camera, it is essential to implement proper maintenance practices to optimize the performance and longevity of the battery mount. By following these valuable tips, you can ensure the reliability and efficiency of your power source for countless shooting sessions:
- Regular Cleaning: Periodically clean the battery mount and the surrounding area on the camera to prevent the accumulation of dust, dirt, or residue. A soft brush or compressed air can be used to gently remove debris, ensuring optimal contact and functionality.
- Battery Rotation: If the battery mount accommodates multiple batteries, consider rotating their usage to prevent uneven wear and discharge. This practice helps maintain balanced performance across all batteries and extends their overall lifespan.
- Storage Conditions: When not in use, store the camera with the mounted battery in a cool, dry environment away from direct sunlight. Avoid exposing the battery mount to extreme temperatures or moisture, which can compromise its performance and safety.
- Periodic Inspection: Routinely inspect the battery mount for any signs of wear, corrosion, or loose connections. Address any issues promptly to prevent potential malfunctions and ensure a secure power supply during critical shooting moments.
- Optimized Charging: Follow the manufacturer’s guidelines for charging the batteries used in the mount. Avoid overcharging or deep discharging, as these practices can diminish the battery’s capacity and overall lifespan.
- Firmware Updates: If the battery mount incorporates electronic components or communicates with the camera, stay informed about firmware updates provided by the manufacturer. Updating the firmware can enhance compatibility and address potential performance enhancements.
By integrating these maintenance tips into your routine, you can preserve the integrity of the battery mount, prolong the lifespan of the batteries, and ensure a consistent power supply for your DSLR camera. Embracing proactive maintenance practices is key to maximizing the reliability and performance of your battery mount, empowering you to focus on capturing captivating moments without concerns about power interruptions.
Conclusion
Mastering the art of mounting a battery on your DSLR camera is a valuable skill that empowers photographers and videographers to embrace extended shooting sessions with confidence and convenience. By carefully selecting the right battery mount, gathering the essential tools and materials, and following a meticulous installation process, you can seamlessly integrate a reliable power source into your camera setup.
Furthermore, prioritizing proper maintenance practices, such as regular cleaning, battery rotation, and optimized charging, ensures the longevity and consistent performance of the battery mount, safeguarding against unexpected power disruptions during critical moments of creativity.
As you embark on your journey to mount a battery on your DSLR camera, remember that attention to detail and proactive care are essential elements in maximizing the reliability and efficiency of your power source. Embrace the seamless integration of a battery mount into your workflow, and revel in the freedom to capture captivating images and videos without the constraints of frequent battery changes.
With this comprehensive guide at your disposal, you are well-equipped to embark on the process of mounting a battery on your DSLR camera, elevating your photography and videography experiences to new heights of uninterrupted creativity and expression.


