Introduction
Building an acoustic guitar is a rewarding and fulfilling project for any music enthusiast or aspiring luthier. It allows you to personalize your instrument, gain a deeper appreciation for its craftsmanship, and create a unique piece that reflects your musical style and tastes.
Whether you’re a seasoned woodworker or a beginner looking to dive into the world of guitar making, this guide will provide you with the essential steps and techniques needed to build your very own acoustic guitar.
Before embarking on this endeavor, it’s important to note that building an acoustic guitar requires time, patience, and attention to detail. It’s a labor-intensive process that involves various woodworking and luthiery skills. However, with the right tools, materials, and guidance, you can successfully create a beautiful and functional instrument.
This guide will cover the main stages of guitar construction, from selecting the wood to applying the finish. Throughout the process, we’ll discuss important considerations, techniques, and tips to help you achieve professional results.
It’s worth mentioning that building an acoustic guitar is not only about the end product but also about the journey and the knowledge you’ll gain along the way. Every step, from shaping the body to installing the tuning pegs, contributes to the overall sound, playability, and aesthetic appeal of the instrument.
By building your own acoustic guitar, you’ll also develop a profound connection with your instrument. You’ll gain insight into its inner workings and have the ability to make adjustments and repairs as needed. Additionally, crafting your own guitar can save you money in the long run, as custom-made instruments can be quite expensive.
So, without further ado, let’s dive into the exciting world of acoustic guitar building and embark on a journey that will not only create a beautiful instrument but also deepen your passion for music and craftsmanship.
Choosing the Wood
When it comes to building an acoustic guitar, choosing the right wood is crucial. The type of wood you select will greatly impact the sound, tone, and overall quality of the instrument. There are several factors to consider when choosing wood for your guitar:
- Top Wood: The most important wood choice is the top, also known as the soundboard or soundboard. Spruce is the most common wood used for guitar tops due to its excellent strength-to-weight ratio and resonance. Other options include cedar and mahogany, each with its own tonal characteristics.
- Back and Sides Wood: The back and sides of the guitar contribute to the overall resonance and tonal properties of the instrument. Common choices for back and sides include rosewood, mahogany, and maple, each offering distinct tonal characteristics. The wood should be well-seasoned and free from defects.
- Neck Wood: The neck provides stability and support for the guitar. Common options for neck wood include mahogany and maple. The wood should be strong and stable, able to withstand tension and stress.
- Fretboard Wood: The fretboard is where you press the strings to produce different notes. Common choices for fretboards include rosewood and ebony. Consider the hardness, durability, and aesthetics of the wood when making your selection.
- Bridge Wood: The bridge is responsible for transmitting vibrations from the strings to the soundboard. Common choices for bridge wood include rosewood, ebony, and maple. The wood should be strong enough to withstand tension and provide good resonance.
When selecting wood, it’s important to consider the tonal characteristics you want to achieve. Experimenting with different wood combinations can result in unique and personalized sound profiles. It’s also essential to source wood from reputable suppliers who provide well-seasoned, stable, and sustainable materials.
Remember that the quality of the wood will greatly affect the final outcome of your guitar. By carefully selecting the right wood, you’ll be on your way to creating an instrument with exceptional sound and playability.
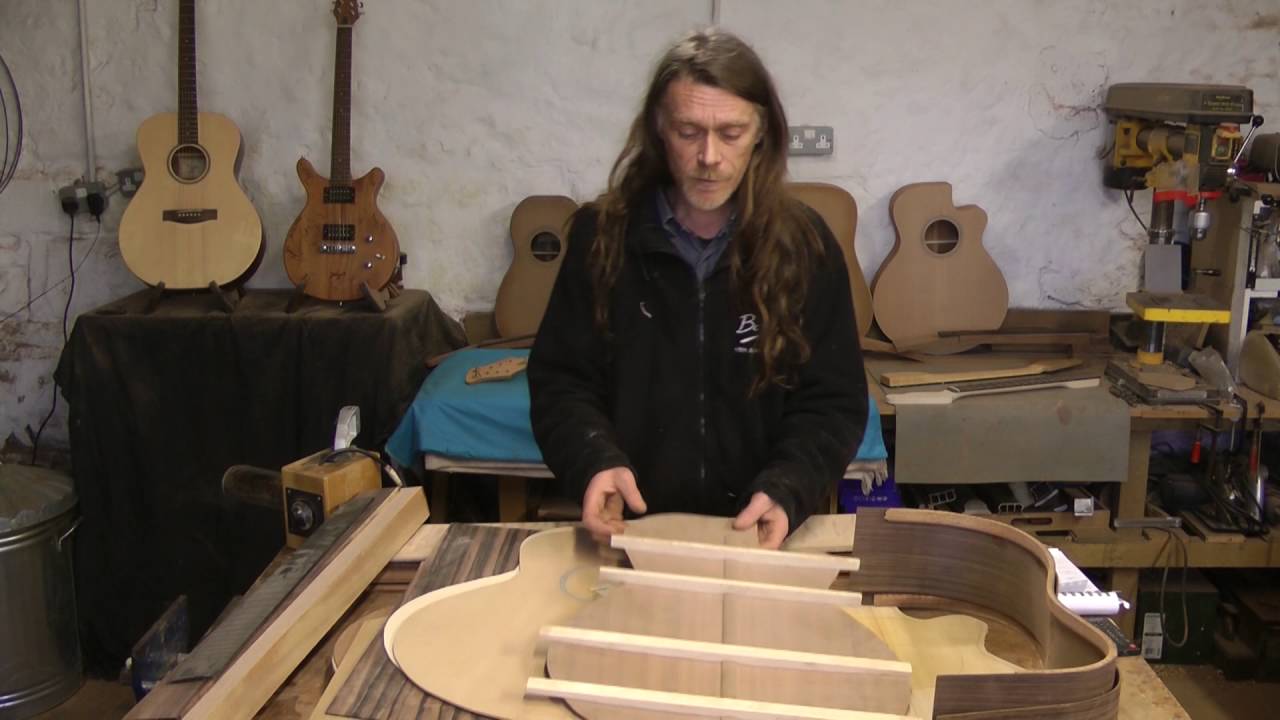
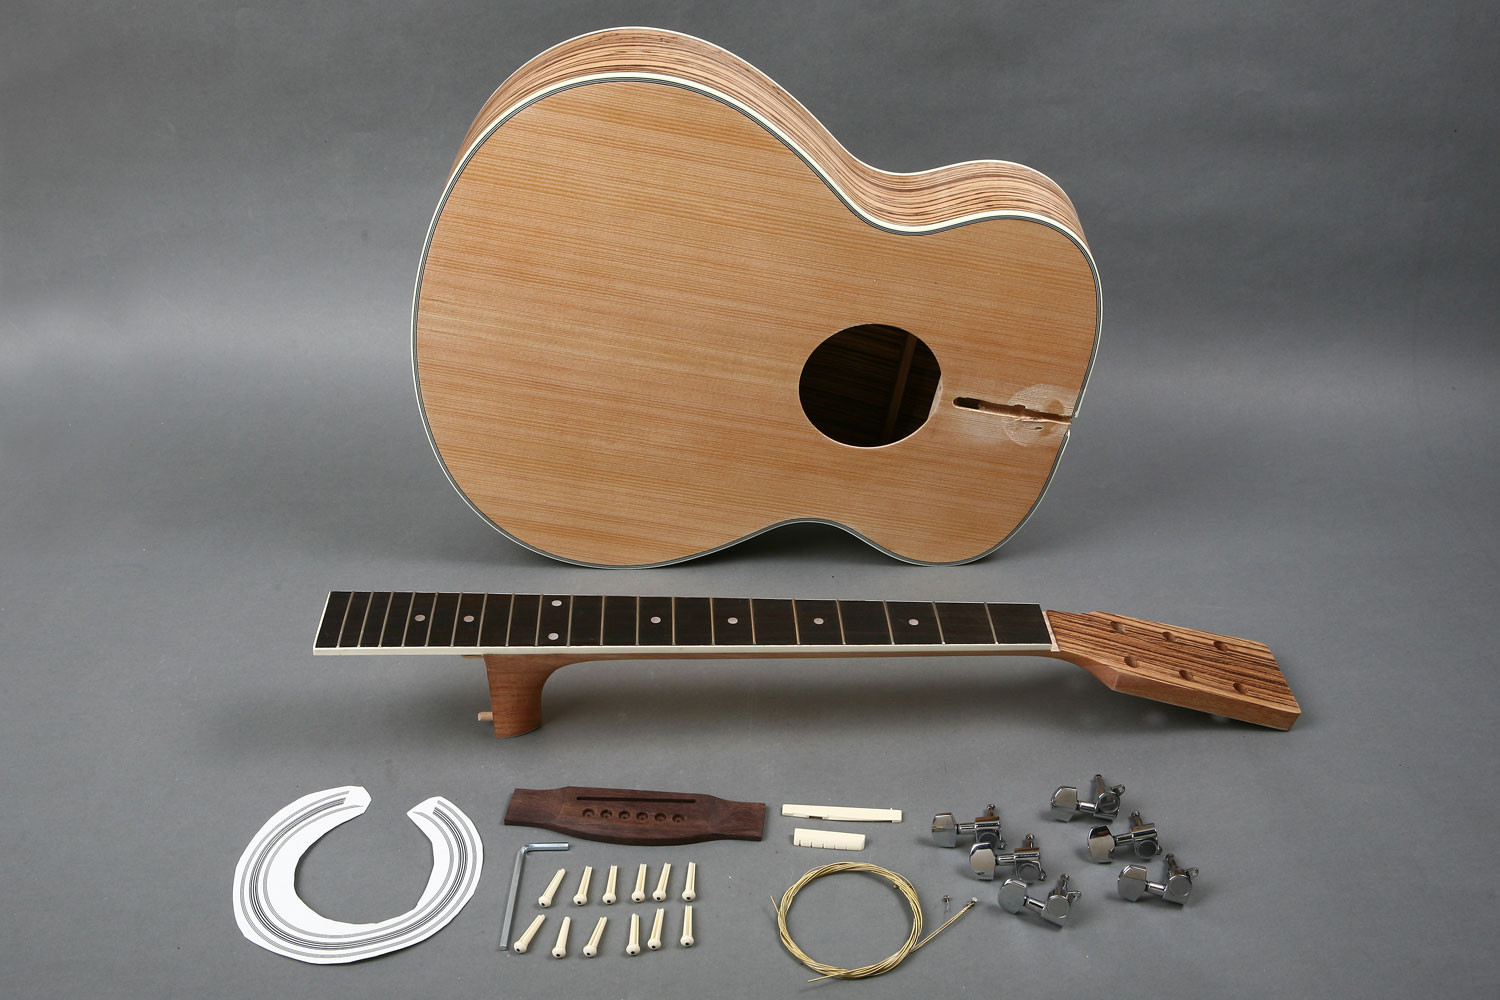
Shaping the Body
Shaping the body of an acoustic guitar is a critical step in the construction process. It not only determines the aesthetics of the instrument but also plays a crucial role in its resonance and projection. Here are the key steps involved in shaping the body:
- Creating the Body Template: Start by creating a template that will serve as a guide for shaping the body. Use a high-quality plywood or MDF to accurately trace the shape of the guitar body.
- Cutting the Sides: Begin by cutting the sides of the guitar from a large piece of wood. Make sure to take into account the thickness and shape of the body template. Use a bandsaw or coping saw to carefully cut along the traced lines.
- Shaping the Sides: Once the sides are cut, use a bending iron or a side bending machine to gently heat and shape the sides to match the curvature of the body template. This step requires precision and patience to achieve the desired shape without damaging the wood.
- Joining the Sides: After shaping the sides, use specialized clamps and bindings to join them together. Apply a high-quality wood glue on the joining surfaces and carefully align the sides. Allow the glue to dry completely before proceeding.
- Carving the Soundboard and Back: The soundboard and back of the guitar need to be carefully carved to achieve the desired arch and contours. Use a combination of hand planes, chisels, and scrapers to gradually shape the wood. Pay attention to details, such as the thickness and bracing patterns, as they greatly influence the sound and structural integrity of the guitar.
- Routing the Soundhole and Purfling: Use a router or a sharp chisel to cut out the soundhole in the soundboard. This step requires precision to ensure a clean and accurate cut. Additionally, consider adding decorative purfling around the soundhole to enhance the aesthetics of the guitar.
- Installing the Soundboard and Back: Carefully align the soundboard and back with the sides of the guitar body. Apply wood glue along the joint surfaces and use specialized clamps to hold everything in place. Allow the glue to dry thoroughly before moving on to the next steps.
Shaping the body of an acoustic guitar requires skill, attention to detail, and patience. It’s important to take your time and make precise cuts and measurements to ensure the overall quality of the instrument. Remember that the shape of the body not only affects the visual appeal but also greatly impacts the sound and performance of the guitar.
Joining the Sides
Joining the sides of an acoustic guitar is a crucial step in the construction process. It involves securely connecting the guitar sides to create the body structure. The joining process requires precision and attention to detail to ensure a strong and stable bond. Here’s a step-by-step guide on how to join the sides:
- Preparing the Sides: Start by making sure that the sides are properly shaped and sanded. They should align with the body template and have smooth, even surfaces for a clean joint.
- Applying Glue: Apply a thin, even coat of high-quality wood glue to the joining surfaces of the sides. Make sure to cover the entire surface area where the sides will be joined.
- Clamping the Sides: Carefully align the sides, ensuring that they match the shape and contour of the body template. Use specialized clamps, such as radius clamps or go-bars, to clamp the sides together firmly. Apply even pressure along the entire joint to ensure a strong bond.
- Clean-up: Once the glue has dried, remove any excess glue that may have squeezed out from the joint. Use a chisel or scraper to carefully scrape away the dried glue, making sure not to damage the wood’s surface.
- Reinforcing the Joint: To further strengthen the joint, you can add additional reinforcement, such as braces or linings. These components provide added stability and structural integrity to the guitar body. Braces are usually made from spruce or mahogany, while linings are thin strips of wood that line the interior edges of the sides.
It’s important to note that joining the sides requires precision and careful alignment. Taking the time to properly prepare and clamp the sides will result in a sturdy and well-constructed guitar body. However, rushing or applying uneven pressure can lead to weak joints and compromised structural integrity.
When selecting wood glue, make sure to choose a high-quality adhesive that is specifically designed for woodworking. Follow the manufacturer’s instructions regarding dry time and clamping requirements for the best results.
Joining the sides is a critical step in guitar construction that sets the foundation for the rest of the building process. The strength and stability of the sides contribute to the overall durability and playability of the instrument.
Bracing the Top
Bracing the top of an acoustic guitar is a crucial step that affects the sound, resonance, and structural integrity of the instrument. The bracing pattern and placement significantly impact the tonal characteristics and responsiveness of the guitar. Here’s a step-by-step guide on how to brace the top of an acoustic guitar:
- Choosing the Bracing: Selecting the bracing material is the first step. Traditionally, guitar tops are braced using spruce or cedar due to their excellent strength-to-weight ratio and tonal qualities. The bracing stock should be well-seasoned and free from defects.
- Marking the Bracing Layout: Carefully mark the positions of the braces on the top using the body template as a guide. The braces should be placed strategically to enhance the structural support and tonal response of the guitar.
- Shaping the Braces: Use a combination of hand tools, such as chisels and sandpaper, to shape the braces according to the desired dimensions and profiles. The bracing should be thin and tapered to allow for optimal flexibility and resonance.
- Gluing the Braces: Apply a thin layer of high-quality wood glue to the joining surfaces of the top and braces. Carefully place the braces in their designated positions and apply gentle pressure to ensure good adhesion. Use specialized clamps or go-bars to hold the braces in place until the glue dries.
- Scalloping the Braces: To enhance the responsiveness and tonal dynamics of the guitar, scallop the braces. This process involves carefully removing material from the underside of the braces, creating a lighter and more flexible structure. Scalloping allows the top to vibrate more freely, resulting in improved resonance and tonal complexity.
- Final Shaping and Finishing: Once the braces are securely glued and scalloped, sand the top to achieve a smooth and even surface. Pay attention to the transitions between the braces and the surrounding wood, ensuring a seamless blend. Apply a finish to protect the wood and enhance its appearance.
It’s important to note that bracing patterns may vary depending on the guitar’s design and the desired sound. Traditional bracing patterns include X-bracing, ladder bracing, and fan bracing, each offering distinct tonal characteristics. Experimenting with different bracing styles can result in unique and personalized sound profiles.
When working with braces, it’s essential to maintain precision and adhere to the design specifications. Careful bracing ensures a structurally sound and acoustically balanced guitar top. Take your time during this step, as the placement and shaping of the braces greatly impact the overall quality and performance of the instrument.
Carving the Neck
Carving the neck of an acoustic guitar is a critical step that determines the playability and comfort of the instrument. The neck should be shaped to provide optimal support for the strings and allow for easy fretting. Here’s a step-by-step guide on how to carve the neck of an acoustic guitar:
- Preparing the Neck Blank: Start by selecting a high-quality hardwood blank for the neck. Common options include mahogany, maple, and rosewood. Make sure the blank is well-seasoned and free from defects.
- Marking the Neck Profile: Use a pencil or marking gauge to outline the desired neck profile on both the front and back of the neck blank. Take into consideration your personal preferences and playing style when determining the shape and thickness of the neck.
- Rough Shaping: Use a bandsaw or coping saw to roughly shape the neck blank according to the marked profile. Cut away excess material, leaving some room for further shaping and refinement.
- Shaping the Neck: Use a combination of hand tools, such as rasps, files, and sandpaper, to gradually shape the neck. Begin by removing larger amounts of material and gradually refine the shape, ensuring smooth transitions and a comfortable feel.
- Creating the Neck Profile: Pay close attention to the neck profile, which refers to the curve and contour along the back of the neck. Common options include C-shaped, V-shaped, and U-shaped profiles. Experiment with different profiles to find the one that suits your playing style best.
- Carving the Heel and Headstock: Carve the heel of the neck to ensure a comfortable fit when playing higher frets. Shape the headstock to the desired design, taking into consideration the type of tuning pegs or machine heads you plan to use.
- Refining and Smoothing: Once the neck is roughly shaped, use finer grit sandpaper to smooth out any rough spots or imperfections. Pay attention to the fretboard alignment, ensuring it is properly centered and aligned with the neck.
- Applying a Finish: After the neck is fully carved and smoothed, apply a finish to protect the wood and enhance its appearance. Common options include nitrocellulose lacquer or oil finishes. Follow the manufacturer’s instructions for best results.
When carving the neck, it’s important to take your time and frequently check the feel and comfort of the neck in your hand. Aim for a profile and shape that allows for easy movement along the fretboard and minimizes strain on your hand and fingers. Remember that each person’s playing style and preferences may vary, so it’s essential to find a neck shape that suits you best.
By carefully carving the neck, you’ll create an instrument that not only looks great but also provides excellent playability and comfort for years to come.
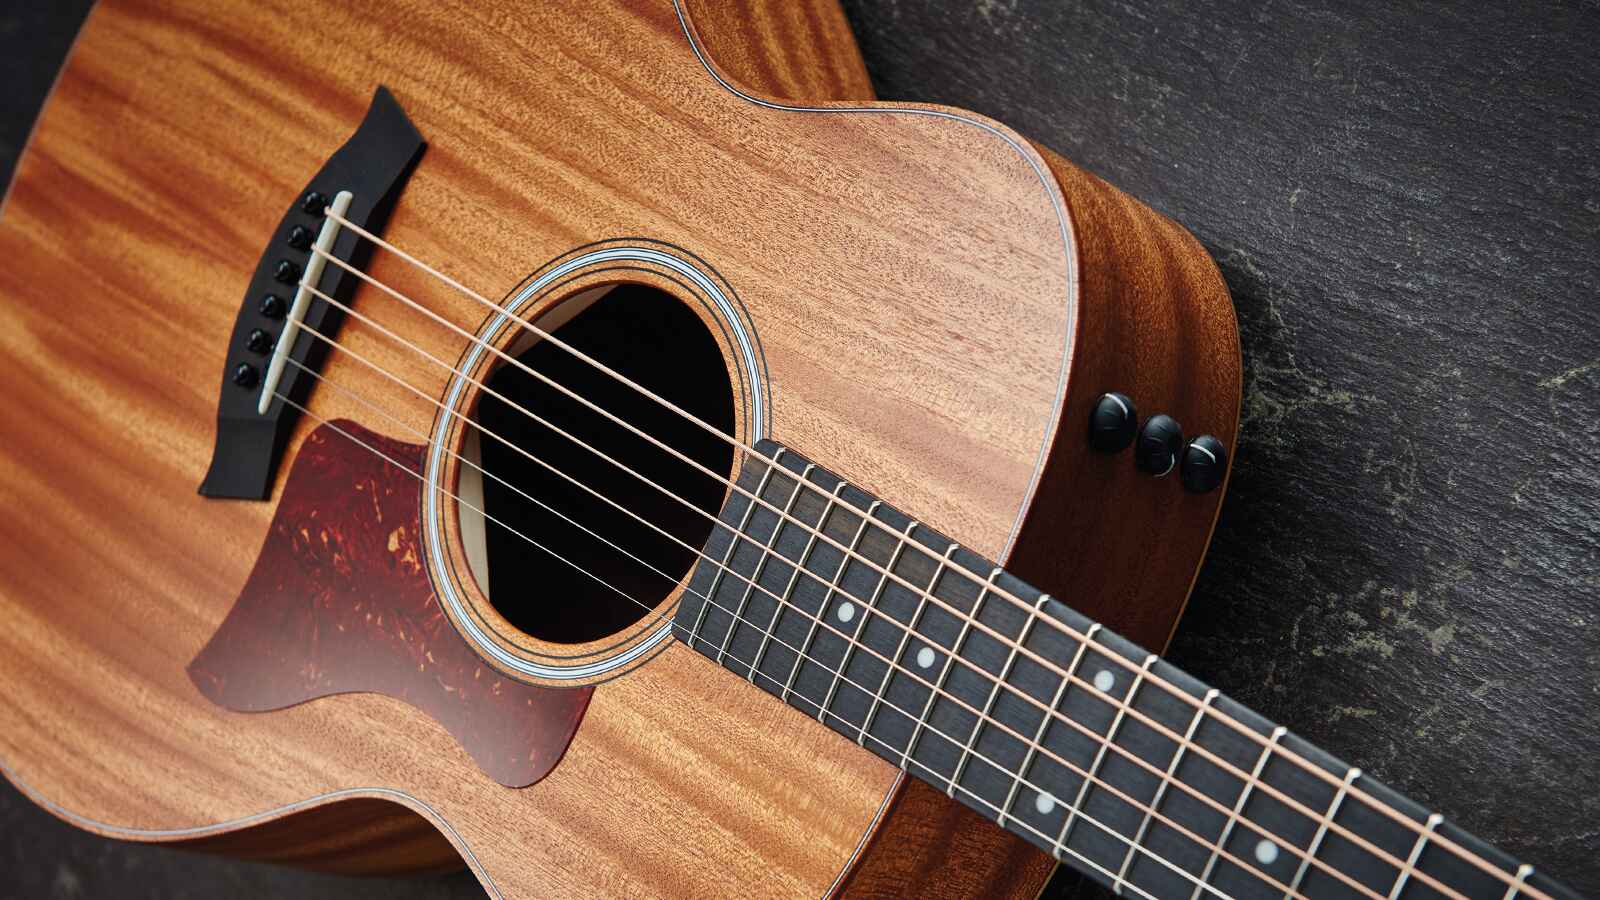
Installing the Fretboard
Installing the fretboard is a crucial step in guitar construction that involves carefully attaching the fretboard to the neck. The fretboard not only provides a playing surface for the strings but also determines the pitch and intonation of each note. Here’s a step-by-step guide on how to install the fretboard:
- Selecting the Fretboard: Choose a high-quality hardwood for the fretboard, such as rosewood, ebony, or maple. Consider the visual appeal, durability, and tonal characteristics of the wood when making your selection.
- Preparing the Neck: Ensure that the neck is properly shaped and sanded, creating a flat surface for the fretboard to be attached. Double-check the alignment to ensure that the neck is straight and the fret slots are correctly positioned.
- Trimming the Fretboard: Cut the fretboard to the appropriate length, leaving some excess material for overhang on both ends. Use a saw or bandsaw to make precise cuts, ensuring a smooth and even surface.
- Creating the Fret Slots: Use a specialized fret slotting saw or a fretting template to cut the fret slots into the fretboard. Take care to make accurate and precise cuts, ensuring that each slot is deep enough to accommodate the fret wire.
- Installing the Fretboard: Apply a thin, even coat of wood glue to the neck where the fretboard will be placed. Carefully position the fretboard on the neck, making sure the fret slots align with the neck’s fret markers. Apply even pressure and use specialized clamps to hold the fretboard in place until the glue dries.
- Fretting the Fretboard: Once the glue has dried, insert the fret wire into each fret slot, ensuring a snug fit. Use a specialized fretting hammer or a fret press to gently tap the fret wire into place. Take care to seat the frets firmly and evenly along the entire length of the fretboard.
- Trimming and Leveling the Frets: Use a fret saw or a specialized fret end cutter to trim the excess fret wire protruding from the sides of the fretboard. Afterward, use a leveling tool or a fret leveling file to ensure that the frets are all the same height and level with each other. This step is essential for optimal playability and intonation.
- Finalizing the Fretboard: Smooth the fret ends using a fret file and finish the fretboard with sandpaper to achieve a smooth playing surface. Apply a protective finish, such as oil or lacquer, to preserve the wood and enhance its appearance.
Installing the fretboard requires careful attention to detail and precision. Taking the time to properly align, glue, and fret the fretboard will result in an instrument that not only looks great but also plays well and produces accurate intonation.
Remember to work slowly and methodically, ensuring that each step is done accurately. By installing the fretboard carefully, you’ll create an instrument that provides a comfortable and enjoyable playing experience.
Attaching the Neck to the Body
Attaching the neck to the body of an acoustic guitar is a critical step that ensures the stability and alignment of the instrument. This process requires careful positioning, precise measurements, and a secure bond between the neck and body. Here’s a step-by-step guide on how to attach the neck to the body:
- Preparing the Neck Joint: Evaluate the type of neck joint you’ll be using, such as a dovetail joint, mortise and tenon joint, or a bolt-on joint. Each joint requires specific preparations, so ensure that the neck and body are both properly prepared and compatible with the chosen joint.
- Fitting the Neck and Body: Carefully align the neck heel with the neck block on the body. Ensure that the neck is centered and properly aligned with the centerline of the body. Make any necessary adjustments to achieve a snug fit between the neck and body.
- Marking and Drilling Pilots Holes: Mark the location of the screw or dowel holes that will be used to attach the neck to the body. Use a drill press or handheld drill to drill pilot holes, ensuring that they are straight and accurately placed.
- Applying Glue: If you’re using a glue-based joint, apply a thin, even layer of high-quality wood glue to the mating surfaces of the neck joint and body. Ensure that the glue is spread evenly and covers the entirety of the joint surfaces.
- Aligning and Clamping: Carefully position the neck in place and align the pilot holes. Insert screws or dowels through the pilot holes to secure the neck to the body. Use specialized clamps or clamping cauls to apply even pressure and secure the joint. Ensure that the neck remains properly aligned throughout the clamping process.
- Cleaning and Removing Excess Glue: After the glue has dried, remove any excess glue that may have squeezed out from the joint using a chisel or scraper. Clean the joint surfaces to ensure a clean and professional-looking finish.
- Checking Alignment and Fit: Once the glue has fully cured, check the alignment and fit of the neck-to-body joint. Ensure that the neck is securely attached and that the joint is stable. Make any necessary adjustments to ensure proper alignment and fit.
Attaching the neck to the body is a critical step that requires precision and attention to detail. It’s important to take your time and ensure that the joint is strong, stable, and properly aligned. A well-attached neck contributes to the overall playability, stability, and tonal qualities of the guitar.
Whether you opt for a traditional dovetail joint or a modern bolt-on joint, following the proper techniques and ensuring a secure bond will result in a guitar that not only looks great but also performs exceptionally well.
Fitting the Bridge
Fitting the bridge is a crucial step in the construction of an acoustic guitar as it directly affects the playability, intonation, and overall sound of the instrument. The bridge serves as the anchor point for the strings and transfers their vibrations to the soundboard. Here’s a step-by-step guide on how to fit the bridge:
- Selecting the Bridge: Choose a bridge that matches the design and style of your guitar. Consider factors such as the type of wood, bridge shape, and aesthetics. Common bridge materials include rosewood, ebony, and maple.
- Preparing the Guitar Body: Ensure that the guitar body is properly prepared for the installation of the bridge. This includes leveling the area where the bridge will be placed to ensure a flush fit and clean contact surface.
- Marking the Bridge Placement: Use a ruler, scale, or bridge placement template to accurately mark the desired location for the bridge on the soundboard. Take into consideration factors such as scale length, intonation, and overall design.
- Routing for the Bridge: If necessary, use a router or chisel to carefully remove material from the marked area to create a recess for the bridge. Take care to achieve a precise and clean fit so that the bridge sits flush with the soundboard.
- Preparing the Bridge: Before attaching the bridge, ensure that it is properly shaped and contoured. Smooth any rough edges and ensure that the saddle slot is accurately positioned.
- Gluing the Bridge: Apply a thin, even layer of high-quality wood glue to the bottom surface of the bridge and carefully position it on the soundboard, aligning it with the marked placement. Use specialized clamps or adhesive tape to hold the bridge securely in place.
- Allowing the Glue to Cure: Follow the manufacturer’s instructions for the recommended drying time of the wood glue. Allow the glue to cure fully before moving on to the next steps.
- Installing the Bridge Pins: Once the glue has dried, you can install the bridge pins. Gently press them into the holes provided in the bridge, ensuring a secure fit. The bridge pins hold the strings in place and contribute to the transfer of vibrations.
When fitting the bridge, it’s crucial to pay attention to detail and ensure a proper fit. The bridge should sit flush with the soundboard, making a solid contact for optimal sound transfer. Additionally, the placement of the bridge plays a significant role in intonation and overall playability.
Take your time to carefully position and secure the bridge, as it is a critical component that greatly affects the instrument’s tone and performance. A well-fitted bridge ensures a stable and responsive connection between the strings and the soundboard, resulting in an instrument that produces a balanced and vibrant sound.
Attaching the Tuning Pegs
Attaching the tuning pegs, also known as machine heads or tuning machines, is a crucial step in completing the construction of an acoustic guitar. The tuning pegs allow for the precise adjustment of the string tension, ensuring accurate tuning and maintaining the desired pitch. Here’s a step-by-step guide on how to attach the tuning pegs:
- Choosing the Tuning Pegs: Select tuning pegs that match the style, design, and functional requirements of your guitar. Consider factors such as the peg material, gear ratio, and aesthetics. Common materials include chrome, nickel, or gold-plated options.
- Marking the Pilot Holes: Use a ruler or marking gauge to mark the precise locations for the pilot holes on the headstock. Make sure the pegs are evenly spaced and aligned for a balanced and symmetrical appearance.
- Drilling the Pilot Holes: Use an appropriately-sized drill bit to carefully drill pilot holes at the marked locations on the headstock. The diameter of the pilot holes should match the size of the screws or mounting hardware provided with the tuning pegs.
- Attaching the Tuning Pegs: Insert the tuning pegs into the pilot holes, ensuring a snug fit. Depending on the type of pegs, you may need to secure them using screws or mounting hardware. Make sure the pegs are aligned properly and firmly attached to the headstock.
- Stringing the Instrument: After the tuning pegs are securely attached, you can begin stringing the guitar. Thread the strings through the appropriate holes in the tuning pegs and wind them neatly around the pegs. Make sure to leave enough slack for proper winding and tension.
- Tightening the Strings: Use the tuning pegs to tighten the strings by turning them in the desired direction. It’s important to tune the strings carefully and gradually to avoid excessive tension or potential string breakage.
- Ensuring Proper Functionality: After the strings are tuned, check the functionality of the tuning pegs. Make sure they rotate smoothly and hold the strings securely in tune. Adjust the tension as needed to achieve proper pitch.
When attaching the tuning pegs, it’s crucial to follow the manufacturer’s instructions and use the appropriate tools. Properly attached tuning pegs ensure stable tuning and playability, allowing for precise adjustments and accurate intonation.
Take your time and double-check the alignment and functionality of the tuning pegs to ensure the best possible performance. Well-attached pegs guarantee that your acoustic guitar will hold its tune and provide a pleasurable playing experience.
Making and Installing the Nut and Saddle
The nut and saddle play a crucial role in the playability, tone, and overall performance of an acoustic guitar. The nut guides the strings as they pass from the headstock to the fretboard, while the saddle transfers their vibrations to the body. Here’s a step-by-step guide on how to make and install the nut and saddle:
- Selecting the Material: Choose a high-quality and appropriately sized nut and saddle material. Common options include bone, synthetic bone, ivory, or various types of synthetic materials. Consider the tonal characteristics, sustainability, and durability of the material when making your selection.
- Making the Nut: Start by measuring the width and thickness required for the nut. Use a file or specialized nut files to carefully shape and refine the nut. Ensure that the slots for the strings are accurately sized and properly spaced.
- Making the Saddle: Measure and shape a blank piece of material to create the saddle. Pay attention to the height, length, and curvature of the saddle. Use files and sandpaper to achieve the desired shape and contour.
- Removing Old Nut and Saddle: If replacing an existing nut and saddle, carefully remove them using specialized nut removal tools or by gently tapping them with a mallet and block of wood. Take precautions not to damage the surrounding wood.
- Installing the Nut: Apply a small amount of glue or adhesive into the nut slot and carefully place the nut into its designated position. Ensure that it is aligned with the fretboard and appropriately spaced from the first fret. Use a fretting hammer or a rubber mallet to gently tap the nut into place.
- Installing the Saddle: Apply a small amount of glue or adhesive into the saddle slot and carefully place the saddle in its designated position on the bridge. Make sure it sits securely and aligns with the strings and their corresponding bridge pins.
- Filing and Shaping: Use specialized nut files and sandpaper to adjust the nut and saddle heights for proper action and intonation. File the nut slots to ensure the strings sit at the correct height above the first fret. Shape and contour the saddle to achieve proper string height and compensation.
When making and installing the nut and saddle, it’s crucial to pay attention to detail and ensure accurate measurements and shaping. These components greatly influence the playability, tone, and intonation of the guitar.
Take your time to properly shape and fit the nut and saddle, making sure they sit securely and perform optimally. A well-crafted and properly installed nut and saddle contribute to a well-balanced sound, comfortable playing experience, and accurate tuning.
Applying the Finish
Applying the finish is a crucial step in the construction of an acoustic guitar. Not only does the finish enhance the visual appeal, but it also protects the wood from moisture, wear, and tear. Additionally, the choice of finish can impact the tone and resonance of the instrument. Here’s a step-by-step guide on how to apply the finish:
- Preparing the Surface: Before applying the finish, ensure that the wood surface is clean, smooth, and free from dust or debris. Use sandpaper or a scraper to remove any imperfections or rough spots.
- Choosing the Finish: Decide on the type of finish you want to use, such as nitrocellulose lacquer, polyurethane, or oil-based finishes. Consider factors such as durability, ease of application, and the desired aesthetic and tonal qualities.
- Applying the Base Coat: Start by applying a thin base coat of finish or sealer to the guitar. This helps to seal the wood and provide a smooth surface for further coats. Follow the manufacturer’s instructions regarding drying time and sanding between coats.
- Applying Additional Coats: Apply subsequent coats of finish, allowing each coat to dry thoroughly before applying the next. Depending on the type of finish, you may need to sand between coats to achieve a smooth and even surface.
- Leveling and Buffing: Once the desired number of finish coats has been applied, level and buff the surface to achieve a professional and polished look. Use sandpaper, polishing compounds, and a buffer to ensure a smooth and glossy finish.
- Protecting the Soundboard: To protect the soundboard and preserve the instrument’s acoustic properties, consider leaving the top layer of the soundboard unfinished or using a more breathable finish option.
- Finishing Touches: Apply any final touches, such as decorative binding, purfling, or inlays, that you desire. These details can add a unique and personal touch to the overall appearance of the instrument.
When applying the finish, it’s important to work in a well-ventilated area and follow safety precautions, as some finishes may contain harmful chemicals. Take your time and apply thin, even coats to achieve the best results.
Remember that the choice of finish can affect the tone and resonance of the guitar. Experimentation and testing on scrap wood pieces can help you find the finish that best complements the desired sound you want to achieve.
By carefully applying the finish, you’ll protect the wood, enhance the visual appeal, and ensure the longevity of your acoustic guitar.
Stringing and Tuning the Guitar
Stringing and tuning the guitar is the final step before playing your newly constructed acoustic guitar. Proper stringing and tuning are crucial for achieving accurate pitch, good intonation, and optimal playability. Here’s a step-by-step guide on how to string and tune your guitar:
- Selecting the Strings: Choose high-quality strings that suit your playing style and desired tone. Consider factors such as the string gauge, material (such as steel or nylon), and your preferred brand.
- Removing Old Strings: If your guitar already has strings, remove them by loosening the tuning pegs and unwinding the strings from the pegs and the bridge. Dispose of the old strings responsibly.
- Attaching the Strings: Starting with the thickest string (typically the low E string), insert it into the corresponding bridge hole or tailpiece. Thread the string through the appropriate tuning peg on the headstock and leave some excess string length for winding.
- Winding the Strings: Hold the string near the tuning peg and rotate the peg clockwise to wind the string. Make sure the string wraps neatly and tightly around the peg, minimizing any slack or overlapping. Repeat this process for the remaining strings.
- Stretching the Strings: After the strings are wound, gently tug on each string to stretch and settle them. This helps to stabilize the tuning and reduces the likelihood of strings going out of tune quickly.
- Tuning the Guitar: Starting with the thickest string, use a tuner or your ear to adjust the tension of each string until it reaches the desired pitch. Use the tuning pegs to tighten or loosen the strings accordingly.
- Fine-tuning the Intonation: Once the strings are in tune, check the intonation of each string by playing harmonics at the 12th fret and comparing them to the fretted 12th fret note. Use an electronic tuner to make any necessary adjustments to achieve accurate intonation.
- Retuning and Readjusting: After fine-tuning the intonation, recheck the tuning of each string and make any necessary adjustments. You may need to repeat the tuning process a few times until the strings settle and hold their pitch more consistently.
When stringing and tuning your guitar, it’s important to take your time, make small adjustments, and frequently check the pitch with a tuner. Be patient, as it may take a little time for the strings to stabilize and hold their tuning more effectively.
Remember, consistent tuning and regular maintenance are essential to keep your guitar sounding its best. Regularly check the tension and condition of your strings and make adjustments as needed, especially during the first few weeks of playing on a newly strung guitar.
By following these steps, you’ll be on your way to enjoying the full potential of your acoustic guitar and creating beautiful music.
Final Adjustments and Setup
After stringing and tuning your acoustic guitar, there are a few final adjustments and setups to ensure optimal playability, comfort, and sound quality. These adjustments will help fine-tune the instrument and make it truly tailored to your playing preferences. Here are the key steps for final adjustments and setup:
- Action Height: Check the action height, which refers to the distance between the strings and the fretboard. Adjust the truss rod, located inside the neck, to achieve the desired action. If needed, file or sand down the saddle to lower the string height or use shims to raise it.
- Intonation: Fine-tune the intonation by comparing the pitch of each string’s harmonic at the 12th fret with the fretted note at the same position. Adjust the saddle position to ensure accurate intonation across the entire fretboard.
- Neck Relief: Check the neck relief, which refers to the slight curvature of the neck. Use the truss rod to adjust the neck relief, aiming for a slight bow that allows for comfortable playing without any fret buzzing.
- Nut Slots: Ensure that the nut slots are properly cut and lubricated to minimize string binding. Use a nut file or sandpaper to widen and shape the slots as needed, allowing the strings to move freely.
- Pickup and Electronics: If your guitar is equipped with pickups or electronics, test and adjust their placement, height, and wiring to achieve the desired sound and performance. Follow the manufacturer’s instructions or consult a professional if needed.
- Hardware and Components: Check and tighten any loose hardware, such as strap buttons, tuning pegs, and bridge pins. Make sure they are secure to avoid any unwanted rattling or instability during playing.
- Finishing Touches: Clean and polish the guitar to remove any residue, fingerprints, or smudges. Consider using a guitar-specific cleaning product to protect the finish and maintain its appearance.
- Play and Assess: After completing the final adjustments and setup, play the instrument to assess its playability, sound, and overall performance. Make note of any areas that may still require fine-tuning or adjustments for further refinement.
Performing these final adjustments and setup steps will ensure that your acoustic guitar is optimized for your playing style and preferences. It may take some time and experimentation to find the perfect balance, but the effort will be worthwhile in achieving the best possible sound and playability.
Remember that maintaining proper care and regular maintenance is essential for keeping your guitar in optimal condition. Regularly check and readjust your guitar’s setup as needed, especially with changes in humidity, temperature, or string gauge.
With the final adjustments and setup complete, you can confidently enjoy your acoustic guitar, knowing that it has been fine-tuned to deliver exceptional sound and performance.
Conclusion
Building an acoustic guitar is a labor of love that allows you to create a unique instrument that reflects your personal style and passion for music. Throughout the construction process, you’ve learned about choosing the right wood, shaping the body, joining the sides, bracing the top, carving the neck, installing the fretboard, attaching the neck to the body, fitting the bridge, installing the tuning pegs, making and installing the nut and saddle, applying the finish, stringing and tuning the guitar, and final adjustments and setup.
Each step in the guitar-building journey requires patience, attention to detail, and a dedication to craftsmanship. By carefully selecting materials, shaping and joining components, and meticulously setting up the instrument, you’ve created a guitar that not only looks beautiful but also delivers exceptional playability and tone.
Building your own acoustic guitar provides a deep connection to the instrument as you become intimately familiar with its construction and unique characteristics. It offers a sense of pride and accomplishment, knowing that you’ve created a unique piece of art that resonates with your musical expression.
Remember that this guide serves as a starting point, and there are countless variations and techniques to explore as you continue to refine your guitar-building skills. The more experience you gain, the more you’ll hone your craft and develop your own techniques and preferences.
As you embark on your guitar-building journey, take the time to enjoy the process and embrace the challenges along the way. Building an acoustic guitar is not just about creating a musical instrument, but also about nurturing a deep passion for music and craftsmanship.
Whether you build guitars as a hobby or aspire to become a professional luthier, the knowledge and skills gained from this experience will stay with you and continue to grow. So, pick up your newly built acoustic guitar, strum a chord, and let the music flow from an instrument that you crafted with your own hands.