Introduction
Welcome to the world of immersive gaming audio! Setting up your gaming headset on Windows 7 can significantly enhance your gaming experience, allowing you to communicate with teammates, hear in-game audio cues, and enjoy crystal-clear sound. Whether you're a seasoned gamer or just getting started, this guide will walk you through the process of setting up your gaming headset on a Windows 7 computer.
A gaming headset is a crucial accessory for any gamer, providing not only high-quality audio output but also a reliable microphone for in-game communication. By following the steps outlined in this guide, you'll be able to seamlessly integrate your gaming headset with your Windows 7 system, ensuring that you get the most out of your gaming sessions.
In the following sections, we'll cover everything you need to know to set up your gaming headset on Windows 7. From checking compatibility and connecting the headset to installing drivers and configuring system settings, we've got you covered every step of the way. By the end of this guide, you'll have a fully functional gaming headset that's ready to deliver an immersive audio experience.
So, grab your gaming headset, buckle up, and let's dive into the exciting world of gaming audio setup on Windows 7! Whether you're gearing up for an intense multiplayer battle or immersing yourself in a captivating single-player adventure, having your gaming headset properly configured will ensure that you don't miss a beat – or a crucial in-game communication. Let's get started!
Step 1: Check the Compatibility of Your Gaming Headset with Windows 7
Before diving into the setup process, it’s essential to ensure that your gaming headset is compatible with Windows 7. Compatibility issues can lead to frustrating experiences, including driver conflicts, audio malfunctions, or microphone problems. To avoid these potential pitfalls, follow these steps to verify compatibility:
- Check the Manufacturer’s Specifications: Visit the manufacturer’s website or refer to the product manual to confirm that the gaming headset is designed to work with Windows 7. Look for specific mentions of compatibility with Windows 7 in the product description or technical specifications.
- Search for Windows 7 Compatibility: Utilize online resources to search for user reviews, forums, or support documentation related to your gaming headset model and its compatibility with Windows 7. Look for any reported issues or successful setups on Windows 7 systems.
- Consult Customer Support: If you’re uncertain about the compatibility of your gaming headset with Windows 7, consider reaching out to the manufacturer’s customer support. They can provide valuable insights and guidance to ensure a smooth setup process.
By confirming the compatibility of your gaming headset with Windows 7, you can preemptively address any potential hurdles and proceed with confidence to the next steps of the setup process. This proactive approach sets the stage for a seamless integration of your gaming headset with your Windows 7 system, paving the way for an optimal gaming experience.
Step 2: Connect the Gaming Headset to Your Computer
Now that you’ve confirmed the compatibility of your gaming headset with Windows 7, it’s time to establish the physical connection between the headset and your computer. Follow these steps to ensure a proper and secure connection:
- Locate the Audio and Microphone Ports: Identify the audio and microphone ports on your computer. These are typically color-coded as green for audio and pink for the microphone.
- Plug in the Headset: Connect the audio plug of your gaming headset to the corresponding audio port on your computer. Ensure a firm and secure connection to prevent audio interruptions.
- Connect the Microphone: If your gaming headset features a built-in microphone or a detachable one, plug it into the microphone port on your computer. Verify that the connection is snug to enable clear communication.
- Adjust Headset Controls: If your gaming headset includes volume controls, microphone mute buttons, or other adjustable features, take a moment to familiarize yourself with these controls. This ensures that you can fine-tune the audio settings according to your preferences.
Once you’ve completed these steps, your gaming headset should be physically connected to your Windows 7 computer, ready to deliver immersive audio and enable seamless communication during your gaming sessions. A secure and proper connection is essential for optimal audio output and microphone functionality, setting the stage for an enhanced gaming experience.
Step 3: Install Any Necessary Drivers
Installing the appropriate drivers for your gaming headset is crucial to ensure seamless compatibility and optimal performance on your Windows 7 system. Follow these steps to identify and install any necessary drivers:
- Check the Manufacturer’s Website: Visit the official website of the gaming headset’s manufacturer to locate the latest drivers for Windows 7. Look for a dedicated support or downloads section where you can find the relevant drivers for your specific headset model.
- Download and Install Drivers: Once you’ve identified the correct drivers for your gaming headset and Windows 7, download the installation package to your computer. Follow the provided instructions to install the drivers, ensuring that you select the appropriate options for your operating system.
- Restart Your Computer: After the driver installation is complete, restart your computer to allow the changes to take effect. This step is essential to ensure that the newly installed drivers are fully integrated into your system.
- Verify Driver Functionality: Upon restarting your computer, verify that the gaming headset is recognized and functioning properly. Check the audio output and microphone input to confirm that the installed drivers have enabled seamless communication and audio playback.
By installing the necessary drivers for your gaming headset on Windows 7, you pave the way for a harmonious integration of the device with your system. The correct drivers facilitate optimal audio performance and ensure that the microphone functions as intended, providing a solid foundation for an immersive gaming experience.
Step 4: Configure the Gaming Headset in Windows 7 Settings
Once you’ve connected your gaming headset and installed the necessary drivers, it’s time to fine-tune the audio and microphone settings within Windows 7 to optimize the performance of your headset. Follow these steps to configure the gaming headset in your system settings:
- Access Sound Settings: Navigate to the “Sound” settings in Windows 7. You can typically access these settings by right-clicking on the speaker icon in the system tray and selecting “Playback devices” and “Recording devices” to configure audio output and microphone input, respectively.
- Select the Gaming Headset: In the “Playback devices” section, locate your gaming headset and set it as the default playback device. This ensures that audio output is directed to your headset, providing an immersive gaming audio experience.
- Adjust Audio Levels: Fine-tune the volume and audio levels for your gaming headset to suit your preferences. You can adjust the volume and balance settings to achieve optimal audio output that enhances your gaming experience without overpowering or distorting the sound.
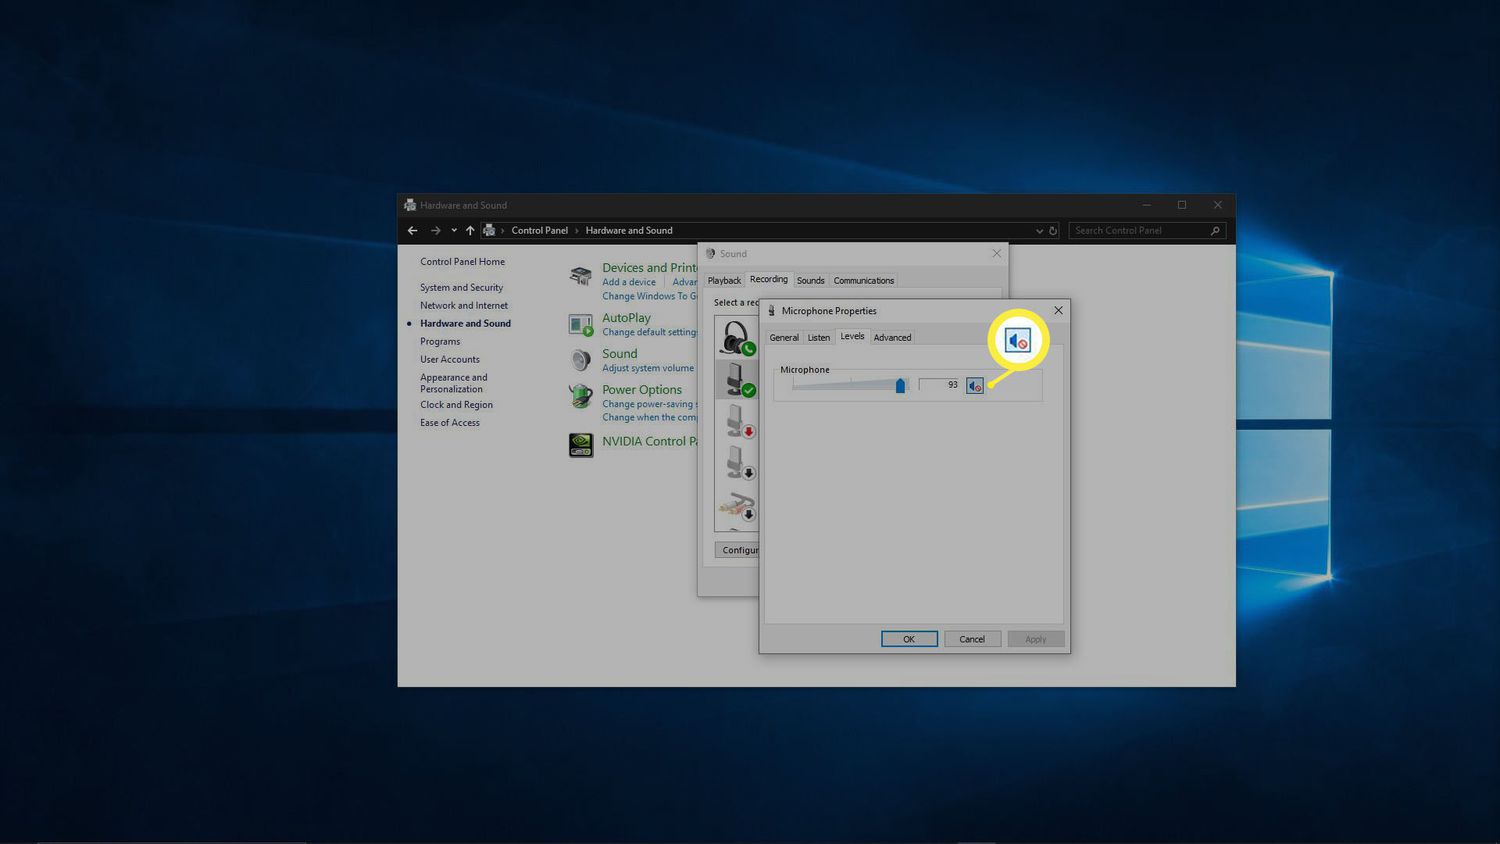
- Configure Microphone Settings: In the “Recording devices” section, select your gaming headset as the default recording device. Adjust the microphone levels and settings to ensure clear and accurate communication during gaming sessions.
- Test the Settings: Verify the configured settings by playing audio and testing the microphone. Ensure that the audio playback is directed to your gaming headset, and the microphone accurately captures your voice without distortion or background noise.
By configuring the gaming headset in Windows 7 settings, you can tailor the audio and microphone parameters to align with your gaming preferences, ensuring that you receive optimal audio output and seamless communication capabilities during your gaming endeavors.
Step 5: Test the Gaming Headset
After completing the setup and configuration process, it’s essential to thoroughly test your gaming headset to ensure that it functions as intended and delivers the expected audio and communication performance. Follow these steps to conduct comprehensive testing:
- Audio Playback Test: Play various types of audio content, including music, game sound effects, and dialogue, to gauge the quality and clarity of the audio output from your gaming headset. Pay attention to detail and assess the overall audio experience to ensure that it meets your expectations.
- Microphone Test: Engage in voice communication, either within a game or through a dedicated communication application, to test the microphone functionality of your gaming headset. Verify that your voice is transmitted clearly and accurately without distortion or background noise.
- Longer Gaming Session Test: Engage in an extended gaming session while using your gaming headset. Evaluate the comfort, audio quality, and microphone performance over an extended period to ensure that the headset remains reliable and comfortable throughout prolonged use.
- Adjustment and Fine-Tuning: If you encounter any issues during testing, such as imbalanced audio, microphone sensitivity, or discomfort, make necessary adjustments to the settings or headset positioning. Fine-tune the audio and microphone parameters based on your testing experience.
Thoroughly testing your gaming headset allows you to identify any potential issues and make adjustments to optimize its performance. By conducting comprehensive tests across various scenarios, you can gain confidence in the functionality and reliability of your gaming headset, ensuring that it enhances your overall gaming experience.
Conclusion
Congratulations! You’ve successfully set up your gaming headset on a Windows 7 computer, laying the groundwork for an immersive and seamless gaming audio experience. By following the comprehensive steps outlined in this guide, you’ve ensured that your gaming headset is compatible, connected, configured, and thoroughly tested, ready to deliver high-quality audio output and reliable communication capabilities.
With your gaming headset seamlessly integrated into your Windows 7 system, you’re poised to embark on captivating gaming adventures, engage in multiplayer battles with clear communication, and immerse yourself in the rich audio landscapes of your favorite games. The setup process has equipped you with the tools to optimize audio playback, fine-tune microphone settings, and tailor the headset to your gaming preferences, ensuring that you don’t miss a beat in the virtual realm.
As you venture into the realm of gaming with your newly configured headset, remember to periodically revisit the settings and make adjustments based on your evolving preferences and gaming experiences. This proactive approach allows you to continually optimize the audio and communication aspects of your gaming headset, ensuring a consistently enjoyable and immersive gaming experience.
Whether you’re exploring vast open worlds, engaging in intense multiplayer battles, or unraveling gripping narratives, your gaming headset is now an essential companion, enriching your gaming escapades with its audio prowess and communication capabilities. Embrace the power of immersive gaming audio and enjoy the enhanced depth and clarity that your gaming headset brings to your virtual endeavors.
Now, with your gaming headset seamlessly integrated into your gaming setup, it’s time to embark on thrilling adventures, communicate effectively with teammates, and experience the full spectrum of audio nuances that your favorite games have to offer. Your gaming headset is more than just a device – it’s a gateway to a heightened gaming experience, and you’ve successfully unlocked its potential.