Introduction
When it comes to using a headset microphone on your Windows 7 computer, ensuring that it works properly is essential for clear communication during voice calls, recording audio, or participating in online gaming. Whether you're a professional who relies on crystal-clear audio for virtual meetings or a casual user who enjoys chatting with friends, understanding how to test your headset microphone can save you from frustrating technical hiccups.
In this comprehensive guide, we will walk you through the process of setting up and testing your headset microphone on a Windows 7 system. By following these steps, you can quickly determine if your microphone is functioning correctly and troubleshoot any potential issues that may arise.
A functional headset microphone is a valuable tool for various activities, such as making voice calls, participating in online gaming communities, recording audio notes, or engaging in virtual meetings. The ability to communicate clearly and effectively through your headset microphone can significantly enhance your overall digital experience.
Whether you're a remote worker, a student attending virtual classes, or an avid gamer, a reliable headset microphone is an indispensable asset. By understanding how to ensure its proper functionality, you can avoid the frustration of encountering technical difficulties when trying to communicate or record audio on your Windows 7 device.
Now, let's delve into the process of setting up and testing your headset microphone in Windows 7, ensuring that you can confidently use this essential tool for seamless communication and audio recording.
Setting up Your Headset Microphone
Setting up your headset microphone on a Windows 7 computer involves a few straightforward steps to ensure that it is properly recognized and ready for use. Before diving into the testing phase, it's crucial to establish a solid foundation by setting up your headset microphone correctly. Here's a detailed guide to help you through the process:
-
Physical Connection: Begin by physically connecting your headset to the appropriate ports on your computer. Most headsets utilize a 3.5mm audio jack for the headphones and a separate 3.5mm jack for the microphone. Ensure that these jacks are securely plugged into the corresponding audio input and output ports on your computer.
-
Driver Installation: In some cases, your headset microphone may require specific drivers to function optimally. Check the manufacturer's instructions or website to determine if any drivers need to be installed. If necessary, follow the provided instructions to download and install the required drivers for your headset.
-
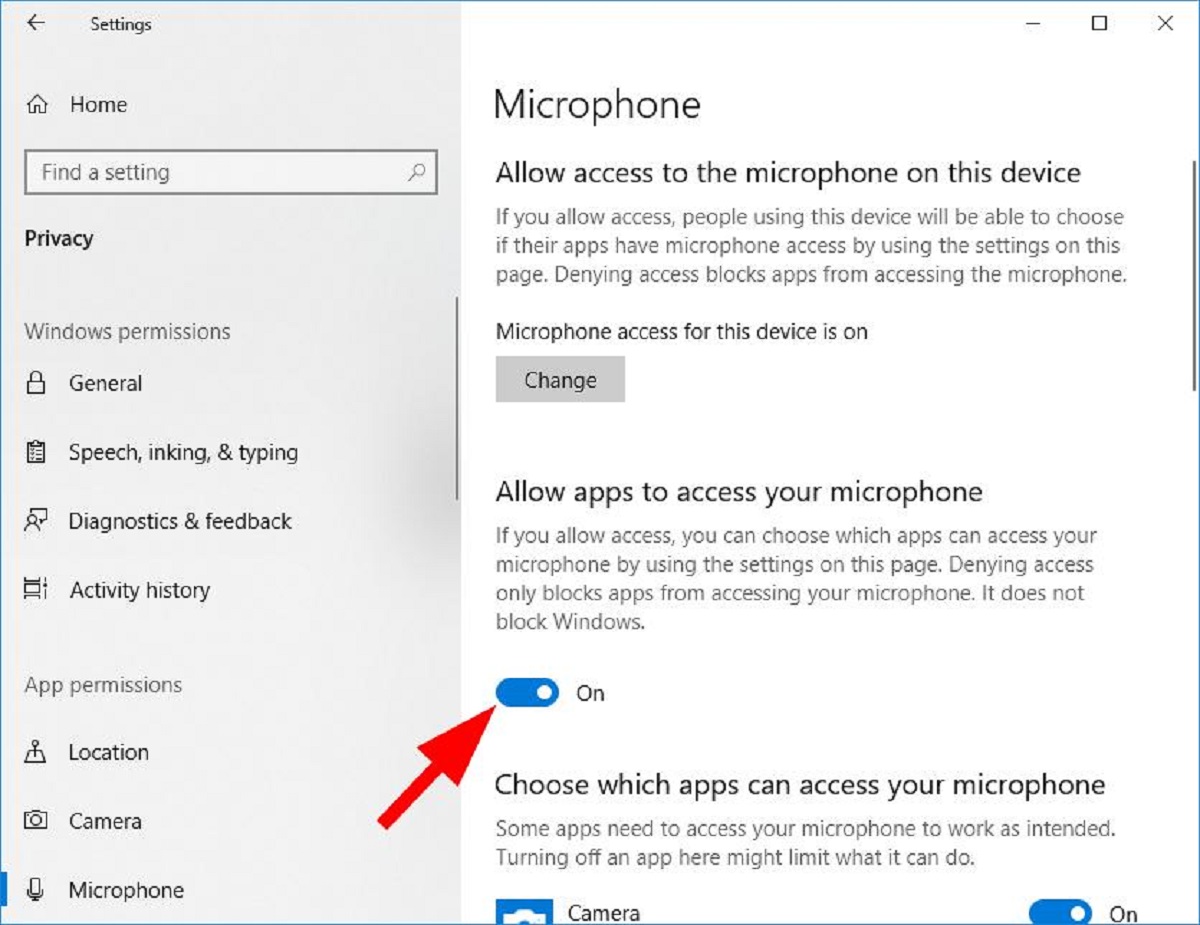
Adjusting Microphone Settings: Access the sound settings on your Windows 7 computer by right-clicking the sound icon in the system tray and selecting "Recording devices." Here, you can view a list of available recording devices, including your headset microphone. Right-click on the microphone and select "Properties" to configure its settings. Ensure that the microphone is set as the default recording device and adjust its levels and enhancements as needed.
-
Testing the Connection: Before proceeding to the testing phase, it's advisable to conduct a quick sound check to ensure that your headset microphone is being detected by your computer. Speak into the microphone and observe the volume levels on the recording devices window. You should see the volume bar reacting to your voice, indicating that the microphone is functioning and being recognized by your system.
-
Positioning the Microphone: Properly position the microphone to optimize its performance. Adjust the microphone boom or placement to ensure that it is close enough to capture your voice clearly without picking up excessive background noise.
By following these steps, you can effectively set up your headset microphone on a Windows 7 computer, laying the groundwork for the subsequent testing phase. A well-configured headset microphone can significantly enhance your communication and audio recording experiences, providing clear and reliable sound input for various applications.
Testing Your Headset Microphone in Windows 7
After successfully setting up your headset microphone, the next crucial step is to test its functionality on your Windows 7 system. This process allows you to verify that the microphone accurately captures your voice and that it is configured to transmit clear audio input. Here's a detailed guide to help you effectively test your headset microphone:
Using the Sound Recorder
-
Accessing Sound Recorder: Navigate to the "Start" menu and search for "Sound Recorder" in the search bar. Click on the Sound Recorder application to launch it.
-
Recording a Test Clip: Once the Sound Recorder is open, click the "Start Recording" button and speak into your headset microphone. Ensure that you speak clearly and at a normal volume to capture a representative audio sample.
-
Playback and Evaluation: After recording a brief clip, stop the recording and play it back using the Sound Recorder. Listen attentively to the playback to assess the quality of the recorded audio. Ensure that your voice is clear and devoid of any distortions or excessive background noise.
Using Windows 7 Sound Settings
-
Accessing Sound Settings: Right-click on the sound icon in the system tray and select "Recording devices." This will open the "Sound" window, displaying a list of available recording devices.
-
Testing Microphone Levels: In the "Sound" window, select your headset microphone and click on "Properties." Navigate to the "Levels" tab and observe the microphone levels while speaking into the microphone. The volume bar should react to your voice, indicating that the microphone is capturing sound.
-
Adjusting Microphone Sensitivity: While in the "Properties" window, you can fine-tune the microphone sensitivity to ensure optimal performance. Experiment with the microphone levels to find the appropriate sensitivity that captures your voice clearly without picking up excessive ambient noise.
Using Communication Applications
-
Testing in Communication Software: If you frequently use communication applications such as Skype, Zoom, or Discord, consider initiating a test call within these applications. This allows you to verify that your headset microphone is functioning correctly in the specific software environment where you intend to use it regularly.
-
Soliciting Feedback: When testing your headset microphone in communication applications, seek feedback from the recipient to confirm the clarity and quality of your voice transmission. This real-time evaluation can provide valuable insights into the performance of your microphone during live communication scenarios.
By following these testing methods, you can confidently assess the functionality of your headset microphone on a Windows 7 system. Whether you opt for the simplicity of using the Sound Recorder or prefer to test your microphone within specific communication applications, conducting thorough tests ensures that your microphone is ready for seamless communication, audio recording, and online interactions.
Remember, the testing phase is crucial for identifying any potential issues with your headset microphone and making necessary adjustments to optimize its performance on your Windows 7 computer.
Troubleshooting Common Issues
Even after setting up and testing your headset microphone, you may encounter common issues that can hinder its optimal functionality on a Windows 7 system. Identifying and addressing these issues is essential for ensuring a seamless and frustration-free experience with your microphone. Here are some common problems you may encounter and the corresponding troubleshooting steps to resolve them:
1. Low Microphone Volume
If you notice that the volume of your recorded audio is unexpectedly low or barely audible, consider the following troubleshooting steps:
- Check Microphone Levels: Access the sound settings and verify that the microphone levels are appropriately adjusted. Increase the microphone volume to a suitable level that captures your voice clearly.
- Microphone Sensitivity: Experiment with the microphone sensitivity settings to ensure that it is optimized for capturing your voice without picking up excessive background noise.
2. Distorted or Muffled Audio
When the recorded audio from your headset microphone sounds distorted or muffled, try the following troubleshooting measures:
- Check Physical Connections: Ensure that the headset microphone and audio jacks are securely connected to the computer. Loose connections can lead to audio distortions.
- Driver Updates: Check for driver updates for your headset microphone. Installing the latest drivers can resolve compatibility issues and improve audio quality.
3. Background Noise Interference
If your microphone picks up unwanted background noise, consider implementing the following troubleshooting strategies:
- Positioning the Microphone: Adjust the position of the microphone to minimize the capture of ambient sounds. Position it closer to your mouth to prioritize your voice over background noise.
- Noise Suppression: Explore the microphone settings to enable noise suppression or noise cancellation features, if available. These settings can help reduce background noise during audio capture.
4. Inconsistent Microphone Detection
In cases where your headset microphone is intermittently detected by the system, consider the following troubleshooting steps:
- Check USB or Audio Jack Connections: If your headset utilizes a USB connection, ensure that the USB port is functioning correctly. For audio jack connections, inspect the integrity of the audio ports and cables.
- Driver Reinstallation: Uninstall and reinstall the drivers for your headset microphone to address any potential driver-related issues affecting its detection.
By addressing these common issues through systematic troubleshooting, you can enhance the performance and reliability of your headset microphone on a Windows 7 computer. Troubleshooting is an essential aspect of maintaining an optimal audio experience, and by applying these solutions, you can overcome potential challenges and enjoy clear and consistent audio input from your headset microphone.
Conclusion
In conclusion, mastering the process of setting up, testing, and troubleshooting your headset microphone on a Windows 7 computer is pivotal for ensuring a seamless and frustration-free audio experience. By following the comprehensive guide presented in this article, you have gained valuable insights into the essential steps required to optimize the functionality of your headset microphone.
A well-configured headset microphone serves as a gateway to clear and effective communication, whether you are engaging in voice calls, participating in online gaming communities, recording audio notes, or attending virtual meetings. The ability to capture and transmit your voice accurately is instrumental in enhancing your digital interactions and overall productivity.
By meticulously setting up your headset microphone, including physical connections, driver installations, and microphone adjustments, you have established a solid foundation for its optimal performance. The testing phase, encompassing the use of Sound Recorder, Windows 7 sound settings, and communication applications, has allowed you to verify the microphone's functionality in various contexts, ensuring that it accurately captures your voice without distortions or interference.
Furthermore, the troubleshooting strategies provided equip you with the necessary tools to address common issues that may arise with your headset microphone, such as low volume, distorted audio, background noise interference, and inconsistent detection. By implementing these troubleshooting measures, you can overcome potential challenges and maintain the reliability of your headset microphone on your Windows 7 system.
Ultimately, a functional and well-maintained headset microphone enhances your overall digital experience, enabling you to communicate clearly, record audio with precision, and engage seamlessly in various online activities. The knowledge and skills acquired through this guide empower you to harness the full potential of your headset microphone, contributing to a more efficient and enjoyable digital lifestyle.
As you apply the insights and techniques outlined in this guide, you are poised to leverage the capabilities of your headset microphone to their fullest extent, whether in professional, educational, or recreational contexts. Embracing the process of setting up, testing, and troubleshooting your headset microphone on Windows 7 positions you to navigate the digital landscape with confidence and clarity, ensuring that your voice is heard loud and clear in every interaction.