Introduction
In today’s digital world, communication plays a vital role in our daily lives, whether it’s staying connected with friends and family or engaging in online meetings and gaming sessions. When it comes to using a headset with a microphone on your PC, it opens up a realm of possibilities for clear and convenient audio input.
Whether you’re a professional looking to enhance your productivity, a gamer aiming for immersive gameplay experiences, or simply someone who enjoys voice chats, having a quality headset with a microphone is essential. However, many people struggle with the initial setup and configuration process, unsure of how to use their headset mic effectively on their PC.
In this guide, we’ll walk you through the steps to use a headset mic on your PC, from choosing the right headset to adjusting audio settings and troubleshooting common issues. By the end of this article, you’ll be well-equipped with the knowledge to harness the power of your headset mic and make the most out of your audio experiences.
Before diving into the technical aspects, it’s important to note that the type and quality of your headset will greatly impact the performance of its microphone. While some headsets come bundled with a microphone, others have detachable mics or offer superior noise cancellation features. The key is to choose a headset that suits your specific needs and budget.
Next, we’ll guide you through the process of connecting your headset to your PC, as well as adjusting audio settings in Windows to ensure optimal performance. We’ll also cover testing and troubleshooting methods to address any mic-related issues you may encounter.
Additionally, we’ll discuss how to configure microphone settings within specific applications, such as video conferencing software or gaming platforms, to maximize the clarity and quality of your voice transmission.
Lastly, we’ll share some valuable tips to elevate your mic performance, including suggestions for maintaining microphone hygiene, minimizing background noise, and optimizing microphone sensitivity.
Now, let’s embark on this journey to harness the power of your headset mic and unlock a world of seamless communication on your PC.
Choosing the Right Headset with a Mic
When it comes to choosing the right headset with a microphone for your PC, there are several factors to consider. The quality of your audio experience is heavily dependent on the headset you choose, so it’s essential to make an informed decision. Here are some key aspects to consider in selecting the perfect headset:
1. Purpose: Determine the primary purpose of your headset. Are you using it for professional video calls, gaming, or general multimedia consumption? Different headsets excel in different areas, so understanding your requirements will help narrow down your options.
2. Design and Comfort: Look for a headset with a design that suits your preferences. Over-ear headphones offer better noise isolation, while on-ear headphones are more portable. Ensure that the headset is comfortable, especially if you plan to wear it for extended periods.
3. Wired or Wireless: Decide whether you prefer the flexibility of a wireless headset or the reliability and consistent performance of a wired one. Wireless headsets offer convenience, while wired options often have better audio quality and don’t require charging.
4. Microphone Quality: Pay attention to the microphone’s quality. Look for headsets with noise-canceling features and adjustable microphone sensitivity to optimize voice clarity and minimize background noise.
5. Compatibility: Ensure that the headset you choose is compatible with your PC’s operating system. Most headsets are designed to work with Windows, macOS, and popular gaming platforms, but it’s worth double-checking before making a purchase.
6. Budget: Set a budget that suits your needs. While high-end headsets may offer superior audio quality and advanced features, there are also affordable options that provide decent performance. Consider your budget constraints and prioritize the features that matter most to you.
By considering these factors, you can narrow down your options and find the perfect headset with a microphone to meet your needs. Remember to read reviews and do thorough research before making a purchase to ensure you’re investing in a reliable and high-quality headset.
Now that you have an idea of what to look for in a headset, let’s move on to the next section, where we’ll guide you through the process of connecting your headset to your PC.
Connecting the Headset to Your PC
Now that you’ve chosen the perfect headset with a mic, it’s time to connect it to your PC. The process may vary depending on whether you have a wired or wireless headset. Follow these steps to ensure a seamless connection:
Wired Headsets:
- Locate the audio jacks on your PC. Most PCs have separate audio input and output jacks.
- Take note of the color-coding: the pink jack is for the microphone, while the green jack is for audio output.
- Plug the headset’s audio connector into the corresponding green output jack.
- Insert the headset’s microphone connector into the pink input jack.
- Ensure that the connections are secure, and the headset is properly plugged in.
Wireless Headsets:
- Check if your wireless headset requires a USB dongle or if it uses Bluetooth technology.
- If using a USB dongle, insert it into an available USB port on your PC.
- If your headset uses Bluetooth technology, turn on Bluetooth on your PC and put the headset in pairing mode.
- Follow the instructions provided by the manufacturer to pair your headset with your PC.
Once connected, your PC should detect the headset and configure it as the default audio input and output device. However, if the headset is not automatically recognized, you may need to manually select it in your PC’s audio settings.
Now that your headset is connected, let’s move on to the next section, where we’ll explore how to adjust audio settings in Windows for optimal performance.
Adjusting Audio Settings in Windows
After connecting your headset to your PC, it’s essential to adjust the audio settings in Windows to ensure optimal performance. Follow these steps to fine-tune your audio settings:
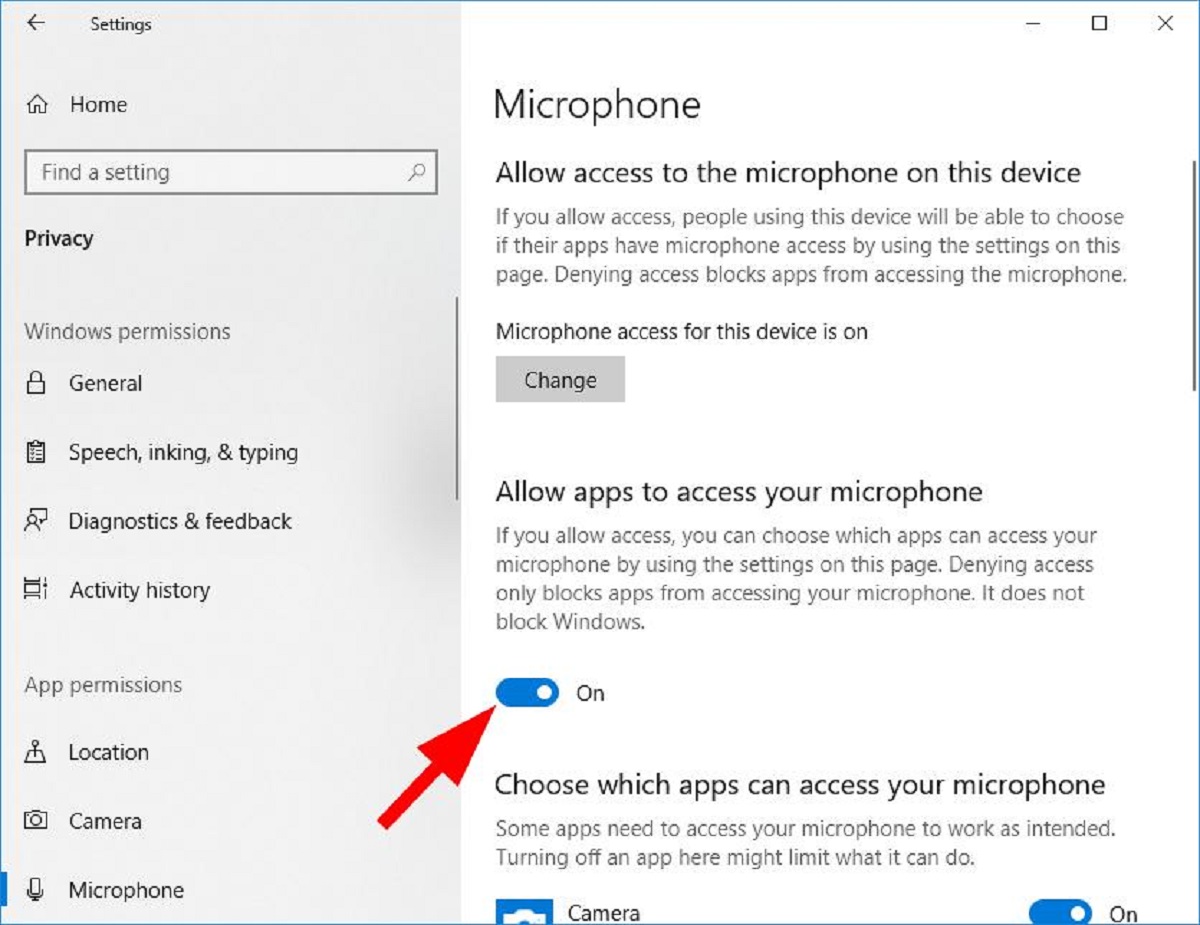
- Right-click on the volume icon in the taskbar and select “Open Sound settings.”
- In the Sound settings window, under the “Input” section, select your headset as the default microphone device.
- Test your microphone by speaking into it and observing the input level meter. Adjust the microphone sensitivity if necessary to capture your voice clearly without distortion.
- Next, navigate to the “Output” section in the Sound settings window and select your headset as the default audio output device.
- Test the audio output by playing some sound or music and ensuring that it is properly routed through your headset.
- If your headset has additional software or drivers provided by the manufacturer, install them and customize the audio settings accordingly for enhanced performance.
- Explore advanced audio settings in the Windows Control Panel or Settings menu to further adjust audio playback and recording preferences, such as equalizer settings or microphone enhancements.
By adjusting these audio settings, you can ensure that your headset mic is correctly recognized and optimized for clear input and output. Remember to save your changes and test your headset in various applications to ensure the settings are working as intended.
In the next section, we’ll discuss how to test and troubleshoot your microphone to resolve any potential issues.
Testing and Troubleshooting the Mic
Once you have connected your headset and adjusted the audio settings, it’s time to test your microphone and troubleshoot any issues that may arise. Follow these steps to ensure your microphone is working correctly:
- Open the Windows Sound settings by right-clicking on the volume icon in the taskbar and selecting “Open Sound settings.”
- Under the “Input” section, locate the microphone and speak into it.
- Observe the input level meter to ensure that the microphone is capturing your voice and producing audio signals.
- If the input level is too low or there is no sound, check the physical connections of your headset and ensure that it is properly plugged in.
- If the microphone still does not work, try restarting your PC and testing it again.
- Ensure that your microphone is not muted or set to a very low volume in the audio settings. Adjust the microphone volume level if necessary.
- Update or reinstall the microphone drivers if the issue persists. Visit the manufacturer’s website for the latest drivers and install them accordingly.
- Consider testing your headset with another PC or device to determine if the problem lies with the headset or your PC.
- If none of the above steps resolve the issue, it may be a hardware problem with your headset. In such cases, contact the manufacturer’s support for further assistance or consider replacing the headset.
By following these troubleshooting steps, you can identify and address any microphone-related issues effectively. Remember to test your microphone in different applications, such as voice recording software or online communication platforms, to ensure consistent performance.
In the next section, we’ll discuss how to configure microphone settings within specific applications, such as video conferencing software or gaming platforms, to further optimize your headset microphone.
Configuring Microphone Settings in Applications
After connecting your headset and ensuring it is working properly in Windows, it’s important to configure microphone settings within specific applications to ensure the best audio experience. Here’s how to do it:
1. Video Conferencing Software:
- Open the video conferencing software, such as Zoom or Microsoft Teams.
- Navigate to the audio settings or preferences section.
- Select your headset as the default microphone device.
- Adjust the microphone volume or sensitivity, if available, to achieve clear and balanced audio.
- Some video conferencing software also allows you to enable echo cancellation or noise reduction features to enhance microphone performance.
2. Gaming Platforms:
- Launch your preferred gaming platform, such as Steam or Discord.
- Access the audio or voice settings within the platform.
- Select your headset as the default microphone device.
- Adjust the microphone sensitivity and noise reduction settings to suit your needs.
- Some gaming platforms offer additional features, such as push-to-talk or voice activation, to control when your microphone is active.
Note: The process of configuring microphone settings may vary depending on the application you are using. Refer to the application’s documentation or support resources for detailed instructions on adjusting microphone settings.
By customizing microphone settings within specific applications, you can ensure that your voice is captured accurately and transmitted clearly during video calls or gaming sessions. Test your microphone in the respective applications to ensure the changes are taking effect.
Now that you have configured microphone settings in applications, let’s move on to the next section where we’ll share some valuable tips to enhance the performance of your headset microphone.
Tips for Better Mic Performance
To get the most out of your headset mic and enhance its performance, consider the following tips:
1. Microphone Placement:
- Position the microphone close to your mouth for optimal sound capture and reduced background noise.
- Avoid blocking the microphone with your hands or other objects to ensure clear audio transmission.
2. Microphone Hygiene:
- Regularly clean the microphone using a soft cloth or gentle cleaning solution to remove dust and debris.
- Avoid blowing directly into the microphone, as it can cause moisture buildup and damage.
3. Background Noise Minimization:
- Minimize background noise in your environment by closing windows, doors, or using sound-absorbing materials.
- Consider using a headset with noise-canceling or noise-isolating features to reduce environmental disturbances.
4. Adjust Microphone Sensitivity:
- If your microphone picks up too much background noise, adjust the sensitivity settings in Windows or application-specific settings.
- Experiment with different sensitivity levels to find the balance between capturing clear audio and minimizing unwanted noise.
5. Volume Control:
- Monitor your microphone volume to avoid distortion or clipping. Adjust the volume levels in your PC’s sound settings or application settings accordingly.
- Ensure that your microphone is not set too low, as it may result in a weak signal and poor audio quality.
6. Test with Different Applications and Environments:
- Test your headset and microphone with various applications and environments to identify any specific settings that may optimize performance.
- Make adjustments as necessary for each application or environment to achieve the best audio quality.
By following these tips, you can improve the performance of your headset microphone and enjoy clearer and more immersive audio experiences during voice calls, gaming, or other activities.
Now that you’re equipped with these valuable tips, you can make the most of your headset mic. In the concluding section, we’ll summarize the key points discussed in this guide.
Conclusion
Using a headset with a microphone on your PC provides a seamless and convenient way to communicate, collaborate, and immerse yourself in various audio experiences. By following the steps outlined in this guide, you can maximize the performance of your headset mic and enjoy crystal-clear audio.
We began by emphasizing the importance of choosing the right headset that suits your needs, considering factors like purpose, design, and budget. Then, we guided you through the process of connecting your headset to your PC, whether it’s a wired or wireless option.
After connecting your headset, we explored how to adjust audio settings in Windows to ensure optimal performance. We discussed selecting your headset as the default audio input and output device and testing the microphone to ensure it captures your voice properly.
We then moved on to testing and troubleshooting the microphone, providing steps to identify and resolve any potential issues. From checking physical connections to updating drivers, these steps can help you troubleshoot and ensure your microphone works flawlessly.
In addition to Windows settings, we discussed configuring microphone settings within specific applications, such as video conferencing software and gaming platforms. Customizing these settings allows you to tailor the microphone’s performance to the specific requirements of each application.
Lastly, we shared valuable tips for better mic performance, including microphone placement, hygiene, background noise minimization, adjusting sensitivity, and volume control. These tips can optimize your audio quality and minimize unwanted noise during voice calls, gaming, or other activities.
By applying these guidelines and tips, you can fully harness the power of your headset microphone and enjoy enhanced audio experiences on your PC.
Now that you have mastered the art of using a headset mic on your PC, it’s time to put your knowledge into practice and enjoy seamless communication and immersive audio experiences.