Introduction
Setting up a Panasonic surround sound system can elevate your home entertainment experience to a whole new level. Whether you’re a movie enthusiast or a music lover, the immersive audio provided by a surround sound system can transform your living room into a private theater or a concert hall.
However, hooking up a surround sound system might seem like a daunting task, especially if you’re not familiar with the technical aspects. But don’t worry! In this guide, we will walk you through the process step-by-step, so you can enjoy the rich and detailed sound of your Panasonic surround sound system in no time.
Before we dive into the setup process, it’s essential to gather the necessary equipment. Make sure you have the following items ready:
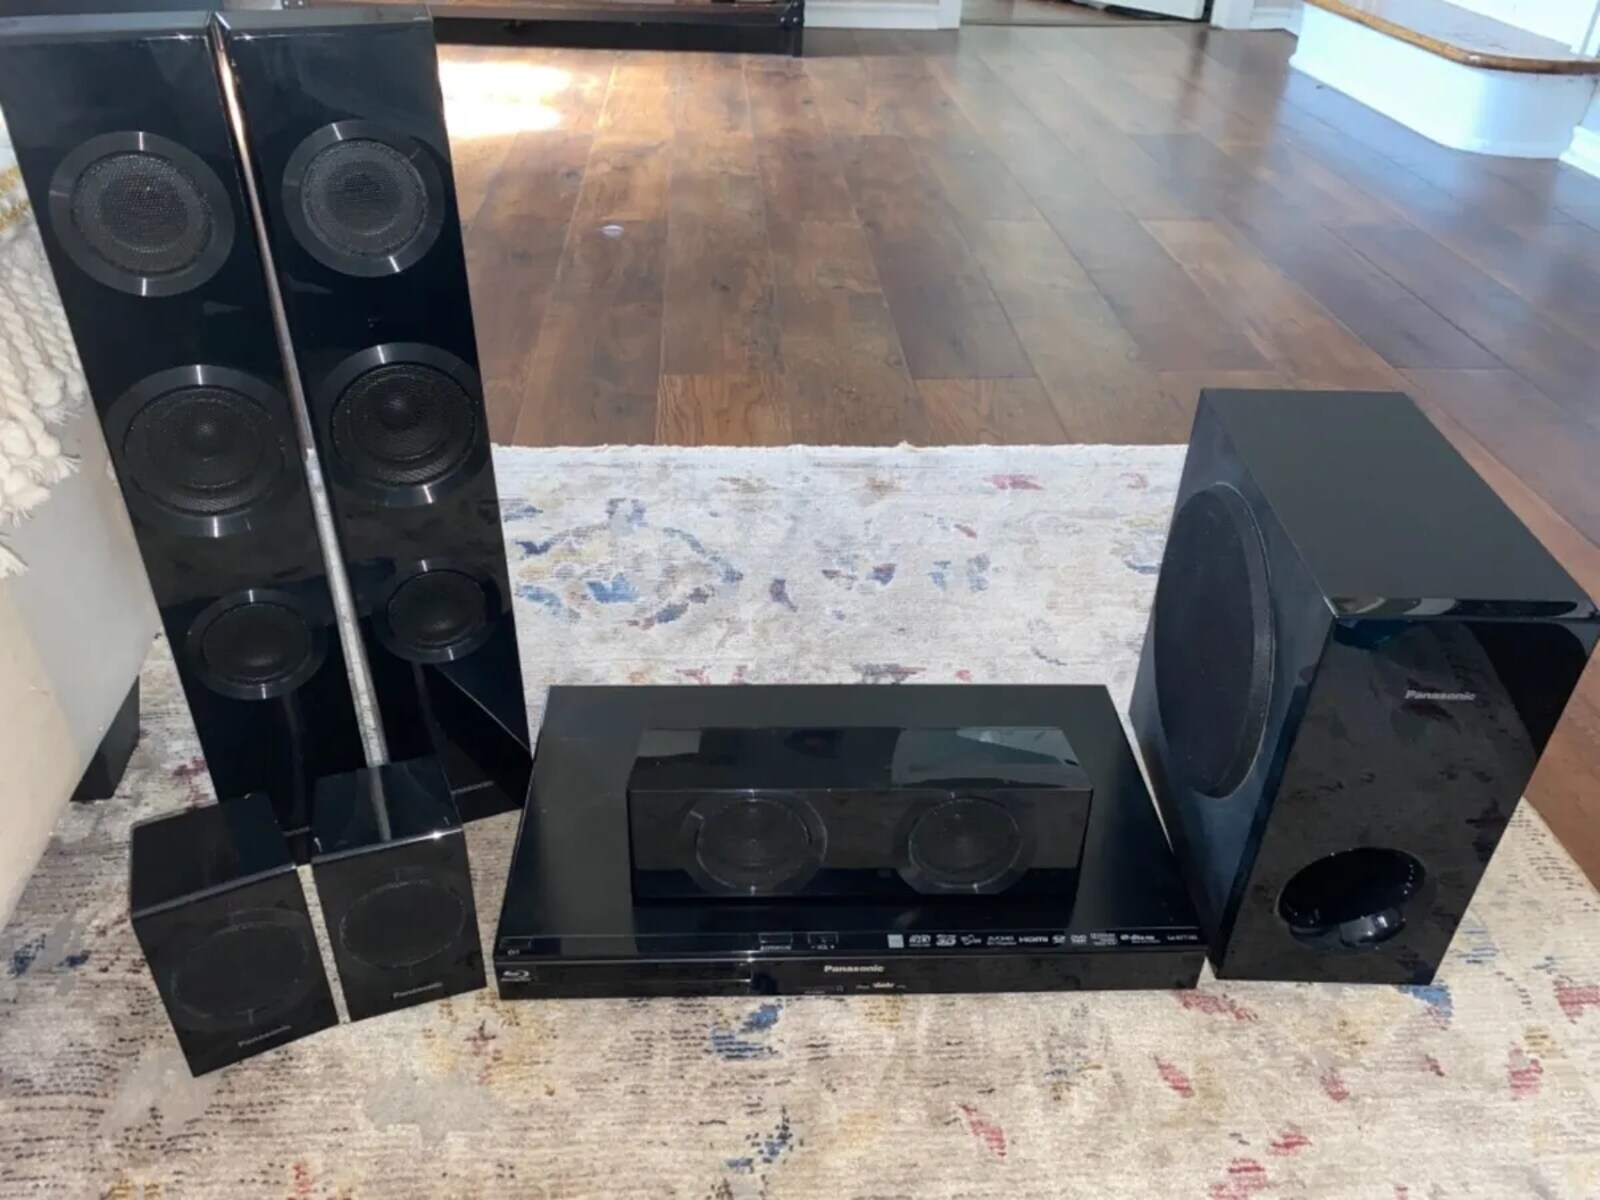
- A Panasonic surround sound system with a receiver
- Speakers (including a center speaker, front speakers, and rear speakers)
- A subwoofer for deep bass
- Audio and video cables (such as HDMI cables, optical cables, and speaker wires)
- A television or a display device
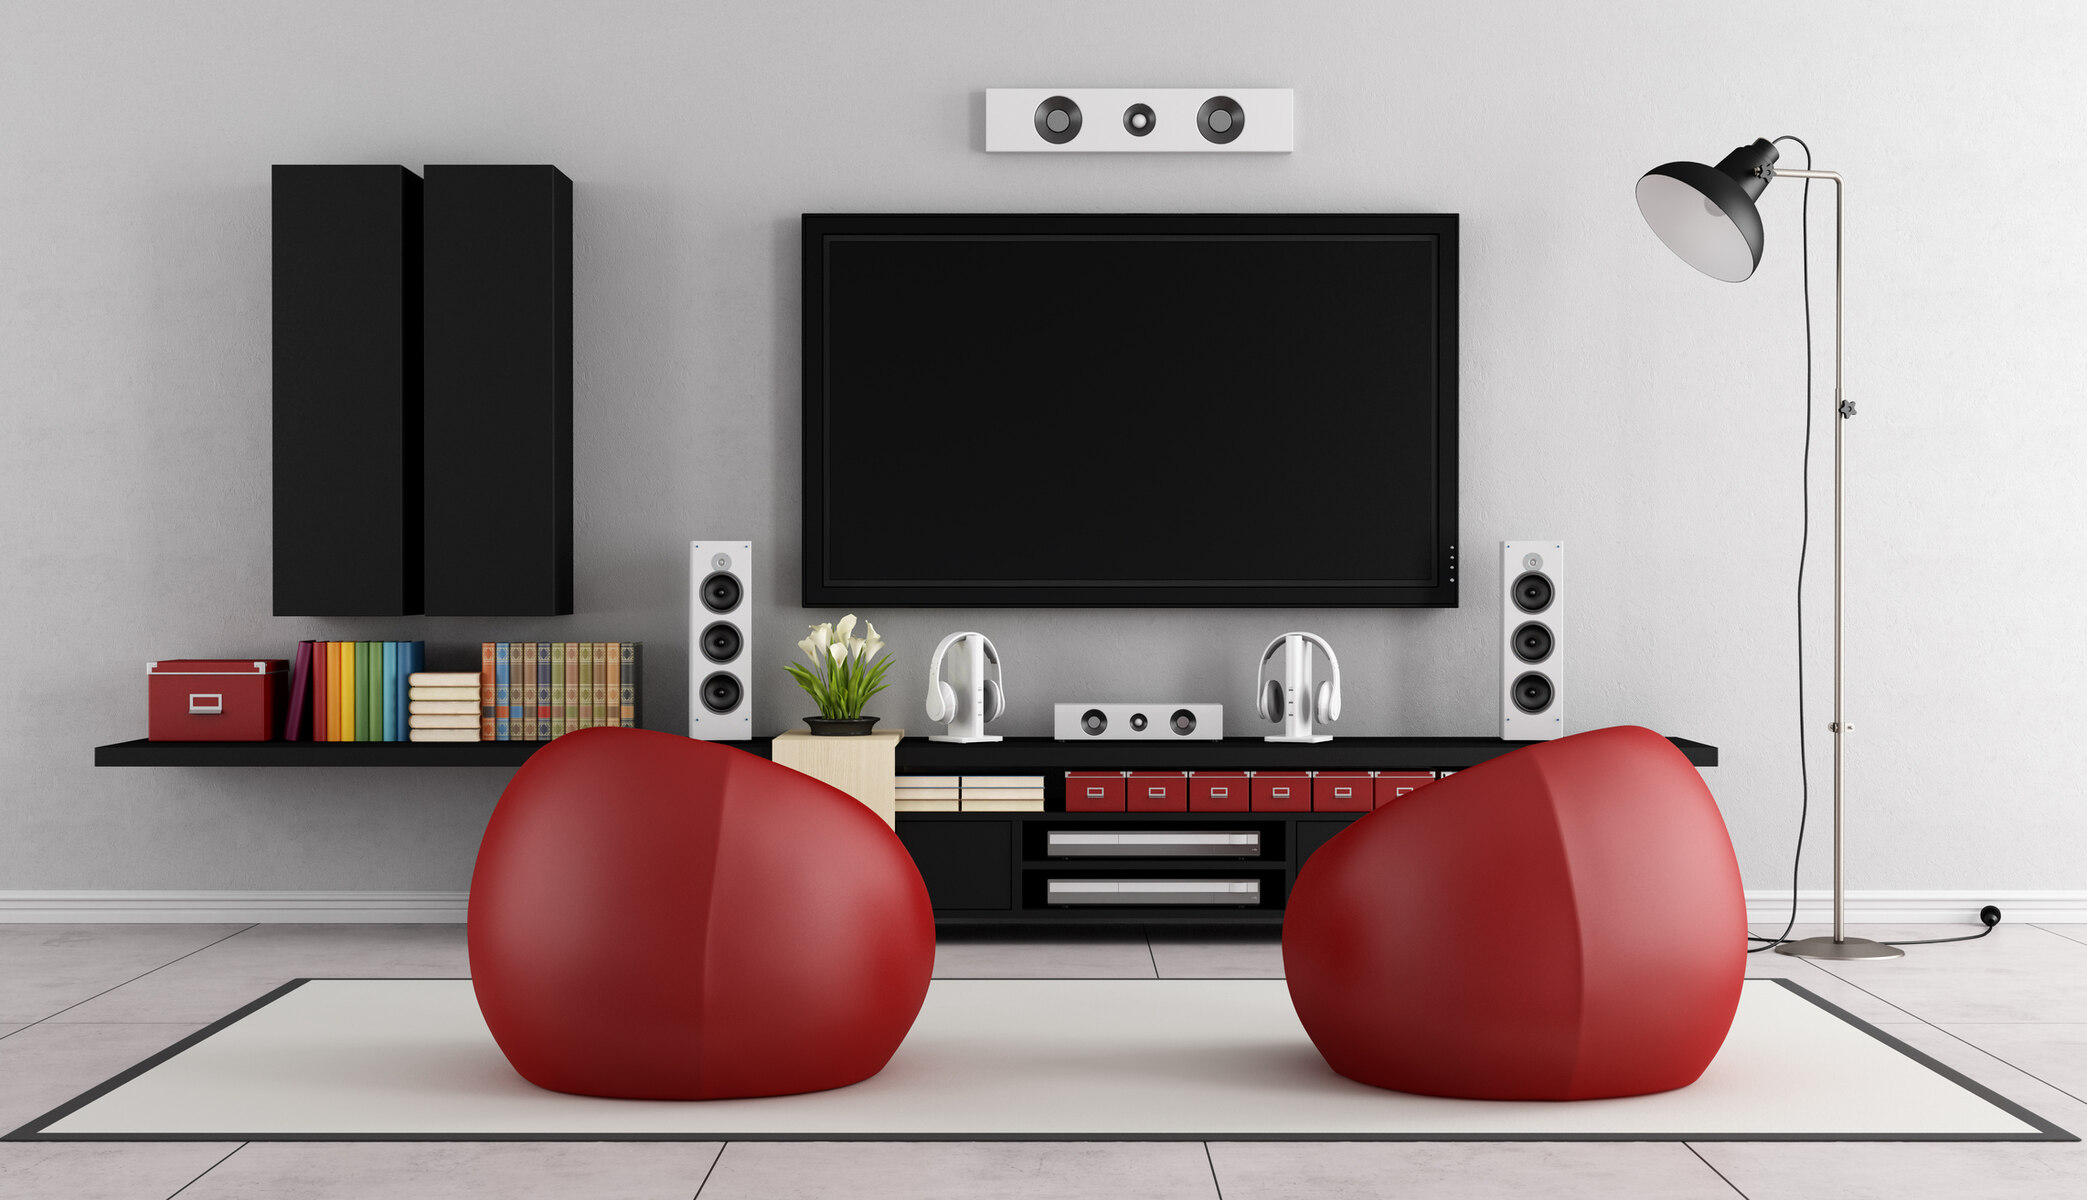
Once you have all the equipment, it’s time to position your surround sound system. Proper placement of the speakers is crucial to achieve optimal sound quality. In the next section, we will guide you on how to position your speakers for the best audio experience. Let’s get started!
Step 1: Gather the necessary equipment
Before you begin setting up your Panasonic surround sound system, it’s important to ensure that you have all the required equipment. By gathering everything upfront, you can avoid any delays or frustrations during the installation process.
Here’s a checklist of the essential equipment you’ll need:
- Panasonic surround sound system with a receiver: This is the core component of your audio setup. The receiver acts as the central hub that connects all your speakers and other audio/video devices.
- Speakers: The number and type of speakers you need will depend on your personal preference and the size of your room. At a minimum, you’ll need a center speaker, front speakers, and rear speakers to create a surround sound experience. Some systems may also include additional speakers, such as height or overhead speakers, for more immersive sound.
- Subwoofer: A subwoofer is responsible for reproducing deep bass frequencies, adding depth and impact to your audio. Most surround sound systems come with a dedicated subwoofer, but make sure you have one that is compatible with your Panasonic system.
- Audio and video cables: To connect your components, you’ll need various cables, such as HDMI cables, optical cables, and speaker wires. HDMI cables are typically used to transmit both audio and video signals, while optical cables are specifically designed for high-quality audio transmission. Speaker wires are essential for connecting the speakers to the receiver.
- Television or display device: You’ll need a TV or a display device to enjoy the visuals while the surround sound system takes care of the audio. Make sure your TV has the necessary audio outputs to connect to the receiver.
Once you have gathered all the equipment, you’re ready to move on to the next step: positioning your surround sound system. This step is crucial for achieving optimal sound quality and immersive audio. In the next section, we will guide you on how to position your speakers effectively. Let’s get started!
Step 2: Positioning your surround sound system
Properly positioning your speakers is essential to ensure the best audio experience from your Panasonic surround sound system. The placement of each speaker plays a crucial role in creating a balanced and immersive soundstage. Follow the guidelines below to position your speakers effectively:
1. Center speaker: The center speaker is responsible for reproducing dialogue and other central audio elements in movies and TV shows. Ideally, it should be placed directly above or below your TV, at ear level when you’re seated. This positioning helps anchor the sound to the on-screen action, ensuring clear and accurate dialogue reproduction.
2. Front speakers: The front speakers create the left and right audio channels. Place them on either side of your TV or display, facing towards the seating area. Position them at an equal distance from the center speaker and angled slightly inward to create a focused soundstage. This arrangement helps deliver a wide and spacious audio image.
3. Rear speakers: The rear speakers are responsible for producing ambient sounds and surround effects. Ideally, place them behind your seating area, slightly above ear level. Aim the speakers towards the seating position for an immersive surround sound experience. If you have a 7.1 channel system, you can also add additional side speakers for even more enveloping audio.
4. Subwoofer: The subwoofer is not as directional as the other speakers, so you have more flexibility in its placement. Experiment with different positions in the room to find the spot that delivers the best bass response. Common locations include beside or near the front speakers or in a corner of the room. Adjust the subwoofer settings on your receiver for optimal bass integration with the rest of the speakers.
5. Speaker stands and mounts: Depending on your room layout, you may need speaker stands or wall mounts to position your speakers properly. Speaker stands provide stability and can help improve sound quality, while wall mounts allow for a cleaner and space-saving setup. Make sure to follow the manufacturer’s instructions when using stands or mounts.
Remember, the key is to achieve a balanced and coherent soundstage, where the audio seamlessly surrounds you. Take the time to experiment with speaker placement until you find the setup that works best for your space and listening preferences. Once your speakers are positioned correctly, you’re ready to move on to the next step: connecting the speakers to your Panasonic surround sound system.
Step 3: Connect the speakers
Now that you have positioned your Panasonic surround sound system speakers, it’s time to connect them to the receiver for proper audio playback. Follow these steps to ensure a seamless connection:
1. Identify the speaker outputs: Locate the speaker outputs on the back of your receiver. These outputs are usually labeled with corresponding channels (e.g., Center, Front Left, Front Right, Rear Left, Rear Right, Subwoofer). Make sure to match each speaker with its respective output.
2. Connect the center speaker: Take the speaker wire for the center speaker and strip a small portion of insulation from the ends. Insert the positive (+) wire into the corresponding positive terminal (+) on the receiver, and the negative (-) wire into the negative terminal (-). Repeat this process for the other end of the wire, connecting it to the center speaker itself.
3. Connect the front speakers: Repeat the same process for the front left and right speakers. Connect the positive (+) and negative (-) wires from the receiver’s front left output to the corresponding terminals on the left speaker. Repeat this for the front right speaker.
4. Connect the rear speakers: Connect the rear left and right speakers in the same manner as the front speakers. Ensure that the positive (+) and negative (-) wires from the receiver align with the correct terminals on each speaker.
5. Connect the subwoofer: Depending on your subwoofer, you may have different connection options. Most subwoofers have a dedicated subwoofer output on the receiver. Use an RCA cable or a specialized subwoofer cable to connect the subwoofer output to the subwoofer’s input. If your subwoofer has speaker-level inputs, you can also connect it using speaker wire.
Once all the speakers and the subwoofer are connected, ensure that the wires are securely connected to both the receiver and the speakers. Take note of the polarity and connect the positive (+) wire to the positive terminal and the negative (-) wire to the negative terminal on both ends.
With the speakers connected, you can move on to the next step: connecting the receiver to your TV. This step will allow you to enjoy the audio and video output from your surround sound system on your television or display device.
Step 4: Connect the receiver to your TV
Connecting your Panasonic surround sound system receiver to your TV is essential for synchronizing the audio and video output. Follow these steps to ensure a seamless connection:
1. Identify the audio and video outputs on your receiver: Locate the audio and video outputs on the back of your surround sound system receiver. The most common audio outputs are HDMI, optical, and RCA. The video output is usually an HDMI port.
2. Identify the corresponding inputs on your TV: Locate the audio and video inputs on your TV. The audio inputs will match the type of audio output you are using (HDMI, optical, or RCA), while the video input will typically be an HDMI port.
3. Connect the audio output from the receiver to the TV:
- HDMI connection: If both your receiver and TV have HDMI ports, this is the recommended method. Use an HDMI cable to connect the HDMI output on the receiver to an HDMI input on your TV. Remember to note the HDMI input number used on the TV for the receiver connection.
- Optical connection: If your receiver and TV have optical audio ports, you can use an optical cable to connect the optical output on the receiver to the optical input on your TV.
- RCA connection: If your receiver and TV have RCA audio ports, use an RCA cable to connect the RCA audio output on the receiver to the RCA audio input on your TV. The RCA ports are usually color-coded (red and white for analog stereo audio).
4. Connect the video output from the receiver to the TV:
- HDMI connection: If you have not already connected the HDMI cable for audio, connect an additional HDMI cable from the HDMI video output on the receiver to an HDMI input on your TV. This will ensure that both audio and video signals are transmitted through a single cable.
5. Power on your TV and receiver: Ensure that both your TV and receiver are plugged into a power source and turned on. Use the TV remote to select the corresponding HDMI input or audio input for the receiver connection.
Once the receiver is successfully connected to your TV, you can move on to the next step: connecting additional devices, such as a Blu-ray player, game console, or streaming device, to your surround sound system.
Step 5: Connect additional devices
Connecting additional devices to your Panasonic surround sound system allows you to enjoy enhanced audio from sources like Blu-ray players, game consoles, streaming devices, and more. Follow these steps to connect additional devices:
1. Identify the available input ports: Take note of the available input ports on your receiver. Common input ports include HDMI, optical, and RCA.
2. Connect the device to the receiver:
- HDMI connection: If your device and receiver have HDMI ports, use an HDMI cable to connect the HDMI output on the device to an available HDMI input on the receiver. This will ensure both audio and video signals are transmitted.
- Optical connection: If your device has an optical audio output and your receiver has an optical input, use an optical cable to connect the device’s optical output to an available optical input on the receiver.
- RCA connection: For devices with RCA audio outputs, such as older game consoles or DVD players, use RCA cables to connect the device’s audio output to the corresponding RCA inputs on the receiver.
3. Set the input source: Once the device is connected, select the appropriate input source on your receiver. Use the receiver’s remote or control panel to switch to the input where the device is connected (e.g., HDMI 1, Optical 2, etc.).
4. Configure device audio settings: Depending on the device, you may need to adjust the audio output settings. For example, if you’re connecting a game console, Blu-ray player, or streaming device, navigate to the device’s settings menu and ensure that the audio output is set to surround sound or bitstream.
5. Test the audio: Play audio or video from the connected device to test if the sound is coming through the surround sound system. Make sure the audio is balanced and all speakers are producing sound. If necessary, use the receiver’s settings to adjust the volume levels and speaker configurations for optimal audio performance.
By connecting additional devices to your surround sound system, you can enjoy a wide range of audio sources with enhanced sound quality. With everything connected, you’re now ready to move on to the next step: setting up the audio settings on your receiver to fine-tune your surround sound system.
Step 6: Set up the audio settings
Setting up the audio settings on your Panasonic surround sound system is essential to optimize the sound performance and achieve the desired audio experience. Follow these steps to fine-tune your audio settings:
1. Access the receiver’s audio settings: Using the receiver’s remote or control panel, navigate to the audio settings menu. The exact location may vary depending on the model of your receiver.
2. Speaker configuration: In the audio settings menu, you will find options to configure the speaker setup. Select the appropriate configuration that matches your speaker arrangement (e.g., 5.1, 7.1). This setting ensures that the receiver knows how many speakers are connected and their respective positions.
3. Speaker levels and balance: Adjust the volume levels and balance of each speaker to ensure a well-balanced sound. Most receivers have a test tone feature that emits a sound from each speaker individually. Use this feature to make adjustments and ensure that the sound output from each speaker is at the desired level.
4. Audio decoding: If your receiver supports various audio formats, such as Dolby Digital or DTS, select the appropriate audio decoding setting. This setting ensures that the receiver can properly decode and reproduce the audio format from your content source.
5. Equalizer settings: Some receivers offer an equalizer or audio enhancement settings. Use these settings to fine-tune the audio output to your preference. Adjust the bass, treble, and other sound parameters to suit your musical or movie viewing preferences.
6. Digital audio input settings: If you’re using digital audio inputs, such as HDMI or optical, ensure that the audio input settings on the receiver match the output settings of the connected device. This ensures compatibility and optimal audio transmission.
7. Save and test the settings: Once you have made the desired changes to the audio settings, save the settings and exit the menu. Play audio or video content to test the sound quality and verify that the adjustments have produced the desired results.
By carefully configuring the audio settings on your Panasonic surround sound system, you can significantly enhance your listening experience. Take the time to adjust and fine-tune the settings until you achieve the best sound quality that suits your preferences and the content you’re enjoying.
Step 7: Test and fine-tune your surround sound system
After setting up your Panasonic surround sound system and configuring the audio settings, it’s crucial to test and fine-tune the system to ensure optimal sound quality and performance. Follow these steps to test and fine-tune your surround sound system:
1. Test each speaker: Play a variety of audio content that utilizes the full range of your surround sound system. Listen carefully to each speaker individually to ensure they are producing sound and are balanced with the other speakers. Adjust the speaker levels and balance if necessary to achieve a harmonious soundstage.
2. Positioning adjustments: If you notice any imbalances in sound or uneven audio distribution, consider making slight adjustments to the speaker positions. Experiment with subtle changes in speaker placement to achieve the best sound imaging and balance.
3. Bass management: Pay attention to the performance of the subwoofer and its integration with the other speakers. Adjust the subwoofer controls on the receiver to achieve the desired level of bass impact without overpowering the other frequencies. Fine-tuning the bass management ensures a well-rounded and immersive audio experience.
4. Listening environment: Consider the acoustics of your room and make any necessary adjustments. You can add acoustic treatments, such as curtains or sound-absorbing panels, to minimize sound reflections and improve the overall audio quality. Experiment with these adjustments to create an optimal listening environment.
5. Surround sound modes: Most surround sound systems offer various sound modes designed to enhance specific content types like movies, music, or gaming. Explore these different modes and select the one that best complements the content you’re enjoying. Experiment with different modes to find the one that suits your preferences and maximizes the enjoyment of your audio source.
6. Fine-tune audio settings: Go back to the audio settings on your receiver and make any subtle adjustments if needed. This could include tweaking the equalizer settings, adjusting speaker distances, or changing the audio balance. Use your ears as a guide, and make adjustments that enhance your overall listening experience.
7. Regular calibration: As you acquire more experience with your surround sound system, periodically revisit the audio settings and fine-tune them according to your evolving preferences and the characteristics of your listening environment. This regular calibration will ensure your surround sound system continues to deliver an optimized and immersive audio experience over time.
By testing and fine-tuning your Panasonic surround sound system, you can extract the maximum audio performance and enjoy a truly immersive and engaging entertainment experience.
Conclusion
Setting up a Panasonic surround sound system may seem overwhelming at first, but by following the step-by-step process outlined in this guide, you can confidently connect and optimize your audio setup. From gathering the necessary equipment to testing and fine-tuning the system, each step plays a crucial role in creating an immersive and captivating audio experience.
Remember to carefully position your speakers for optimal sound distribution and clarity. Take the time to connect each speaker to the receiver, ensuring secure and proper wire connections. Once your speakers are connected, link your receiver to the TV to synchronize audio and video output.
By connecting additional devices, such as Blu-ray players or game consoles, you can expand your audio sources and enjoy enhanced sound quality across various media.
With the physical setup complete, configuring the audio settings on your receiver allows you to fine-tune the sound to your desired preferences. Adjusting speaker levels, speaker distances, equalizer settings, and surround sound modes can significantly enhance the immersive audio experience.
Lastly, testing and fine-tuning your surround sound system are essential steps to achieve the best sound quality possible. By carefully listening to each speaker, making any necessary adjustments to the positioning or audio settings, and creating an ideal listening environment, you can optimize the performance of your Panasonic surround sound system.
With everything properly set up and fine-tuned, you are ready to immerse yourself in a world of rich, detailed sound. Whether you are watching movies, playing games, or enjoying your favorite music, your Panasonic surround sound system will elevate your home entertainment to new heights.
Now, sit back, relax, and let the immersive audio of your surround sound system envelop you in a truly captivating audio experience!