Introduction
Unlocking the bootloader of your Redmi 4A can provide you with the freedom to customize your device, install custom ROMs, and explore a multitude of advanced features. However, it's important to recognize that an unlocked bootloader can also expose your device to potential security risks. Therefore, relocking the bootloader is a crucial step in safeguarding your Redmi 4A and ensuring its security.
Relocking the bootloader of your Redmi 4A involves reversing the process of unlocking it, effectively reinstating the default security measures put in place by the manufacturer. By doing so, you can prevent unauthorized access to your device's system, protect your personal data, and maintain the integrity of the device's software.
In this comprehensive guide, we will walk you through the essential steps to relock the bootloader of your Redmi 4A. By following these instructions carefully, you can effectively enhance the security of your device while retaining the flexibility to explore its full potential. Let's delve into the process of securing your Redmi 4A by relocking its bootloader.
Step 1: Back up Your Data
Before embarking on the process of relocking the bootloader of your Redmi 4A, it is imperative to prioritize the safety of your personal data. Relocking the bootloader involves resetting the device to its default settings, which can result in the loss of all data stored on the device. To prevent any potential loss, it is crucial to back up your data thoroughly. Here's how you can ensure the safety of your valuable information:
-
Backup Options: Explore the various backup options available for your Redmi 4A. The device offers built-in backup features that allow you to securely store your data, including contacts, messages, photos, videos, and app data. Additionally, you can utilize cloud storage services or third-party backup applications to create a comprehensive backup of your device's contents.
-
Contacts and Calendars: Ensure that your contacts, calendars, and important schedules are synchronized with your Google account or any other preferred cloud service. This will ensure that your essential contact information and appointments are safely stored and can be easily retrieved after the relocking process.
-
Media Files: Transfer all your photos, videos, music, and other media files to an external storage device or cloud storage. This will safeguard your cherished memories and entertainment content from being lost during the relocking procedure.
-
App Data: Some applications store crucial data locally on your device. It is advisable to use the built-in backup functionality of these apps or utilize third-party backup solutions to secure app-specific data. This will enable you to restore your apps with their associated data intact after the relocking process.
-
Documents and Files: If you have important documents, files, or any other user-generated content on your Redmi 4A, ensure that they are backed up to a secure location. This can be achieved by transferring them to a computer, uploading them to a cloud service, or using a dedicated file backup application.
By diligently backing up your data using the aforementioned methods, you can mitigate the risk of losing valuable information during the bootloader relocking process. This proactive approach will provide you with the peace of mind and assurance that your data is safeguarded, allowing you to proceed with the subsequent steps of relocking the bootloader of your Redmi 4A without any concerns about data loss.
Step 2: Download and Install Necessary Tools
To commence the process of relocking the bootloader of your Redmi 4A, it is essential to equip yourself with the necessary tools and software that will facilitate the seamless execution of the relocking procedure. By ensuring that you have the required tools at your disposal, you can proceed with confidence and efficiency. Here's a detailed guide on downloading and installing the essential tools for relocking the bootloader of your Redmi 4A:
-
Official Xiaomi Mi Unlock Tool: Visit the official Xiaomi website or the designated Mi Unlock Tool page to download the official Mi Unlock Tool. This tool is specifically designed to facilitate the unlocking and relocking of the bootloader on Xiaomi devices, including the Redmi 4A. Ensure that you download the latest version of the Mi Unlock Tool to benefit from any improvements or bug fixes introduced in subsequent releases.
-
USB Drivers: It is crucial to have the appropriate USB drivers installed on your computer to establish a stable and reliable connection between your Redmi 4A and the computer. Visit the official Xiaomi website or the support page for the Redmi 4A to download and install the recommended USB drivers for your specific device model. Properly installed USB drivers will ensure seamless communication between your device and the computer during the bootloader relocking process.
-
ADB and Fastboot Tools: ADB (Android Debug Bridge) and Fastboot are essential command-line tools that facilitate communication between your computer and Android devices, enabling advanced operations such as unlocking and relocking the bootloader. Download the ADB and Fastboot tools for your operating system (Windows, macOS, or Linux) from a trusted source or the official Android developer website. Once downloaded, follow the installation instructions to set up ADB and Fastboot on your computer.
-
Device-Specific Firmware: Obtain the official firmware or stock ROM for the Redmi 4A from the Xiaomi website or other reputable sources. This firmware will be required during the bootloader relocking process to restore the device to its original state. Ensure that you download the correct firmware version corresponding to your Redmi 4A variant to avoid compatibility issues.
By meticulously acquiring and installing the aforementioned tools and software, you can establish a solid foundation for the subsequent steps involved in relocking the bootloader of your Redmi 4A. With the necessary tools in place, you are well-prepared to proceed with confidence and precision, ensuring a smooth and successful relocking process.
Step 3: Relock the Bootloader
Relocking the bootloader of your Redmi 4A involves reversing the unlocking process and reinstating the default security measures implemented by the manufacturer. By relocking the bootloader, you can enhance the security of your device and mitigate potential risks associated with an unlocked bootloader. The following detailed steps will guide you through the process of relocking the bootloader of your Redmi 4A:
-
Enable Developer Options: On your Redmi 4A, navigate to "Settings" and tap on "About phone." Locate the "MIUI version" or "Build number" and tap on it multiple times until you see a message confirming that the developer options have been enabled.
-
Access Developer Options: After enabling the developer options, go back to the main "Settings" menu and select "Additional settings." Then, tap on "Developer options" to access the advanced developer settings on your Redmi 4A.
-
Enable OEM Unlocking: Within the "Developer options," locate the "OEM unlocking" toggle and enable it. This step is crucial as it allows the bootloader to be relocked after the necessary preparations have been made.
-
Connect to Computer: Using a USB cable, connect your Redmi 4A to your computer. Ensure that the device is recognized and the necessary USB drivers are installed to facilitate a stable connection.
-
Boot into Fastboot Mode: Power off your Redmi 4A and then press and hold the "Volume Down" and "Power" buttons simultaneously to enter Fastboot mode. Once in Fastboot mode, your device will be ready for the bootloader relocking process.
-
Launch Mi Unlock Tool: Open the Mi Unlock Tool on your computer and log in with your Mi account credentials. Follow the on-screen instructions to proceed with the bootloader relocking process.
-
Relock the Bootloader: Within the Mi Unlock Tool interface, select the option to relock the bootloader of your Redmi 4A. Confirm the action and allow the tool to execute the relocking process.
-
Wait for Confirmation: Once the relocking process is initiated, wait for the Mi Unlock Tool to confirm the successful relocking of the bootloader. Upon receiving the confirmation, you can proceed to verify the bootloader status.
By meticulously following these steps, you can effectively relock the bootloader of your Redmi 4A, reinforcing the security of your device and restoring the default security measures implemented by Xiaomi. This proactive approach ensures that your device is safeguarded against potential security vulnerabilities associated with an unlocked bootloader, allowing you to maintain a secure and reliable mobile experience.
Step 4: Verify the Bootloader Status
After successfully relocking the bootloader of your Redmi 4A, it is essential to verify the bootloader status to ensure that the relocking process has been executed effectively. By confirming the status of the bootloader, you can ascertain that the device's security measures have been reinstated, and the bootloader is securely locked, thereby mitigating potential security risks associated with an unlocked bootloader.
Here's a detailed guide on how to verify the bootloader status of your Redmi 4A:
-
Access Fastboot Mode: Power off your Redmi 4A and then press and hold the "Volume Down" and "Power" buttons simultaneously to enter Fastboot mode. Once in Fastboot mode, your device's bootloader status can be accessed for verification.
-
Connect to Computer: Using a USB cable, ensure that your Redmi 4A is connected to your computer. This connection is necessary to facilitate communication between the device and the computer during the bootloader status verification process.
-
Open Command Prompt or Terminal: On your computer, open the Command Prompt (Windows) or Terminal (macOS or Linux) and navigate to the directory where the ADB and Fastboot tools are installed. This will allow you to execute commands to verify the bootloader status.
-
Execute ADB Command: In the Command Prompt or Terminal, enter the following ADB command to check the bootloader status:
adb devices
This command will display the list of devices attached, confirming that your Redmi 4A is recognized and ready for further commands.
-
Verify Bootloader Status: Once the device is recognized, execute the following ADB command to verify the bootloader status:
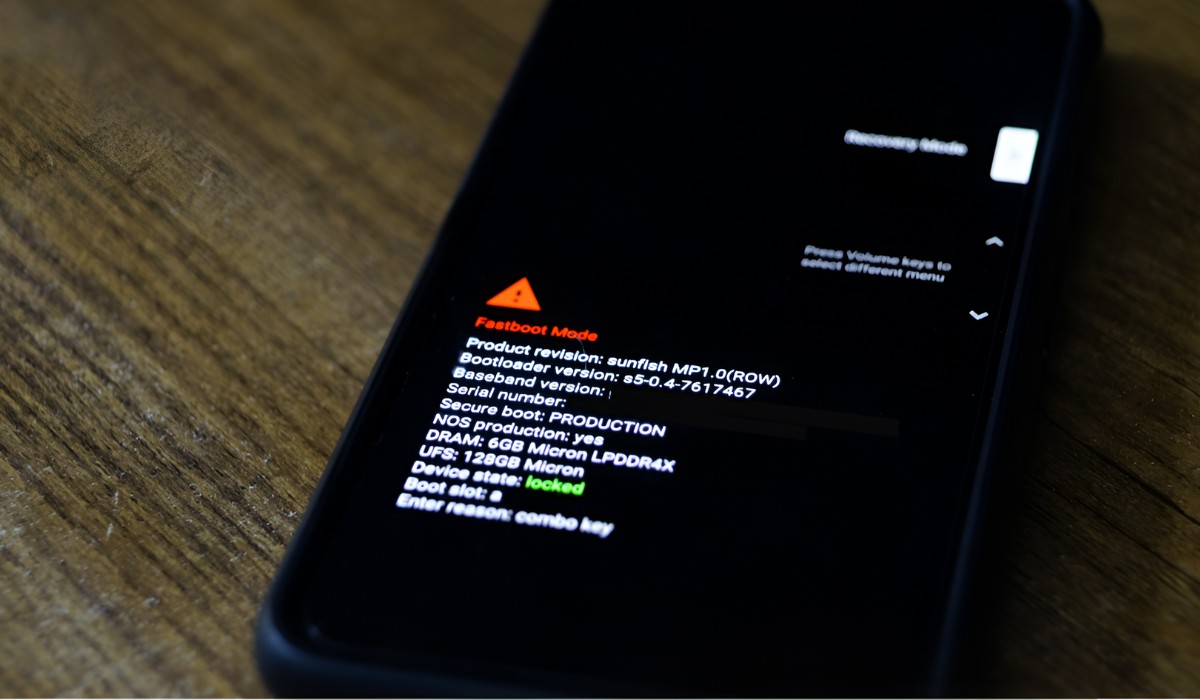
fastboot getvar all
This command will retrieve detailed information about the device, including the bootloader status. Look for the "locked" or "unlocked" status to confirm that the bootloader is securely locked after the relocking process.
-
Review the Output: After executing the command, carefully review the output displayed in the Command Prompt or Terminal. Locate the "locked" status in the bootloader information to confirm that the bootloader of your Redmi 4A is securely locked.
By meticulously following these steps to verify the bootloader status, you can ensure that the relocking process has been completed successfully, and the bootloader of your Redmi 4A is securely locked. This proactive verification step provides you with the assurance that the device's security measures have been reinstated, safeguarding your device against potential security vulnerabilities associated with an unlocked bootloader.
Conclusion
In conclusion, relocking the bootloader of your Redmi 4A is a pivotal step in ensuring the security and integrity of your device. By following the comprehensive steps outlined in this guide, you have taken proactive measures to safeguard your personal data and enhance the overall security of your Redmi 4A.
Relocking the bootloader not only mitigates potential security risks associated with an unlocked bootloader but also reinstates the default security measures implemented by Xiaomi, thereby ensuring a secure and reliable mobile experience. Through the meticulous execution of the relocking process, you have effectively fortified your device against unauthorized access and potential vulnerabilities, providing you with peace of mind and confidence in the security of your Redmi 4A.
Furthermore, the proactive approach of backing up your data prior to relocking the bootloader demonstrates a commitment to preserving your valuable information. By diligently securing your contacts, media files, app data, and documents, you have mitigated the risk of data loss and positioned yourself to seamlessly restore your device's contents after completing the relocking process.
The careful acquisition and installation of the necessary tools, including the official Xiaomi Mi Unlock Tool, USB drivers, ADB and Fastboot tools, and device-specific firmware, have equipped you with the essential resources to execute the relocking process with precision and efficiency. This proactive preparation has laid a solid foundation for a seamless and successful relocking procedure, ensuring that you can navigate the process with confidence and clarity.
By verifying the bootloader status after completing the relocking process, you have confirmed that the security measures have been reinstated, and the bootloader of your Redmi 4A is securely locked. This final verification step provides you with the assurance that your device is fortified against potential security vulnerabilities, thereby enhancing the overall security posture of your Redmi 4A.
In essence, by relocking the bootloader of your Redmi 4A, you have prioritized the security and privacy of your device, while retaining the flexibility to explore its full potential within a secure and protected environment. This proactive approach reflects a commitment to maintaining a secure and reliable mobile experience, ensuring that your Redmi 4A remains safeguarded against potential security threats and unauthorized access.
Congratulations on successfully relocking the bootloader of your Redmi 4A, and may your device continue to provide you with a secure and fulfilling mobile experience.