Introduction
Inserting a SIM card into your Samsung Galaxy S22 Ultra is a fundamental step in setting up your device for communication and connectivity. Whether you're upgrading to a new phone or switching carriers, understanding how to properly insert the SIM card is crucial for seamless functionality. In this guide, we will walk you through the step-by-step process of inserting a SIM card into your S22 Ultra. By following these simple instructions, you can ensure that your device is ready to make calls, send messages, and access mobile data.
The SIM card, or Subscriber Identity Module card, plays a pivotal role in enabling your phone to connect to your carrier's network. It contains essential information such as your phone number, carrier details, and security authentication, allowing your device to communicate with the cellular network. Without a properly inserted SIM card, your phone may not be able to make calls, send texts, or access mobile data, making it essential to understand the process.
The Samsung Galaxy S22 Ultra is designed with precision and elegance, and the SIM card tray is ingeniously integrated into its sleek design. By familiarizing yourself with the location of the SIM card tray and the proper insertion technique, you can effortlessly set up your device for optimal performance. Whether you're a tech enthusiast or a first-time smartphone user, this guide will equip you with the knowledge and confidence to insert your SIM card seamlessly.
Now, let's embark on this journey together as we delve into the intricacies of inserting a SIM card into your Samsung Galaxy S22 Ultra. With clear instructions and insightful tips, you'll soon master this essential aspect of setting up your smartphone. Let's dive into the step-by-step process and ensure that your S22 Ultra is ready to connect you with the world.
Step 1: Locate the SIM Card Tray
The first step in inserting a SIM card into your Samsung Galaxy S22 Ultra is to locate the SIM card tray. This essential component is intricately designed to securely house the SIM card while ensuring a seamless connection to the device's hardware. To begin this process, you'll need to identify the precise location of the SIM card tray on your S22 Ultra.
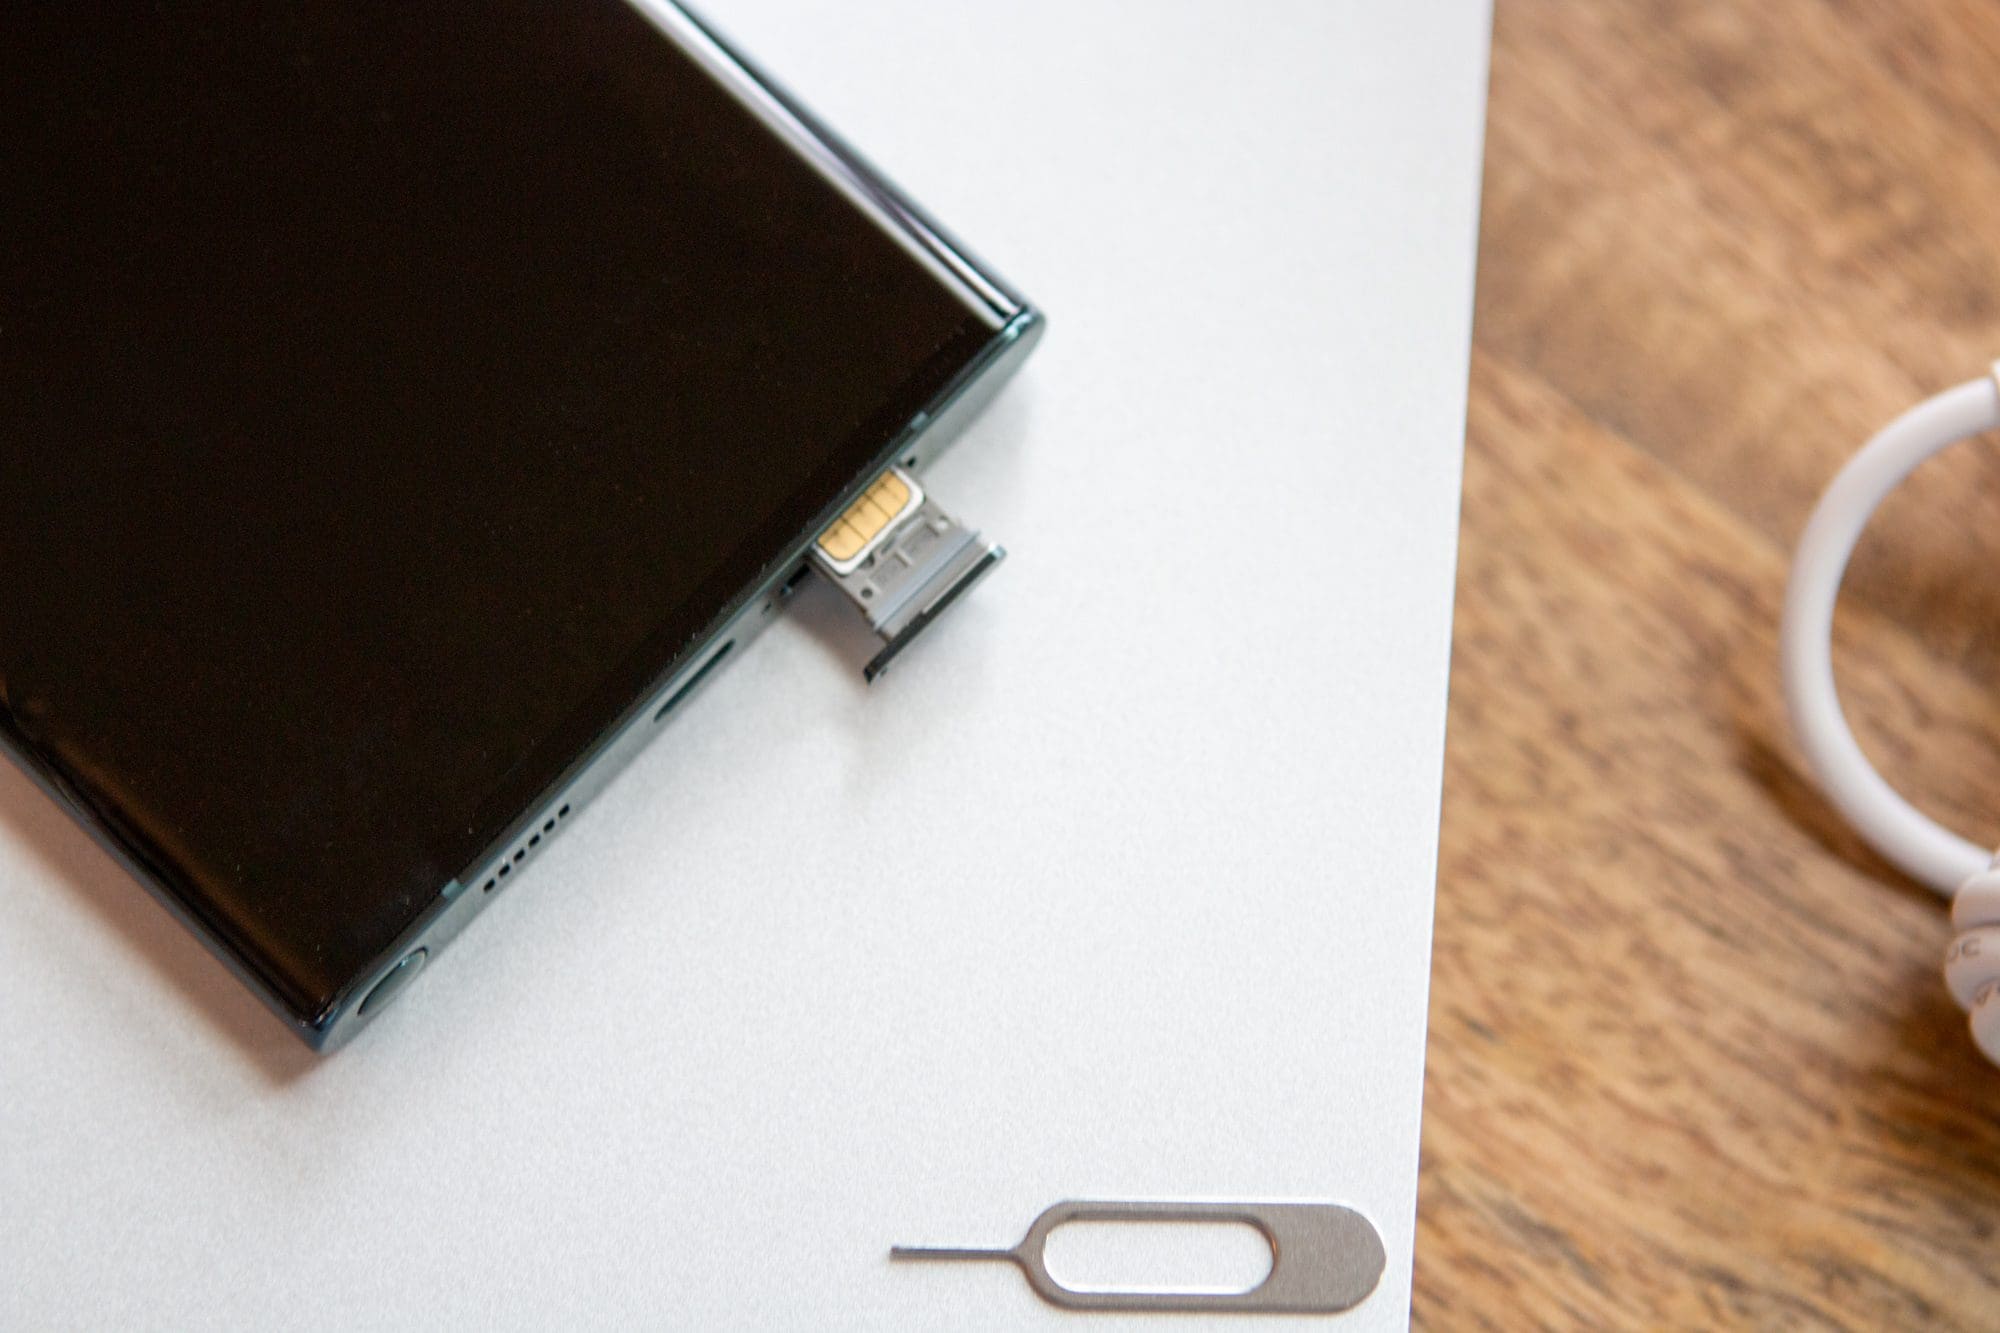
The SIM card tray on the S22 Ultra is strategically positioned to facilitate easy access without compromising the device's sleek and sophisticated design. Typically, the SIM card tray is located on the side of the phone, adjacent to the volume buttons. To locate the SIM card tray, gently inspect the sides of your device, feeling for a small indentation or a tiny pinhole. This discreet feature conceals the SIM card tray and serves as the entry point for accessing and inserting the SIM card.
Once you've identified the location of the SIM card tray, take a moment to familiarize yourself with its orientation and the mechanism for ejecting it. The SIM card tray is designed to be easily removable, allowing you to access the interior of the device without the need for specialized tools. By understanding the location and functionality of the SIM card tray, you'll be better prepared to proceed with the subsequent steps of inserting the SIM card into your S22 Ultra.
Locating the SIM card tray is the foundational step in preparing your Samsung Galaxy S22 Ultra for seamless connectivity. By identifying this crucial component, you're one step closer to ensuring that your device is equipped to harness the full potential of your chosen carrier's network. With the SIM card tray within reach, you're now ready to embark on the next phase of the process: ejecting the tray to prepare for the insertion of the SIM card.
As you prepare to move to the next step, take a moment to appreciate the thoughtful design and engineering that underpins the functionality of the SIM card tray. Its discreet placement and intuitive accessibility exemplify Samsung's commitment to user-friendly design, ensuring that inserting a SIM card into the S22 Ultra is a straightforward and hassle-free experience. With the SIM card tray located, let's proceed to the next step and continue our journey toward seamlessly setting up your device for connectivity.
Step 2: Eject the SIM Card Tray
Ejecting the SIM card tray from your Samsung Galaxy S22 Ultra is a pivotal step in the process of inserting a SIM card. This seamless procedure allows you to access the interior of the device and prepare the SIM card tray for the insertion of your SIM card. Samsung has ingeniously designed the S22 Ultra to facilitate easy and tool-free removal of the SIM card tray, ensuring a hassle-free experience for users.
To begin the process of ejecting the SIM card tray, locate the small pinhole adjacent to the SIM card tray on the side of your S22 Ultra. This pinhole serves as the access point for ejecting the tray and is strategically positioned for easy identification. Once you've identified the pinhole, gently insert the SIM eject tool or a paperclip into the pinhole, applying a slight amount of pressure. This will trigger the release mechanism, causing the SIM card tray to protrude from the device.
As the SIM card tray emerges from the S22 Ultra, carefully grasp the edge of the tray and gently pull it out of the device. The smooth and precise movement of the tray ensures that you can access the interior without any difficulty. Samsung's meticulous attention to detail is evident in the seamless ejection process, allowing users to effortlessly prepare the device for the insertion of the SIM card.
As you complete the process of ejecting the SIM card tray, take a moment to appreciate the intuitive design and user-friendly approach that Samsung has integrated into the S22 Ultra. The ease with which the SIM card tray can be ejected exemplifies Samsung's commitment to enhancing the user experience, ensuring that every step of setting up the device is straightforward and accessible.
With the SIM card tray successfully ejected from your Samsung Galaxy S22 Ultra, you're now prepared to proceed to the next crucial step: inserting the SIM card into the tray. The seamless ejection process sets the stage for the subsequent phase, allowing you to seamlessly integrate the SIM card into your device and prepare it for connectivity. As you move forward in this process, the thoughtful design and engineering of the S22 Ultra continue to enhance your experience, ensuring that every interaction with the device is intuitive and effortless.
Step 3: Insert the SIM Card
With the SIM card tray successfully ejected from your Samsung Galaxy S22 Ultra, you've reached a pivotal phase in the process: inserting the SIM card. This step is essential for establishing the connection between your device and your chosen carrier's network, enabling you to make calls, send messages, and access mobile data. Samsung has streamlined the process of inserting a SIM card, ensuring that it can be seamlessly integrated into the S22 Ultra without any complexity.
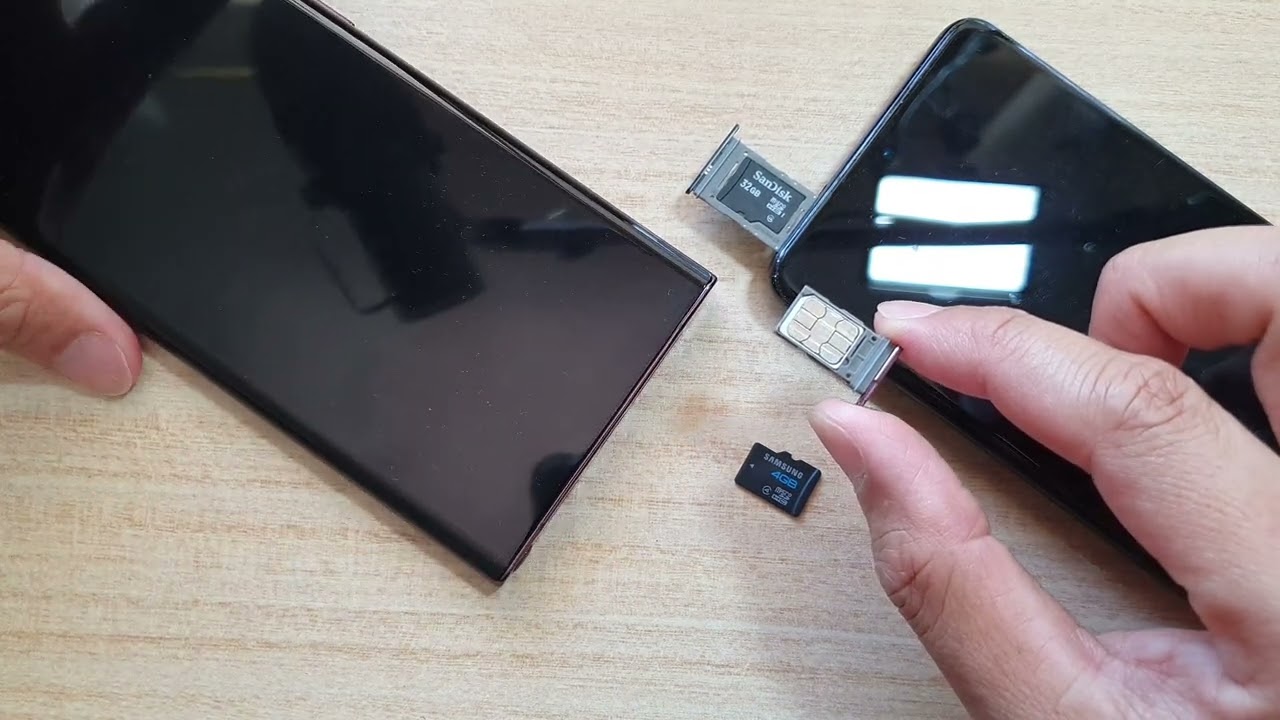
Begin by carefully removing the SIM card tray from the device, taking note of its orientation and the position of the SIM card slot. The SIM card tray is designed to securely hold the SIM card, safeguarding it against any potential damage while ensuring a stable connection to the device's hardware. With the tray in hand, gently place it on a flat surface and prepare to insert the SIM card.
Next, retrieve your SIM card and examine it closely. Most SIM cards are designed with a notch or corner cutout, ensuring that they can only be inserted in one orientation. This design feature prevents incorrect insertion and safeguards the delicate components of the SIM card. Take a moment to align the SIM card with the corresponding slot on the tray, ensuring that it fits snugly without any forceful manipulation.
Carefully place the SIM card onto the designated slot on the tray, ensuring that it aligns perfectly with the contours of the slot. The SIM card should rest securely within the slot, with no protruding edges or misalignment. Samsung's meticulous design ensures that the SIM card can be effortlessly integrated into the tray, allowing for a seamless and secure connection.
As you insert the SIM card into the tray, take note of the smooth and precise fit, exemplifying Samsung's commitment to user-friendly design. The seamless integration of the SIM card into the tray sets the stage for the final phase of the process, ensuring that your Samsung Galaxy S22 Ultra is equipped to harness the full potential of your chosen carrier's network.
With the SIM card securely inserted into the tray, you're now prepared to reinsert the tray into your S22 Ultra, finalizing the setup process and ensuring that your device is ready to connect you with the world. As you proceed to the next step, the seamless insertion of the SIM card serves as a testament to Samsung's dedication to enhancing the user experience, making every interaction with the S22 Ultra intuitive and effortless.
Now, let's move on to the final step and conclude the process of preparing your Samsung Galaxy S22 Ultra for seamless connectivity.
Step 4: Reinsert the SIM Card Tray
With the SIM card securely inserted into the tray, the final step in setting up your Samsung Galaxy S22 Ultra for seamless connectivity is to reinsert the SIM card tray into the device. This crucial phase ensures that the SIM card is securely integrated into the S22 Ultra, allowing you to harness the full potential of your chosen carrier's network without any interruptions or connectivity issues.
Begin by carefully aligning the SIM card tray with the corresponding slot on your S22 Ultra. Samsung has meticulously designed the tray and the device to facilitate a seamless fit, ensuring that the tray slots back into place effortlessly. Take note of the orientation of the tray, aligning it with the designated slot to guarantee a perfect fit.
As you gently guide the SIM card tray back into the device, you'll feel a smooth and precise movement, indicative of Samsung's commitment to user-friendly design. The tray seamlessly slides back into place, securing the SIM card within the device without any resistance or difficulty. This seamless reinsertion process underscores Samsung's dedication to ensuring that every aspect of setting up the S22 Ultra is intuitive and accessible.
Once the SIM card tray is securely reinserted into your Samsung Galaxy S22 Ultra, take a moment to appreciate the seamless integration of the SIM card and the meticulous engineering that underpins the device's functionality. The smooth reinsertion process signifies that your device is now fully equipped to connect you with your chosen carrier's network, enabling you to make calls, send messages, and access mobile data without any hindrances.
With the SIM card tray securely back in place, your Samsung Galaxy S22 Ultra is now ready to embark on its journey as your reliable communication and connectivity companion. The successful reinsertion of the tray signifies the completion of the setup process, ensuring that your device is fully equipped to seamlessly integrate with your chosen carrier's network.
As you conclude this final step, take a moment to admire the seamless setup process and the thoughtful design that defines the Samsung Galaxy S22 Ultra. With the SIM card tray securely reinserted, your device is now primed to connect you with the world, allowing you to experience the full spectrum of communication and connectivity features that the S22 Ultra has to offer.
Conclusion
As we conclude this comprehensive guide on inserting a SIM card into the Samsung Galaxy S22 Ultra, it's essential to reflect on the seamless and intuitive process that underpins the setup of this remarkable device. The meticulous design and engineering prowess showcased in the integration of the SIM card tray exemplify Samsung's commitment to enhancing the user experience, ensuring that every interaction with the S22 Ultra is intuitive and effortless.
By following the step-by-step instructions outlined in this guide, you've gained a deeper understanding of the intricate process of preparing your S22 Ultra for seamless connectivity. From locating the SIM card tray to seamlessly reinserting it into the device, each step has been meticulously crafted to ensure a hassle-free experience for users of all levels of expertise.
The Samsung Galaxy S22 Ultra stands as a testament to innovation and precision, and the process of inserting a SIM card seamlessly aligns with the device's ethos of intuitive functionality. As you embark on your journey with the S22 Ultra, equipped with a securely inserted SIM card, you can revel in the seamless connectivity and communication features that define this cutting-edge smartphone.
With the SIM card securely integrated into your S22 Ultra, you're now poised to experience the full spectrum of connectivity, enabling you to make calls, send messages, and access mobile data with unparalleled ease. Samsung's dedication to user-centric design is evident in every aspect of the SIM card insertion process, ensuring that setting up your device is a seamless and gratifying experience.
As you venture into the world with your Samsung Galaxy S22 Ultra, adorned with a securely inserted SIM card, you're empowered to forge meaningful connections, stay informed, and navigate the digital landscape with confidence. The successful completion of the SIM card insertion process signifies the beginning of an enriching journey with your S22 Ultra, where seamless connectivity and effortless communication await at your fingertips.
In essence, the process of inserting a SIM card into the Samsung Galaxy S22 Ultra encapsulates the device's ethos of user-centric design and seamless functionality. With a securely inserted SIM card, your S22 Ultra stands ready to be your steadfast companion in the realm of communication and connectivity, embodying the pinnacle of technological innovation and user experience excellence.