Introduction
Having a Smart TV allows you to access a world of entertainment, streaming services, and online content right from the comfort of your living room. However, it can be frustrating when your Smart TV refuses to connect to your Wi-Fi network. In today’s digital age, a stable and reliable internet connection is crucial for enjoying your favorite shows, movies, and music.
Wi-Fi connection issues can stem from various factors, including incorrect settings, router problems, or network signal interference. This article aims to guide you through troubleshooting steps to resolve Wi-Fi connectivity problems with your Smart TV. By following these steps, you will be able to enjoy uninterrupted streaming and access all the features of your Smart TV without any issues.
It’s important to note that the methods and settings mentioned in this article may vary slightly depending on the model and brand of your Smart TV. However, the general principles and steps provided here should be applicable to most Smart TVs.
Before we dive into the troubleshooting steps, it’s essential to understand the common reasons behind Wi-Fi connection issues with Smart TVs. By familiarizing yourself with these causes, you can have a better grasp of what might be causing the problem and proceed accordingly.
Common Reasons for Wi-Fi Connection Issues
There are several common reasons that can cause Wi-Fi connection issues with your Smart TV. Understanding these reasons can help you diagnose the problem and find an appropriate solution. Here are some of the most frequent culprits:
- Weak Wi-Fi Signal: One of the primary reasons for connectivity problems is a weak Wi-Fi signal. If your Smart TV is located far away from your router or if there are obstacles like walls and furniture blocking the signal, it can result in a poor connection.
- Incorrect Wi-Fi Settings: Sometimes, a simple misconfiguration in your Wi-Fi settings can prevent your Smart TV from connecting to the network. This can include entering the wrong password, using an incompatible security protocol, or not enabling the SSID broadcast on your router.
- Router Issues: Problems with your router can also impact the connection between your Smart TV and the Wi-Fi network. Router firmware that needs updating, overheating, or being overwhelmed by multiple devices can all lead to connectivity problems.
- Signal Interference: Other devices or appliances near your Smart TV can generate signal interference, leading to a weak or unstable Wi-Fi connection. Cordless phones, baby monitors, microwave ovens, and even neighboring Wi-Fi networks can all contribute to signal interference.
- Outdated Firmware: Smart TVs, like other electronic devices, rely on firmware to function properly. Outdated firmware can cause compatibility issues with your Wi-Fi network and lead to connection problems.
Identifying the likely cause of the Wi-Fi connection issue with your Smart TV can help you narrow down the troubleshooting steps and find the most effective solution. In the following sections, we will discuss various methods and techniques to address these common problems and get your Smart TV connected to the Wi-Fi network successfully.
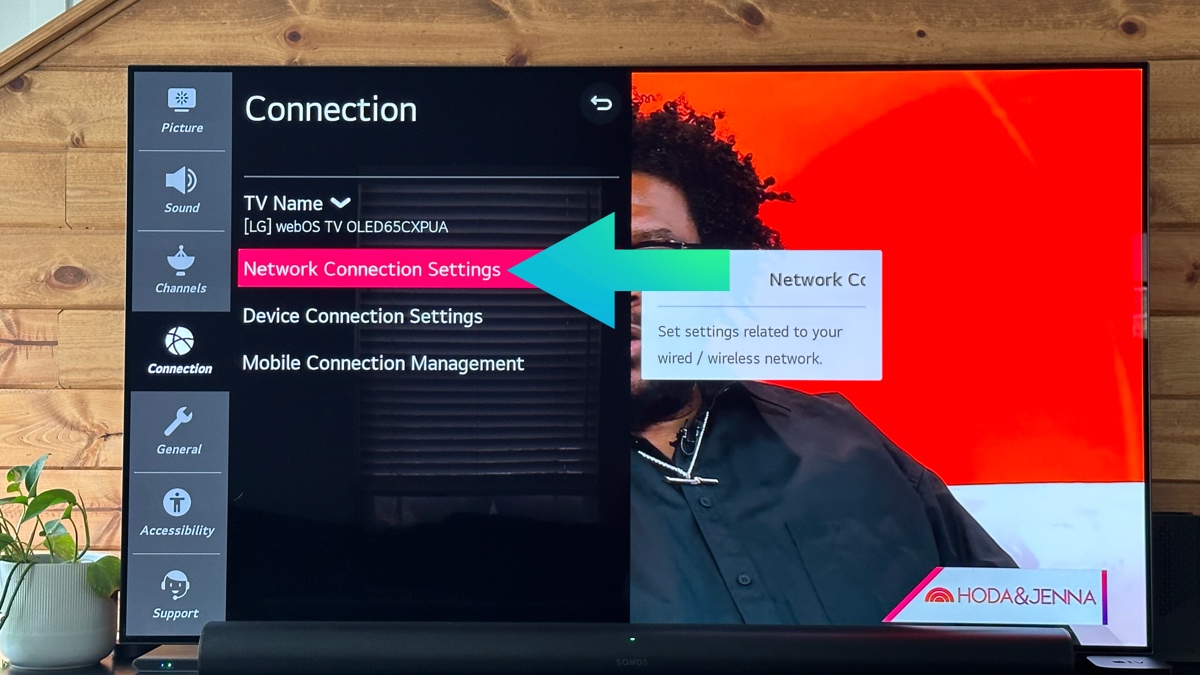
Checking Wi-Fi Settings on Smart TV
Before diving into complex troubleshooting steps, it’s essential to start with the basics and ensure that your Wi-Fi settings on the Smart TV are correctly configured. Here’s how you can check the Wi-Fi settings on your Smart TV:
- Access the Settings Menu: Use your TV remote to navigate to the settings menu on your Smart TV. This can usually be done by pressing the “Menu” or “Settings” button on the remote.
- Select the Network Settings: Once in the settings menu, navigate to the network or Wi-Fi settings option. This will vary depending on the brand and model of your Smart TV.
- Scan for Available Networks: In the network settings, look for an option to scan for available networks. This will initiate a search for nearby Wi-Fi networks that your Smart TV can connect to.
- Select Your Wi-Fi Network: After the scan is complete, a list of available networks will be displayed on the screen. Locate your Wi-Fi network in the list and select it.
- Enter Wi-Fi Password: If your Wi-Fi network is password-protected, you will be prompted to enter the password. Be sure to enter the correct password with the appropriate capitalization and special characters if required.
- Confirm Network Connection: Once you have entered the correct password, your Smart TV will attempt to establish a connection with the selected Wi-Fi network. It may take a few moments to complete the connection process.
After following these steps, your Smart TV should be connected to your Wi-Fi network. However, if the connection is still not successful or if you encounter any error messages, there are a few troubleshooting techniques you can try to resolve the issue. We will explore these troubleshooting steps in the upcoming sections.
Troubleshooting Wi-Fi Connection Issues
If your Smart TV is still not connecting to your Wi-Fi network, it’s time to dive into some troubleshooting techniques to help resolve the issue. Here are some steps you can take to troubleshoot Wi-Fi connection problems:
- Restart Your Smart TV and Router: Sometimes, a simple reboot can fix connectivity issues. Start by turning off both your Smart TV and router. Wait for a minute, then turn them back on. This can help refresh the network connection and resolve any temporary glitches.
- Update Firmware on Smart TV: Outdated firmware can cause compatibility issues with your Wi-Fi network. Check if there are any available firmware updates for your Smart TV model and install them. This can often address connectivity problems and improve overall performance.
- Reset Smart TV Network Settings: If your Wi-Fi settings on the Smart TV seem to be correct, but the connection is still not working, try resetting the network settings. This will remove any saved network configurations and allow you to set up the connection from scratch.
- Check Network Signal Strength: Weak Wi-Fi signal can result in poor connectivity. You can check the signal strength on your Smart TV by navigating to the network settings and looking for a signal strength indicator. If the signal is weak, consider relocating your router or using a Wi-Fi extender to boost the range.
- Verify Wi-Fi Password and Network Security: Double-check the Wi-Fi password you entered on your Smart TV to ensure it is correct. Additionally, make sure the security settings on your router match the ones supported by your Smart TV. Mismatched security settings can prevent the connection from establishing.
- Connect Smart TV to Wi-Fi using Manual Setup: If the automatic connection setup is not working, you can try setting up the Wi-Fi connection manually. In the network settings on your Smart TV, look for a manual setup option and follow the on-screen instructions to enter the Wi-Fi network name (SSID) and password.
- Contact Customer Support for Further Assistance: If you have tried all the troubleshooting steps and your Smart TV is still not connecting to the Wi-Fi network, it may be necessary to contact the customer support of your Smart TV manufacturer. They can provide further guidance and help resolve any technical issues that may be causing the problem.
By following these troubleshooting steps, you should be able to resolve most Wi-Fi connection issues with your Smart TV. However, if the problem persists, it is recommended to seek professional assistance to ensure a comprehensive and accurate resolution.
Restarting Your Smart TV and Router
One of the simplest and most effective troubleshooting techniques for Wi-Fi connection issues is to restart both your Smart TV and router. Restarting these devices can help resolve temporary glitches and refresh the network connection. Here’s how you can restart your Smart TV and router:
- Turn off your Smart TV: Use the remote control or the power button on your Smart TV to turn it off. Wait for a few seconds to ensure it completely powers down.
- Unplug your router: Locate the power cord of your router and unplug it from the power outlet. This will turn off the router and disconnect it from the power source.
- Wait for a minute: Give both your Smart TV and router a minute or two to fully power down and release any lingering electrical charges.
- Plug in your router: Connect the power cord of your router back into the power outlet and wait for it to power up. This may take a few moments, and you may see the lights on the router indicating its status.
- Turn on your Smart TV: Once the router is powered up and stable, use the remote control or the power button on your Smart TV to turn it back on. Wait for it to fully boot up.
- Connect to Wi-Fi network: After the Smart TV has restarted, navigate to the network settings and attempt to connect to your Wi-Fi network again by selecting it and entering the correct password if prompted.
Restarting your Smart TV and router can often resolve connectivity issues caused by temporary network glitches or conflicts. This process allows both devices to start fresh and establish a new network connection. If the connection is still not successful after restarting, you may need to explore additional troubleshooting methods or contact customer support for further assistance.
Updating Firmware on Smart TV
Updating the firmware on your Smart TV can address compatibility issues with your Wi-Fi network and improve overall performance. Firmware updates often include bug fixes, security patches, and enhancements that can help resolve connectivity problems. Here’s how you can update the firmware on your Smart TV:
- Check for available firmware updates: Use your Smart TV’s remote control to navigate to the settings menu. Look for an option related to firmware or software updates. The location of this option may vary depending on the brand and model of your Smart TV.
- Connect your Smart TV to the internet: To check for firmware updates, ensure that your Smart TV is connected to the internet. If it is not currently connected, go to the network settings and select your Wi-Fi network to establish the connection.
- Start the firmware update process: Once you have accessed the firmware update section, follow the on-screen instructions to initiate the update process. This may involve selecting a “Check for Updates” or “Update Firmware” option.
- Allow the update to complete: Your Smart TV will now connect to the manufacturer’s server to check for available firmware updates. If an update is found, it will begin downloading and installing automatically. It’s crucial not to turn off your Smart TV or disconnect it from the power source during the update process.
- Restart your Smart TV: Once the firmware update is complete, your Smart TV may prompt you to restart it. Follow the instructions to restart the device, which will ensure that the new firmware is fully applied.
- Reconnect to your Wi-Fi network: After your Smart TV has restarted, go to the network settings and reconnect it to your Wi-Fi network. Enter the correct Wi-Fi password if prompted.
By updating the firmware on your Smart TV, you ensure that it has the latest software improvements and fixes. This can help resolve Wi-Fi connection issues and provide a smoother and more reliable streaming experience. If updating the firmware does not resolve the connectivity problem, there may be other underlying factors that need to be examined.
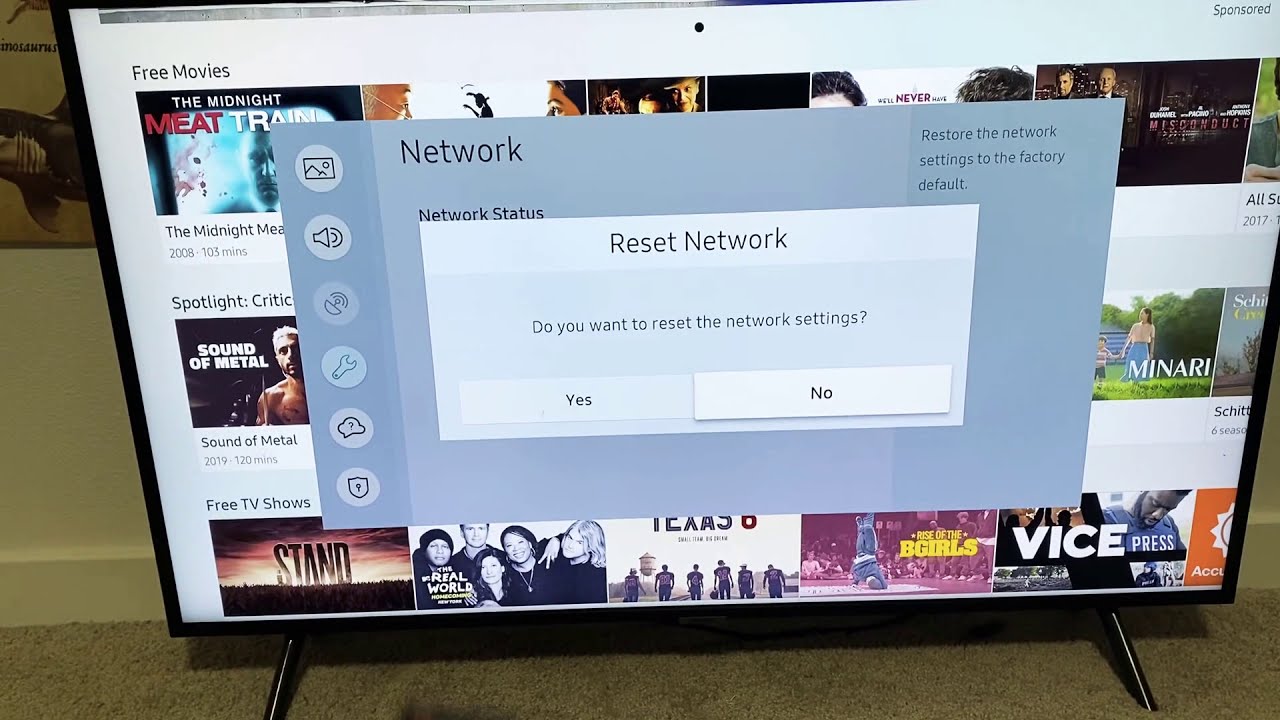
Resetting Smart TV Network Settings
If your Smart TV is still having trouble connecting to your Wi-Fi network, resetting the network settings can often resolve the issue. This step clears any saved network configurations and allows you to set up the connection from scratch. Here’s how you can reset the network settings on your Smart TV:
- Access the settings menu: Using your Smart TV’s remote control, navigate to the settings menu. This can usually be done by pressing the “Menu” or “Settings” button on the remote.
- Find the network settings: Look for an option related to network settings. The location of this option may vary depending on the brand and model of your Smart TV.
- Select the reset option: Once in the network settings, look for an option to reset the network or Wi-Fi settings. This may be labeled as “Reset Network,” “Factory Reset,” or a similar term.
- Confirm the reset: Your Smart TV will display a warning message informing you that resetting the network settings will remove all saved configurations. Confirm the reset by selecting the appropriate option.
- Set up the Wi-Fi connection again: After the network settings reset is complete, you will need to set up the Wi-Fi connection on your Smart TV from scratch. Go back to the network settings and select your Wi-Fi network, then enter the correct password if prompted.
- Test the connection: After reestablishing the Wi-Fi connection, test whether your Smart TV is now able to connect to the network and access the internet. If the connection is successful, you should be able to stream content and use the Smart TV features without any issues.
Resetting the network settings on your Smart TV can often resolve Wi-Fi connection problems caused by incorrect configurations or conflicting settings. However, it’s important to note that this step will remove any saved network information, so you will need to reenter your Wi-Fi network details after the reset is complete. If the connection issue persists even after resetting the network settings, further troubleshooting steps may be required.
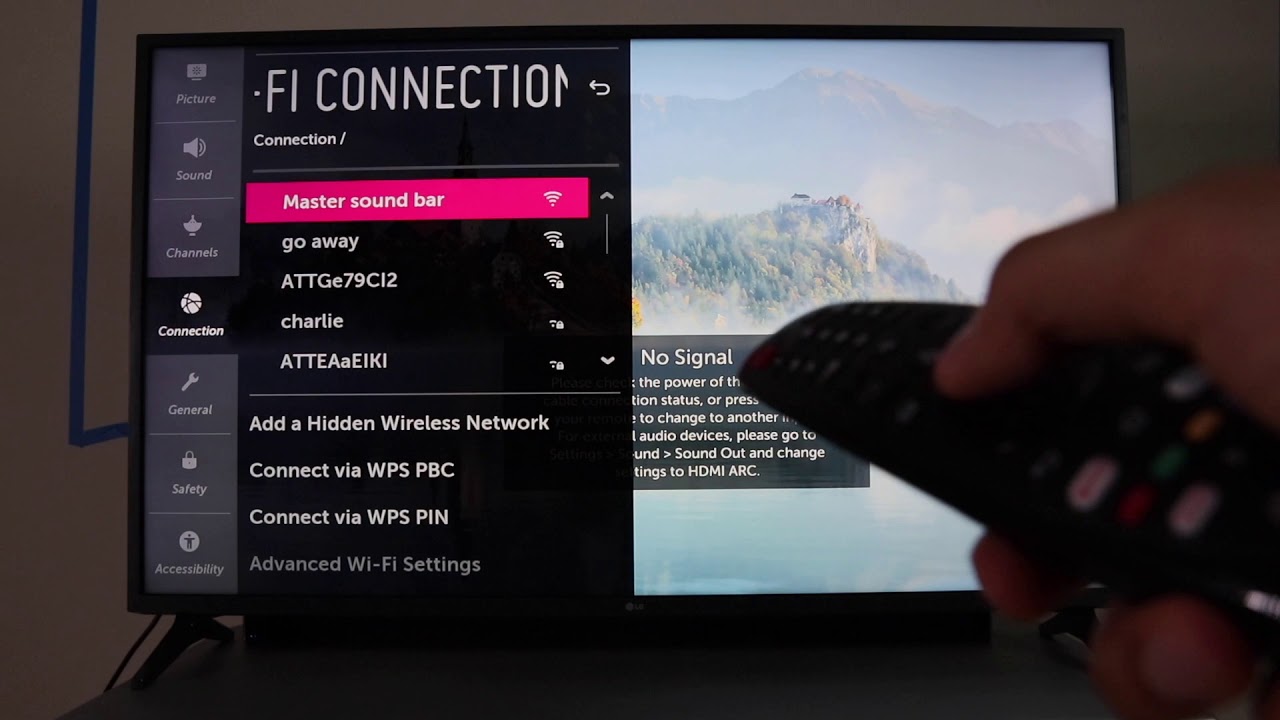
Checking Network Signal Strength
Weak Wi-Fi signal can significantly impact the performance and stability of your Smart TV’s connection. If you’re experiencing connectivity issues, it’s crucial to check the network signal strength. Here’s how you can do it:
- Access the network settings: Using your Smart TV remote control, navigate to the settings menu, and find the network or Wi-Fi settings.
- Check the signal strength indicator: Within the network settings, look for a signal strength indicator or a similar option that shows the strength of the Wi-Fi signal. This can usually be represented by bars, percentages, or color-coded symbols.
- Analyze the signal strength: Once you’ve located the signal strength indicator, assess the level of the signal. If the indicator shows a low signal strength, it means that the Wi-Fi signal is weak in that location.
- Reposition your Smart TV and router: If the signal strength is weak, consider relocating your Smart TV closer to the router. Ensure that there are no obstructions like walls, furniture, or other electronic devices blocking the path of the signal.
- Use a Wi-Fi extender: If repositioning your Smart TV and router doesn’t improve the signal strength, you can consider using a Wi-Fi extender. A Wi-Fi extender, also known as a range extender or a repeater, amplifies the Wi-Fi signal and extends its reach throughout your home.
- Switch to a different Wi-Fi channel: Signal interference from other devices or neighboring Wi-Fi networks can impact the signal strength. Within your router settings, try switching to a different Wi-Fi channel to reduce interference and improve the signal quality.
- Contact your internet service provider: If none of the above steps help improve the signal strength, it’s recommended to reach out to your internet service provider. They may be able to offer additional assistance or perform diagnostics to identify and resolve any underlying issues.
By checking the network signal strength and taking appropriate measures to optimize it, you can significantly improve the Wi-Fi connection quality on your Smart TV. This will result in smoother streaming, faster downloads, and a more enjoyable smart TV experience overall.
Verifying Wi-Fi Password and Network Security
Incorrect Wi-Fi passwords and network security settings can prevent your Smart TV from connecting to your Wi-Fi network. It’s important to verify that you have correctly entered the Wi-Fi password and that your network security settings are compatible with your Smart TV. Here’s what you can do:
- Double-check the Wi-Fi password: Access the network settings on your Smart TV and make sure that you have entered the correct Wi-Fi password. Pay attention to capitalization, special characters, and any spaces within the password.
- Reset the Wi-Fi password: If you are unsure about the Wi-Fi password or suspect that it may have been changed, you can reset it through your router’s settings. Consult your router’s user manual or contact your internet service provider for guidance on resetting the Wi-Fi password.
- Ensure network security compatibility: Some Smart TVs may have limitations regarding the type of network security they support. Verify that the security protocol used by your router (such as WPA, WPA2, or WEP) is compatible with your Smart TV. If not, you may need to change your router’s security settings or consider using an alternate form of network security.
- Temporarily disable network security: As a troubleshooting step, you can temporarily disable the network security on your router and see if your Smart TV can connect. If the issue is resolved, it indicates a compatibility problem with your network security settings. Reinstate the network security after testing to maintain a secure Wi-Fi connection.
- Perform a router reboot: Rebooting your router can also help in resolving network security-related issues. Turn off your router, wait for a few seconds, and then turn it back on. Allow the router to fully restart before attempting to establish the Wi-Fi connection with your Smart TV again.
- Update router firmware: Outdated router firmware can affect the compatibility and security of the connection. Check if there are any firmware updates available for your router model and install them. Updating the router’s firmware can often resolve security issues and improve network stability.
Verifying the Wi-Fi password and network security settings ensures that your Smart TV can authenticate and establish a secure connection with your Wi-Fi network. By following these steps, you can eliminate any password-related issues and ensure compatibility between your Smart TV and your network security settings.
Connecting Smart TV to Wi-Fi Using Manual Setup
If your Smart TV isn’t connecting to your Wi-Fi network using the automatic setup option, you can try connecting it manually. Manual setup allows you to enter the Wi-Fi network details directly and can help resolve any connectivity issues. Here’s how you can connect your Smart TV to Wi-Fi using manual setup:
- Access the network settings: Using your Smart TV remote control, navigate to the settings menu. Look for an option related to network or Wi-Fi settings.
- Start the manual setup: Within the network settings, select the option for manual setup or custom setup. This will allow you to enter the Wi-Fi network details manually.
- Enter the Wi-Fi network name (SSID): When prompted, enter the name of your Wi-Fi network (SSID). Make sure to type it accurately, with the correct capitalization and any special characters or spaces included.
- Select the network security type: Choose the appropriate network security type used by your Wi-Fi network. This may include options such as WPA, WPA2, WEP, or None. Refer to your router’s settings or contact your internet service provider if you are unsure of the security type.
- Enter the Wi-Fi network password: If your Wi-Fi network is secured with a password, you will be prompted to enter it. Carefully type in the password, making sure to use the correct capitalization, special characters, and any spaces required.
- Confirm the settings: Review the network settings you have entered and ensure they are accurate. Check for any typos or errors before proceeding.
- Test the connection: After entering the Wi-Fi network details, your Smart TV will attempt to connect to the network using the manual setup. Wait for a moment to allow the connection process to complete. If successful, you should see an indication that the connection has been established.
By connecting your Smart TV to Wi-Fi using manual setup, you can ensure that all the network details are correctly entered, minimizing the chance of connectivity issues. If the connection is still not successful, it may be necessary to further troubleshoot the network or seek technical assistance from the manufacturer or your internet service provider.
Contacting Customer Support for Further Assistance
If you have exhausted all the troubleshooting steps mentioned above and your Smart TV is still unable to connect to your Wi-Fi network, it may be time to seek further assistance from customer support. The manufacturer’s customer support team is well-equipped to address technical issues specific to your Smart TV model. Here’s how you can reach out to them:
- Find the customer support contact information: Visit the manufacturer’s website or refer to the user manual for your Smart TV to find the customer support contact details. These may include a phone number, email address, or live chat option. Some manufacturers also provide an online support portal where you can submit a support ticket or browse through troubleshooting articles.
- Prepare necessary information: Before reaching out to customer support, gather relevant information about your Smart TV, such as the model number, serial number, and any error codes or messages you have encountered during the troubleshooting process. Having this information readily available will help the support team assist you more efficiently.
- Explain the issue: When contacting customer support, clearly describe the issue you are facing with your Smart TV’s Wi-Fi connection. Provide detailed information about the troubleshooting steps you have already taken, including any error messages or results you observed. The more information you can provide, the better they will be able to assist you.
- Follow their guidance: Customer support may ask you to perform additional steps to diagnose and resolve the Wi-Fi connectivity issue. Follow their instructions carefully and provide any requested information or logs. They may also remotely access your Smart TV to troubleshoot the problem directly or suggest scheduling a technician visit, if necessary.
- Keep a record: During your interaction with customer support, keep track of the case or ticket number assigned to your issue. This will help you reference the conversation in case you need to follow up or escalate the matter.
- Be patient: Resolving complex technical problems may take time, especially if advanced troubleshooting measures are required. Customer support will work with you to find a solution but bear in mind that it might require multiple interactions or escalations. Stay patient and maintain open communication to reach a resolution.
Contacting customer support for further assistance is an important step when all other efforts to resolve the Wi-Fi connection issue have been exhausted. Their expertise and knowledge can help identify and resolve more complex issues specific to your Smart TV, allowing you to enjoy seamless connectivity and uninterrupted entertainment.
Conclusion
When your Smart TV is not connecting to your Wi-Fi network, it can be frustrating. However, by following the troubleshooting steps outlined in this article, you can often resolve the connectivity issues and get your Smart TV back online. From checking Wi-Fi settings and verifying the password to troubleshooting network signal strength and updating firmware, these steps cover a wide range of potential solutions.
Remember to double-check the Wi-Fi settings on your Smart TV, ensuring that the network name and password are entered correctly. Additionally, pay attention to the network signal strength and consider repositioning your Smart TV or using Wi-Fi extenders if necessary. Updating your Smart TV’s firmware can also address compatibility issues and improve overall performance.
If all else fails, reaching out to customer support can provide further assistance specific to your Smart TV model. They can guide you through advanced troubleshooting steps or help schedule a technician visit if required.
By being proactive and following these guidelines, you can overcome common Wi-Fi connection issues with your Smart TV and enjoy uninterrupted streaming, access to online content, and a seamless entertainment experience.