Introduction
High CPU usage can be a frustrating issue for Windows 7 users, as it can slow down the overall performance of the computer and negatively impact productivity. CPU usage refers to the amount of processing power utilized by the Central Processing Unit (CPU). When the CPU usage is high, it means that the processor is working at its maximum capacity, which can cause system slowdowns, freezes, and even crashes.
There can be several reasons why your CPU usage is high in Windows 7. Understanding these reasons can help you identify and address the underlying issues to optimize your system’s performance. This article will explore common causes of high CPU usage and provide effective solutions to mitigate the problem.
It’s important to note that high CPU usage is not always a cause for concern. Your CPU usage may spike temporarily when running resource-intensive tasks such as video editing or gaming. However, if your CPU usage remains consistently high even during idle or less demanding activities, it indicates a problem that requires attention.
This article will guide you through the process of identifying the causes of high CPU usage in Windows 7 and implementing appropriate solutions. By following these steps, you can optimize your system’s performance and improve its overall efficiency.
What is CPU Usage?
CPU usage refers to the percentage of processing power that your computer’s CPU is utilizing at any given time. The CPU (Central Processing Unit) is responsible for executing instructions and performing calculations for all the software running on your computer. It is the most crucial component of your computer’s hardware, and its performance greatly impacts the overall speed and responsiveness of your system.
CPU usage is typically measured as a percentage, showing how much of the CPU’s processing power is currently being utilized. A low CPU usage indicates that your system is running efficiently, with plenty of available processing power. On the other hand, a high CPU usage signifies that your CPU is working at full capacity, potentially causing performance issues and slowing down your computer.
It’s important to differentiate between overall CPU usage and individual core usage. CPUs can have multiple cores, each capable of processing tasks independently. When monitoring CPU usage, you may see a breakdown of usage for each core, as well as an overall average. Understanding the distribution of CPU usage across cores can provide insights into how effectively your system utilizes its processing power.
Monitoring CPU usage can help you identify performance bottlenecks, troubleshoot system slowdowns, and optimize resource allocation. By keeping an eye on CPU usage, you can identify processes or applications that consume excessive processing power and take appropriate steps to mitigate their impact on system performance.
Windows 7 provides various tools and methods to monitor CPU usage, such as the Task Manager and Resource Monitor. These utilities allow you to track CPU usage in real-time, view historical data, and identify high-resource processes or applications. By utilizing these tools, you can gain deeper insights into your computer’s performance and make informed decisions to optimize its efficiency.
Common Reasons for High CPU Usage
There can be several reasons why you may experience high CPU usage on your Windows 7 computer. It’s important to identify the underlying causes to effectively address and resolve the issue. Here are some common reasons for high CPU usage:
- Background Processes: Background processes running on your computer, such as system updates, scheduled tasks, or third-party applications, can consume a significant amount of CPU power. These processes may run in the background without your knowledge and impact system performance.
- Malware or Virus Infection: Malware or viruses often disguise themselves as legitimate processes and consume excessive CPU resources. When your system is infected, these malicious programs can cause your CPU to work overtime, resulting in high CPU usage and performance degradation. Regularly scanning your system for malware can help prevent this issue.
- Outdated Drivers: Outdated or incompatible drivers can lead to high CPU usage. Drivers are essential software components that allow your operating system to communicate with hardware devices. When drivers are outdated or malfunctioning, they can cause CPU spikes and system instability.
- Insufficient RAM: Insufficient Random Access Memory (RAM) can cause your CPU to work harder to compensate for the lack of available memory. When your computer runs out of physical memory, it starts using the hard drive as virtual memory, which can significantly slow down performance and increase CPU usage.
- Overheating: Overheating happens when your computer’s cooling system is unable to adequately dissipate heat generated by the CPU. When the CPU temperature rises, the system may throttle the CPU speed to prevent damage, resulting in high CPU usage. Cleaning the computer’s cooling system and ensuring proper ventilation can help alleviate this issue.
- High Resource Demand Programs: Certain programs, especially resource-demanding ones like graphic-intensive games or video editing software, can utilize a significant amount of CPU power. Running multiple demanding programs simultaneously can overload the CPU and lead to high CPU usage.
- Windows Updates: Windows 7 updates can sometimes cause high CPU usage, particularly during the installation process. These updates often require CPU-intensive processes to ensure proper installation and system security. Allowing Windows updates to complete can help resolve this temporary issue.
By understanding the common reasons behind high CPU usage, you can proceed to the next steps of troubleshooting and resolving the issue. It’s essential to address these causes accordingly to optimize your system’s performance and ensure smooth operation.
Background Processes
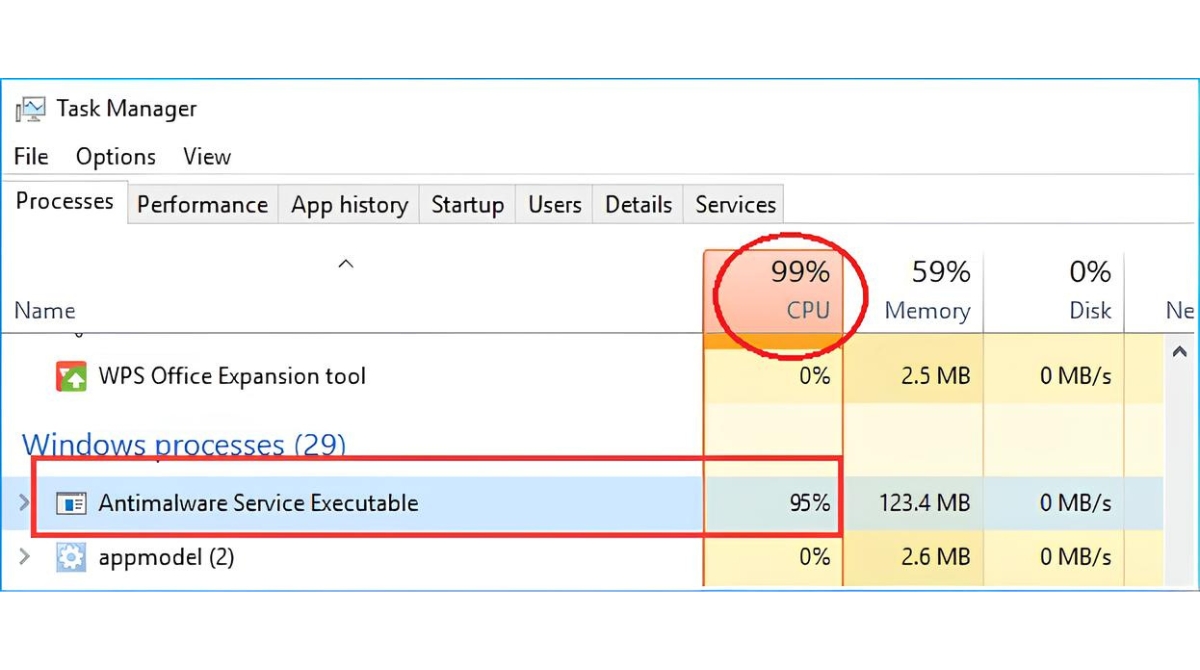
Background processes refer to the programs and tasks that run on your computer without your active involvement. These processes ensure the smooth functioning of your operating system and associated applications. However, some background processes may consume a significant amount of CPU power, leading to high CPU usage and decreased system performance.
To identify and manage background processes in Windows 7, you can use the built-in Task Manager. Here’s how to do it:
- Open Task Manager by right-clicking on the taskbar and selecting “Task Manager,” or by pressing Ctrl + Shift + Esc.
- In the Task Manager window, click on the “Processes” tab to view a list of running processes.
- Sort the processes by CPU usage by clicking on the “CPU” column header. This will display the processes consuming the highest amount of CPU power at the top.
- Identify any processes that are consistently using a large amount of CPU power. Pay attention to processes that are not essential to the functioning of your system or that you do not recognize. These processes may warrant further investigation.
- To end a process, right-click on it and select “End Process.” Exercise caution when ending processes, as terminating critical system processes can lead to instability. Only terminate processes that you are confident are not essential.
- Monitor the CPU usage after ending unnecessary background processes. If the CPU usage decreases significantly, the terminated processes were likely responsible for the high CPU usage.
It’s important to note that some background processes are necessary for the proper functioning of your system. Terminating critical system processes can lead to system instability or crashes. Therefore, exercise caution when ending processes and ensure that you only terminate non-essential processes.
Managing background processes can help reduce high CPU usage and improve overall system performance. By keeping an eye on resource-intensive processes and terminating unnecessary ones, you can optimize your system’s resources and ensure a smoother computing experience.
Malware or Virus Infection
Malware or virus infections can result in high CPU usage as malicious programs consume processing power to carry out their activities. These infections can have various detrimental effects on your system, including decreased performance, system crashes, and unauthorized access to sensitive information. It is crucial to scan your system regularly to detect and remove any malware or viruses that may be causing high CPU usage.
To scan for malware or virus infections in Windows 7, you can use reputable antivirus software. Follow these steps to perform a scan:
- Ensure that your antivirus software is up to date. If you don’t have antivirus software installed, choose a reputable antivirus program and install it on your system.
- Open your antivirus software and navigate to the scan settings. Select a full system scan option, as this will thoroughly scan all files and processes on your computer.
- Start the scan and allow the antivirus software to thoroughly examine your system for any malware or viruses.
- If any infected files or processes are detected, follow the prompts provided by your antivirus software to quarantine, repair, or remove them.
- Restart your computer to ensure that all changes take effect and to verify that the high CPU usage issue has been resolved.
Regularly updating your antivirus software and performing scans will help protect your system from malware and viruses. Additionally, exercise caution when downloading files or visiting unfamiliar websites to minimize the risk of infection. Adhering to safe browsing habits and practicing good cybersecurity hygiene can go a long way in preventing malware or virus infections.
By regularly scanning for malware or viruses and taking appropriate actions to remove them, you can reduce high CPU usage caused by these malicious programs. Remember, prevention is key, so stay vigilant and keep your system protected with up-to-date antivirus software and safe browsing practices.
Outdated Drivers
Outdated or incompatible drivers can contribute to high CPU usage in Windows 7. Drivers are software components that facilitate communication between your operating system and hardware devices. When drivers become outdated or incompatible, they can cause instability, system errors, and increased CPU usage.
To address issues related to outdated drivers, you can follow these steps:
- Identify the devices for which you suspect outdated drivers may be causing high CPU usage. Common culprits include graphics cards, network adapters, and audio devices.
- Visit the official website of the device manufacturer and navigate to the support or drivers section.
- Search for the latest version of the driver specific to your device and operating system. Download the driver installation package to your computer.
- Uninstall the existing driver for the device that you identified in the first step. To do this, open the “Device Manager” by right-clicking on the “Computer” or “My Computer” icon, selecting “Manage,” and then choosing “Device Manager.” Find the device in the list, right-click on it, and select “Uninstall.”
- After uninstalling the driver, restart your computer to complete the uninstallation process.
- Once your computer has restarted, locate the downloaded driver installation package and run it. Follow the on-screen instructions to install the updated driver.
- Restart your computer again to apply the changes and verify that the high CPU usage issue has been resolved.
Regularly updating drivers is important for maintaining system stability and optimizing performance. Some manufacturers may offer automatic driver update utilities that can streamline the process for you. Check if such utilities are available for your devices to simplify the driver update process.
By ensuring that your drivers are up to date and compatible with your operating system, you can minimize the risk of high CPU usage caused by outdated or incompatible drivers. Taking the time to perform these driver updates periodically will help keep your system running smoothly and efficiently.
Insufficient RAM
Insufficient Random Access Memory (RAM) can contribute to high CPU usage in Windows 7. RAM is responsible for temporarily storing data that your CPU needs to access quickly. When your computer runs out of physical memory, it compensates by using the hard drive as virtual memory, known as paging or swapping. This process can significantly slow down performance and lead to increased CPU usage.
To address issues related to insufficient RAM, you have a few options:
- Upgrade your RAM: If your computer has slots available for additional RAM modules, consider upgrading your RAM capacity. Increasing the amount of RAM will provide more space for data to be stored, reducing the need for excessive swapping to the hard drive.
- Close unnecessary programs: Running too many programs simultaneously can quickly consume available RAM. Close any unused programs, especially those that are resource-intensive, to free up RAM for more critical tasks.
- Manage startup programs: Some programs automatically start when you boot up your computer, consuming valuable RAM. Use the System Configuration tool (msconfig) or a third-party startup manager to disable unnecessary startup programs.
- Adjust virtual memory settings: Windows 7 allows you to adjust the virtual memory settings manually. To do this, open the Control Panel, navigate to “System and Security,” select “System,” and click on “Advanced system settings.” In the “Advanced” tab, under the “Performance” section, click on “Settings” and go to the “Advanced” tab again. Under the “Virtual memory” section, click on “Change.” Here, you can adjust the virtual memory settings according to your needs.
- Optimize system performance: Windows 7 provides a built-in performance troubleshooter that can help identify and resolve issues that impact system performance, including insufficient RAM. Open the Control Panel, go to “System and Security,” and select “Find and fix problems” under the “System” section. Choose “Check for performance issues” and follow the prompts to optimize your system’s performance.
By upgrading your RAM, managing programs, adjusting virtual memory settings, and optimizing system performance, you can alleviate the strain on your CPU caused by insufficient RAM. These steps will help ensure that your system has enough memory to handle tasks efficiently and minimize unnecessary CPU usage.
Overheating
Overheating can be a common cause of high CPU usage in Windows 7. When your computer’s cooling system is unable to effectively dissipate the heat generated by the CPU, it can result in increased CPU temperatures. In response to excessive heat, the system may throttle the CPU speed to prevent damage, leading to high CPU usage and performance degradation.
Here are some steps you can take to address overheating issues:
- Clean the cooling system: Dust and debris can accumulate on the cooling fans and heat sinks, inhibiting proper air circulation and heat dissipation. Use compressed air or a soft brush to gently clean the cooling fans, heat sinks, and vents. Ensure that the computer is turned off and unplugged before performing any cleaning.
- Check for proper ventilation: Ensure that your computer is placed in a well-ventilated area. Avoid blocking the vents with objects or placing the computer on surfaces that impede airflow. Additionally, using a laptop cooling pad or elevating the bottom of the laptop can help improve ventilation.
- Monitor CPU temperatures: Install monitoring software that allows you to track CPU temperatures in real-time. Some popular options include Core Temp, HWMonitor, and SpeedFan. Monitor your CPU temperatures and ensure they stay within acceptable ranges, typically below 80-85 degrees Celsius under heavy loads.
- Apply thermal paste: Over time, the thermal paste that ensures proper contact between the CPU and the heat sink can degrade. If you are comfortable with computer hardware, consider applying a new layer of thermal paste to improve heat transfer between the CPU and the heat sink.
- Consider additional cooling solutions: If your system continues to experience overheating, you may need to invest in additional cooling solutions. This could include installing more cooling fans, upgrading to a better CPU cooler, or utilizing liquid cooling systems.
By cleaning the cooling system, ensuring proper ventilation, monitoring CPU temperatures, applying thermal paste, and considering additional cooling solutions, you can address overheating issues and reduce the strain on your CPU. Taking these steps will help maintain optimal CPU performance and prevent excessive CPU usage caused by high temperatures.
High Resource Demand Programs
Certain programs that demand a high amount of system resources can contribute to high CPU usage in Windows 7. These resource-demanding programs, such as graphic-intensive games, video editing software, or complex 3D modeling applications, can push the CPU to its limits and lead to increased CPU utilization. Running multiple resource-demanding programs simultaneously can overload the CPU, causing high CPU usage and potential performance issues.
To manage high CPU usage caused by resource-demanding programs, you can follow these steps:
- Close unnecessary programs: If you have resource-demanding programs running in the background, close any unnecessary programs or processes that are not currently in use. By reducing the number of active programs, you can free up CPU resources and alleviate the strain on your system.
- Adjust program settings: Some resource-demanding programs offer settings that allow you to adjust performance options. Look for options or preferences within the program that can optimize performance, such as lowering graphical settings or reducing the number of background tasks.
- Monitor CPU usage: Use the Task Manager or other system monitoring tools to monitor the CPU usage while running resource-demanding programs. This will give you an idea of how much CPU power each program is consuming and help you identify programs that are putting excessive strain on the CPU.
- Run programs one at a time: If you are running multiple resource-demanding programs simultaneously and experiencing high CPU usage, try running them one at a time. By giving each program exclusive access to CPU resources, you can ensure that it has enough processing power to run smoothly.
- Upgrade hardware: If you consistently work with resource-demanding programs, consider upgrading your hardware components. This could involve increasing the CPU power, adding more RAM, or upgrading to a more powerful graphics card. By having more capable hardware, your system can handle resource-intensive tasks more efficiently.
By closing unnecessary programs, adjusting program settings, monitoring CPU usage, running programs one at a time, and upgrading hardware if necessary, you can manage high CPU usage caused by resource-demanding programs. These steps will help ensure that your system allocates CPU resources effectively and maintains efficient performance when running these demanding applications.
Windows Updates
Windows 7 updates can sometimes cause high CPU usage, especially during the installation process. These updates are crucial for maintaining system security, stability, and compatibility with the latest software and hardware. However, certain updates may require CPU-intensive processes to ensure proper installation, leading to temporary spikes in CPU usage.
To address high CPU usage caused by Windows updates, you can follow these steps:
- Allow updates to complete: If you notice high CPU usage during the installation of updates, it is best to let them complete. Windows updates often require CPU-intensive processes to configure and install important system files. Once the updates are installed, the CPU usage should return to normal.
- Configure automatic updates: By setting Windows 7 to automatically install updates during non-working hours or when the computer is idle, you can minimize the impact of high CPU usage on your workflow. To configure automatic updates, open the Control Panel, go to “System and Security,” select “Windows Update,” and click on “Change settings” on the left-hand side.
- Check for stuck updates: In some cases, updates can get stuck or fail to install properly, causing high CPU usage. You can check for stuck updates by opening the Control Panel, going to “System and Security,” and selecting “Windows Update.” Click on “Check for updates” and look for any updates that are not progressing or showing errors. If you encounter stuck updates, you may need to manually download and install them from the Microsoft Update Catalog.
- Reset Windows Update components: If you continue to have issues with high CPU usage during Windows 7 updates, you can try resetting the Windows Update components. Microsoft provides a dedicated troubleshooter tool called “Windows Update Troubleshooter” that can automatically detect and fix problems with Windows Update.
Regularly updating your Windows 7 system is crucial for maintaining security and performance. While high CPU usage during updates may be temporary, it is important to allow the updates to complete to ensure that your system remains up to date and protected.
By allowing updates to complete, configuring automatic updates, checking for stuck updates, and resetting Windows Update components if necessary, you can manage high CPU usage caused by Windows updates and ensure that your system stays secure and up to date.
How to Check CPU Usage in Windows 7
To effectively manage high CPU usage in Windows 7, it’s important to have a way to monitor the CPU usage in real-time. Fortunately, Windows 7 provides built-in tools that allow you to check CPU usage and keep track of resource utilization. Here are some methods you can use to check CPU usage in Windows 7:
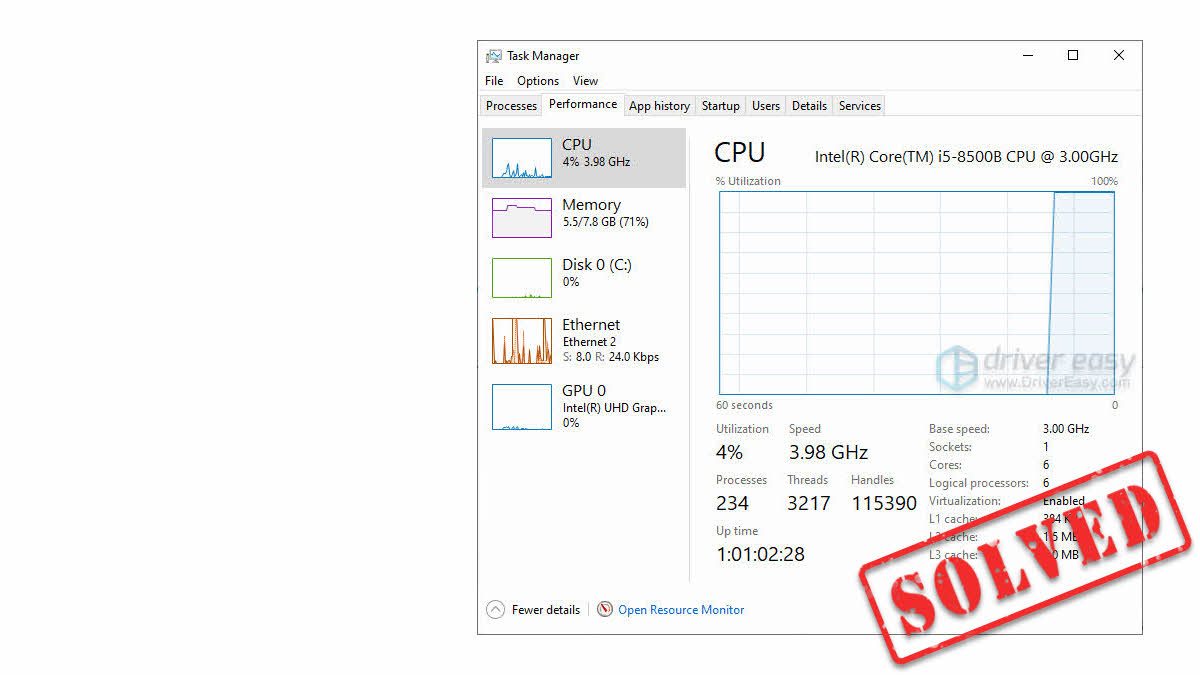
- Task Manager: The Task Manager is a powerful tool that provides real-time insights into system performance, including CPU usage. To access the Task Manager, right-click on the taskbar and select “Task Manager,” or press Ctrl + Shift + Esc. In the Task Manager window, click on the “Performance” tab to view the CPU usage graph and other performance metrics. You can also switch to the “Processes” tab to see a list of running processes and their respective CPU usage percentages.
- Resource Monitor: The Resource Monitor offers a more detailed view of the system’s resource usage, including CPU, memory, disk, and network. To open the Resource Monitor, go to the Control Panel, choose “System and Security,” and select “Administrative Tools.” Then, click on “Resource Monitor.” In the Resource Monitor window, navigate to the “CPU” tab to view detailed information about each process’s CPU usage, including average CPU usage, maximum frequency, and so on.
- Command Prompt: Another way to check CPU usage is through the Command Prompt. Open the Command Prompt by pressing Win + R, typing “cmd,” and hitting Enter. In the Command Prompt window, type “wmic cpu get loadpercentage” and press Enter. This command will display the current CPU usage as a percentage.
- Third-Party Monitoring Software: There are several third-party monitoring software options available that offer more advanced features and capabilities. These applications provide comprehensive real-time monitoring of CPU usage, temperatures, and other system performance metrics. Some popular choices include HWMonitor, Core Temp, and CPU-Z.
By utilizing these methods, you can effectively keep track of CPU usage in Windows 7 and identify any abnormal spikes or patterns that may indicate high CPU usage. Regularly monitoring CPU usage can enable you to take appropriate actions to optimize system performance and resolve any issues that may be causing excessive CPU utilization.
Ways to Reduce High CPU Usage
High CPU usage can significantly impact the performance and responsiveness of your Windows 7 system. To address and reduce high CPU usage, there are several effective strategies you can employ. By implementing these methods, you can optimize your CPU usage and ensure smooth operation. Here are some ways to reduce high CPU usage:
- End Unnecessary Background Processes: Identify and terminate unnecessary background processes that consume CPU resources. Use the Task Manager to view running processes and end those that are not essential.
- Scan for Malware or Viruses: Regularly perform system scans using reputable antivirus software to detect and remove malware or viruses that may be causing high CPU usage.
- Update Drivers: Keep your drivers up to date to ensure compatibility and optimal performance. Visit the manufacturer’s website for the latest driver versions and install them as needed.
- Increase RAM Capacity: If your system has insufficient RAM, consider upgrading to a higher capacity. This allows your computer to handle more processes simultaneously, reducing the strain on the CPU.
- Check for Overheating: Clean the cooling system of your computer to prevent overheating. Ensure proper ventilation and monitor CPU temperatures to avoid excessive heat buildup that can increase CPU usage.
- Manage Resource Demand Programs: Close resource-demanding programs that are not in use. Limit the number of simultaneous resource-intensive tasks, such as gaming or running multiple complex applications.
- Install Windows Updates: Keep your Windows 7 system up to date with the latest updates. These updates often include fixes and performance improvements that can help reduce high CPU usage.
Implementing these strategies will help optimize CPU usage and improve the overall performance of your Windows 7 system. Regular system maintenance, including updating drivers and scanning for malware, is essential to prevent and mitigate high CPU usage. By adopting these practices, you can ensure that your computer operates efficiently, with reduced CPU usage and enhanced productivity.
End Unnecessary Background Processes
One effective way to reduce high CPU usage in Windows 7 is to identify and terminate unnecessary background processes that consume CPU resources. Background processes are applications or services that run in the background without your active involvement. While some background processes are essential for the proper functioning of your operating system, others may be unnecessary or even harmful.
To end unnecessary background processes, you can make use of the built-in Task Manager utility in Windows 7. Here’s how:
- Right-click on the taskbar and select “Task Manager” from the context menu, or press Ctrl + Shift + Esc to open the Task Manager window.
- In the Task Manager window, navigate to the “Processes” tab.
- You can sort the processes by CPU usage by clicking on the “CPU” column to identify the processes consuming the most CPU power.
- Look for processes that are using high CPU percentages consistently while not being essential for your system’s operation.
- To end a process, right-click on it and select “End Process” from the context menu.
- Exercise caution when ending processes, as terminating critical system processes can lead to system instability. Only terminate processes that you are confident are not essential.
- Monitor the CPU usage after ending unnecessary background processes to observe the impact on CPU usage.
Terminating unnecessary and resource-hungry background processes can free up CPU resources, resulting in lower CPU usage and improved system performance. However, it’s important to note that some background processes are crucial for the smooth operation of your system. Be careful not to terminate essential system processes or processes associated with critical applications.
Regularly reviewing and managing background processes can help keep your CPU usage in check. By identifying and ending unnecessary processes, you can optimize your system’s resources and ensure that the CPU is utilized efficiently. This, in turn, promotes smoother multitasking, faster application response times, and an overall enhanced computing experience.
Scan for Malware or Viruses
Malware or viruses can often be the culprits behind high CPU usage in Windows 7. These malicious programs can disguise themselves as legitimate processes and consume an excessive amount of CPU resources. To address this issue, it is crucial to regularly scan your system for malware or viruses using reputable antivirus software.
Follow these steps to scan for malware or viruses and mitigate high CPU usage:
- Ensure your antivirus software is up to date. If you don’t have antivirus software installed, choose a reputable antivirus program and install it on your system.
- Open your antivirus software and navigate to the scan settings. Select a full system scan option to thoroughly scan all files and processes on your computer.
- Start the scan and allow the antivirus software to thoroughly examine your system for any malware or viruses.
- If any infected files or processes are detected, follow the prompts provided by your antivirus software to quarantine, repair, or remove them.
- Restart your computer to ensure all changes take effect and to verify that the high CPU usage issue has been resolved.
Regular scanning for malware or viruses is crucial to maintain a secure and optimized system. Additionally, adopting safe browsing habits, avoiding suspicious websites or downloads, and being cautious with email attachments can help prevent malware infections in the first place.
By regularly scanning for malware or viruses and taking immediate action to remove them, you can significantly reduce high CPU usage caused by malicious programs. It is essential to keep your antivirus software up to date and perform regular scans to ensure the ongoing security and stability of your Windows 7 system.
Update Drivers
Outdated or incompatible drivers can contribute to high CPU usage in Windows 7. Drivers are essential software components that allow communication between your operating system and hardware devices. When drivers become outdated or malfunctioning, they can cause system instability, errors, and increased CPU utilization.
To address high CPU usage caused by outdated drivers, follow these steps:
- Identify the devices for which you suspect outdated drivers may be causing high CPU usage. Common culprits include graphics cards, network adapters, and audio devices.
- Visit the official website of the device manufacturer and navigate to the support or drivers section.
- Search for the latest version of the driver specific to your device and operating system. Download the driver installation package to your computer.
- Before installing the new driver, it is recommended to uninstall the existing driver. Open the Device Manager by right-clicking on the “Computer” or “My Computer” icon, selecting “Manage,” and then choosing “Device Manager.” Find the device in the list, right-click on it, and select “Uninstall.”
- After uninstalling the driver, restart your computer to complete the uninstallation process.
- Once your computer has restarted, locate the downloaded driver installation package and run it. Follow the on-screen instructions to install the updated driver.
- Restart your computer again to apply the changes and verify that the high CPU usage issue has been resolved.
It is important to note that some driver updates may require additional steps or specific installation procedures. Always follow the instructions provided by the device manufacturer to ensure a successful driver update.
Keeping your drivers up to date can improve system performance, stability, and compatibility with the latest software and hardware. It is recommended to periodically check for driver updates, especially after installing new hardware or updating your operating system. By regularly updating your drivers, you can minimize the risk of high CPU usage caused by outdated or incompatible drivers, ensuring smooth operation and optimal performance on your Windows 7 system.
Increase RAM Capacity
Insufficient Random Access Memory (RAM) can cause high CPU usage in Windows 7. RAM is a crucial component of your computer’s hardware that temporarily stores data that the CPU needs to access quickly. When your system runs out of physical memory, it compensates by using the hard drive as virtual memory, which can significantly slow down performance and increase CPU usage.
To address high CPU usage caused by insufficient RAM, there are a few options available:
- Upgrade RAM: If your computer has available slots for additional RAM modules, consider upgrading your RAM capacity. Increasing the amount of RAM allows your computer to store more data in memory, reducing the need for excessive swapping to the hard drive and decreasing CPU usage.
- Close Unnecessary Programs: Running too many programs simultaneously can quickly consume available RAM. Close any unused programs, especially those that are resource-intensive, to free up RAM for more critical tasks.
- Manage Startup Programs: Some programs automatically start when you boot up your computer, consuming valuable RAM. Use the System Configuration tool (msconfig) or a third-party startup manager to disable unnecessary startup programs and reduce RAM usage.
- Adjust Virtual Memory Settings: Windows 7 allows you to manually adjust the virtual memory (also known as paging file) settings. The virtual memory acts as an extension of the physical RAM. Open the Control Panel, navigate to “System and Security,” select “System,” and click on “Advanced system settings.” In the “Advanced” tab, under the “Performance” section, click on “Settings” and go to the “Advanced” tab again. Under the “Virtual memory” section, click on “Change.” Here, you can adjust the virtual memory settings according to your needs.
Increasing your RAM capacity can have a significant impact on reducing high CPU usage. By having more RAM available, your computer can handle more processes simultaneously and store critical data in memory, resulting in lower CPU utilization and improved overall performance.
It is important to ensure compatibility when upgrading RAM modules. Check your computer’s specifications and consult the manufacturer’s recommendations to determine the type and maximum capacity of RAM modules that are compatible with your system.
By increasing your RAM capacity, closing unnecessary programs, managing startup programs, and adjusting virtual memory settings, you can effectively reduce high CPU usage caused by insufficient RAM. These steps will help optimize your system’s performance, minimize resource bottlenecks, and provide a smoother computing experience on your Windows 7 system.
Check for Overheating
Overheating can cause high CPU usage in Windows 7, as excessive heat can lead to system instability and increased CPU temperatures. When the CPU temperature rises beyond its safe operating limit, the system may throttle the CPU speed, resulting in high CPU usage and reduced performance.
To check for overheating and address the issue, follow these steps:
- Clean the Cooling System: Dust and debris can accumulate on the cooling fans and heat sinks, obstructing proper airflow and heat dissipation. Use compressed air or a soft brush to gently clean the cooling fans, heat sinks, and vents. Ensure that the computer is turned off and unplugged before performing any cleaning.
- Ensure Proper Ventilation: Make sure that your computer is placed in a well-ventilated area. Avoid obstructing the vents with objects and ensure that there is sufficient space around the computer for adequate airflow. Additionally, using a laptop cooling pad or elevating the bottom of a laptop can help improve ventilation.
- Monitor CPU Temperatures: Install monitoring software that allows you to track CPU temperatures in real-time. Several software options, such as Core Temp, HWMonitor, and SpeedFan, can provide you with accurate temperature readings. Monitor the CPU temperatures and ensure that they stay within acceptable ranges, typically below 80-85 degrees Celsius under heavy loads.
- Apply Thermal Paste: Over time, the thermal paste between the CPU and the heat sink can degrade, reducing the efficiency of heat transfer. If you are comfortable working with computer hardware, consider applying a fresh layer of thermal paste to improve heat dissipation.
- Consider Additional Cooling Solutions: If your system continues to experience overheating despite cleaning and thermal paste application, you may need to consider additional cooling solutions. This might include installing additional cooling fans, upgrading to a more efficient CPU cooler, or implementing liquid cooling systems.
Regularly checking for overheating and taking necessary steps to address the issue is integral to maintaining optimal system performance. Proper cooling of the CPU ensures that it can operate within safe temperature limits, reducing the possibility of high CPU usage and performance degradation.
By cleaning the cooling system, ensuring proper ventilation, monitoring CPU temperatures, applying thermal paste, and considering additional cooling solutions if needed, you can successfully combat overheating issues. Maintaining appropriate temperatures will lead to a more efficient CPU, lower CPU usage, and an overall improved computing experience on your Windows 7 system.
Manage Resource Demand Programs
Resource demand programs, such as graphic-intensive games, video editing software, or complex 3D modeling applications, can cause high CPU usage in Windows 7. These programs often require a significant amount of system resources, including CPU power, to function properly. Running multiple resource-demanding programs simultaneously can overload the CPU, leading to high CPU usage and potential performance issues.
To manage high CPU usage caused by resource-demanding programs, consider the following strategies:
- Close Unnecessary Programs: Close any resource-demanding programs that are not actively in use. Running too many programs simultaneously can quickly consume available CPU resources. By closing unused programs, you can free up CPU power for critical tasks.
- Limit the Number of Simultaneous Programs: Minimize running multiple demanding programs at the same time. If possible, stagger their usage or run them one at a time to ensure that each program has exclusive access to CPU resources.
- Adjust Program Settings: Check if the resource-demanding programs offer settings that allow you to adjust their performance options. Look for options to lower graphical settings, reduce background tasks, or optimize resource usage. Fine-tuning these settings can help lower CPU usage and improve overall system performance.
- Monitor CPU Usage: Use the Task Manager or other system monitoring tools to observe CPU usage while running resource-demanding programs. This will give you insights into how much CPU power each program is consuming and help identify programs that are putting excessive strain on the CPU.
- Upgrade Hardware: If you regularly work with resource-demanding programs, consider upgrading your hardware components. This could involve increasing CPU power, adding more RAM, or upgrading to a more powerful graphics card. By having more capable hardware, your system can handle resource-intensive tasks more efficiently, resulting in lower CPU usage.
Effectively managing resource demand programs can help reduce high CPU usage and improve overall system performance. By closing unnecessary programs, limiting simultaneous usage, adjusting program settings, monitoring CPU usage, and upgrading hardware if necessary, you can ensure that your CPU resources are used optimally, resulting in smoother multitasking, faster application response times, and a more enjoyable computing experience on your Windows 7 system.
Install Windows Updates
Installing Windows updates is an essential step in reducing high CPU usage and maintaining the overall performance and security of your Windows 7 system. Windows updates often include bug fixes, security patches, and performance improvements that can optimize your system’s operation and help address high CPU usage issues.
To ensure that your system is up to date with the latest Windows updates, follow these steps:
- Enable Automatic Updates: Configure your system to automatically download and install Windows updates. To do this, open the Control Panel, go to “System and Security,” select “Windows Update,” and click on “Change settings” on the left-hand side. Choose the “Install updates automatically” option, and you can also specify a convenient time for the updates to be installed.
- Check for Updates: If automatic updates are not enabled, manually check for updates regularly to ensure that your system is up to date. Open the Control Panel, go to “System and Security,” and select “Windows Update.” Click on “Check for updates” and allow Windows to scan for available updates.
- Install Updates: Once the system has finished scanning, a list of available updates will be displayed. Select the desired updates, including important and recommended updates, and click on “Install.” Follow the on-screen instructions for the installation process.
- Restart Your Computer: After the updates have been installed, it is often necessary to restart your computer to apply the changes. Save any open work and restart your system to complete the update installation.
Windows updates not only address security vulnerabilities but also often contain performance optimizations that can help reduce high CPU usage. By installing updates regularly, you can ensure that your system benefits from the latest improvements and bug fixes provided by Microsoft.
When Windows updates are being installed, CPU usage may temporarily increase due to the CPU-intensive tasks involved in the installation process. Therefore, it is recommended to schedule updates during non-working hours or periods when the system is not in heavy use.
By keeping your Windows 7 system up to date with the latest updates, you can reduce the risk of security vulnerabilities and improve the overall performance and stability of your system. Regularly checking for and installing Windows updates is an essential maintenance practice to minimize high CPU usage and ensure the smooth operation of your Windows 7 system.
Conclusion
High CPU usage in Windows 7 can be a frustrating issue that impacts the performance and responsiveness of your computer. However, by understanding and addressing the common reasons for high CPU usage, you can optimize your system’s performance and improve its overall efficiency.
We explored several causes of high CPU usage, including unnecessary background processes, malware or virus infections, outdated drivers, insufficient RAM, overheating, resource-demanding programs, and Windows updates. Each of these factors can contribute to high CPU usage, but fortunately, there are effective ways to tackle them.
By ending unnecessary background processes, scanning for malware or viruses, updating drivers, increasing RAM capacity, checking for overheating, managing resource-demanding programs, and installing Windows updates, you can effectively reduce high CPU usage and enhance your Windows 7 system’s performance.
Regularly monitoring CPU usage, keeping your system updated, and practicing good computer maintenance habits are essential for maintaining optimal CPU performance and preventing high CPU usage.
Overall, addressing high CPU usage requires a combination of proactive monitoring, software management, and hardware maintenance. By implementing the strategies discussed in this article, you can optimize your system’s resources, improve multitasking capabilities, and ensure a smoother and more efficient computing experience on your Windows 7 system.