Common Wi-Fi Connection Issues
Having difficulty connecting your computer to Wi-Fi can be frustrating. There are several common issues that can affect your Wi-Fi connection. Understanding these issues can help you troubleshoot and resolve the problem quickly. Here are some of the most common Wi-Fi connection issues:
-
Insufficient Signal Strength
A weak Wi-Fi signal can make it difficult for your computer to establish a reliable connection. This can happen if you’re too far away from the router or if there are physical obstacles, such as walls or furniture, blocking the signal. Moving closer to the router or repositioning it can often solve this issue.
-
Incorrect Wi-Fi Password
If you’re getting an authentication error or unable to connect to your Wi-Fi network, double-check that you’re entering the correct Wi-Fi password. Sometimes, a simple typo can prevent your computer from connecting to the network.
-
Connection Limit Reached
Some routers have a maximum number of devices that can be connected to the Wi-Fi network at the same time. If the connection limit is reached, you won’t be able to connect with your computer. Check your router’s settings and consider disconnecting unused devices or upgrading to a router with a higher connection limit.
-
IP Address Conflict
An IP address conflict can occur when two devices on the same network have the same IP address. This can lead to connectivity issues. To resolve this problem, you can try restarting your router or assigning static IP addresses to your devices.
-
Wi-Fi Network Compatibility
Not all devices support all Wi-Fi standards. If your computer is using an older Wi-Fi standard and your router is set to use a newer one, you may experience compatibility issues. Check your computer’s Wi-Fi capabilities and make sure they match the settings of your router.
-
Router Firmware Issues
Outdated or faulty router firmware can cause connectivity problems. It’s essential to keep your router’s firmware up to date to ensure optimal performance. Consult your router’s manufacturer website for instructions on how to update the firmware.
-
Outdated Wi-Fi Drivers
Outdated or corrupted Wi-Fi drivers on your computer can prevent it from connecting to Wi-Fi. Check the manufacturer’s website for the latest drivers for your Wi-Fi adapter and install them if necessary.
-
Network Adapter Problems
Hardware or software issues with your network adapter can lead to connectivity problems. You can try disabling and re-enabling the adapter or reinstalling its drivers to fix any potential issues.
-
Firewall or Security Software Blocking the Connection
Sometimes, firewalls or security software on your computer can mistakenly block the Wi-Fi connection. Check your firewall settings and make sure they allow connections to your Wi-Fi network.
-
Wi-Fi Radio Disabled
On some laptops, there is a physical switch or keyboard shortcut to disable the Wi-Fi radio. Make sure the Wi-Fi radio is enabled on your computer.
-
Interference from Other Devices
Other electronic devices like cordless phones, microwave ovens, and Bluetooth devices can interfere with Wi-Fi signals. Keep your Wi-Fi router away from these devices to minimize interference.
-
Wi-Fi Network Hidden
If your Wi-Fi network is hidden, you’ll need to manually enter the network name (SSID) to connect. Check your router’s settings to make sure the network is not hidden.
-
Malware or Virus Infections
Malware or viruses on your computer can sometimes disrupt the Wi-Fi connection. Perform a full system scan using reliable antivirus software to remove any malicious programs.
-
Router Hardware Problems
In rare cases, the Wi-Fi connection issues may be due to hardware problems with your router. If you’ve tried all the above troubleshooting steps and still can’t connect, you may need to consider replacing or repairing your router.
By understanding these common Wi-Fi connection issues, you’ll be better equipped to troubleshoot and resolve them when they occur. Remember to double-check your settings, update firmware and drivers, and eliminate any possible sources of interference. With a little patience and persistence, you’ll be enjoying a stable and reliable Wi-Fi connection in no time.
Insufficient Signal Strength
A common issue that can prevent your computer from connecting to Wi-Fi is insufficient signal strength. If you’re experiencing a weak signal, it may be challenging for your computer to establish a reliable connection. Several factors can contribute to this problem:
- Distance from the router: If you’re too far away from the router, the Wi-Fi signal may weaken significantly before reaching your computer. Moving closer to the router can improve the signal strength and increase the chances of a successful connection.
- Obstacles: Physical objects like walls, furniture, or appliances can obstruct Wi-Fi signals. If there are solid obstacles between your computer and the router, try repositioning the router for better line-of-sight or consider using Wi-Fi range extenders to amplify the signal in those areas.
To improve signal strength and enhance your Wi-Fi connection, follow these steps:
- Position your computer closer to the router: Find a workspace within a reasonable distance from the router. The closer you are to the router, the stronger the signal will be.
- Remove physical barriers: Ensure that there are no large objects, such as walls or furniture, obstructing the Wi-Fi signal between your computer and the router. If possible, place the router in an open area to maximize signal propagation.
- Adjust the router’s antennas: If your router has adjustable antennas, try positioning them vertically or horizontally to optimize signal coverage.
- Consider using a Wi-Fi range extender: If the router’s signal does not reach certain areas of your home or office, you can install a Wi-Fi range extender to amplify the signal and extend its range.
- Upgrade to a more powerful router: If you have a weak signal even after implementing the above steps, it may be time to upgrade your router to a model with better signal strength and coverage capabilities.
Remember that Wi-Fi signal strength can vary depending on your environment, so it’s essential to experiment with different positioning options to find the optimal setup. By improving the signal strength of your Wi-Fi connection, you’ll enjoy faster internet speeds and a more stable connection for your computer.
Incorrect Wi-Fi Password
An incorrect Wi-Fi password is a common issue that can prevent your computer from connecting to your Wi-Fi network. If you’re receiving an authentication error or unable to connect, it’s important to double-check that you’re entering the correct password. Here are some steps to troubleshoot and resolve this issue:
- Verify the password: Make sure you’re typing the Wi-Fi password correctly. Remember that Wi-Fi passwords are case-sensitive, so check for any uppercase or lowercase letters and special characters.
- Re-enter the password: Sometimes, a simple typo can cause connectivity issues. Delete the current password stored on your computer and carefully type it in again.
- Reset the Wi-Fi password: If you’re unsure about the correct password, you can reset the Wi-Fi password on your router. Check the manufacturer’s documentation or website for instructions on how to reset the password.
- Reset the network settings on your computer: In some cases, outdated or incorrect network settings on your computer can interfere with the Wi-Fi connection. Resetting the network settings can help resolve any conflicts and allow you to enter the correct password.
- Restart the router: A quick restart of your router can sometimes resolve temporary issues. Power off the router, wait for a few seconds, and then power it back on.
- Check for MAC address filtering: Some routers have MAC address filtering enabled, which only allows devices with specific MAC addresses to connect to the network. Ensure that the MAC address of your computer is allowed on the router’s access list.
By following these steps, you can ensure that you’re entering the correct Wi-Fi password and establish a successful connection to your network. It’s worth noting that if you have recently changed your Wi-Fi password, you will need to update the saved Wi-Fi credentials on all devices that connect to your network.
If you’re still unable to connect to your Wi-Fi network even after verifying the password, there may be other underlying issues at play. In such cases, it is recommended to reach out to your internet service provider or router manufacturer for further assistance.
Connection Limit Reached
One common Wi-Fi connection issue that can hinder your computer’s ability to connect is hitting the connection limit set by your router. Most routers have a maximum number of devices that can be connected to the Wi-Fi network at the same time. If this limit is reached, your computer may not be able to establish a connection. Here’s how you can troubleshoot and resolve this problem:
- Check your router’s connection limit: Refer to your router’s manual or manufacturer’s website to determine the maximum number of devices your router can support simultaneously. This information can typically be found in the router’s settings or on the manufacturer’s website.
- Disconnect unused devices: If you have reached the connection limit, consider disconnecting devices that are not currently in use. This will free up spots for your computer to connect.
- Upgrade your router: If you frequently have multiple devices connected to your Wi-Fi network and often encounter connection issues, it may be time to upgrade to a router with a higher connection limit. A more advanced router can handle more simultaneous connections and provide a better overall experience for all devices.
Managing the number of devices connected to your Wi-Fi network is essential to maintain a stable and fast connection for all devices, including your computer. By understanding and addressing the connection limit issue, you’ll be able to ensure that your computer can connect to the network without any problems.
IP Address Conflict
An IP address conflict can occur when two or more devices on the same network are assigned the same IP address. This conflict can cause connectivity issues and prevent your computer from connecting to Wi-Fi. Here’s what you can do to troubleshoot and resolve an IP address conflict:
- Restart your router: Sometimes, a simple restart of the router can resolve IP address conflicts. Power off the router, wait for a few seconds, and then power it back on. This process can refresh the IP address assignments and potentially resolve the conflict.
- Release and renew IP addresses: On your computer, you can release and renew the IP address assigned to it. Go to the network settings or network adapter properties and select the option to release the IP address. Afterward, select the option to renew the IP address. This action forces your computer to request a new IP address from the router, which can help resolve conflicts.
- Assign static IP addresses: If you frequently encounter IP address conflicts, consider assigning static IP addresses to your devices on the network. Static IP addresses are manually assigned and remain fixed, eliminating the chance of conflicts. Access your router’s settings and configure the devices’ IP addresses to specific values within the network range.
- Check for DHCP server issues: If your router’s DHCP server is not functioning correctly, it may lead to IP address conflicts. Make sure that your router’s DHCP server settings are enabled and properly configured.
- Reset the network settings: If the IP address conflict persists, resetting the network settings on your computer can help resolve conflicts at the software level. This action removes any network-related configurations and preferences, allowing your computer to obtain a fresh IP address.
By following these steps, you can troubleshoot and resolve IP address conflicts that prevent your computer from connecting to Wi-Fi. It’s important to ensure that your devices have unique IP addresses to avoid conflicts on your network.
Wi-Fi Network Compatibility
Wi-Fi network compatibility can be a potential issue that prevents your computer from connecting to Wi-Fi. Not all devices support all Wi-Fi standards, and if your computer is using an older Wi-Fi standard that your router doesn’t support, compatibility issues may arise. Here’s how you can address this problem:
- Check your computer’s Wi-Fi capabilities: Verify the Wi-Fi standard supported by your computer. This information can usually be found in the device’s specifications or network settings. Common Wi-Fi standards include 802.11ac, 802.11n, and 802.11g.
- Check your router’s supported Wi-Fi standard: Consult your router’s manual or manufacturer’s website to confirm the Wi-Fi standards it supports. This information can typically be found in the router’s settings or on the manufacturer’s website.
- Upgrade your router: If your computer is using an older Wi-Fi standard that your router doesn’t support, consider upgrading to a router that supports the standard. This ensures compatibility and allows your computer to connect seamlessly.
- Update your computer’s Wi-Fi adapter drivers: Outdated Wi-Fi adapter drivers can also cause compatibility issues. Visit the manufacturer’s website or use the device manager to check for the latest drivers and install them if necessary.
- Consider using a Wi-Fi adapter: If your computer’s built-in Wi-Fi adapter is incompatible with your router, you can use a USB Wi-Fi adapter that supports the appropriate standard. These adapters plug into your computer’s USB port and provide an alternative Wi-Fi connection.
Ensuring compatibility between your computer and the Wi-Fi network is crucial for establishing a successful connection. By checking the Wi-Fi standards supported by your devices and upgrading your router or adapter if necessary, you can overcome compatibility challenges and enjoy a stable Wi-Fi connection.
Router Firmware Issues
Router firmware issues can often be the cause of connectivity problems when trying to connect your computer to Wi-Fi. Firmware serves as the operating system of your router, and outdated or faulty firmware can result in various issues. Here’s what you can do to address router firmware issues:
- Check for firmware updates: Visit the manufacturer’s website or log into your router’s admin interface to check for any available firmware updates. Manufacturers often release firmware updates to address bugs, improve compatibility, and enhance performance. If an update is available, follow the provided instructions to install it.
- Perform a firmware reset: If you’re experiencing persistent issues even after updating the firmware, you might consider performing a firmware reset. This process involves restoring the router to its factory default settings and reinstalling the firmware. Note that performing a reset will erase any custom settings you have configured on the router, so make sure to back up any important configurations beforehand.
- Manually flash the firmware: If for some reason a firmware update or reset does not resolve the issues, you can manually flash the firmware. Download the appropriate firmware file from the manufacturer’s website, then access your router’s admin interface and navigate to the firmware update section. Follow the provided instructions to upload and install the firmware manually.
- Seek professional assistance: If you’re uncomfortable or unsure about updating or flashing the firmware yourself, it’s best to seek help from professional IT technicians or contact the router manufacturer’s support team for guidance. They can provide expert assistance and ensure the process is carried out correctly.
Regularly keeping your router’s firmware up to date is crucial for optimal performance and security. By checking for updates, performing resets if needed, and seeking professional assistance when necessary, you can address router firmware issues and improve your Wi-Fi connectivity.
Outdated Wi-Fi Drivers
Outdated or corrupted Wi-Fi drivers on your computer can cause connectivity issues when trying to connect to Wi-Fi. Wi-Fi drivers are responsible for facilitating communication between your computer’s operating system and the wireless adapter. If these drivers are outdated or not functioning correctly, it can result in a failed or unstable connection. Here’s how you can address outdated Wi-Fi drivers:
- Check for driver updates: Visit the manufacturer’s website of your computer or the Wi-Fi adapter to check for the latest driver updates. Look for the specific model and operating system compatibility to ensure you download the correct drivers. Install the updates if newer versions are available.
- Update through device manager: You can also update the Wi-Fi drivers through the device manager. In Windows, right-click on the Start menu, select “Device Manager,” and expand the “Network Adapters” category. Locate your Wi-Fi adapter, right-click on it, and select “Update driver.” Choose the option to search automatically for updated driver software.
- Uninstall and reinstall drivers: If updating the drivers doesn’t resolve the issue, you can try uninstalling and reinstalling them. In the device manager, right-click on the Wi-Fi adapter, select “Uninstall device,” and follow the prompts. Afterward, restart your computer and let Windows automatically reinstall the drivers.
- Third-party driver update software: If you’re unsure or unable to manually update the Wi-Fi drivers, you can consider using third-party driver update software. These programs scan your computer for outdated drivers and automatically download and install the latest versions.
- Seek professional assistance: If you’re uncomfortable or unsure about updating the Wi-Fi drivers yourself, it’s always a good idea to seek help from professional IT technicians. They can provide guidance and ensure the drivers are updated correctly.
By keeping your Wi-Fi drivers up to date, you can ensure compatibility, improve stability, and resolve many connectivity issues. Regularly checking for updates and performing driver updates will help guarantee a smooth and reliable connection to your Wi-Fi network.
Network Adapter Problems
Network adapter problems can contribute to connectivity issues when attempting to connect your computer to Wi-Fi. The network adapter, also known as the network interface card (NIC), is responsible for enabling communication between your computer and the network. If the network adapter is experiencing hardware or software issues, it can result in a failed or inconsistent Wi-Fi connection. Here are some troubleshooting steps to address network adapter problems:
- Disable and enable the adapter: In certain cases, disabling and re-enabling the network adapter can help resolve temporary issues. Right-click on the network connection icon in the system tray, select “Open Network & Internet settings,” and navigate to the “Network Status” section. Click on “Change adapter options,” right-click on the network adapter in use, and select “Disable.” After a few seconds, right-click again and select “Enable.”
- Update network adapter drivers: Outdated or incompatible drivers can cause network adapter problems. Visit the manufacturer’s website for your computer or network adapter and search for the latest drivers applicable to your specific model and operating system. Download and install the updated drivers to ensure compatibility and optimal performance.
- Check for conflicts with other devices: Sometimes, conflicts with other hardware devices or software can impact the functionality of the network adapter. Disable any conflicting devices or software temporarily to see if it helps resolve the connectivity issues.
- Verify physical connections: Ensure that the network adapter is securely connected to the appropriate port on your computer. If you are using an external network adapter, verify the cable connections as well.
- Test with a different network adapter: If available, you can try using a different network adapter to determine if the issue lies with the specific adapter. This will help identify whether the problem is with the adapter itself or other factors.
- Seek professional assistance: If you have exhausted all the troubleshooting steps and are still experiencing network adapter problems, it may be best to seek help from professional IT technicians. They can diagnose the issue and provide further guidance or repair options.
Resolving network adapter problems is crucial for establishing a stable and reliable Wi-Fi connection on your computer. By following these troubleshooting steps and seeking appropriate assistance, you can identify and address network adapter issues effectively.
Firewall or Security Software Blocking the Connection
Firewalls or security software on your computer can sometimes mistakenly block the connection to Wi-Fi networks. While these security measures are essential for protecting your computer from threats, they may occasionally interfere with network connectivity. Here’s how you can address issues arising from firewalls or security software:
- Check firewall settings: Open the security software or firewall settings on your computer and ensure that it is not blocking your Wi-Fi connection. Look for options related to network or internet connections and verify that they allow connections to your Wi-Fi network. If necessary, add your Wi-Fi network to the list of trusted networks or temporarily disable the firewall to test the connection.
- Disable security software temporarily: If you have third-party security software installed on your computer, try disabling it temporarily to see if it resolves the connectivity issue. Keep in mind that disabling the security software temporarily exposes your computer to potential security risks, so make sure to enable it once the troubleshooting is complete.
- Update security software: Ensure that your security software is up to date. Outdated or incompatible security software can sometimes cause conflicts with your Wi-Fi connection. Check for updates through the software’s interface or visit the manufacturer’s website to download and install the latest version.
- Configure firewall exceptions: If you have advanced firewall software, you can configure specific exceptions for your Wi-Fi connection. Consult the software’s documentation or support resources to learn how to add exceptions for your Wi-Fi network.
- Use the default firewall settings: Sometimes, modifying the default settings of your firewall can cause unintended issues. If you have made changes to your firewall settings, consider reverting them back to their default values.
It’s crucial to strike a balance between security and connectivity. By checking and adjusting firewall or security software settings, you can ensure that your computer can connect to Wi-Fi networks without compromising protection against potential threats.
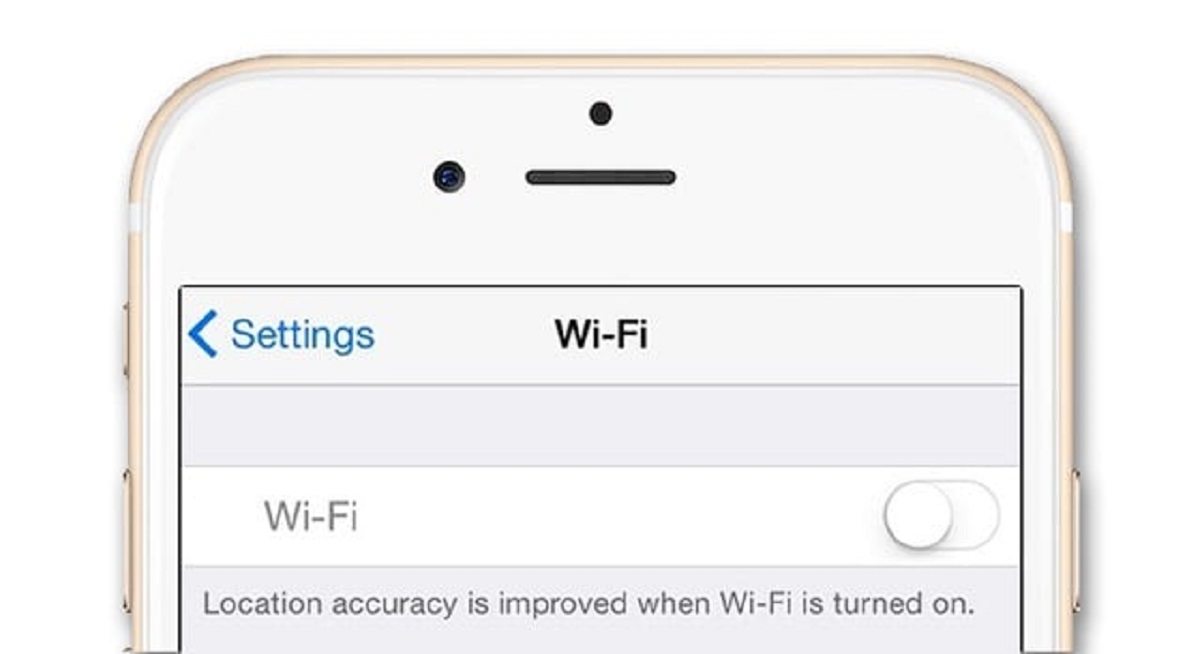
Wi-Fi Radio Disabled
One possible reason for your computer’s inability to connect to Wi-Fi is that the Wi-Fi radio is disabled. Some laptops and mobile devices have physical switches or keyboard shortcuts that allow you to turn the Wi-Fi radio on or off. If the Wi-Fi radio is disabled, you won’t be able to establish a connection. Here’s what you can do to address this issue:
- Look for physical Wi-Fi switch: On some laptops, there is a physical switch or button that controls the Wi-Fi radio. Locate this switch on your laptop and make sure it is in the “On” position. If you’re unsure, consult your device’s user manual for guidance.
- Check keyboard shortcuts: Many laptops have keyboard shortcuts that can enable or disable the Wi-Fi radio. Look for the Wi-Fi icon on your keyboard, typically indicated with an antenna or network symbol, and press the corresponding key combination (usually Fn key + Wi-Fi key or a dedicated Wi-Fi toggle key) to enable the Wi-Fi radio.
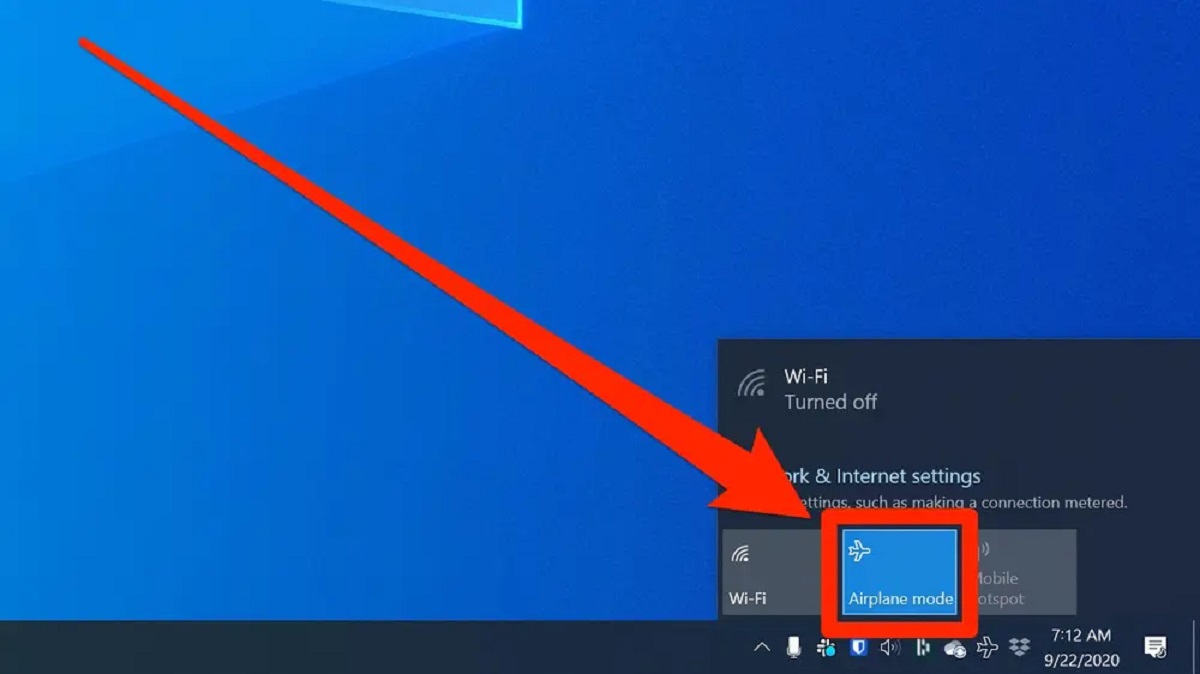
- Access Wi-Fi settings: In some cases, you can enable the Wi-Fi radio through the operating system’s settings. On Windows, go to the “Network & Internet Settings” and toggle the Wi-Fi switch to turn it on. On Mac, click on the Wi-Fi icon in the menu bar and select “Turn Wi-Fi On” if it is currently disabled.
- Restart your computer: A simple restart can sometimes resolve Wi-Fi radio-related issues. Restart your computer and see if the Wi-Fi radio turns on automatically after rebooting.
- Check for BIOS settings: In rare cases, the Wi-Fi radio may be disabled in the computer’s BIOS settings. Restart your computer and enter the BIOS setup by pressing the designated key (usually displayed on the boot screen). Look for any settings related to the Wi-Fi radio and make sure it is enabled if disabled.
- Update Wi-Fi drivers: Outdated or corrupted Wi-Fi drivers can sometimes lead to issues with the Wi-Fi radio. Ensure that you have the latest drivers for your Wi-Fi adapter installed. Visit the manufacturer’s website or use the device manager to check for updates and install them if available.
By checking the physical switches, using keyboard shortcuts, accessing Wi-Fi settings, and updating Wi-Fi drivers, you can ensure that the Wi-Fi radio is enabled on your computer. This will allow you to connect to Wi-Fi networks and enjoy internet connectivity.
Interference from Other Devices
Interference from other electronic devices can disrupt the Wi-Fi signal and cause connectivity issues when trying to connect your computer to Wi-Fi. It’s important to be aware that devices like cordless phones, microwave ovens, Bluetooth devices, and even certain types of lighting can emit signals that interfere with Wi-Fi signals. Here’s how you can address interference issues:
- Identify potential sources of interference: Look around your environment for devices that could potentially interfere with your Wi-Fi signal. Keep in mind that walls, floors, and other physical obstacles can also impact signal strength.
- Reposition your Wi-Fi router: Move your Wi-Fi router, if possible, to a different location away from potential sources of interference. Experiment with different placements to find the optimal position that minimizes interference and maximizes signal strength.
- Change Wi-Fi channel: Routers operate on specific channels to transmit Wi-Fi signals. If you’re experiencing interference from neighboring Wi-Fi networks, use a Wi-Fi analyzer tool to determine which channels are less crowded and switch your router to a less congested channel.
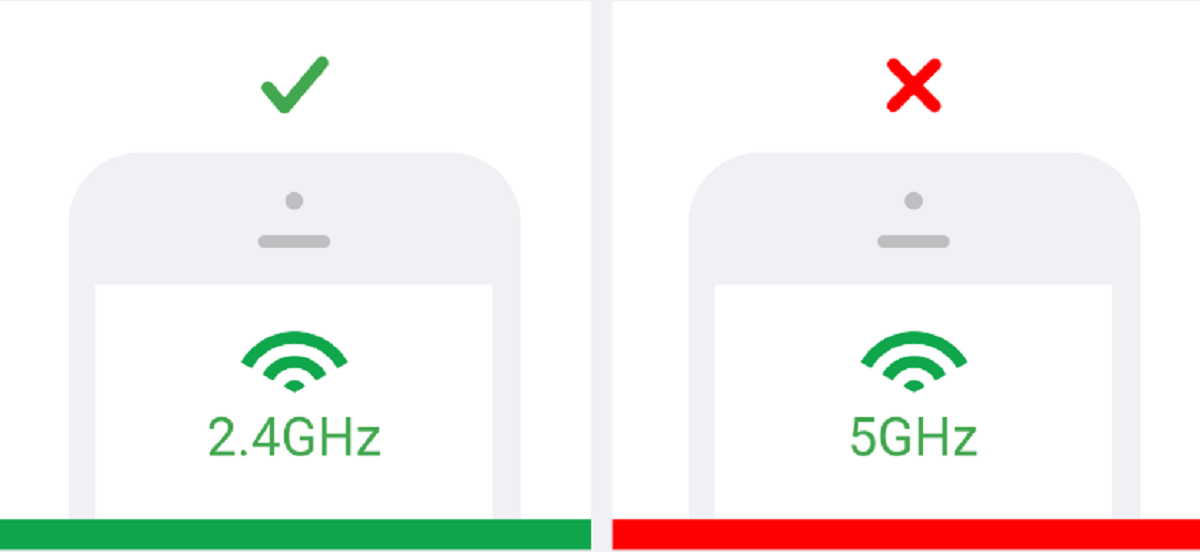
- Adjust the router’s frequency band: If your router supports both 2.4 GHz and 5 GHz frequency bands, try switching to the less crowded or less interfered band. The 5 GHz band typically offers less interference but has a shorter range compared to the 2.4 GHz band.
- Use Wi-Fi range extenders or repeaters: Sometimes, the Wi-Fi signal may not reach certain areas of your home or office due to interference or distance. Wi-Fi range extenders or repeaters can help amplify the signal and extend its reach to those areas.
- Update router firmware: Outdated router firmware can contribute to interference issues. Ensure that your router’s firmware is up to date to optimize performance and potentially mitigate interference problems.
Minimizing interference from other devices is crucial for maintaining a stable and reliable Wi-Fi connection for your computer. By identifying potential sources of interference, repositioning your router, changing Wi-Fi channels, adjusting frequency bands, using range extenders, and keeping your router firmware updated, you can enhance your Wi-Fi signal and mitigate interference-related connectivity issues.
Wi-Fi Network Hidden
Sometimes, your Wi-Fi network may be hidden, which can lead to connectivity issues when trying to connect your computer to Wi-Fi. A hidden network does not broadcast its network name (SSID), so your computer won’t automatically detect it. Here’s how you can connect to a hidden Wi-Fi network:
- Manually enter the network name (SSID): In your computer’s Wi-Fi settings or network manager, look for the option to manually add a Wi-Fi network. Enter the network name (SSID) exactly as it is, including any uppercase or lowercase letters or special characters.
- Enter the correct security type: Make sure to select the correct security type for the hidden network. Common security types include WEP, WPA, or WPA2. If unsure, consult the network administrator or refer to the router’s settings for the security type.
- Enter the network password: If the hidden network is secured, you will need the correct password. Enter the password exactly as it is, paying attention to uppercase or lowercase letters and special characters. Double-check the password to ensure accuracy.
- Try connecting to a visible network first: To confirm that your computer’s Wi-Fi capability is functioning correctly, try connecting to a visible Wi-Fi network. If you can connect successfully to a visible network, it indicates that the issue may be related to the hidden network settings.
- Consider broadcasting the SSID temporarily: If you have administrative access to the router, you can change the settings to temporarily broadcast the network name (SSID) and connect your computer. Once connected, you can revert the router settings back to hide the network name if desired.
Connecting to a hidden Wi-Fi network requires manually entering the network name (SSID) and the correct security type and password. By following these steps, you can successfully connect your computer to a hidden network and enjoy Wi-Fi connectivity.
Malware or Virus Infections
Malware or virus infections on your computer can cause disruptions to your Wi-Fi connection. These malicious programs can interfere with the network settings, compromise security protocols, and disrupt the normal functioning of your computer’s Wi-Fi capabilities. Here’s what you can do to address Wi-Fi issues caused by malware or virus infections:
- Perform a full system scan: Use reputable antivirus software to perform a thorough scan of your computer for any malware or viruses. Make sure the antivirus software is up to date to detect the latest threats effectively. Allow the scan to complete and follow the instructions to remove any detected infections.
- Remove suspicious programs or apps: Check your computer for any suspicious programs or apps that may have been installed without your knowledge. Uninstall any unfamiliar or suspicious applications from your computer’s control panel or settings.
- Reset network settings: If the malware or virus has altered your network settings, resetting the network settings can help restore them to their default configurations. Access the network settings on your computer and select the option to reset the network settings. Note that this action will remove any saved Wi-Fi networks and you will need to reconnect to them manually.
- Secure your connection: After removing the malware or virus, take steps to secure your connection. Update your Wi-Fi password to a strong and unique one, enable encryption on your Wi-Fi network (WPA2 is recommended), and consider enabling MAC address filtering to allow only trusted devices to connect.
- Keep your operating system and software up to date: Regularly install software updates and security patches for your operating system and other applications. These updates often include bug fixes and security enhancements that can protect your computer against malware and viruses.
Dealing with malware or virus infections requires proactive measures to remove the threat and prevent future infections. By running regular scans, removing suspicious programs, resetting network settings, securing your connection, and maintaining up-to-date software, you can help safeguard your computer and maintain a secure and reliable Wi-Fi connection.
Router Hardware Problems
In rare cases, router hardware problems can contribute to connectivity issues and prevent your computer from connecting to Wi-Fi. Hardware issues can range from faulty components to damaged ports or antenna, which can result in a weak or unstable Wi-Fi signal. Here’s what you can do to address router hardware problems:
- Restart the router: Sometimes, a simple power cycle can resolve minor hardware issues. Power off the router, wait for a few seconds, and then power it back on. This action can help refresh the router’s hardware and potentially resolve any temporary problems.
- Check the router’s physical connections: Ensure that all cables connected to the router are securely plugged in. Pay attention to the power cable, Ethernet cables, and any other cables connected to the router. Loose or faulty connections can impact the router’s performance.
- Inspect for physical damage: Examine your router for any signs of physical damage. Check for any broken or loose parts, damaged ports, or antennas. If you notice any physical damage, contact the router manufacturer’s support or consider replacing the router if it is no longer under warranty.
- Reset the router to factory settings: Performing a factory reset can help restore the router to its default settings and potentially resolve hardware-related issues. Keep in mind that a factory reset will erase any custom configurations, so make sure to back up any important settings before proceeding with the reset.
- Update router firmware: Outdated router firmware can sometimes contribute to hardware-related problems. Ensure that your router’s firmware is up to date by checking the manufacturer’s website or the router’s admin interface. Follow the provided instructions to update the firmware.
- Seek professional assistance: If you have exhausted all the troubleshooting steps and suspect a hardware issue with your router, it is advisable to seek help from professional IT technicians or contact the router manufacturer’s support. They can provide further guidance or assistance in diagnosing and repairing hardware problems.
Router hardware problems are relatively uncommon but can cause significant disruptions to your Wi-Fi connection. By restarting the router, checking physical connections, inspecting for damage, resetting to factory settings, updating firmware, and seeking professional assistance when necessary, you can address and resolve hardware-related issues with your router.
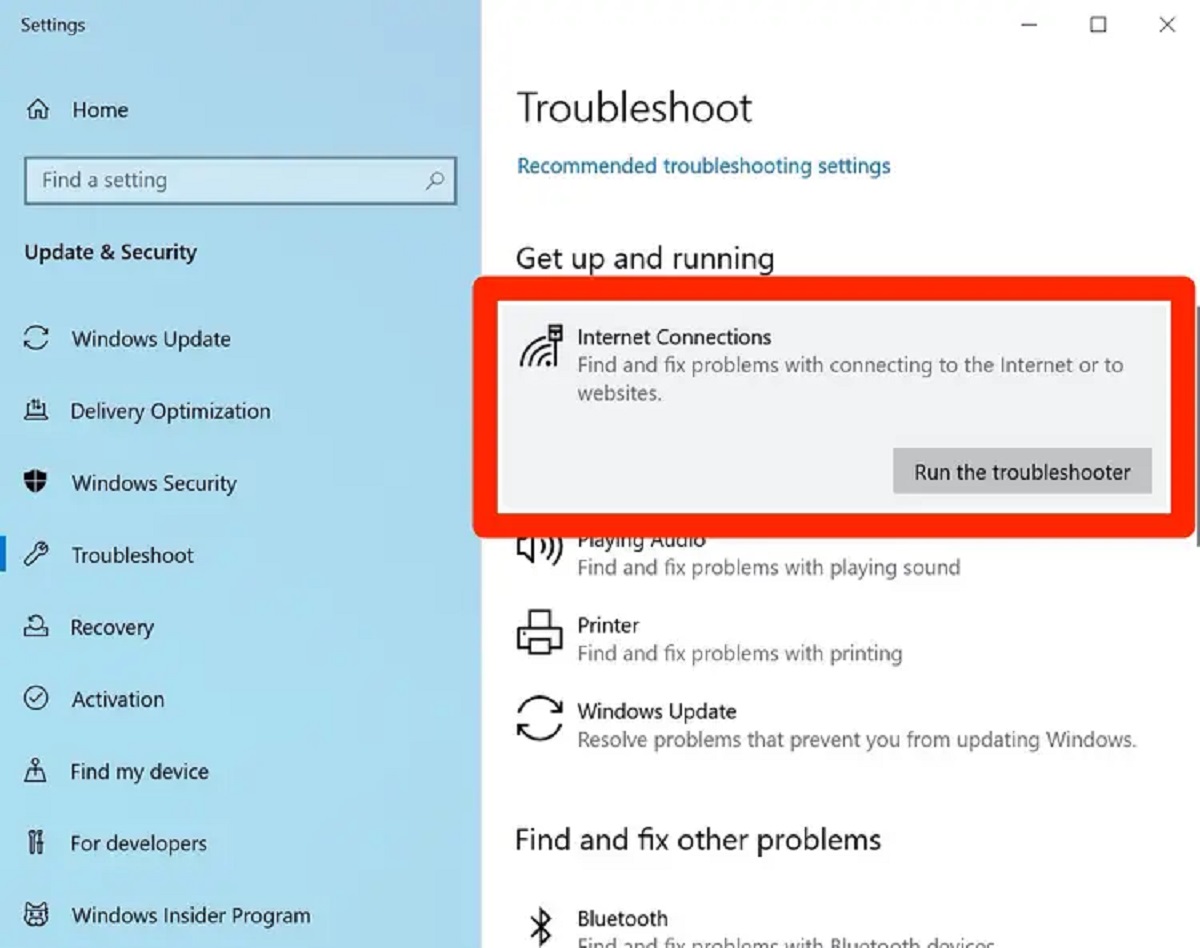
Troubleshooting Wi-Fi Connection Issues
When experiencing Wi-Fi connection issues with your computer, it’s essential to go through a systematic troubleshooting process to identify and resolve the problem. Here’s a step-by-step guide to troubleshooting Wi-Fi connection issues:
- Check signal strength: Ensure that you’re within a reasonable range of your Wi-Fi router and that there are no physical obstacles blocking the signal.
- Verify Wi-Fi password: Double-check that you’re entering the correct Wi-Fi password. Typos or incorrect passwords can prevent your computer from connecting to the network.
- Confirm router settings: Make sure your router is functioning correctly and configured with the appropriate settings, such as network name (SSID) and security type.
- Restart router and computer: Power cycle both your router and computer to refresh their settings and resolve any temporary issues.
- Update router firmware: Check for and install any available firmware updates for your router to improve performance and fix compatibility issues.
- Update Wi-Fi drivers: Ensure that your computer’s Wi-Fi drivers are up to date. Visit the manufacturer’s website to download and install the latest drivers.
- Disable firewall or security software: Temporarily disable any firewall or security software on your computer that may be blocking the Wi-Fi connection.
- Check for IP address conflicts: Verify that there are no IP address conflicts on your network, as this can disrupt connectivity. Restarting your router can help resolve this issue.
- Scan for malware or viruses: Run a full system scan with reputable antivirus software to detect and remove any malicious programs that may be affecting your Wi-Fi connection.
- Seek professional help: If you’ve tried all the above steps and still can’t connect to Wi-Fi, consider contacting your internet service provider or seeking assistance from a professional IT technician.
By following this troubleshooting process, you can systematically identify and resolve common Wi-Fi connection issues. Remember to start with the most basic steps, such as checking signal strength and verifying Wi-Fi passwords, before moving on to more advanced troubleshooting options. With patience and persistence, you’ll be able to restore a stable and reliable Wi-Fi connection for your computer.
Conclusion
In conclusion, Wi-Fi connection issues can be frustrating, but they are often solvable with the right troubleshooting steps. By understanding the common problems that can affect your computer’s ability to connect to Wi-Fi, you can effectively diagnose and resolve these issues. From signal strength and incorrect passwords to firmware updates and hardware problems, there are various factors to consider when troubleshooting Wi-Fi connection problems.
Remember to start with the basic steps, such as checking signal strength and verifying passwords, before moving on to more advanced solutions. It’s essential to keep your Wi-Fi drivers, router firmware, and security software up to date to ensure compatibility and network security. Additionally, maintaining a clean and secure system, free from malware or viruses, is crucial for optimal Wi-Fi connectivity.
If you encounter persistent Wi-Fi connection issues despite your best efforts, don’t hesitate to seek professional help. Internet service providers and IT technicians can provide specialized assistance in diagnosing and resolving complex Wi-Fi problems.
By following proper troubleshooting techniques and staying proactive with updates and security measures, you can enjoy a stable and reliable Wi-Fi connection for your computer. Stay patient, persistent, and proactive, and you’ll be able to overcome any Wi-Fi connection challenges that come your way!