Introduction
Welcome to the world of modern technology, where capturing audio recordings has become easier than ever. With the advancement of digital devices, applications like Microsoft Voice Recorder offer a convenient solution for recording voice notes, interviews, meetings, and more. However, many users are often left wondering where these recordings are saved and how to access them.
In this article, we will explore the ins and outs of Microsoft Voice Recorder and shed light on the default save location of voice recordings on Windows 10. Additionally, we will discuss how you can change the save location, locate your saved recordings, and even recover lost or deleted recordings. So, whether you’re a seasoned user or just getting started with Microsoft Voice Recorder, this guide is here to help you navigate the file saving process.
Understanding how Microsoft Voice Recorder functions and where it stores your audio files is essential to ensure you can easily access and manage your recordings. Let’s dive into the details and uncover the mysteries behind the save location of Microsoft Voice Recorder on your Windows 10 operating system.
Understanding Microsoft Voice Recorder
Microsoft Voice Recorder is a simple yet powerful application available on Windows 10 that allows users to record audio with ease. It offers a user-friendly interface, making it accessible to both novice and experienced users. Whether you need to capture an impromptu idea, conduct an interview, or record important meetings, this versatile tool has got you covered.
When you open Microsoft Voice Recorder, you’ll find a minimalistic set of controls that make recording a breeze. The interface typically consists of a record button, a pause button, and a stop button. You can also find a timer that displays the duration of your recording as well as a visual representation of the audio waveform.
In addition to its basic recording capabilities, Microsoft Voice Recorder also offers some handy features. For instance, you can pause and resume recordings to eliminate unnecessary gaps or interruptions. You can also trim the beginning or end of a recording to remove any unwanted parts.
To cater to different user preferences, Microsoft Voice Recorder allows you to choose the audio quality for your recordings. You can select between standard quality, which offers a balance between file size and audio clarity, or high quality, which prioritizes the best possible audio fidelity at the cost of larger file sizes.
Whether you’re using a built-in microphone on your device or an external microphone, Microsoft Voice Recorder ensures clear and crisp audio capture. It also supports recording from other sources, such as USB microphones or headsets, providing flexibility and convenience for professional or high-quality recordings.
Now that we have an understanding of the functionalities and features of Microsoft Voice Recorder, let’s explore where exactly your recorded audio files are saved by default on your Windows 10 system.
Default Save Location on Windows 10
When you record audio using Microsoft Voice Recorder on Windows 10, the application automatically saves your recordings in a designated folder. By default, this folder is located in the “Documents” directory.
Specifically, the default save location for Microsoft Voice Recorder recordings is: C:\Users\[Your Username]\Documents\Sound recordings.
It’s important to note that the exact path may vary slightly depending on your Windows 10 version and username. However, the general structure remains the same, with the “Documents” folder being the primary location for saving your audio recordings.
You can access this folder by opening the File Explorer on your Windows system and navigating to the “Documents” directory. From there, you’ll find a subfolder named “Sound recordings,” where your Microsoft Voice Recorder files are stored.
It’s worth mentioning that each recording you make using Microsoft Voice Recorder will be saved as a separate audio file in this folder. The files will typically have the “.m4a” format, which is a widely supported file format for audio recordings.
Now that you know the default save location for your Microsoft Voice Recorder recordings, you might be wondering if it’s possible to change this location to a different folder of your choice. Let’s find out in the next section.
Changing the Save Location
If you prefer to save your Microsoft Voice Recorder recordings in a different folder or location on your Windows 10 system, you have the option to change the default save location. This can be particularly useful if you want to categorize your recordings or store them in a more accessible location.
To change the save location for Microsoft Voice Recorder, follow these steps:
- Open the Microsoft Voice Recorder application on your Windows 10 system.
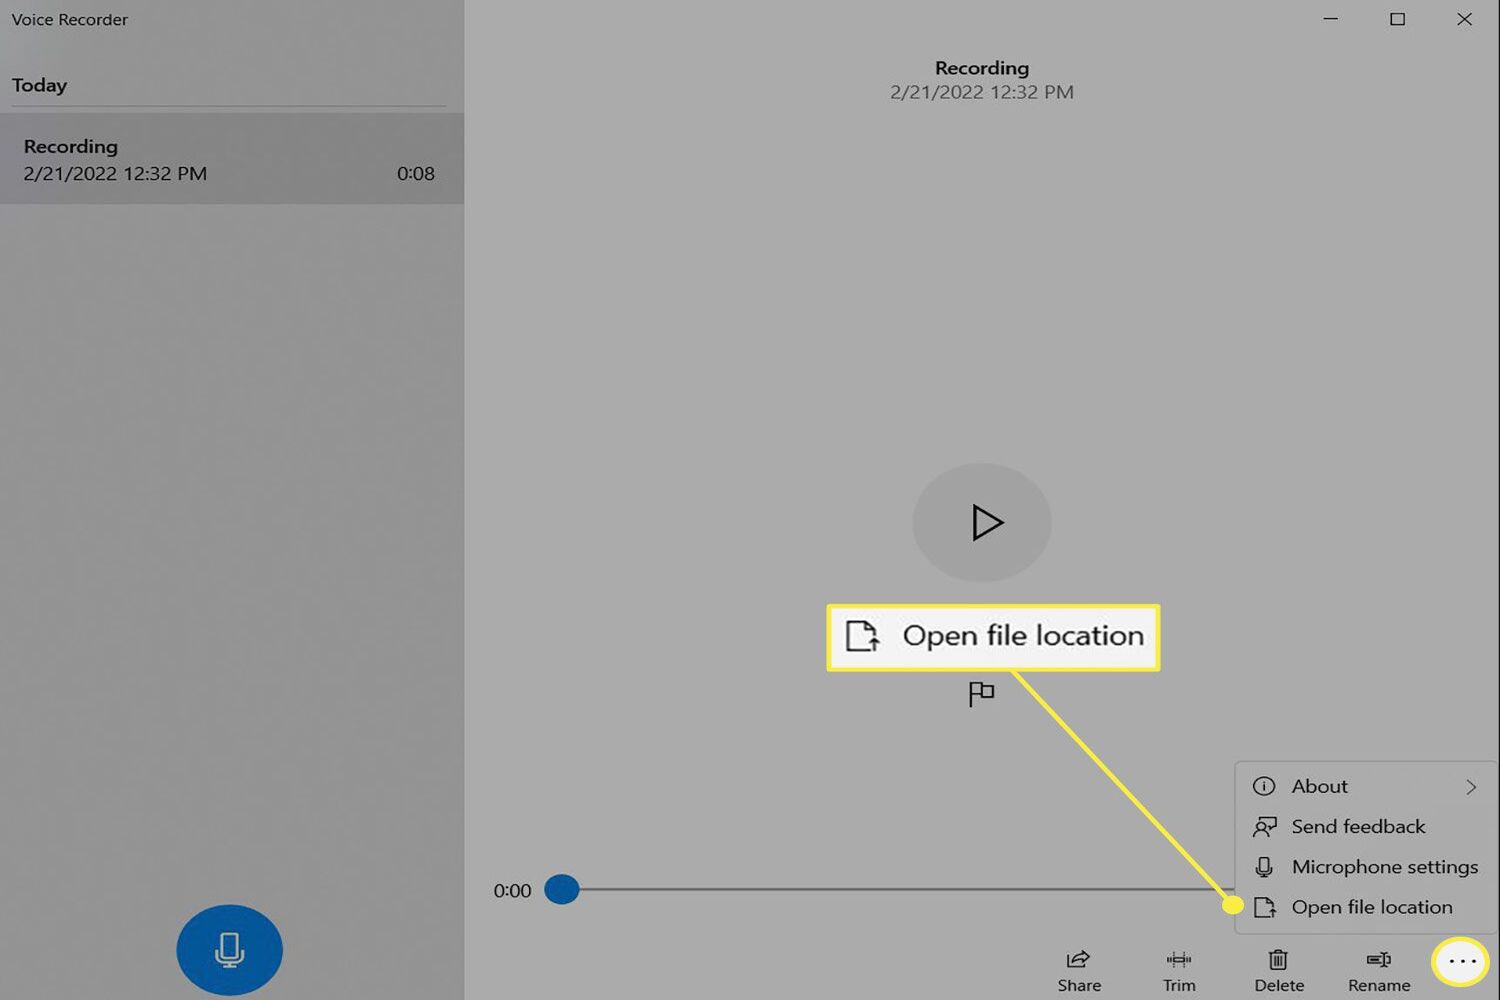
- Click on the three-dot menu icon located in the top-right corner of the application window.
- From the drop-down menu, select “Settings.”
- In the Settings menu, you’ll see an option called “Save location.” By default, it will display the current save location, such as “C:\Users\[Your Username]\Documents\Sound recordings”.
- Click on the “Browse” button next to the save location path.
- Navigate to the folder or directory where you want to save your Microsoft Voice Recorder recordings.
- Once you’ve selected the desired folder, click on the “Select folder” button.
After following these steps, any new recordings you make in Microsoft Voice Recorder will be saved in the folder you’ve selected as the new save location.
It’s important to note that changing the save location will not affect your previously recorded files. The existing recordings will remain in their original location, and only new recordings will be saved in the new designated folder.
Now that you know how to change the save location in Microsoft Voice Recorder, let’s move on to the next section to learn how to locate your saved voice recordings quickly and easily.
Locating Your Saved Voice Recordings
Once you’ve recorded audio using Microsoft Voice Recorder and saved it in the default or changed save location, you may want to access those recordings for playback or further editing. Locating your saved voice recordings is a straightforward process, and there are multiple ways to do it.
Here are a few methods to help you locate your saved voice recordings:
- Using File Explorer: Open the File Explorer on your Windows 10 system. Navigate to the default or changed save location for Microsoft Voice Recorder recordings. You can usually find them in the “Documents” directory, specifically within the “Sound recordings” subfolder.
- Search for the recording: If you’re unsure of the exact save location, you can use the search functionality in File Explorer. Simply open File Explorer and type in the name or partial name of the recording file in the search bar. This will help you locate the file quickly.
- Recent files list: If you’ve recently accessed a recording, you can find it in the “Recent files” list in File Explorer. This list displays the files you’ve recently modified or opened, making it convenient to access your most recent voice recordings.
- Sort by modified date: Another way to locate your saved voice recordings is by sorting the files in the save location by the modified date. This will help you find the most recent recordings at the top of the list.
- Using Cortana: On Windows 10, you can also use Cortana, the virtual assistant, to search for your voice recordings. Simply activate Cortana by clicking the search bar or saying “Hey Cortana,” and then provide the recording name or related keywords to initiate the search.
By utilizing these methods, you should be able to easily locate your saved voice recordings in Microsoft Voice Recorder on your Windows 10 system.
Now that we have explored how to locate and access your recordings, let’s move on to the next section to learn about moving or transferring your voice recordings to another location or device.
Moving or Transferring Voice Recordings
There may be instances when you need to move or transfer your Microsoft Voice Recorder recordings to another location or device. Whether you want to organize your files, create backups, or share your recordings with others, the process of moving or transferring voice recordings is relatively simple.
Here are a few methods to help you move or transfer your voice recordings:
- Using File Explorer: Open the File Explorer on your Windows 10 system. Navigate to the folder where your Microsoft Voice Recorder recordings are saved. From there, select the recordings you want to move or transfer, and then use the drag-and-drop method to move them to the desired location or external storage device.
- Copying and pasting: Alternatively, you can also copy the voice recordings by right-clicking on the desired files and selecting the “Copy” option. Then, navigate to the destination folder or external storage device, right-click, and select “Paste” to transfer the files.
- Using cloud storage: If you prefer a more convenient and accessible method, you can consider using cloud storage services such as Dropbox, Google Drive, or Microsoft OneDrive. Simply upload your voice recordings to your cloud storage account from the current save location, and then you’ll be able to access them from any device with an internet connection.
- Transferring to a mobile device: If you want to transfer your voice recordings to a mobile device, you can connect your device to your computer via a USB cable. Once connected, you can copy and paste or drag and drop the recordings from your computer to the appropriate folder on your mobile device.
It’s important to ensure that you have sufficient storage space available in the destination location or device before moving or transferring your voice recordings. Also, be aware that transferring large files or a substantial number of recordings may take some time, depending on the size and speed of your storage devices or internet connection.
With these methods at your disposal, you can easily move or transfer your Microsoft Voice Recorder voice recordings to another location or device for your convenience and organizational needs.
Now that we have covered moving and transferring recordings, let’s move on to the next section where we will discuss how to recover lost or accidentally deleted voice recordings.
Recovering Lost or Deleted Recordings
Accidentally deleting or losing important voice recordings can be frustrating, but don’t worry, there are a few methods you can try to recover them. However, it’s important to note that the success of recovery depends on various factors, such as the duration since the files were deleted and the actions taken after the deletion.
Here are a few methods you can use to attempt recovery of lost or deleted Microsoft Voice Recorder recordings:
- Check the Recycle Bin: When you delete files on your Windows 10 system, they are often moved to the Recycle Bin first. Open the Recycle Bin on your desktop or File Explorer and search for your deleted voice recordings. If you find them, right-click and choose the “Restore” option to recover them to their original save location.
- File Recovery Software: If you’ve emptied the Recycle Bin or the files are not present in it, you can try using third-party data recovery software. There are several reliable options available, such as Recuva, EaseUS Data Recovery Wizard, or Disk Drill. These software tools can scan your storage devices and attempt to retrieve deleted files, including your voice recordings.
- Backup Restoration: If you regularly back up your Windows 10 system using File History or another backup solution, you may be able to restore your lost or deleted voice recordings from a previous backup. Open the backup software or settings on your system and follow the instructions to restore the files to their original or a new location.
- Professional Data Recovery Services: In situations where the deleted or lost voice recordings are of utmost importance and other recovery methods have failed, you may consider consulting professional data recovery services. These services specialize in retrieving data from various storage devices and can often recover files that are otherwise difficult to retrieve.
It’s crucial to act quickly if you discover that your voice recordings have been lost or deleted. Avoid writing new files or making any modifications to the storage devices where the recordings were saved, as doing so may overwrite the deleted files and reduce the chances of successful recovery.
Remember that prevention is always better than cure. To minimize the risk of losing your voice recordings in the future, consider regularly backing up your important files and maintaining a consistent backup schedule. This way, you can easily restore your recordings if they are accidentally deleted or lost.
With these methods at your disposal, you have a good chance of recovering your lost or deleted Microsoft Voice Recorder recordings.
Now that we have explored methods for recovering lost or deleted recordings, let’s conclude our article with a recap of what we’ve learned.
Conclusion
In this article, we have delved into the world of Microsoft Voice Recorder and explored various aspects of saving, accessing, and managing your voice recordings on Windows 10. We started by understanding the basics of Microsoft Voice Recorder and its user-friendly interface for recording audio effortlessly.
We then discovered the default save location of Microsoft Voice Recorder recordings on Windows 10, which is in the “Documents” directory under the “Sound recordings” subfolder. We also discussed how you can change the save location to a folder of your preference, offering you more control over the organization of your recordings.
Locating your saved voice recordings was the next step in our journey. We provided several methods, such as using File Explorer, search functionality, recent files list, and sorting by modified date, to help you quickly and efficiently find your recordings.
Should you need to move or transfer your voice recordings to another location or device, we shared various methods to accomplish this task. Whether it’s using File Explorer, cloud storage services, or transferring to a mobile device, you now have the knowledge to easily manage your recordings.
We also tackled the unfortunate scenario of losing or accidentally deleting your voice recordings. By checking the Recycle Bin, utilizing file recovery software, restoring from backups, or seeking professional data recovery services, you have several options to attempt recovering your valuable recordings.
By understanding the functionalities of Microsoft Voice Recorder and knowing where and how to save, locate, move, and recover your voice recordings, you can enhance your overall recording experience and ensure the safety of your important audio files.
Now, armed with this knowledge, you can confidently navigate the world of Microsoft Voice Recorder and make the most out of your audio recording endeavors on Windows 10.