Introduction
When it comes to capturing stunning aerial footage with your drone, having control over the amount of light that enters the camera is crucial. This is where the ND filter, or Neutral Density filter, comes into play. An ND filter is a must-have accessory for drone enthusiasts and professional aerial photographers alike, as it allows you to achieve better exposure and more creative control over your shots.
Whether you’re a hobbyist or a professional, understanding when and how to use ND filters effectively can significantly enhance the quality of your aerial photography or videography. With the right ND filter, you can capture stunning landscapes, create mesmerizing long exposure shots, and even mitigate issues like rolling shutter or the infamous “jello effect” that can occur when shooting with a drone.
In this article, we will explore the ins and outs of ND filters for drones, why they are essential, and when to use them for optimal results. We will also provide some valuable tips to help you get the most out of your ND filters while flying your drone.
What is an ND Filter?
An ND filter, short for Neutral Density filter, is a camera accessory that reduces the amount of light entering the camera without affecting the color or altering the image’s overall quality. It acts as a sort of sunglasses for your drone’s camera, allowing you to control the exposure and shutter speed, even in bright lighting conditions.
The name “neutral density” is derived from the fact that these filters are designed to evenly reduce the intensity of all wavelengths of light, hence maintaining a neutral color balance in your images or footage. ND filters are commonly available in different strengths, represented by ND numbers such as ND2, ND4, ND8, etc. The higher the ND number, the stronger the filter and the greater the reduction in light entering the camera.
By using an ND filter, you can achieve several beneficial effects in your drone photography and videography. Firstly, it allows you to use slower shutter speeds, resulting in smoother and more cinematic footage or photos with motion blur. Additionally, ND filters enable you to open up the aperture wider, creating a shallow depth of field effect and isolating your subject from the background for a more professional look.
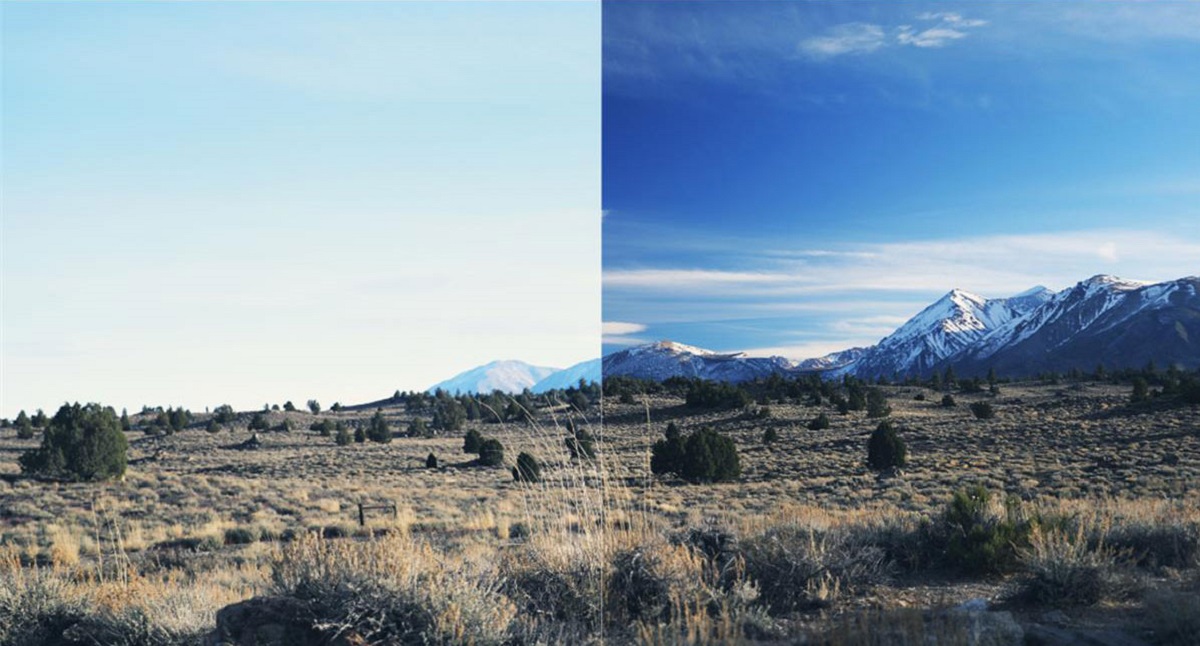
Moreover, ND filters can assist you in balancing exposure in high-contrast scenes. When shooting landscapes, for instance, you may encounter situations where the sky is much brighter than the ground, leading to overexposed skies and underexposed land. By using an ND filter, you can reduce the intensity of the light entering the camera through the sky, ensuring that both the sky and the ground are properly exposed.
Overall, ND filters provide drone pilots and photographers with greater creative control over their shots, allowing them to achieve more professional, visually appealing results. Next, we will delve deeper into the reasons why using an ND filter on a drone is essential.
Why Use an ND Filter on a Drone?
Using an ND filter on a drone is essential for several reasons. Let’s explore why:
1. Exposure Control: Drones often have small sensors that can struggle with high-contrast scenes. By using an ND filter, you can reduce the amount of light entering the camera, allowing you to achieve proper exposure in challenging lighting conditions. This is particularly useful when shooting on bright sunny days.
2. Shutter Speed Control: ND filters allow you to control the shutter speed of your camera. Slowing down the shutter speed helps to create motion blur in your footage, making it appear smooth and cinematic. This is especially useful when capturing moving subjects such as waterfalls, rivers, or vehicles.
3. Achieving a Shallow Depth of Field: By using an ND filter to reduce the amount of light entering the camera, you can open up the aperture wider. This allows you to create a shallow depth of field, where the subject is in sharp focus while the background is beautifully blurred. This technique is commonly used in portrait photography to create a pleasing separation between the subject and the background.
4. Avoiding Overexposure and Highlight Clipping: Bright sunlight can often lead to overexposure in your drone footage. By using an ND filter, you can reduce the intensity of the light, preventing overexposure and preserving details in both the highlights and shadows of your images or videos.
5. Enhancing Colors and Image Quality: ND filters not only reduce the light entering the camera but also help to eliminate unwanted glare and reflections. This results in cleaner images with improved color saturation and contrast, providing a more professional and visually appealing end result.
6. Reducing Rolling Shutter and Jello Effect: Drones are susceptible to the “rolling shutter” effect, which causes distortion or skewing of the image when capturing fast-moving subjects. Additionally, the rapid vibrations and movements of a drone can create the infamous “jello effect.” By using an ND filter to slow down the shutter speed, you can minimize or eliminate these issues, resulting in smoother and more stable footage.
Overall, ND filters are indispensable tools for drone photographers and videographers. They provide you with greater control over exposure, shutter speed, and image quality, allowing you to capture stunning aerial footage with ease. Next, we’ll explore the different types of ND filters available for drones.
Different Types of ND Filters for Drones
When it comes to ND filters for drones, there are a variety of options available to suit different shooting scenarios and lighting conditions. Here are the most common types of ND filters you’ll come across:
1. Full ND Filters: Full ND filters are designed to uniformly reduce the overall intensity of light entering the camera. These filters are ideal for situations where you want a consistent level of light reduction across the entire frame. They are available in different strengths, such as ND2, ND4, ND8, and so on, with higher numbers indicating greater light reduction.
2. Graduated ND Filters: Graduated ND filters are partially tinted from one edge to the other. They are typically used for scenes with a significant difference in brightness between the sky and the land, such as during sunrise or sunset photography. The darker portion of the filter is positioned over the brighter area (usually the sky), helping to balance the exposure and retain detail in both the sky and the land.
3. Variable ND Filters: Variable ND filters offer adjustable light reduction by rotating the filter ring. They are a versatile option as they allow you to dial in the desired amount of light reduction based on the shooting conditions. Variable ND filters are especially useful when you need to quickly adjust the exposure on the go without changing filters.
4. Polarizing ND Filters: Polarizing ND filters combine the neutral density effect with a polarizing filter. They reduce glare, reflections, and atmospheric haze while also providing adjustable light reduction. Polarizing ND filters are great for landscape photography, architecture, and any situation where you want to enhance colors, reduce unwanted reflections, and improve overall image clarity.
When choosing an ND filter for your drone, consider factors such as the lighting conditions you’ll be shooting in, the desired level of light reduction, and the specific effects you want to achieve in your aerial photography or videography. It’s also important to ensure that the filter you choose is compatible with your drone’s camera model.
Now that we’ve explored the different types of ND filters available, let’s move on to the next section to learn about the specific situations when using ND filters on a drone can greatly enhance your aerial shots.
When to Use ND Filters on a Drone
Knowing when to use ND filters on a drone can significantly elevate the quality of your aerial photography or videography. Let’s explore some common scenarios where using ND filters can greatly enhance your shots:
1. Shooting in Bright Daylight: When capturing footage or images on sunny days, the abundance of light can lead to overexposed and washed-out shots. ND filters help you reduce the amount of light entering the camera, allowing you to achieve a balanced exposure without sacrificing image quality.
2. Capturing Water or Motion Blur: Waterfalls, rivers, and other moving subjects can benefit greatly from the use of ND filters. By using a filter with a higher ND number, you can achieve slower shutter speeds and create a mesmerizing motion blur effect in your footage or photos, adding a sense of dynamism and smoothness.
3. Reducing Jello Effect or Rolling Shutter: Drones are susceptible to vibrations and rapid movements that can result in the dreaded “jello effect” or rolling shutter distortion in the footage. By using an ND filter to slow down the shutter speed, you can mitigate these issues and achieve smoother, more stable footage.
4. Creating Cinematic Time-Lapse Videos: ND filters are essential for creating captivating time-lapse videos with smooth transitions and balanced exposure. By using a filter that reduces the amount of light, you can capture long exposures over an extended period, resulting in stunning visuals that showcase the passage of time.
5. Balancing Exposure in High-Contrast Scenes: Whether it’s a bright sky contrasted with a dark landscape or a sunset against a foreground subject, high-contrast scenes can be challenging to capture without losing detail in the highlights or shadows. ND filters help you balance the exposure between the bright and dark areas, ensuring that you capture all the details in your shots.
It’s important to assess the lighting conditions and the specific effect you want to achieve before deciding to use an ND filter. Experimenting with different filters and strengths will allow you to fine-tune your shots and achieve the desired visual impact.
Now that we’ve explored when to use ND filters on a drone, let’s move on to the next section where we’ll provide some valuable tips on how to effectively use ND filters with your drone.
Shooting in Bright Daylight
One of the primary reasons to use an ND filter on a drone is shooting in bright daylight. When the sun is at its peak, the intense light can lead to overexposed images or washed-out footage. ND filters come to the rescue by reducing the amount of light entering the camera, allowing you to achieve a well-balanced exposure in these challenging lighting conditions.
By using an ND filter, you can maintain control over your camera’s settings, prevent blown-out highlights, and capture more details in highlights and shadows. This is particularly important when shooting landscape scenes or aerial shots with a wide dynamic range, where the sky may be significantly brighter than the ground.
The level of light reduction required will depend on the specific lighting conditions, the time of day, and other factors. For bright daylight, a moderate to high-strength ND filter, such as ND8 or ND16, is commonly used. These filters allow for a sufficient reduction in light without compromising image quality.
When shooting in bright daylight with an ND filter, you’ll notice improvements in color saturation, contrast, and overall image quality. The filter helps to produce more vibrant and well-exposed images by preventing overexposure and preserving details in both the sky and the landscape.
Not only does using an ND filter in bright daylight help you achieve better exposure, but it also allows you to explore creative possibilities. With a reduced shutter speed, you can create motion blur effects in moving subjects like vehicles, water bodies, or even people. This adds a sense of dynamism and smoothness to your footage or images, creating visually appealing results.
When mounting an ND filter on your drone’s camera, ensure that it is properly attached and aligned to avoid any vignetting or artifacts in the corners of the frame. It’s also important to adjust your camera settings accordingly, such as lowering the shutter speed or adjusting the ISO, to maintain optimal exposure.
Ultimately, using an ND filter in bright daylight allows you to capture well-exposed images or footage with enhanced color and detail. It’s a valuable tool for drone photography and videography, enabling you to overcome the challenges posed by harsh lighting conditions and produce stunning aerial visuals.
Now that we’ve explored shooting in bright daylight, let’s move on to the next section where we’ll discuss capturing water or motion blur with ND filters on a drone.
Capturing Water or Motion Blur
One of the fascinating capabilities of using an ND filter on a drone is the ability to capture water or create motion blur in your aerial shots. Whether it’s a flowing river, crashing waves, or a cascading waterfall, incorporating motion blur adds a sense of dynamism and smoothness to your footage or images, resulting in visually captivating results.
The key to achieving motion blur is to use a slower shutter speed, allowing the camera to capture the movement of the subject over time. However, in bright lighting conditions, the abundance of light can lead to a faster shutter speed, resulting in frozen or tack-sharp captures. This is where an ND filter comes in handy by reducing the amount of light entering the camera and enabling you to extend the shutter speed.
When capturing water or motion blur with an ND filter, the strength of the filter will depend on the desired effect and the speed of the subject. For slower-moving water or a subtle motion blur, a lower ND filter like ND4 may suffice. However, for more pronounced blur in rapidly moving subjects, such as waterfalls or fast-paced activities, a higher ND filter like ND8 or ND16 is recommended.
By using an ND filter to slow down the shutter speed, you can convey the motion and energy of the subject in a visually appealing manner. As the camera captures the movement over an extended period, the water appears silky smooth, creating a calming and ethereal effect. This technique is especially popular in landscape photography when capturing the flow of rivers, ocean waves, or waterfalls.
When capturing motion blur with an ND filter, it’s essential to consider the composition, framing, and the duration of the exposure to achieve the desired result. Experiment with different shutter speeds, angles, and ND filters to find the perfect balance between capturing the movement and retaining details in the scene.
Keep in mind that using a slower shutter speed also introduces the risk of camera shake or blur in the entire frame. To ensure sharpness, use a tripod or stabilize your drone to mitigate any vibrations or movements that could blur the image.
By incorporating motion blur through the use of an ND filter, you can add a dynamic and artistic touch to your aerial photography or videography, capturing breathtaking scenes that evoke a sense of movement and wonder.
Now that we’ve explored capturing water or motion blur, let’s move on to the next section where we’ll discuss reducing the jello effect or rolling shutter with ND filters on a drone.
Reducing Jello Effect or Rolling Shutter
The jello effect or rolling shutter distortion is a common issue that drone photographers and videographers encounter when capturing fast-moving subjects or flying under challenging conditions. This phenomenon is caused by the rolling shutter mechanism used in the camera, which reads the image line by line, resulting in a distorted or skewed appearance of the subject.
Fortunately, using an ND filter on a drone can be an effective solution to reduce or even eliminate the jello effect and rolling shutter distortion. The key lies in slowing down the shutter speed using the ND filter, which captures a more prolonged duration of the subject’s movement and helps to smooth out the distortions caused by the rolling shutter.
By reducing the shutter speed with an ND filter, the camera has more time to capture each line of the image, resulting in a more accurate representation of the subject and minimizing the exaggerated skewing or wobbling effect.
Furthermore, ND filters can provide some additional benefits in reducing the jello effect. They can help reduce vibrations and sudden movements of the drone, improving overall stability and resulting in smoother footage. This is particularly useful when flying in windy conditions or when executing rapid maneuvers with the drone.
When combating the jello effect or rolling shutter distortion with ND filters, it’s important to select an appropriate filter strength based on the specific situation. A higher ND number, such as ND8 or ND16, may be more effective in minimizing the distortions caused by fast-moving subjects or high-frequency vibrations.
It’s also worth noting that the jello effect can be exacerbated when using higher frame rates or shooting in environments with complex patterns or structures. Therefore, it’s important to test different ND filter strengths and adjust the shutter speed accordingly to find the right balance between reducing the jello effect and capturing sharp and stable footage.
Overall, using an ND filter to reduce the jello effect and rolling shutter distortion can greatly improve the overall quality and stability of your drone footage. It allows you to capture smooth and distortion-free images, enhancing the professionalism and visual appeal of your aerial photography and videography.
Now that we’ve discussed reducing the jello effect or rolling shutter with ND filters, let’s move on to the next section, where we’ll explore using ND filters to create cinematic time-lapse videos.
Creating Cinematic Time-lapse Videos
Capturing time-lapse videos is a fantastic way to showcase the passage of time in a visually captivating manner. With the help of an ND filter on your drone, you can take your time-lapse footage to the next level, creating cinematic sequences that mesmerize your audience.
An ND filter is essential for time-lapse photography because it allows you to use longer exposure times, even in bright lighting conditions. By reducing the amount of light entering the camera, the ND filter enables you to capture each frame of the time-lapse with a slow shutter speed, resulting in smooth and fluid movements.
When creating a time-lapse video with an ND filter, it’s important to determine the right exposure settings. Set your camera to manual mode and adjust the aperture, shutter speed, and ISO according to the lighting conditions. The goal is to achieve a well-balanced exposure while maintaining a slow shutter speed for each frame.
The specific strength of the ND filter required will depend on the amount of light available and the desired level of motion blur. Lower ND filter strengths, such as ND4 or ND8, may be sufficient for capturing time-lapse sequences during golden hour or in overcast conditions. On the other hand, higher ND filter strengths, such as ND16 or ND32, may be necessary for shooting time-lapses in bright daylight.
When shooting a time-lapse video with an ND filter, it’s crucial to have a stable drone setup. Ensure that your drone is securely mounted on a tripod or stable surface to avoid any unwanted movement or vibrations that could affect the final footage.
Additionally, it’s important to plan your time-lapse sequence carefully, considering the duration of the event or scene you wish to capture. Determine the interval between each shot based on the desired speed of the final video. For example, shorter intervals between shots create a faster-paced time-lapse, while longer intervals result in a slower and more dramatic effect.
By using an ND filter when creating a time-lapse video, you can capture smooth and stunning footage that showcases the gradual change or transformation of a scene over time. Whether it’s the movement of clouds, the transition from day to night, or the hustle and bustle of a busy city, an ND filter enhances the visual quality and adds a cinematic touch to your time-lapse videos.
Now that we’ve discussed creating cinematic time-lapse videos, let’s move on to the next section, where we’ll explore using ND filters to balance exposure in high-contrast scenes.
Balancing Exposure in High-Contrast Scenes
High-contrast scenes, where there is a significant difference in brightness levels between the brightest and darkest areas, can pose a challenge for photographers and videographers. In such situations, using an ND filter on your drone can be a game-changer, allowing you to balance the exposure and capture detail in both the highlights and shadows of the scene.
Typically, high-contrast scenes occur when you have a bright sky and a darker foreground, such as during sunrise or sunset, or when shooting landscapes with strong backlighting. Without an ND filter, it can be challenging to capture these scenes without sacrificing details in either the bright or dark areas.
By using an ND filter, you can reduce the intensity of the light entering the camera through the sky, allowing you to achieve a more balanced exposure. The filter effectively darkens the sky while maintaining the exposure in the foreground or darker areas of the scene, resulting in a well-exposed image or footage.
Selecting the appropriate ND filter strength will depend on the lighting conditions and the extent of the contrast in the scene. For moderate contrast scenarios, such as a slightly overcast day, a lower ND strength like ND4 or ND8 may be sufficient. However, for more extreme contrast situations, such as a bright midday sun, a higher ND strength like ND16 or ND32 might be necessary.
When using an ND filter to balance exposure in high-contrast scenes, it’s important to pay attention to the composition and framing of your shots. Consider how the filter will affect the overall image, especially if you’re using a graduated ND filter that darkens only a portion of the frame. Properly positioning the filter to align with the sky and adjusting your camera settings accordingly will help you achieve the desired exposure balance.
With the help of an ND filter, you can capture stunning images or footage in high-contrast scenes without losing detail in the bright or dark areas. The filter allows you to overcome the challenge of excessive contrast, resulting in well-exposed shots with improved dynamic range and visual impact.
Now that we’ve explored balancing exposure in high-contrast scenes, let’s move on to the next section, where we’ll provide some valuable tips for using ND filters with your drone.
Tips for Using ND Filters with Drones
Using ND filters with your drone can greatly enhance the quality of your aerial photography and videography. To make the most out of your ND filters, consider the following tips:
1. Understand the lighting conditions: Familiarize yourself with the lighting conditions and plan your drone flights accordingly. Different lighting scenarios may require different ND filter strengths to achieve the desired exposure and creative effects.
2. Experiment with filter strengths: Don’t be afraid to experiment with different ND filter strengths to find the right balance for your shots. Test various filter strengths in different lighting conditions to see which filters work best to achieve the desired outcome.
3. Adjust camera settings: When using an ND filter, make sure to adjust your camera settings accordingly. Lower the shutter speed to capture motion blur or select a wider aperture to achieve a shallow depth of field effect. Find the optimal settings for each shooting situation to maximize the impact of the ND filter.
4. Use a gimbal or tripod: To ensure stability and eliminate camera shake, consider using a gimbal or mounting your drone on a stable tripod. This will help you capture sharp and smooth footage, especially when using slower shutter speeds with ND filters.
5. Keep an eye on the horizon: Pay attention to the horizon line in your shots to ensure that the ND filter is properly aligned. Misalignment can result in uneven exposure or unwanted artifacts in your images or footage.
6. Practice and refine: Like any skill, using ND filters effectively takes practice and refinement. Take the time to experiment with different filters, shooting scenarios, and compositions. Analyze your results, learn from them, and continue to improve your skills with each flight.
7. Consider polarizing ND filters: If you’re looking to improve color saturation, reduce reflections, and enhance overall image quality, consider using polarizing ND filters. These filters combine the benefits of both polarizers and ND filters, offering a versatile solution for your drone photography needs.
8. Carry multiple filters: It’s a good idea to carry a range of ND filter strengths in your kit. Different shooting conditions may require different levels of light reduction, so having a variety of filters allows you to adapt to various scenarios and achieve the best results.
9. Post-processing adjustments: While ND filters help you achieve the desired exposure and effects in-camera, minor post-processing adjustments may still be needed. Fine-tune your images or footage using photo editing software to enhance colors, contrast, and overall visual impact.
By following these tips, you’ll be able to make the most out of your ND filters, capturing stunning aerial imagery with your drone and taking your photography and videography skills to new heights.
Now that we’ve covered the tips for using ND filters with drones, let’s wrap up this article by summarizing the key points we’ve discussed.
Conclusion
Using ND filters with drones is a valuable technique that allows drone photographers and videographers to elevate the quality and creativity of their aerial shots. These filters provide control over exposure, shutter speed, and image quality, enabling you to capture stunning images and footage in various lighting conditions and shooting scenarios.
Throughout this article, we have explored the importance of ND filters and when to use them on a drone. We learned that ND filters are essential for shooting in bright daylight, capturing water or motion blur, reducing the jello effect or rolling shutter distortion, balancing exposure in high-contrast scenes, and creating cinematic time-lapse videos.
Additionally, we discussed the different types of ND filters available, including full ND filters, graduated ND filters, variable ND filters, and polarizing ND filters. Each type offers unique benefits and can be selected based on the specific shooting requirements and creative objectives.
To use ND filters effectively, we provided valuable tips such as understanding the lighting conditions, experimenting with filter strengths, adjusting camera settings, using gimbals or tripods for stability, and refining your skills through practice and analysis. We also emphasized the importance of carrying multiple filter strengths and considering post-processing adjustments to enhance the final results.
By incorporating these tips and techniques into your drone photography and videography, you can enhance the visual impact of your aerial shots, capture smooth and well-exposed footage, and unleash your creative potential.
So, the next time you take your drone out for a flight, don’t forget to equip it with the appropriate ND filter for the shooting conditions. Embrace the versatility and creative control that these filters offer, and watch as your aerial imagery reaches new heights.