Setting Up Your Apple Watch
So, you’ve just gotten your hands on a brand new Apple Watch. Exciting, isn’t it? But before you start tracking your fitness goals or receiving notifications on your wrist, you’ll need to set up your Apple Watch. Don’t worry, the process is quick and easy. Here’s how you can get started:
1. Open the Apple Watch app on your iPhone: The first step is to open the Apple Watch app on your iPhone. Make sure your iPhone is running the latest version of iOS.
2. Pair your Apple Watch: Follow the on-screen instructions to pair your iPhone with your Apple Watch. Simply hold your iPhone over the animation on your Apple Watch until a message appears confirming the pairing.
3. Set up as new or restore from a backup: Once paired, you’ll be presented with the option to set up your Apple Watch as new or restore from a backup. If this is your first Apple Watch, select “Set Up as New.” If you have a previous Apple Watch backup, choose the “Restore from Backup” option.
4. Customize your settings: Now it’s time to customize your Apple Watch settings. You can choose your preferred language, enable or disable features like Location Services and Siri, and configure your privacy settings.
5. Select watch face and complications: The watch face is the visual display that appears when you raise your wrist or tap the display. Choose from a variety of pre-installed watch faces and customize them by adding complications, which are small widgets that display information like weather, calendar events, and more.
6. Install apps: In the Apple Watch app on your iPhone, you can choose which apps to install on your Apple Watch. You can either install all the available apps or manually select the ones you want to have on your watch.
7. Explore additional settings: Take some time to explore the additional settings available on your Apple Watch. From adjusting the brightness and haptic feedback to configuring accessibility options, you can tailor your Apple Watch to suit your preferences.
That’s it! Your Apple Watch is now set up and ready to use. Put it on your wrist and start exploring all the amazing features and functionalities it has to offer. Whether you want to stay connected, track your fitness, or simply tell time in a stylish way, your Apple Watch has got you covered.
Navigating the Home Screen
Once you’ve set up your Apple Watch, it’s time to familiarize yourself with the home screen and learn how to navigate through its various features and apps. Here’s a guide to help you navigate the home screen of your Apple Watch:
1. Wake up your Apple Watch: To wake up your Apple Watch, simply raise your wrist or tap the screen. The watch face will appear, displaying the time and any complications you’ve set up.
2. Swipe left or right: The home screen of your Apple Watch consists of multiple app icons arranged in a grid-like fashion. To access different apps, simply swipe left or right on the screen. Each swipe will reveal additional app icons, allowing you to find the app you want to use.
3. Use the Digital Crown: The Digital Crown is a small button on the side of the Apple Watch that can be rotated or pressed. Rotating the Digital Crown will zoom in and out of apps or scrolling through content. Pressing the Digital Crown will take you back to the home screen or the app switcher, depending on your current position.
4. Tap app icons: Once you’ve found the app you want to use, simply tap on its icon to open it. You can use your finger to tap and interact with different elements within the app.
5. Organize your apps: You can rearrange the app icons on your Apple Watch home screen to suit your preferences. To do this, press and hold on an app icon until they all start to wiggle. Then, drag an app icon to a new position or move it to a different page by dragging it to the edge of the screen. Press the Digital Crown once you’re done to save your changes.
6. Use app Glances: Swiping up from the bottom of the watch face screen will reveal the Glances view, which provides quick access to frequently used apps and information. You can customize which apps appear in Glances in the Apple Watch app on your iPhone.
7. Return to the watch face: To return to the watch face from within an app, simply press the Digital Crown once. This will take you back to the main home screen where you can access other apps or interact with complications on your watch face.
By following these simple steps, you’ll be able to navigate the home screen of your Apple Watch with ease. Take some time to explore and get familiar with the various apps and features available to make the most out of your Apple Watch experience.
Customizing Watch Faces
One of the great features of the Apple Watch is the ability to customize your watch face to fit your personal style and preferences. With a wide range of watch faces available, you can choose the one that best suits your needs and customize it to display the information you want at a glance. Here are some tips on how to customize your watch face:
1. Access watch face customization: To customize your watch face, firmly press on the watch face screen. This will bring up the watch face editing mode, where you can make various adjustments and changes.
2. Choose a watch face: In the customization mode, swipe left or right to browse through the different watch face options. You’ll find a variety of styles, including analog, digital, and modular faces. Select the one that appeals to you the most by tapping on it.
3. Customize complications: Complications are small widgets that display additional information on your watch face. You can add complications such as weather, calendar events, fitness metrics, and more. To add or remove a complication, tap on the desired location on the watch face and use the Digital Crown to scroll through the available options.
4. Adjust watch face color and style: Depending on the watch face you choose, you may have the option to further customize its color, style, or design elements. Some watch faces allow you to change the color of the dial, hands, or background, while others offer different styles like chronograph or motion.
5. Add complications and order them: You can add multiple complications to your watch face and arrange them in the order you prefer. In the customization mode, tap and hold on a complication to enter the edit mode. From there, you can move the complications around by dragging them or customize their settings.
6. Save and switch between watch faces: Once you’re happy with your customizations, tap on the “Set as Current Watch Face” option. This will save your customized watch face and make it your active watch face. To switch between different watch faces, simply swipe left or right from the watch face screen.
7. Download new watch faces: If the built-in watch faces don’t meet your needs, you can explore additional watch faces available for download from the App Store. Open the Apple Watch app on your iPhone, go to the “Face Gallery,” and browse through a wide selection of watch faces created by developers.
By taking the time to customize your watch face, you can create a truly unique and personalized experience on your Apple Watch. Whether you want a minimalist design or a information-packed face, the customization options are there to make your Apple Watch truly your own.
Managing Notifications
One of the key features of the Apple Watch is its ability to keep you connected and informed through notifications. With your Apple Watch, you can receive and manage notifications from various apps on your wrist. Here’s how you can effectively manage your notifications:
1. Access the notification center: To view your notifications, swipe down from the top of the watch face. This will reveal the Notification Center, where you can see a summary of recent notifications.
2. Respond to notifications: When a new notification arrives, you will feel a gentle tap on your wrist and see it displayed on the watch face. You can quickly respond to notifications by either tapping on them to view more details or using pre-defined response options like sending a quick reply or marking an email as read.
3. Clear individual notifications: To dismiss a single notification, swipe it to the left and tap the “Clear” button. This will remove the notification from the Notification Center.
4. Clear all notifications: If you have multiple notifications and want to clear them all at once, swipe down on the screen and tap the “Clear All” button. This will remove all the notifications from the Notification Center.
5. Adjust notification settings: To customize which apps can send you notifications on your Apple Watch, open the Apple Watch app on your iPhone, go to the “My Watch” tab, and select “Notifications.” From there, you can choose which apps are allowed to send notifications and configure the notification settings for each app.
6. Enable or disable notification alerts: Depending on your preference, you can choose to receive a sound or haptic alert whenever you receive a new notification on your Apple Watch. To adjust these settings, go to the “Sounds & Haptics” section in the Apple Watch app.
7. Use Do Not Disturb mode: If you want to temporarily silence notifications on your Apple Watch, you can enable Do Not Disturb mode. This will prevent any incoming notifications from alerting you, allowing you to focus or enjoy some uninterrupted time. You can enable Do Not Disturb mode either from the Control Center on your watch or from the Apple Watch app on your iPhone.
By effectively managing your notifications on the Apple Watch, you can stay informed without feeling overwhelmed. Take the time to customize your notification settings to ensure that you receive the most relevant and important updates right on your wrist.
Using Apple Watch Apps
One of the main advantages of the Apple Watch is its ability to run apps directly on your wrist. With a growing library of apps optimized for the Apple Watch, you can enhance your productivity, stay connected, and access information right from your wrist. Here’s a guide on how to make the most of Apple Watch apps:
1. Install apps on your Apple Watch: To install apps on your Apple Watch, open the Apple Watch app on your iPhone and navigate to the “App Store” tab. From there, you can browse and download apps specifically designed for the Apple Watch. Once installed, the app icon will appear on your watch’s home screen.
2. Arrange your app layout: You can rearrange the app icons on your Apple Watch’s home screen for easy access. Press and hold an app icon until the icons start to wiggle, then drag the icons to rearrange their position. Press the Digital Crown once you’re done.
3. Launch an app: To launch an app on your Apple Watch, simply tap on its icon on the home screen. Some apps may take a moment to load, so be patient. Once launched, you can interact with the app using taps, swipes, or the Digital Crown, depending on the app’s interface and functionality.
4. Use complications: Complications are small widgets that display information from apps on your watch face. They provide quick access to key information and allow you to interact with apps without opening them. To add complications, tap and hold on the watch face, select “Customize,” and then scroll through the available complication options.
5. Utilize app Glances: Swiping up from the bottom of the watch face screen will reveal the Glances view. Glances are single screens that provide bite-sized information from apps. You can customize which apps appear as Glances in the Apple Watch app on your iPhone.
6. Navigate within apps: Depending on the app, you may need to navigate through various screens or menus to access different features and options. Use swipes, taps, and the Digital Crown to interact with the app and navigate through its interface.
7. Customize app settings: Some apps allow you to customize their settings on your Apple Watch. Within the app, look for the settings or gear icon and explore the available options. You can adjust preferences, enable/disable features, and personalize your app experience.
Remember, the Apple Watch has a smaller screen compared to your iPhone, so app functionality may be more limited. However, the convenience of having apps directly on your wrist makes it a valuable tool for quick interactions and on-the-go information. Explore the wide range of apps available and find the ones that suit your needs and lifestyle.
Tracking and Monitoring Fitness
One of the primary functions of the Apple Watch is to help you track and monitor your fitness activities. With built-in sensors and dedicated fitness features, the Apple Watch can provide valuable insights into your workouts and help you stay motivated towards your fitness goals. Here’s how you can make the most of the fitness tracking capabilities of your Apple Watch:
1. Start a workout: To track your workouts, open the Workout app on your Apple Watch. From there, you can choose from a variety of workout types, including running, cycling, swimming, and more. Simply select the appropriate workout and tap “Start” to begin tracking your activity.
2. Set goals and targets: Within the Workout app, you can set specific goals or targets for your workouts. You can aim for a certain distance, calorie burn, or time duration. By setting goals, you can stay motivated and measure your progress over time.
3. Monitor your heart rate: The Apple Watch can continuously monitor your heart rate during workouts and throughout the day. This data can provide valuable insights into your fitness level and help you track your effort and intensity during workouts.
4. Track your progress: After completing a workout, the Apple Watch will provide you with a summary of your activity, including distance covered, calories burned, and average heart rate. You can also view detailed metrics such as pace, cadence, and elevation if applicable to the type of workout.
5. Set reminders and notifications: You can customize your Apple Watch to send you reminders and notifications to encourage you to stay active throughout the day. These reminders can include prompts to stand up, move, or complete a specific activity goal.
6. Use the Activity app: The Activity app on your Apple Watch provides a comprehensive overview of your daily activity, including your total calories burned, hours stood, and exercise minutes. It can help you monitor your progress towards your daily activity goals and provide insights into your overall fitness level.
7. Sync with fitness apps: The Apple Watch can sync with popular fitness apps, such as Strava, Nike Run Club, MyFitnessPal, and more. By syncing your Apple Watch with these apps, you can seamlessly track your workouts, share your achievements with others, and access additional features and training plans.
By utilizing the fitness tracking features of your Apple Watch, you can gain a deeper understanding of your physical activity, set goals, and make informed decisions about your health and fitness. Whether you’re a beginner or a seasoned athlete, the Apple Watch is a valuable tool to help you stay on track and achieve your fitness aspirations.
Making Calls and Sending Messages
With the Apple Watch, you can easily make phone calls and send messages right from your wrist, providing convenience and quick communication options. Whether you need to make a call on the go or send a quick text, here’s how you can use your Apple Watch for communication:
1. Making phone calls: To make a phone call, open the Phone app on your Apple Watch. You can either use the keypad to enter a phone number manually or use the Contacts app to select a contact. Once you’ve selected a contact or entered a number, tap the call button to initiate the call.
2. Answering phone calls: When you receive an incoming call on your iPhone, you can sync your Apple Watch to answer the call directly from your wrist. A notification will appear, and you can tap the answer button to accept the call. To use your iPhone for the call, simply tap the “Answer on iPhone” button.
3. Sending messages: The Apple Watch allows you to send and receive messages using the Messages app. You can choose from preset quick replies, dictation, or use the Scribble feature to write a message by drawing on the screen. You can also send audio messages or use emojis and stickers to add a fun touch to your messages.
4. Accessing recent messages: You can easily access your recent messages by opening the Messages app on your Apple Watch. You’ll be able to view the full conversation, reply to messages, or compose a new message.
5. Dictation and voice commands: To compose messages or perform tasks on your Apple Watch, you can use voice commands and dictation. Simply activate Siri by saying “Hey Siri” or pressing and holding the Digital Crown, and then speak your command or message. Siri can help you send messages, make calls, set reminders, and more.
6. Use the Walkie-Talkie feature: The Apple Watch also offers a Walkie-Talkie feature that allows you to have quick voice conversations with other Apple Watch users. With just a tap, you can instantly connect and communicate in real-time.
7. Reply with emojis and stickers: If you want to add a touch of personality to your messages, you can use emojis and stickers directly from your Apple Watch. Simply tap on the smiley face icon while composing a message, and choose from a wide range of expressive emojis and fun stickers.
The Apple Watch provides a convenient and hands-free way to communicate on the go. Whether you need to make a phone call, send a text, or have a quick voice conversation, your Apple Watch has the features and capabilities to keep you connected and in touch with others.
Using Siri on Apple Watch
Siri, the intelligent personal assistant developed by Apple, is available on the Apple Watch to help you perform tasks, answer questions, and assist with various functions using just your voice. Here’s how you can make the most of Siri on your Apple Watch:
1. Activating Siri: To activate Siri on your Apple Watch, simply press and hold the Digital Crown, or say “Hey Siri” if you’ve enabled the feature in the Apple Watch settings. Once activated, the Siri interface will appear on the screen, indicating that Siri is ready to assist you.
2. Performing tasks and asking questions: You can use Siri on your Apple Watch to perform a wide range of tasks and answer questions. Simply speak naturally and clearly to initiate a command or ask a question. You can ask Siri to send messages, make phone calls, set reminders, check the weather, launch apps, and more.
3. Controlling Apple Watch features: Siri on the Apple Watch allows you to control various features and settings. You can adjust the volume, brightness, and other settings by simply asking Siri to make the changes for you. Additionally, Siri can toggle various settings such as Wi-Fi, Bluetooth, and Do Not Disturb mode.
4. Dictating and sending messages: Siri makes it easy to send messages without having to type on your Apple Watch. Just activate Siri and say “Send a message to [contact name]” followed by the contents of your message. Siri will transcribe your message and give you a chance to review before sending.
5. Setting reminders and timers: Use Siri to set reminders and timers on your Apple Watch. Simply say “Set a reminder” or “Set a timer for [duration]” and Siri will create the task or start the countdown for you.
6. Finding information: Siri can help you find information on your Apple Watch by utilizing the data stored on your device. Ask Siri for directions, sports scores, stock prices, and other factual information, and it will provide you with the relevant information without needing to search manually.
7. Integrating with other apps: Siri can integrate with various apps on your Apple Watch. For example, you can ask Siri to start a workout, play music, add items to your shopping list, or order a ride using popular apps like Strava, Apple Music, Reminders, and Uber.
Siri on the Apple Watch is designed to make your life easier and more convenient. By utilizing its capabilities to perform tasks, answer questions, and control various features on your wrist, you can save time and have a more seamless experience with your Apple Watch.
Changing Apple Watch Settings
The Apple Watch offers a range of customizable settings that allow you to personalize your device and tailor it to your preferences. Here’s a guide on how to change and adjust the settings on your Apple Watch:
1. Accessing the settings: To access the settings on your Apple Watch, open the Settings app on the home screen. It is represented by a gear icon.
2. Adjusting brightness and text size: In the Display & Brightness section, you can adjust the brightness level of your Apple Watch’s screen to your liking. You can also adjust the text size to make it more comfortable to read.
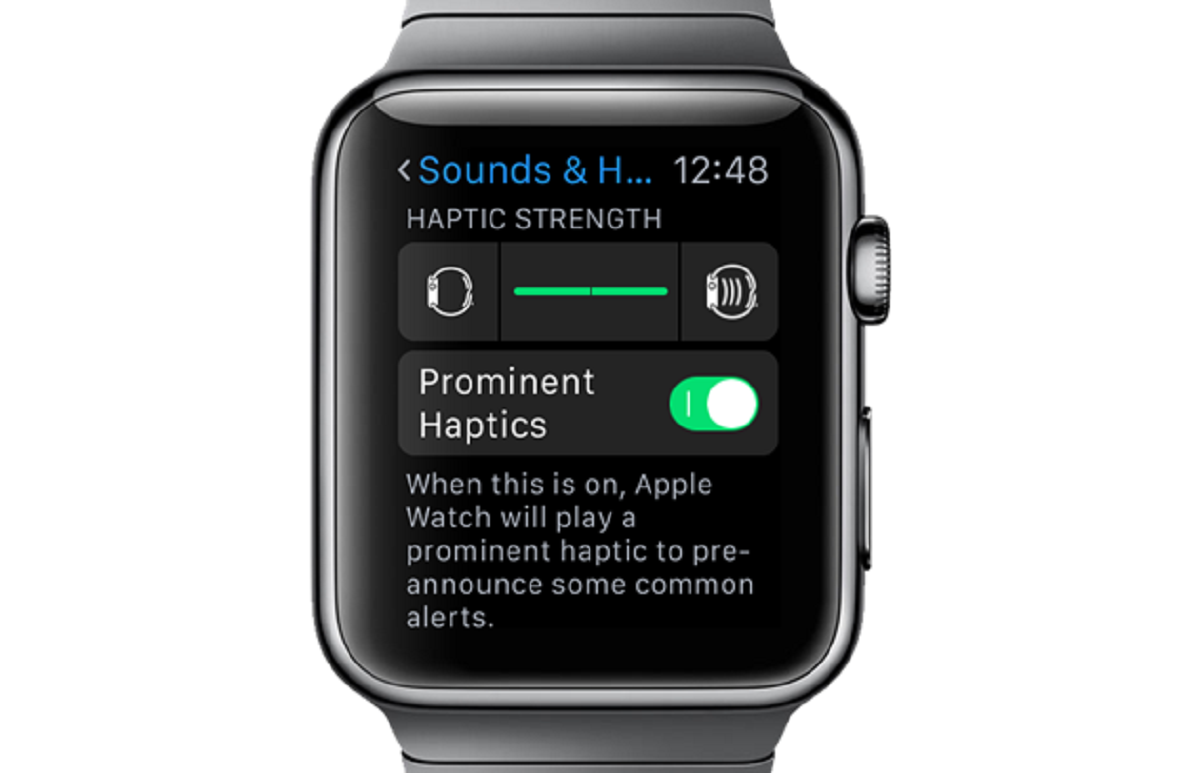
3. Configuring sound and haptic settings: In the Sounds & Haptics section, you can customize the audio and haptic feedback settings of your Apple Watch. You can adjust the volume, enable or disable the prominent haptic feature, and even choose different alert tones.
4. Enabling or disabling the Always-On Display: If you have an Apple Watch model with an Always-On Display feature, you can toggle it on or off in the Display & Brightness settings. When enabled, the watch face will always be visible, even when your wrist is down.
5. Customizing notifications: In the Notifications section, you can manage the notification settings for different apps on your Apple Watch. You can choose which apps are allowed to send you notifications and configure the alert style for each app.
6. Configuring privacy settings: In the Privacy section, you can review and configure the privacy settings for apps installed on your Apple Watch. You can control which apps have access to your location, health data, and other sensitive information.
7. Managing app settings: In the App Store section, you can customize the settings for individual apps installed on your Apple Watch. You can adjust preferences, enable or disable specific features, and manage notifications and complications for each app.
8. Managing connectivity and wireless settings: In the General section, you can manage various connectivity and wireless settings. You can enable or disable Wi-Fi, Bluetooth, Airplane Mode, and even manage the paired devices connected to your Apple Watch.
9. Customizing watch face settings: In the Face Gallery section, you can customize the settings for different watch faces on your Apple Watch. You can configure complications, tweak color schemes, and personalize the overall appearance to your liking.
10. Setting up Apple Pay: If your Apple Watch supports Apple Pay, you can set it up and manage your payment information in the Wallet & Apple Pay section. You can add cards, view transaction history, and adjust security settings for a seamless and secure payment experience.
By exploring and adjusting the settings on your Apple Watch, you can optimize its functionality and tailor it to your specific needs and preferences. Take the time to review the available options and make adjustments that enhance your overall experience with the device.
Apple Pay on Apple Watch
Apple Pay is a convenient and secure mobile payment service offered by Apple. With Apple Pay on your Apple Watch, you can make quick and easy payments directly from your wrist, eliminating the need to carry physical payment cards. Here’s everything you need to know about using Apple Pay on your Apple Watch:
1. Setting up Apple Pay: To get started, open the Apple Watch app on your iPhone and go to the Wallet & Apple Pay section. From there, follow the on-screen prompts to add your payment cards to Apple Pay. You can add credit cards, debit cards, or even store cards from participating merchants.
2. Making payments: To use Apple Pay on your Apple Watch, simply double-press the side button on your watch when you’re ready to make a payment. This brings up your default payment card. Holding the watch near the contactless payment terminal will initiate the payment process. You may need to authenticate the payment using Touch ID or Face ID if required.
3. Choosing your payment card: If you have multiple cards added to Apple Pay, you can switch between them on your Apple Watch. Simply open the Wallet app on your watch, swipe left or right to select the desired card, and then make your payment as usual.
4. Using Apple Pay in apps: Apple Pay can also be used to make quick and secure payments within supported apps on your watch. When you’re ready to make a purchase in an app, simply select Apple Pay as the payment method and follow the on-screen prompts to authorize the transaction using your Apple Watch.
5. Checking your transaction history: To keep track of your Apple Pay transactions, you can view your payment history in the Wallet app on your Apple Watch. This allows you to monitor your spending and review the details of each transaction made with Apple Pay.
6. Apple Pay security: Apple Pay is designed with security in mind. When you add a payment card to Apple Pay, it is encrypted and stored securely on your device. When you make a payment, a unique device-specific number and transaction code is used, meaning your actual card details are never shared with merchants.
7. Supported merchants and countries: Apple Pay is widely accepted at various retail stores, restaurants, online platforms, and other establishments globally. The availability of Apple Pay may vary depending on your country and the merchant’s compatibility with this payment method.
Using Apple Pay on your Apple Watch makes payments effortless and secure. With just a tap on your wrist, you can complete transactions quickly and conveniently, without the need to reach for your wallet or smartphone. Keep your payment cards accessible on your Apple Watch for a seamless and card-free payment experience.
Troubleshooting Tips and Tricks
While the Apple Watch is a reliable and advanced device, you may occasionally encounter issues or glitches that require troubleshooting. Here are some helpful tips and tricks to troubleshoot common problems and ensure a smooth experience with your Apple Watch:
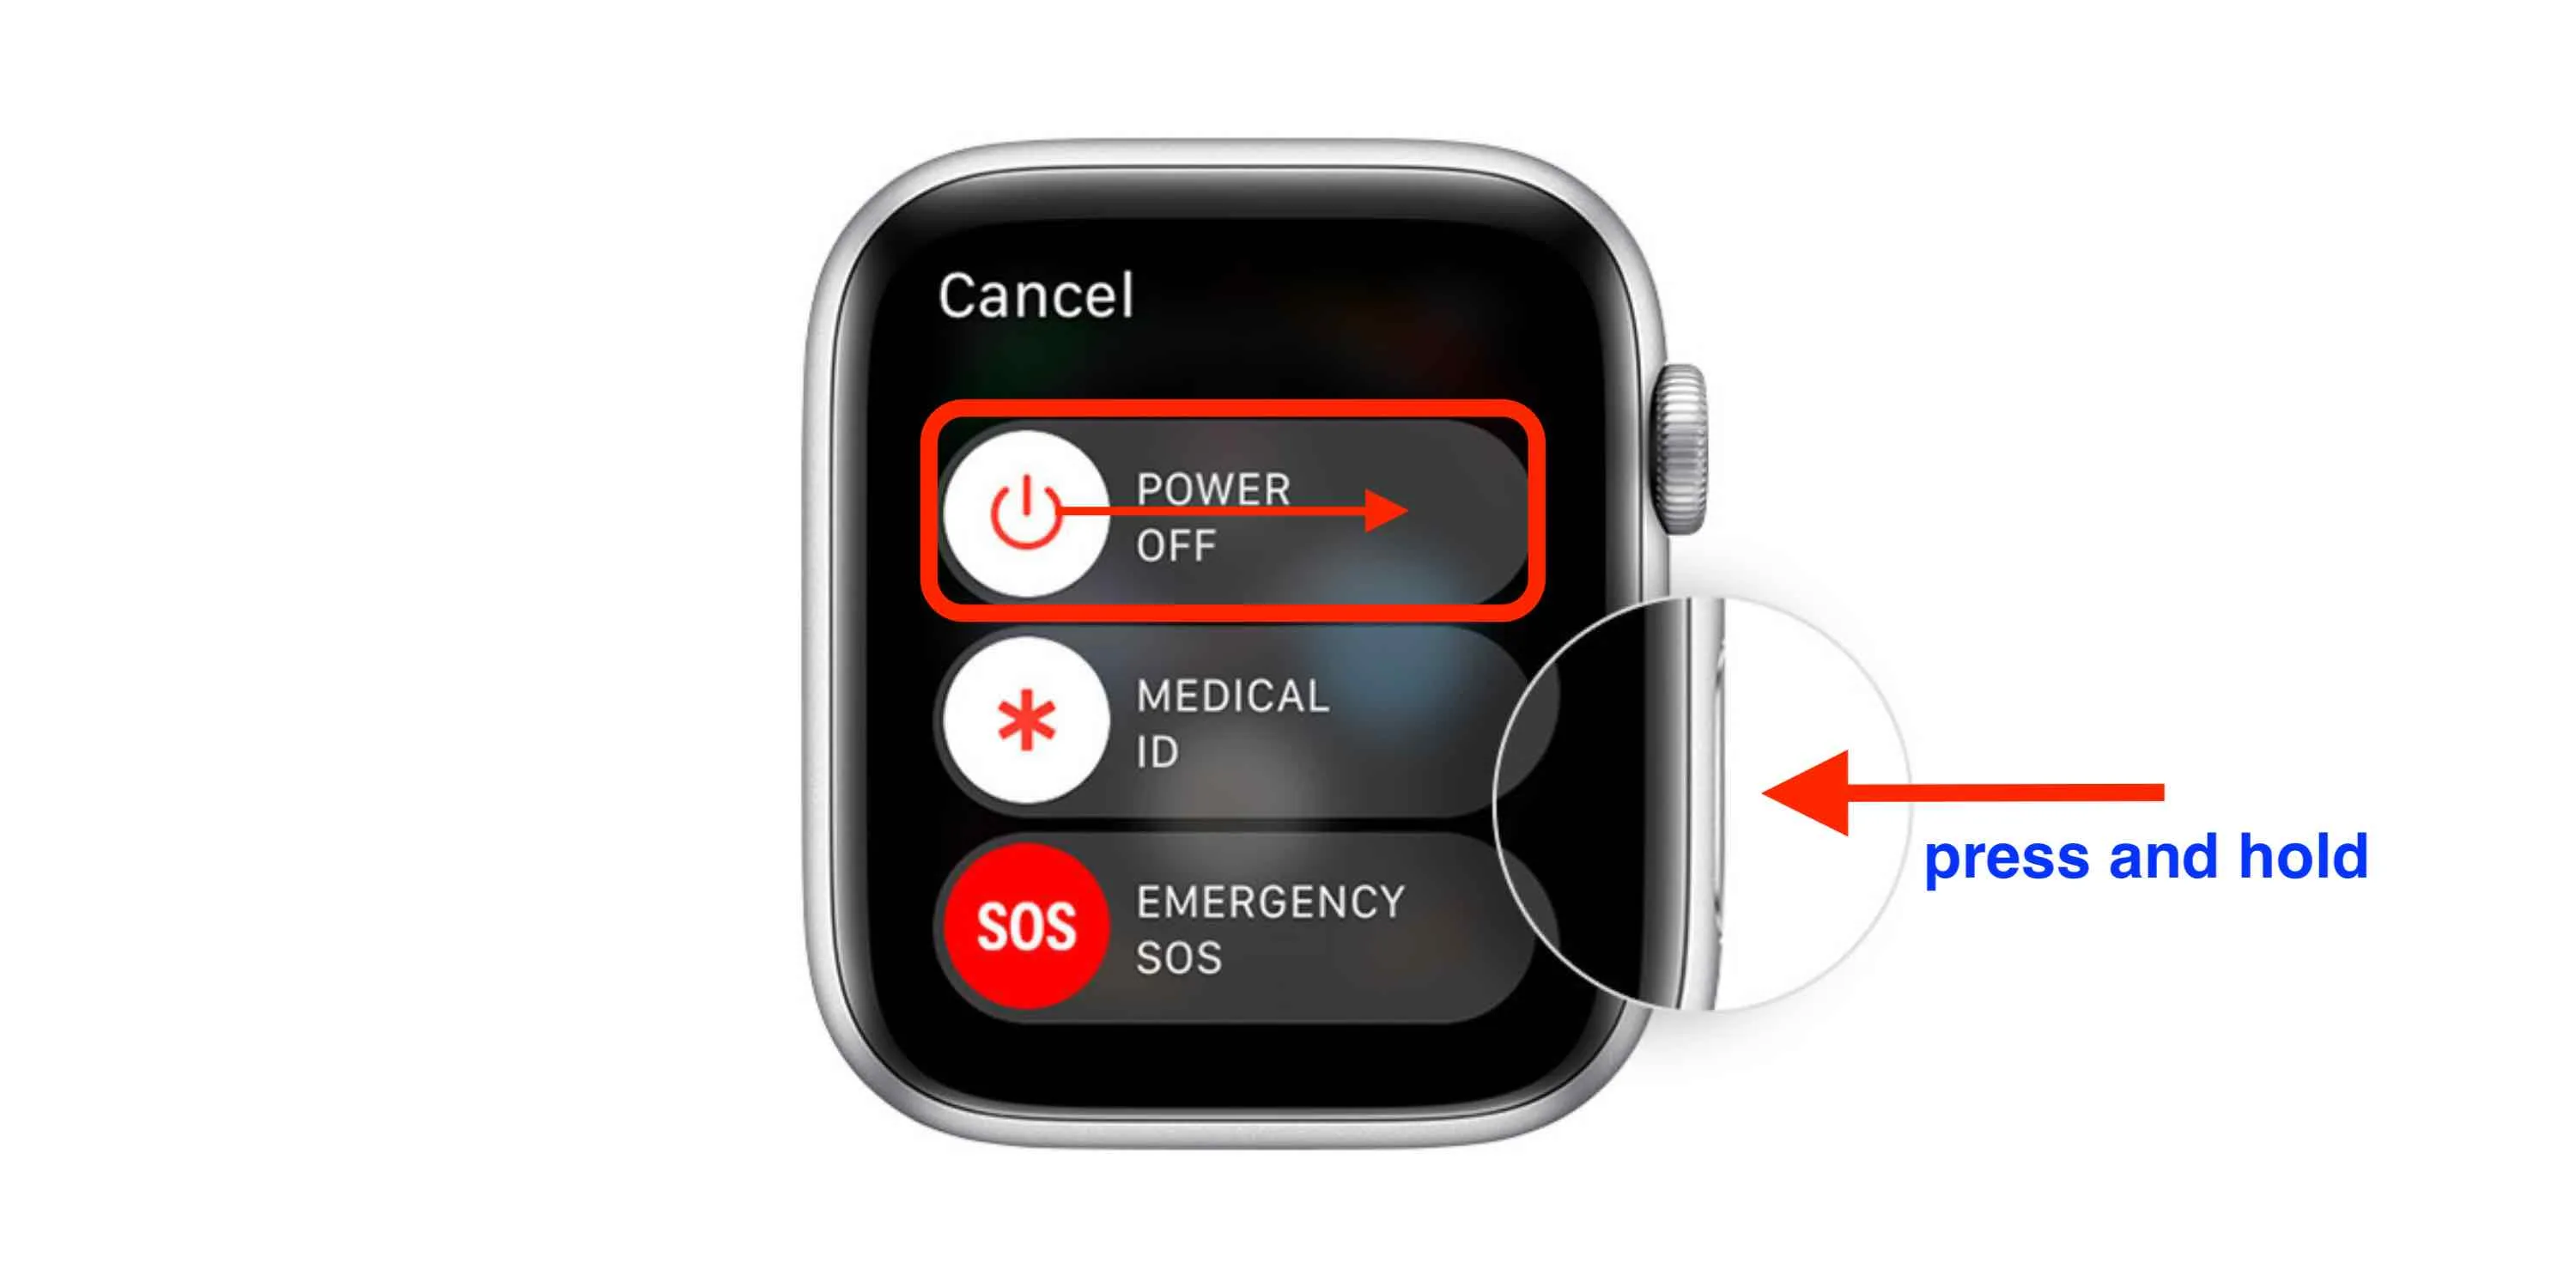
1. Restart or force restart: If your Apple Watch is unresponsive or behaving erratically, try restarting it. To do this, press and hold the side button until the power options appear, then swipe the “Power Off” slider. If a restart doesn’t resolve the issue, you can force restart the watch by pressing and holding both the side button and Digital Crown until the Apple logo appears.
2. Check for software updates: Keeping your Apple Watch up to date with the latest software is essential for optimal performance and bug fixes. Open the Apple Watch app on your iPhone, go to the “My Watch” tab, and select “General” followed by “Software Update” to check for and install any available updates.
3. Adjust notification settings: If you’re not receiving notifications or they’re not appearing on your Apple Watch, check your notification settings. On your iPhone, go to the Apple Watch app, select “Notifications,” and ensure that the necessary apps are enabled for notifications on your watch.
4. Troubleshoot battery drain: If you notice that your Apple Watch battery is draining faster than usual, there are several steps you can take. Make sure you’re using the latest software version, reduce the screen brightness, disable unnecessary notifications, and consider disabling certain battery-intensive features like heart rate monitoring during workouts if they’re not essential for your needs.
5. Sync and restore: If you’re experiencing issues with data not syncing between your iPhone and Apple Watch, or if you suspect that there may be a software issue, try unpairing and then re-pairing your Apple Watch. This process will restore your watch to factory settings and can often resolve syncing issues.
6. Reset settings: If you’re encountering persistent problems with your Apple Watch, resetting the settings may help. On your watch, go to Settings > General > Reset > Reset Settings. This will not erase your data but will reset all settings to their default values.
7. Contact Apple Support: If you’ve exhausted all troubleshooting options and are still experiencing issues, don’t hesitate to reach out to Apple Support for further assistance. They have a wealth of knowledge and resources to help troubleshoot and resolve any persistent problems you may be facing.
By following these troubleshooting tips and tricks, you can resolve common issues and keep your Apple Watch running smoothly. Remember to stay updated with the latest software, configure settings to optimize battery life, and don’t hesitate to seek support if needed. With a little troubleshooting, you can enjoy a seamless and trouble-free experience with your Apple Watch.