Introduction
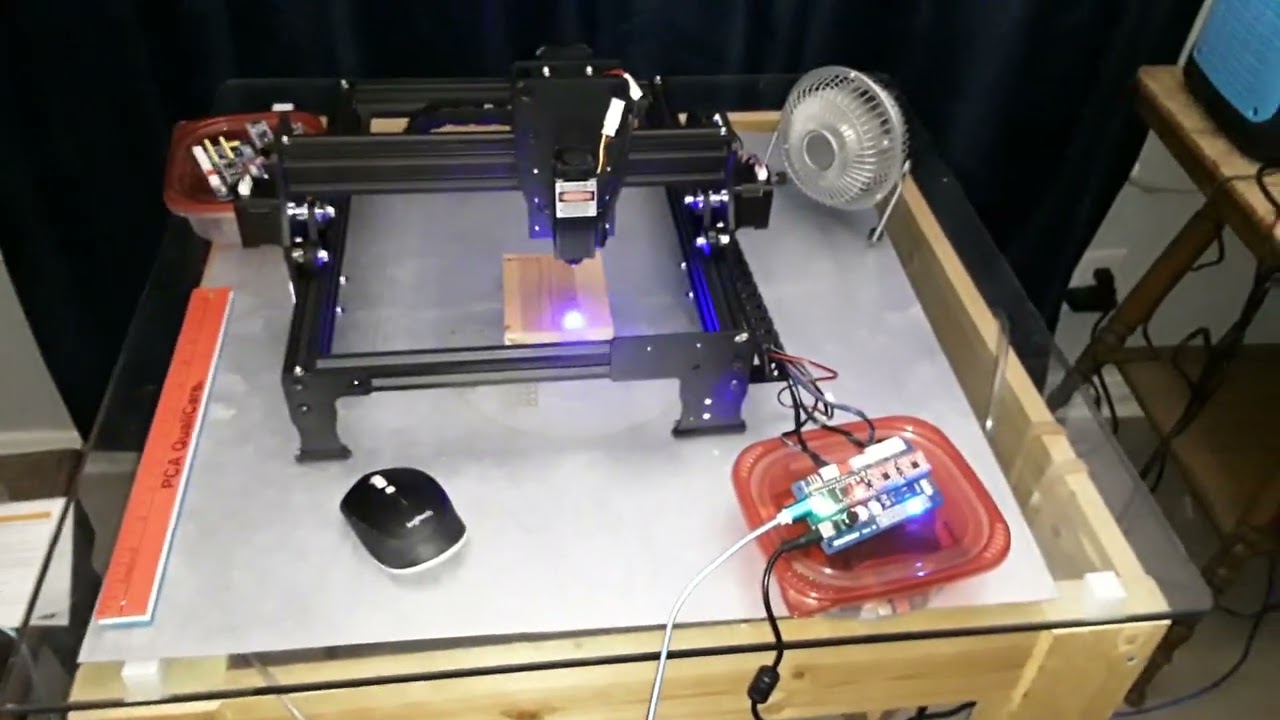
Welcome to this step-by-step guide on how to wire a DIY laser engraver using the Mana CNC controller. If you’re interested in bringing your creativity to life by engraving or etching designs on various materials, this project is perfect for you. With the Mana CNC controller, you can easily control the movements of the laser head and create intricate designs with precision.
In this article, we will walk you through the process of wiring the DIY laser engraver, ensuring that you have a clear understanding of each step. Whether you’re a beginner or have some experience with DIY electronics, this guide will help you successfully set up your laser engraver.
Before we dive into the details, it’s important to note that safety should always be the top priority when working with lasers or any electrical components. Be sure to wear appropriate protective gear and follow the safety precautions outlined in this guide.
In the following sections, we will cover everything you need to know, starting with an overview of the Mana CNC controller and the materials you’ll need for this project. We’ll then guide you through each step, from creating a wiring diagram to connecting the laser module and stepper motors. Finally, we’ll show you how to connect the Mana CNC controller to a computer and perform tests to ensure everything is functioning correctly.
By the end of this guide, you’ll have a fully functional DIY laser engraver and the knowledge to start engraving your own designs on various materials. So let’s get started and bring your creative ideas to life!
Overview of the Mana CNC
The Mana CNC controller is a popular choice among DIY enthusiasts for controlling various CNC machines, including laser engravers. It is compact, versatile, and offers precise control over the movement of the laser head. Understanding its key components and features is essential before diving into the wiring process.
The Mana CNC controller consists of a main control board, stepper motor drivers, and a power supply connector. The main control board acts as the brain of the system, receiving commands from the computer and translating them into precise movements of the stepper motors.
The stepper motor drivers are responsible for controlling the stepper motors, which move the laser head in different directions. These motors provide the necessary precision and accuracy required for engraving intricate designs. The Mana CNC controller typically supports two stepper motors, one for the X-axis (horizontal movement) and another for the Y-axis (vertical movement).
In addition to the stepper motor drivers, the Mana CNC controller also includes connectors for the laser module. These connectors allow you to connect and control a laser module, which emits a focused beam of light for engraving or cutting materials.
The Mana CNC controller is usually connected to a computer via a USB cable. This connection enables you to send commands and design files to the controller, allowing you to control the movement of the laser head and perform precise engraving tasks.
One of the advantages of the Mana CNC controller is its compatibility with various software, such as LaserGRBL and LightBurn. These software options provide a user-friendly interface for designing and controlling the engraving process, making it easier for beginners to get started.
Now that you have a general understanding of the Mana CNC controller, let’s move on to the next section, where we will discuss the safety precautions you should follow during the wiring process.
Safety Precautions
Working with a DIY laser engraver involves potential hazards and risks, so it’s crucial to prioritize safety throughout the entire wiring process. By following these safety precautions, you can minimize the likelihood of accidents or injuries:
- Protective Gear: Always wear appropriate safety gear, including safety glasses or goggles, to protect your eyes from laser beams. Additionally, wearing gloves and long-sleeved clothing can help prevent burns or cuts.
- Work Area: Set up your workspace in a well-ventilated area with good lighting. Ensure that there are no flammable materials nearby, as laser engraving can generate heat. Keep your work surface clean and uncluttered to prevent accidents.
- Power Preparation: Before starting any wiring or assembly, make sure the laser engraver is unplugged and the power supply is turned off. Avoid working on the wiring while the system is powered on to avoid accidental electrical shocks or other hazards.
- Proper Wiring: Double-check all wiring connections to ensure they are secure and correctly connected. Loose wires or faulty connections can result in electrical short circuits or malfunctions.
- Grounding: Ensure your DIY laser engraver has proper grounding to prevent electrical shocks or interference. Consult the manufacturer’s instructions or guidelines for specific grounding requirements.
- Fire Safety: Have a fire extinguisher or fire suppression system nearby in case of emergencies. Always be vigilant and ready to respond to any potential fire hazards.
- Read Manuals: Familiarize yourself with the instruction manuals and guidelines provided by the manufacturer for the Mana CNC controller, laser module, and any other components. Adhering to the manufacturer’s recommendations will help ensure safe and proper usage.
- Continuous Supervision: Do not leave your DIY laser engraver unattended while it is powered on. It’s important to monitor the system throughout the engraving process to quickly respond to any issues or emergencies.
By following these safety precautions, you can ensure a safe working environment and reduce the risk of accidents or injuries. Remember, safety should always be the top priority when working with lasers or any electrical equipment.
Gathering the Materials
Before you begin wiring your DIY laser engraver, it’s important to gather all the necessary materials and tools. Having everything in place will streamline the process and make it easier to complete the project smoothly. Here’s a list of the materials you’ll need:
- Mana CNC Controller: This is the heart of your laser engraver. Make sure you have the Mana CNC controller board, which includes the main control board and the stepper motor drivers.
- Stepper Motors: You’ll need two stepper motors for the X-axis and Y-axis movements. Ensure they are compatible with the Mana CNC controller and have the appropriate torque for your engraving needs.
- Laser Module: Choose a laser module that suits your engraving requirements. Check the compatibility with the Mana CNC controller and ensure the wattage is suitable for the materials you plan to engrave.
- Power Supply: Select a power supply unit that matches the voltage requirements specified by the Mana CNC controller and laser module. This could be a dedicated power supply or an external power supply.
- Wires and Connectors: Gather various wires and connectors to establish connections between the different components of your DIY laser engraver. Use appropriate wire gauges and connectors suitable for the voltage and current requirements.
- USB Cable: You’ll need a USB cable to connect the Mana CNC controller to your computer. Ensure it is of sufficient length and has a stable connection.
- Computer: Your DIY laser engraver will require a computer to send commands and designs to the Mana CNC controller. Make sure you have a compatible computer with the necessary software installed.
- Protective Gear: As mentioned in the safety precautions section, make sure you have safety glasses or goggles to protect your eyes from laser beams. Gloves and long-sleeved clothing are also recommended.
- Additional Tools: Prepare a set of basic tools such as screwdrivers, wire cutters/strippers, pliers, and heat shrink tubing to assist in the wiring process.
It’s essential to have all the required materials and tools ready before starting the wiring process. This will enable you to work efficiently and avoid any unnecessary delays. Now that you have everything gathered, it’s time to move on to the next section and create a wiring diagram for your laser engraver.
Step 1: Making a Wiring Diagram
Before you start the actual wiring process, it’s crucial to create a wiring diagram for your DIY laser engraver. This diagram will serve as a visual guide, outlining how each component is connected to the Mana CNC controller. Making a wiring diagram will help you stay organized, ensure correct connections, and troubleshoot any issues that may arise during the wiring process.
Follow these steps to create a comprehensive wiring diagram:
- Identify Components: Take a close look at the Mana CNC controller, stepper motors, laser module, power supply, and any other components you’ll be using. Familiarize yourself with their connectors and understand how they are meant to be connected.
- Paper or Digital: Decide whether you want to create a hand-drawn diagram on paper or utilize digital tools such as online drawing software or diagrams. Choose the method that works best for you.
- Start with the Mana CNC Controller: Begin your diagram by placing the Mana CNC controller in the center. Clearly label the connectors for power supply, stepper motors, and laser module.
- Add Stepper Motors: Draw lines from the stepper motor connectors on the Mana CNC controller to the corresponding stepper motors. Label each line to indicate the motor it represents (e.g., X-axis or Y-axis).
- Include the Laser Module: Next, draw a line from the laser module connector on the Mana CNC controller to the laser module itself. Label the line to denote the laser connection.
- Power Supply Connection: Draw a line from the power supply connector on the Mana CNC controller to the power supply unit. Ensure you indicate the polarity correctly (positive and negative).
- USB Connection: If desired, add a line representing the USB connection between the Mana CNC controller and your computer. This will indicate how the two devices are connected.
- Check for Errors: Review your diagram carefully to ensure all connections are accurate and there are no missed connections or errors. Make any necessary adjustments before proceeding to the wiring phase.
By creating a wiring diagram, you will have a clear visual representation of how your components should be connected. This will greatly simplify the wiring process and minimize the chances of making mistakes. Once your diagram is complete and accurate, you can proceed to the next step of preparing the laser engraver for wiring.
Step 2: Preparing the Laser Engraver
Before you start the wiring process, it’s important to properly prepare your DIY laser engraver. This step involves making sure that all the components are mounted securely and that any necessary modifications have been made.
Follow these steps to prepare your laser engraver for wiring:
- Read the Manuals: Familiarize yourself with the instruction manuals for the Mana CNC controller, stepper motors, laser module, and any other components you are using. Ensure you understand the installation procedures and any specific requirements.
- Mount the Mana CNC Controller: Securely mount the Mana CNC controller board in a location within your laser engraver’s frame. Ensure that it is positioned where it will not interfere with any moving parts or obstruct the laser module.
- Mount the Stepper Motors: Attach the stepper motors to their designated locations on the laser engraver’s structure. Make sure they are firmly secured and aligned properly to enable smooth movement for the X-axis and Y-axis.
- Mount the Laser Module: If your laser module requires mounting, follow the manufacturer’s instructions to install it securely onto the laser engraver’s carriage or bracket. Ensure that it is aligned with the engraving area.
- Secure Wiring Channels: Create channels or use cable management solutions to neatly organize and secure the wiring throughout your laser engraver. This will help prevent tangled wires and reduce the risk of accidental damage.
- Check for Clearance: Verify that there is ample clearance for the laser head to move freely and that there are no obstructions in its path. Ensure that all wiring connections are not in the way of any moving parts.
- Perform Test Movements: Before proceeding with the wiring, manually move the laser head along both the X-axis and Y-axis to ensure smooth and unhindered movement. This will help identify any potential issues that need to be addressed before wiring.
- Double-Check Everything: Take a final look at the overall setup of your laser engraver to make sure that all components are securely mounted and in the correct positions. Ensure that all wires are properly routed and that connections are accessible for wiring.
By properly preparing your laser engraver, you will set a solid foundation for the wiring process. This step ensures that all components are securely mounted and ready for connection. Once you have completed the necessary preparations, you can move on to the next step of wiring the power supply.
Step 3: Wiring the Power Supply
Wiring the power supply is a crucial step in setting up your DIY laser engraver. It provides the necessary electrical power to the various components of your engraver, including the Mana CNC controller, stepper motors, and laser module. Follow these steps to properly wire the power supply:
- Identify Power Supply Connectors: Locate the power supply connectors on the Mana CNC controller. Usually, there are two connectors labeled as positive (+) and negative (-).
- Refer to the Wiring Diagram: Consult your wiring diagram to determine which wires from the power supply should be connected to the Mana CNC controller.
- Connect the Positive (+) Wire: Take the positive wire from the power supply and connect it to the positive (+) connector on the Mana CNC controller. Ensure a secure connection, such as using a screw terminal or crimp connector.
- Connect the Negative (-) Wire: Take the negative wire from the power supply and connect it to the negative (-) connector on the Mana CNC controller. Again, ensure a secure connection.
- Double-Check Polarity: Verify that you have connected the positive and negative wires to the correct connectors, adhering to the polarity indicated on the power supply and the Mana CNC controller. Reversing the polarity could damage the components.
- Secure and Insulate Connections: Once the power supply is properly wired, ensure that the connections are secure and insulated. You can use heat shrink tubing or electrical tape to prevent any exposed wiring.
- Verify Power Supply Voltage: Check the voltage requirements of your Mana CNC controller and ensure that the power supply is providing the correct voltage. Using an incorrect voltage can lead to equipment damage or malfunction.
- Test Power Supply: With the wiring for the power supply complete, turn on the power supply and check if the Mana CNC controller receives power. Ensure that the power supply is functioning correctly and providing the necessary power to the connected components.
Properly wiring the power supply is essential for the overall functionality and safety of your laser engraver. Take your time to ensure accurate connections and verify the voltage requirements. Once the power supply is correctly wired, you can proceed to the next step of connecting the stepper motors.
Step 4: Connecting the Stepper Motors
Connecting the stepper motors is a crucial step in wiring your DIY laser engraver. These motors control the precise movement of the laser head along the X-axis and Y-axis. Follow these steps to correctly connect the stepper motors:
- Identify Motor Connections: Locate the stepper motor connectors on the Mana CNC controller. These connectors are usually labeled as X and Y, indicating the motor’s corresponding axis.
- Refer to the Wiring Diagram: Consult your wiring diagram to determine the correct wiring connections for the stepper motors. Pay attention to the color coding or labeling of the wires.
- Connect the X-axis Motor: Take the wires from the X-axis stepper motor and connect them to the corresponding X-axis connector on the Mana CNC controller. Ensure a secure connection, either through screw terminals or crimp connectors.
- Connect the Y-axis Motor: Similarly, connect the wires from the Y-axis stepper motor to the designated Y-axis connector on the Mana CNC controller. Again, make sure the connection is secure.
- Check for Correct Coil Polarity: Each stepper motor has two coils, which are usually labeled as A+ and A- for one coil and B+ and B- for the other. Make sure that the wires from each coil are connected correctly to the corresponding terminals on the stepper motor driver board.
- Secure and Insulate Connections: After connecting the stepper motor wires, ensure that the connections are securely fastened. You can use heat shrink tubing or electrical tape to insulate the connections and prevent any accidental short circuits.
- Double-Check Connections: Verify that the wiring connections for the stepper motors match the wiring diagram and that there are no loose or crossed wires. Proper connection is essential for accurate movement of the laser head.
- Test Stepper Motors: Once the connections are made, test the stepper motors by sending movement commands through the Mana CNC controller from your computer. Ensure that each motor moves smoothly and accurately along their respective axes.
By correctly connecting the stepper motors, you enable precise control over the movement of the laser head. Take your time to ensure accurate connections and double-check the wiring against the diagram. Once the stepper motors are properly connected, you can proceed to the next step of wiring the laser module.
Step 5: Wiring the Laser Module
The laser module is a crucial component of your DIY laser engraver as it emits a focused laser beam for engraving or cutting materials. Wiring the laser module correctly will ensure its proper functioning and safety. Follow these steps to wire the laser module:
- Identify Laser Module Connectors: Locate the laser module connectors on the Mana CNC controller. These connectors are specifically designed for connecting the laser module.
- Refer to the Wiring Diagram: Consult your wiring diagram to determine the correct wiring connections for the laser module. Pay attention to any specific polarity requirements or additional connections required.
- Connect Positive (+) Wire: Take the positive wire from the laser module and connect it to the positive (+) connector on the Mana CNC controller. Ensure a secure connection, such as using a screw terminal or crimp connector.
- Connect Negative (-) Wire: Next, connect the negative wire from the laser module to the negative (-) connector on the Mana CNC controller. Double-check the polarity indicated on both the laser module and the controller to ensure the correct connection.
- Additional Connections: Depending on the laser module, there may be additional wires for modulation, TTL control, or other functionalities. Connect these wires as specified in the manufacturer’s instructions or the wiring diagram.
- Secure and Insulate Connections: After connecting the wires, ensure that all connections are secure and insulated. Use heat shrink tubing or electrical tape to protect the connections and prevent any accidental short circuits.
- Double-Check Connections: Verify that all wiring connections for the laser module are accurate and match the wiring diagram. Make sure there are no loose or crossed wires that could cause issues during operation.
- Turn on the Laser Module: Once the wiring is complete, turn on the power supply and check if the laser module receives power. Be cautious and avoid looking directly at the laser beam to protect your eyes.
- Test Laser Module: Test the laser module by sending commands from your computer to turn it on and off. Ensure that the laser beam emits properly, and the control signals work as expected.
By wiring the laser module correctly, you ensure its proper functionality and integrate it seamlessly with your DIY laser engraver. Ensure accurate connections, follow any specific instructions provided by the manufacturer, and always exercise caution when working with laser beams.
Step 6: Connecting the Mana CNC to a Computer
Connecting the Mana CNC controller to a computer is essential for controlling your DIY laser engraver and sending design files for engraving. This step enables you to communicate with the controller and execute precise movements. Follow these steps to connect the Mana CNC controller to your computer:
- Ensure Power Off: Before connecting the Mana CNC controller to your computer, make sure both the controller and your computer are powered off. This precaution prevents any potential damage to the devices or interference during the connection process.
- Locate USB Port: Locate the USB port on the Mana CNC controller. This port allows for the connection between the controller and your computer.
- Connect USB Cable: Take the USB cable and connect one end to the USB port on the Mana CNC controller. Ensure a secure connection by firmly inserting the connector into the port.
- Connect to Computer: Take the other end of the USB cable and connect it to an available USB port on your computer. Make sure to use a compatible USB port and, if necessary, use a USB extender cable for flexibility in positioning.
- Power On the Devices: Power on both the Mana CNC controller and your computer. Ensure that the devices are properly powered and that the USB connection is established.
- Computer Recognition: Once the connection is established, your computer should recognize the Mana CNC controller as a USB device. You may need to install the appropriate drivers or software, depending on the specific requirements of your operating system and engraving software.
- Configure Software: Open your preferred engraving software, such as LaserGRBL or LightBurn, and configure the software to communicate with the Mana CNC controller. This step may involve selecting the correct COM port and configuring the settings for your laser engraver.
- Perform Connection Test: Test the connection between the Mana CNC controller and your computer by sending basic movement commands. Verify that the controller responds to the commands and that its movements align with your expectations.
Establishing a reliable connection between the Mana CNC controller and your computer is key to the successful operation of your DIY laser engraver. Ensure that the USB connection is secure, configure the necessary software settings, and perform tests to verify proper communication between the devices.
Step 7: Testing and Troubleshooting
Once you’ve completed the wiring and connection process for your DIY laser engraver, it’s time to test the system and troubleshoot any potential issues. This step ensures that all components are functioning properly and that you’ll be able to achieve high-quality engraving results. Follow these steps to test and troubleshoot your laser engraver:
- Power On the System: Ensure that the power supply is turned on, and all components are receiving power.
- Send Test Commands: Use your engraving software to send basic movement commands to the Mana CNC controller. Verify that the stepper motors move smoothly and accurately along their respective axes.
- Test Laser Module: Send commands to turn on the laser module and observe the laser beam. Ensure that it emits properly and that the power and modulation controls work as expected.
- Check Engraving Software: Take some time to familiarize yourself with the engraving software and its features. Experiment with different designs and settings to understand how they affect the engraving process.
- Inspect Engraved Results: After engraving a test design, carefully examine the results. Check for clarity, depth, and accuracy. Adjust settings as needed to achieve your desired engraving outcome.
- Troubleshoot Issues: If you encounter any issues during the testing process, refer to the troubleshooting section of the instruction manuals or seek support from the manufacturer or online communities. Common issues may include incomplete engraving, misalignment, or communication problems.
- Make Adjustments: Based on your troubleshooting efforts, make any necessary adjustments to the wiring, software settings, or components of your laser engraver. Repeat the testing process after making adjustments to ensure that the issues have been resolved.
- Document and Learn: Take note of any troubleshooting steps and solutions you discover along the way. This documentation will be valuable for future reference and can help others facing similar challenges.
Testing and troubleshooting are crucial to fine-tuning your DIY laser engraver and ensuring optimal performance. By actively evaluating the system, identifying and addressing any issues, and continuously learning, you’ll be able to maximize the capabilities of your engraver and achieve exceptional results.
Conclusion
Congratulations on successfully wiring your DIY laser engraver using the Mana CNC controller! By following the step-by-step guide provided in this article, you’ve gained the knowledge and skills to set up your own laser engraving system. The careful process of creating a wiring diagram, preparing the engraver, connecting the power supply, stepper motors, laser module, and establishing the connection to your computer has allowed you to build a functional and precise engraving tool.
Remember, safety should always be a top priority when working with lasers and electrical components. Adhere to the safety precautions outlined in this guide and always exercise caution during the wiring and testing process. Protect your eyes and follow safe practices to prevent accidents or injuries.
Once your DIY laser engraver is set up, take the time to familiarize yourself with the engraving software and continue to experiment with different materials, designs, and settings. With your new tool, you have the freedom to unleash your creativity and bring personalized designs to life on various surfaces.
In case you encounter any issues during the testing or troubleshooting process, refer to the instruction manuals or seek assistance from the manufacturer or online communities. Troubleshooting and continuously learning from these experiences will help you enhance your engraving skills and address any challenges that arise.
Now that you’ve learned how to wire a DIY laser engraver using the Mana CNC controller, you have a versatile and powerful tool at your disposal. Start exploring the possibilities, create stunning designs, and enjoy the art of laser engraving right from the comfort of your own home or workshop!


