Introduction
Welcome to the world of Google Sheets and the magical IF function! If you are new to spreadsheets or simply looking to level up your skills, understanding how to use the IF function in Google Sheets is essential. Whether you are managing data, creating reports, or analyzing information, the IF function can be your secret weapon.
The IF function in Google Sheets allows you to perform certain actions based on whether a specific condition is true or false. This powerful function gives you the ability to automate tasks and make data-driven decisions within your spreadsheets.
So, why should you use the IF function in Google Sheets? Well, imagine that you have a spreadsheet with a large dataset and you need to categorize certain values based on specified criteria. This is where the IF function comes in handy. It helps you evaluate conditions and return different values or perform different calculations based on the results.
Before we delve into the nitty-gritty details, let’s take a brief look at the syntax of the IF function.
What is the IF function?
The IF function is a conditional function used in Google Sheets (and other spreadsheet applications) to perform different actions based on whether a certain condition is true or false. It provides a way to automate decision-making within your spreadsheets.
With the IF function, you can set up logical tests to evaluate conditions and specify what should happen if the condition is met or not. This allows you to create dynamic spreadsheets that adapt to different scenarios and data inputs.
Let’s break down the syntax of the IF function:
- IF(condition, value_if_true, value_if_false): This is the basic structure of the IF function. You start with the condition you want to evaluate, followed by the value that should be returned if the condition is true, and then the value that should be returned if the condition is false.
- Condition: This is the logical test that determines whether the condition is true or false. It can be a comparison between two values, a logical expression, or a combination of multiple conditions using logical operators.
- Value_if_true: This is the value or action that will be performed if the condition is true. It can be a number, text, formula, or a reference to another cell.
- Value_if_false: This is the value or action that will be performed if the condition is false. Like the value_if_true, it can be a number, text, formula, or cell reference.
By using the IF function, you can create dynamic formulas that adapt to changing data and conditions. It opens up possibilities for advanced calculations, data analysis, and decision-making within your spreadsheets.
Syntax of the IF function
Understanding the syntax of the IF function is key to successfully implementing it in your Google Sheets. Let’s take a closer look at the components and structure of the IF function:
IF(condition, value_if_true, value_if_false)
- Condition: This is the criterion that you want to evaluate. It can be a logical expression, a comparison between two values, or a combination of conditions using logical operators like AND or OR.
- Value_if_true: This is the value or action that will be executed if the condition evaluates to true. It can be a number, text, formula, or a reference to another cell.
- Value_if_false: This is the value or action that will be executed if the condition evaluates to false. Like the value_if_true, it can be a number, text, formula, or a cell reference.
The IF function follows a logical flow. It first evaluates the condition provided and then determines whether it is true or false. Based on the evaluation, it executes the corresponding action specified in either the value_if_true or value_if_false argument.
The condition can be a simple expression, such as “>10” to check if a value is greater than 10, or it can be more complex with the use of logical operators. For example, “=A1>B1” checks if the value in cell A1 is greater than the value in cell B1. You can also use functions and formulas within the condition argument to create more intricate conditions.
It’s important to note that the value_if_true and value_if_false arguments can be of different data types. For example, if the condition is true, you can return a numeric value, and if the condition is false, you can return a text string. This flexibility allows you to handle various scenarios and perform different actions based on the condition’s result.
Now that we have covered the syntax of the IF function, let’s explore some practical examples of how to use it in Google Sheets.
Basic usage of the IF function
The basic usage of the IF function involves evaluating a condition and returning different values or performing different actions based on the result. Let’s dive into some examples to understand how to apply the IF function in Google Sheets.
Example 1:
Suppose we have a spreadsheet that tracks the sales of different products. We want to categorize each product as “High” if the sales amount is greater than 1000, and “Low” if it is less than or equal to 1000. We can use the IF function to achieve this:
html
=IF(B2>1000, “High”, “Low”)
In this example, B2 represents the cell where the sales amount is stored. The IF function checks whether the sales amount is greater than 1000. If it is, it returns “High”; otherwise, it returns “Low”.
Example 2:
Let’s say we have a spreadsheet that tracks the attendance of students. We want to mark the attendance as “Present” if the student’s score is 80 or above, and “Absent” if it is below 80. We can use the IF function to accomplish this:
html
=IF(C2>=80, “Present”, “Absent”)
Here, C2 represents the cell where the student’s score is entered. The IF function evaluates whether the score is greater than or equal to 80. If it is, it returns “Present”; otherwise, it returns “Absent”.
These are just a couple of examples of the basic usage of the IF function. You can apply the IF function to numerous scenarios, such as conditional formatting, filtering data, calculating grades, and much more. The flexibility of the IF function allows you to customize and automate your spreadsheets based on specific conditions and requirements.
Now that we have covered the basic usage of the IF function, let’s explore more advanced techniques and variations.
Using IF function with logical operators
The IF function in Google Sheets becomes even more powerful when combined with logical operators. Logical operators allow you to create more complex conditions by combining multiple criteria. Let’s explore how we can use logical operators with the IF function.
There are three main logical operators that you can use with the IF function:
- AND: This operator checks if all of the conditions provided are true.
- OR: This operator checks if at least one of the conditions provided is true.
- NOT: This operator negates the condition provided, returning true if the condition is false, and false if the condition is true.
Example 1:
Let’s say we have a spreadsheet that tracks the performance of employees. We want to give a bonus to employees who have both met their sales target (cell A2) and have a customer satisfaction score (cell B2) above 4. We can use the AND operator to combine these conditions:
html
=IF(AND(A2=”Met”, B2>4), “Bonus”, “No Bonus”)
In this example, the AND operator checks if both conditions are true – that the sales target is met and the customer satisfaction score is above 4. If both conditions are true, it returns “Bonus”; otherwise, it returns “No Bonus”.
Example 2:
Let’s consider a scenario where we have a spreadsheet tracking the progress of students. We want to determine if a student is eligible for promotion based on their exam scores (cell C2) and assignment scores (cell D2). To be eligible, the student’s total score must be at least 70. We can use the OR operator to check if either the exam or assignment score meets the minimum criteria:
html
=IF(OR(C2>=70, D2>=70), “Eligible”, “Not Eligible”)
In this example, the OR operator checks if either the exam score is greater than or equal to 70 or the assignment score is greater than or equal to 70. If at least one of the conditions is true, it returns “Eligible”; otherwise, it returns “Not Eligible”.
Using logical operators with the IF function allows you to create more sophisticated conditions and make informed decisions based on multiple criteria. Experiment with different combinations to meet your specific requirements.
Now that we have explored using logical operators with the IF function, let’s move on to using the IF function with text.
Using IF function with text
The IF function in Google Sheets is not limited to numerical values. It can also be used with text to conditionally return different text values or perform actions based on specific criteria. Let’s explore how we can use the IF function with text in different scenarios.
Example 1:
Suppose we have a spreadsheet that tracks the status of a project. We want to display different text values based on the completion status of the project. If the completion status (cell A2) is “Complete”, we want to display “Project finished”; otherwise, we want to display “Ongoing project”. We can use the IF function to achieve this:
html
=IF(A2=”Complete”, “Project finished”, “Ongoing project”)
In this example, the IF function checks if the completion status is “Complete”. If it is, it returns “Project finished”; otherwise, it returns “Ongoing project”.
Example 2:
Let’s say we have a spreadsheet that tracks the availability of items in a store. We want to display different messages based on whether an item (cell A2) is in stock or out of stock. If the item is in stock, we want to display “Available”; otherwise, we want to display “Out of stock”. We can use the IF function to achieve this:
html
=IF(A2=”In stock”, “Available”, “Out of stock”)
In this example, the IF function checks if the item’s status is “In stock”. If it is, it returns “Available”; otherwise, it returns “Out of stock”.
Using the IF function with text allows you to dynamically update the display of information based on specific conditions. Whether you are managing project statuses, inventory levels, or any other text-based data, the IF function can help automate the process and ensure accurate categorization or messaging.
Now that we have explored using the IF function with text, let’s move on to using the IF function with numbers.
Using IF function with numbers
In addition to text, the IF function in Google Sheets can also be used effectively with numbers. By using the IF function with numbers, you can perform calculations, compare values, and make decisions based on specific numerical conditions. Let’s explore some examples of how to use the IF function with numbers.
Example 1:
Suppose we have a spreadsheet that tracks students’ test scores. We want to assign grades based on the scores. If a student’s score (cell A2) is greater than or equal to 90, we want to assign an “A”; if it is between 80 and 89, we want to assign a “B”; if it is between 70 and 79, we want to assign a “C”; and for scores below 70, we want to assign a “Fail”. We can use the IF function to achieve this:
html
=IF(A2>=90, “A”, IF(A2>=80, “B”, IF(A2>=70, “C”, “Fail”)))
In this example, the nested IF functions check the student’s score and assign the appropriate grade based on the conditions. The grades are assigned from highest to lowest, starting with “A” and ending with “Fail”.
Example 2:
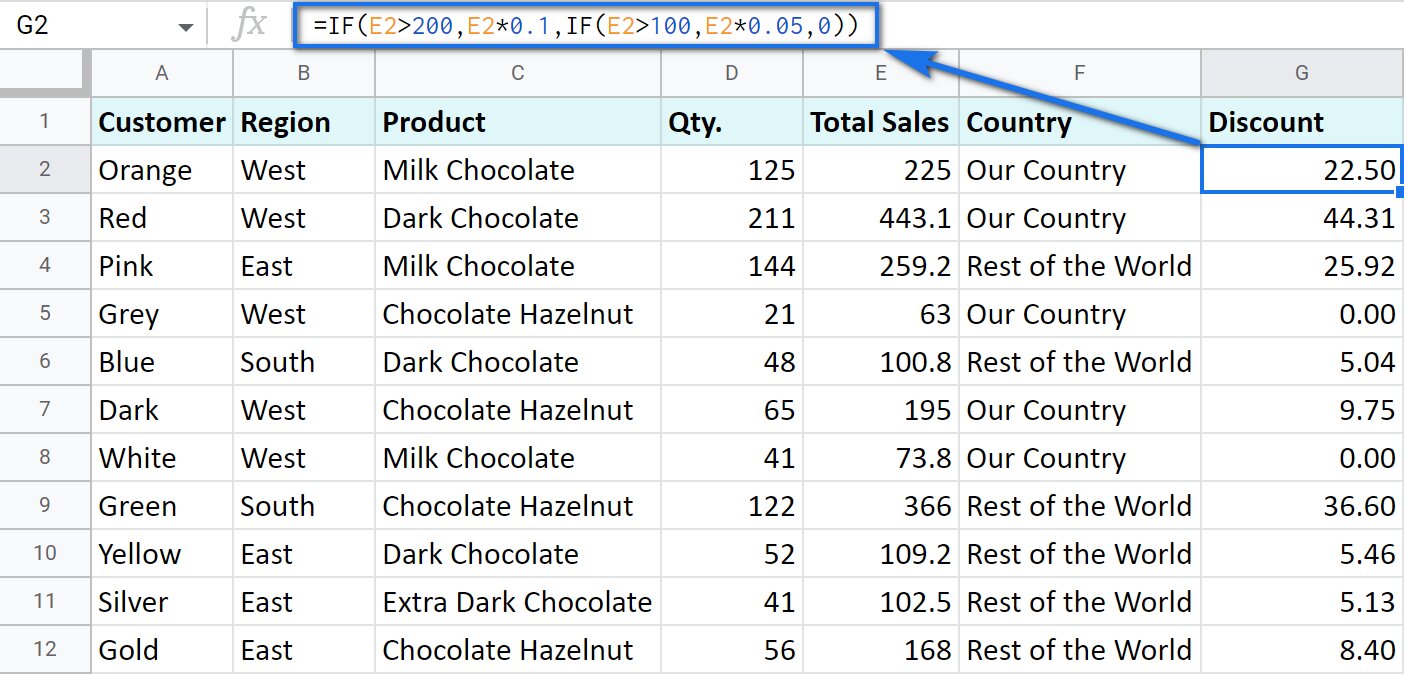
Let’s consider a scenario where we have a spreadsheet that tracks the sales performance of employees. We want to provide a bonus to employees based on their sales targets. If an employee’s sales amount (cell B2) exceeds the target (cell C2), we want to give them a bonus equal to 10% of the target; otherwise, no bonus will be given. We can use the IF function to calculate the bonus:
html
=IF(B2>C2, C2*0.1, 0)
In this example, the IF function checks if the sales amount is greater than the target. If it is, it calculates the bonus as 10% of the target; otherwise, it returns 0, indicating no bonus.
By using the IF function with numbers, you can perform calculations and make decisions based on specific numerical conditions. Whether you are assigning grades, determining bonuses, or analyzing numerical data, the IF function can help streamline the process and provide accurate results.
Now that we have explored using the IF function with numbers, let’s move on to learning about nesting IF functions.
Nesting IF functions
The IF function in Google Sheets allows for advanced functionality by nesting multiple IF functions within one another. Nesting IF functions means using one or more IF functions as the value_if_true or value_if_false argument of another IF function. This allows you to create complex conditions and perform different actions based on multiple criteria. Let’s explore how to nest IF functions in Google Sheets.
Example 1:
Suppose we have a spreadsheet that tracks students’ scores and we want to assign grades based on specific criteria. If a student’s score is greater than or equal to 90, they receive an “A”; if their score is between 80 and 89, they receive a “B”; if their score is between 70 and 79, they receive a “C”; and for scores below 70, they receive a “Fail”. Additionally, if a student’s score is 100, we want to assign a special grade of “Perfect Score”. We can nest IF functions to achieve this:
html
=IF(A2=100, “Perfect Score”, IF(A2>=90, “A”, IF(A2>=80, “B”, IF(A2>=70, “C”, “Fail”))))
In this example, the nested IF functions evaluate the student’s score and return the appropriate grade based on the conditions. The special condition for a score of 100 is checked first, followed by the descending order of the grade criteria.
Example 2:
Let’s consider a spreadsheet that calculates the commission based on sales performance. The commission rates are different based on the sales amount. If the sales amount is greater than or equal to $10,000, the commission rate is 5%; if it is between $5,000 and $9,999, the commission rate is 3%; and for sales below $5,000, the commission rate is 1%. We can nest IF functions to calculate the commission:
html
=IF(B2>=10000, B2*0.05, IF(B2>=5000, B2*0.03, B2*0.01))
In this example, the nested IF functions check the sales amount and calculate the commission based on the conditions. The commission rates are applied in descending order, starting from the highest criteria.
Nesting IF functions allows you to create complex conditions and perform multiple actions based on various criteria. This versatility enables you to handle more intricate scenarios and automate decision-making in your spreadsheets.
Now that we have explored nesting IF functions, let’s move on to some tips and tricks for using the IF function effectively.
Tips and tricks for using the IF function
The IF function is a powerful tool in Google Sheets that can greatly enhance your spreadsheet capabilities. To help you make the most out of the IF function, here are some tips and tricks to keep in mind:
1. Proper nesting: When nesting IF functions, remember to use the correct number of opening and closing parentheses for each function. This ensures that the logic is executed correctly and avoids any errors.
2. Use the value_if_false argument: The If function has a value_if_false argument that is optional but highly recommended to include. This argument allows you to specify the value or action to take if the condition is false. Always provide a fallback option to ensure accurate results.
3. Combine IF with other functions: The IF function can be combined with other functions such as SUM, AVERAGE, COUNT, and more. This combination allows for more complex calculations and data analysis within your spreadsheets.
4. Utilize logical operators: Take advantage of logical operators like AND, OR, and NOT within the condition argument of the IF function. This enables you to set up more sophisticated logical tests and evaluate multiple conditions.
5. Format the output: Consider using formatting options to improve the appearance of the output based on the condition. For example, you can highlight cells, change font colors, or add icons to make the results more visually appealing and easier to interpret.
6. Test with sample data: Always test your IF function with sample data to ensure that it is functioning as expected. This helps identify any potential issues or errors before working with larger datasets.
7. Document your formulas: As your spreadsheet becomes more complex, it’s essential to document your IF formulas and their purpose. Adding comments or explanations will make it easier for others (or future you) to understand the logic behind the formulas.
8. Use relative cell references: To make your IF formulas more versatile, use relative cell references instead of absolute references. This allows the formulas to adjust automatically when copied or applied to different cells.
By applying these tips and tricks, you can effectively harness the power of the IF function in Google Sheets and optimize your spreadsheet workflow.
Now that we have explored some tips and tricks, let’s wrap up our discussion on using the IF function.
Conclusion
The IF function in Google Sheets is a powerful tool that allows you to automate decision-making, perform calculations, and categorize data based on specific conditions. By understanding the syntax and various uses of the IF function, you can unlock the full potential of Google Sheets and create dynamic, data-driven spreadsheets.
We started by introducing the IF function and its purpose, highlighting its ability to perform different actions based on the evaluation of a condition. We explored its syntax, where we discussed the condition, value_if_true, and value_if_false arguments, and how they work together to provide the desired results.
From there, we delved into the basic usage of the IF function, demonstrating how it can be used to categorize data, assign grades, and make decisions based on specific criteria. We then explored how to enhance the functionality of the IF function by using logical operators to evaluate multiple conditions and make more complex decisions.
We also discovered how the IF function can be applied to text and numeric data, allowing us to dynamically categorize and calculate values based on specific conditions. Whether assigning grades, tracking inventory, or calculating commissions, the IF function provides a flexible solution.
Furthermore, we explored the concept of nesting IF functions, which enables us to create advanced conditions by using one or more IF functions within another. This allows for more intricate decision-making and data analysis within Google Sheets.
Lastly, we shared some tips and tricks to help you make the most out of the IF function, including proper nesting techniques, utilizing logical operators, combining IF with other functions, and formatting the output for better readability.
By leveraging the IF function in Google Sheets, you can streamline your data analysis, automate calculations, and make informed decisions with ease. So go ahead, dive into the world of IF functions, and unlock the full potential of your spreadsheets!