Introduction
Upgrading the RAM on your Lenovo laptop can significantly improve its performance, allowing you to run more applications smoothly and multitask efficiently. Whether you’re a gamer looking to enhance your system’s capabilities or a professional who needs more power for resource-intensive tasks, increasing the RAM capacity can be a cost-effective solution.
RAM, or Random Access Memory, is a crucial hardware component that stores data temporarily while the system is in use. When your laptop runs out of available memory, it starts using the hard drive as virtual memory, which significantly slows down its performance. By upgrading the RAM, you provide your laptop with more memory to work with, minimizing the need for virtual memory and improving overall speed and responsiveness.
Before diving into the RAM upgrade process, it’s essential to ensure compatibility and find out the maximum RAM capacity your Lenovo laptop can support. Different laptop models have different limitations, so it’s crucial to consult your laptop’s user manual or visit the manufacturer’s website to gather the necessary information before making any purchases.
In this guide, we’ll walk you through the step-by-step process of upgrading the RAM on your Lenovo laptop. We’ll cover everything from determining compatibility and gathering tools to removing the existing RAM module and installing the new one. By following the instructions carefully and paying attention to safety precautions, you’ll be able to successfully upgrade your laptop’s RAM and enjoy the enhanced performance it brings.
Step 1: Determine the compatibility and maximum RAM capacity
Before you begin the RAM upgrade process on your Lenovo laptop, it’s essential to ensure that the new RAM module you purchase is compatible with your system and that you don’t exceed the maximum RAM capacity.
The first step is to identify your laptop’s model number, which can typically be found on the bottom of the device or in the BIOS settings. Once you have the model number, visit the Lenovo website or refer to your laptop’s user manual to find detailed specifications.
Look for the section that provides information about RAM support. It will include details such as the type of RAM supported (DDR3, DDR4, etc.), the maximum RAM capacity your laptop can handle, and the number of available RAM slots.
It’s important to note that some laptops may have specific limitations on the RAM capacity per slot. For example, your laptop may support a maximum of 16GB of RAM, but each slot can only accommodate up to 8GB. In this case, you’ll need to purchase two 8GB RAM modules instead of a single 16GB module.
Once you have determined the compatibility and maximum RAM capacity, you can decide how much additional RAM you want to install. Consider your needs and budget to make an informed decision. It’s usually recommended to upgrade to the maximum supported RAM capacity for optimal performance.
Keep in mind that upgrading the RAM may void the warranty on your laptop. If you’re unsure about the process, it’s always best to consult with a professional or contact Lenovo support for further guidance.
By taking the time to determine compatibility and maximum RAM capacity, you’ll be well prepared for the next steps in the RAM upgrade process. This ensures that you choose the right type and amount of RAM for your Lenovo laptop, allowing you to take full advantage of the performance benefits it offers.
Step 2: Gather the necessary tools and prepare the workspace
Before you begin upgrading the RAM on your Lenovo laptop, it’s crucial to gather the necessary tools and ensure that you have a clean and organized workspace. This will make the process smoother and minimize the risk of damaging any components.
Here are the tools you’ll need for the RAM upgrade:
- Small Phillips screwdriver: This will be used to remove any screws that hold the laptop’s back cover or RAM slot cover in place.
- Anti-static wristband: While not required, using an anti-static wristband can prevent static electricity from damaging sensitive components during the upgrade process. If you don’t have a wristband, make sure to touch a grounded metal surface before touching any internal parts of the laptop.
- Compressed air: This can be used to remove any dust or debris from the laptop’s internals before opening it up. Ensure that the laptop is turned off and unplugged before using compressed air.
- Clean, lint-free cloth: This will come in handy for wiping any surfaces or contacts that need to be cleaned during the upgrade.
Once you have gathered the necessary tools, it’s important to prepare your workspace. Find a clean and well-lit area where you can comfortably work on your laptop. If possible, use an anti-static mat or a non-conductive surface to minimize the risk of static electricity damaging the components.
Make sure to power off your laptop and disconnect it from any power sources before proceeding. This includes unplugging the charging cable and removing the battery (if applicable). It’s always a good idea to ensure that there is no residual power in the system to avoid any potential safety hazards.
By gathering the necessary tools and preparing a suitable workspace, you will be ready to dive into the RAM upgrade process on your Lenovo laptop. Having everything organized and in place will make the subsequent steps more efficient and help protect your laptop’s components from damage.
Step 3: Shut down and unplug the laptop
Before you begin working on your Lenovo laptop, it’s crucial to shut it down properly and unplug it from any power sources. This ensures your safety and prevents any potential damage to the laptop’s internal components.
Follow these steps to shut down and unplug your laptop:
- Save your work: Before shutting down the laptop, make sure to save any unsaved work and close all applications. This will prevent any data loss or potential issues when you power it back on later.
- Shut down the laptop: Click on the Start menu or press the Windows key, then select the “Shut down” option. Allow the laptop to go through the shutdown process until the screen turns off, indicating that it is completely powered down.
- Unplug the charging cable: If your laptop is currently connected to the charger, unplug the charging cable from both the laptop and the power source. This ensures that there is no electrical current flowing through the system.
- Remove any USB devices: If you have any USB devices connected to your laptop, such as flash drives or external hard drives, make sure to safely remove them before proceeding. This prevents any potential data corruption or hardware conflicts during the RAM upgrade process.
It’s important to note that different laptop models may have different shutdown procedures. If you’re unsure about how to properly shut down your specific Lenovo laptop, refer to the user manual or visit the Lenovo support website for instructions.
Once you have shut down and unplugged your laptop, you are ready to proceed with the RAM upgrade. However, always remember to prioritize safety and caution throughout the process to avoid any unnecessary accidents or damage to your laptop.
Step 4: Remove the laptop battery (if applicable)
Before you begin the RAM upgrade process on your Lenovo laptop, it’s important to check if your laptop has a removable battery. Some newer models may have non-removable batteries, in which case you can skip this step. However, if your laptop does have a removable battery, it’s essential to remove it to ensure safety during the upgrade.
Follow these steps to remove the laptop battery:
- Ensure the laptop is powered off: Make sure your laptop is completely shut down before attempting to remove the battery. This ensures that there is no residual power running through the system.
- Locate the battery release mechanism: Look for a small lever or switch that secures the battery in place. This is usually located on the bottom of the laptop or along the laptop’s side.
- Release the battery: Once you have located the release mechanism, slide or press it in the direction indicated to release the battery from its compartment.
- Remove the battery: Gently lift the battery out of its compartment while holding onto the release mechanism to prevent it from snapping back into place. Place the battery aside in a safe location.
It’s important to handle the battery with care and avoid any unnecessary force to prevent damaging it or the laptop. If you have any concerns about removing the battery or if it seems difficult to remove, refer to your laptop’s user manual or contact Lenovo support for further guidance.
By removing the battery before the RAM upgrade, you eliminate the risk of electrical shocks and minimize potential damage to your laptop. Remember to keep the battery in a safe place and avoid exposing it to extreme temperatures or physical damage.
Step 5: Locate the RAM slots
Before you can upgrade the RAM on your Lenovo laptop, you need to locate the RAM slots where the modules are installed. The number and location of the RAM slots can vary depending on your specific laptop model.
Follow these steps to locate the RAM slots on your Lenovo laptop:
- Refer to the user manual: The user manual that came with your laptop is the best resource for finding the location of the RAM slots. It provides detailed diagrams and instructions specific to your laptop model.
- Inspect the bottom of the laptop: Turn your laptop over and examine the bottom panel. Look for any access doors or panels that may be labeled as “RAM,” “Memory,” or have a recognizable RAM symbol.
- Check the keyboard area: In some cases, the RAM slots may be located beneath the keyboard. If you can’t find them on the bottom of the laptop, refer to the user manual or search for online tutorials specific to your model to learn how to remove the keyboard and access the RAM slots.
- Consult the manufacturer’s website: If you’re unable to find the RAM slots using the previous methods, visit the Lenovo website and search for your laptop model’s specifications. The information provided should indicate the location of the RAM slots.
Once you have located the RAM slots, remember to take note of their orientation and any other relevant details, such as the maximum capacity each slot supports. This will be essential information when it’s time to install the new RAM modules.
If you’re unsure or have any concerns about locating the RAM slots on your Lenovo laptop, don’t hesitate to reach out to Lenovo support or consult with a professional technician. It’s better to seek guidance to prevent any accidental damage to your laptop during the RAM upgrade process.
Step 6: Open the RAM slot cover
Once you’ve located the RAM slots on your Lenovo laptop, the next step is to open the RAM slot cover. The cover protects the RAM slots and ensures that the modules are securely in place.
Follow these steps to open the RAM slot cover:
- Power off and unplug your laptop: Before proceeding, shut down your laptop completely and unplug it from any power sources to ensure safety.
- Flip your laptop over: Turn the laptop upside down to access the bottom panel.
- Locate the RAM slot cover: Look for a removable panel that covers the RAM slots. It is often marked with symbols or labels such as “RAM,” “Memory,” or resembles multiple stacked rectangles.
- Remove the screws: Use a small Phillips screwdriver to remove the screws securing the RAM slot cover. Place the screws in a safe location to avoid losing them.
- Gently lift the RAM slot cover: Once the screws are removed, carefully lift the RAM slot cover using your fingers or a flat tool like a plastic pry tool. Take caution not to force any parts or damage the cover.
Once the RAM slot cover is open, you will have clear access to the RAM slots. Keep the cover in a safe place along with the screws, as you’ll need them when it’s time to secure the RAM module and close the cover later on.
It’s crucial to handle the RAM slot cover and screws with care to avoid any accidental damage. If you encounter any difficulties or have concerns about opening the RAM slot cover, consult your laptop’s user manual or reach out to Lenovo support for assistance.
By successfully opening the RAM slot cover, you’re now ready to remove the existing RAM module and proceed with the RAM upgrade process on your Lenovo laptop.
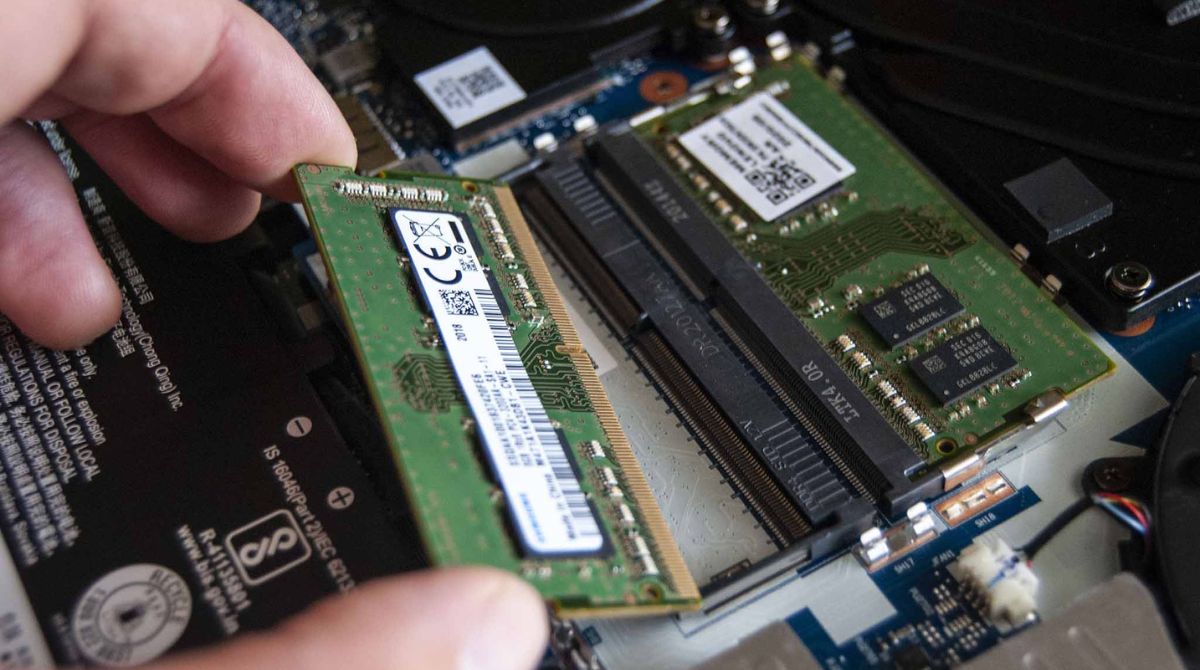
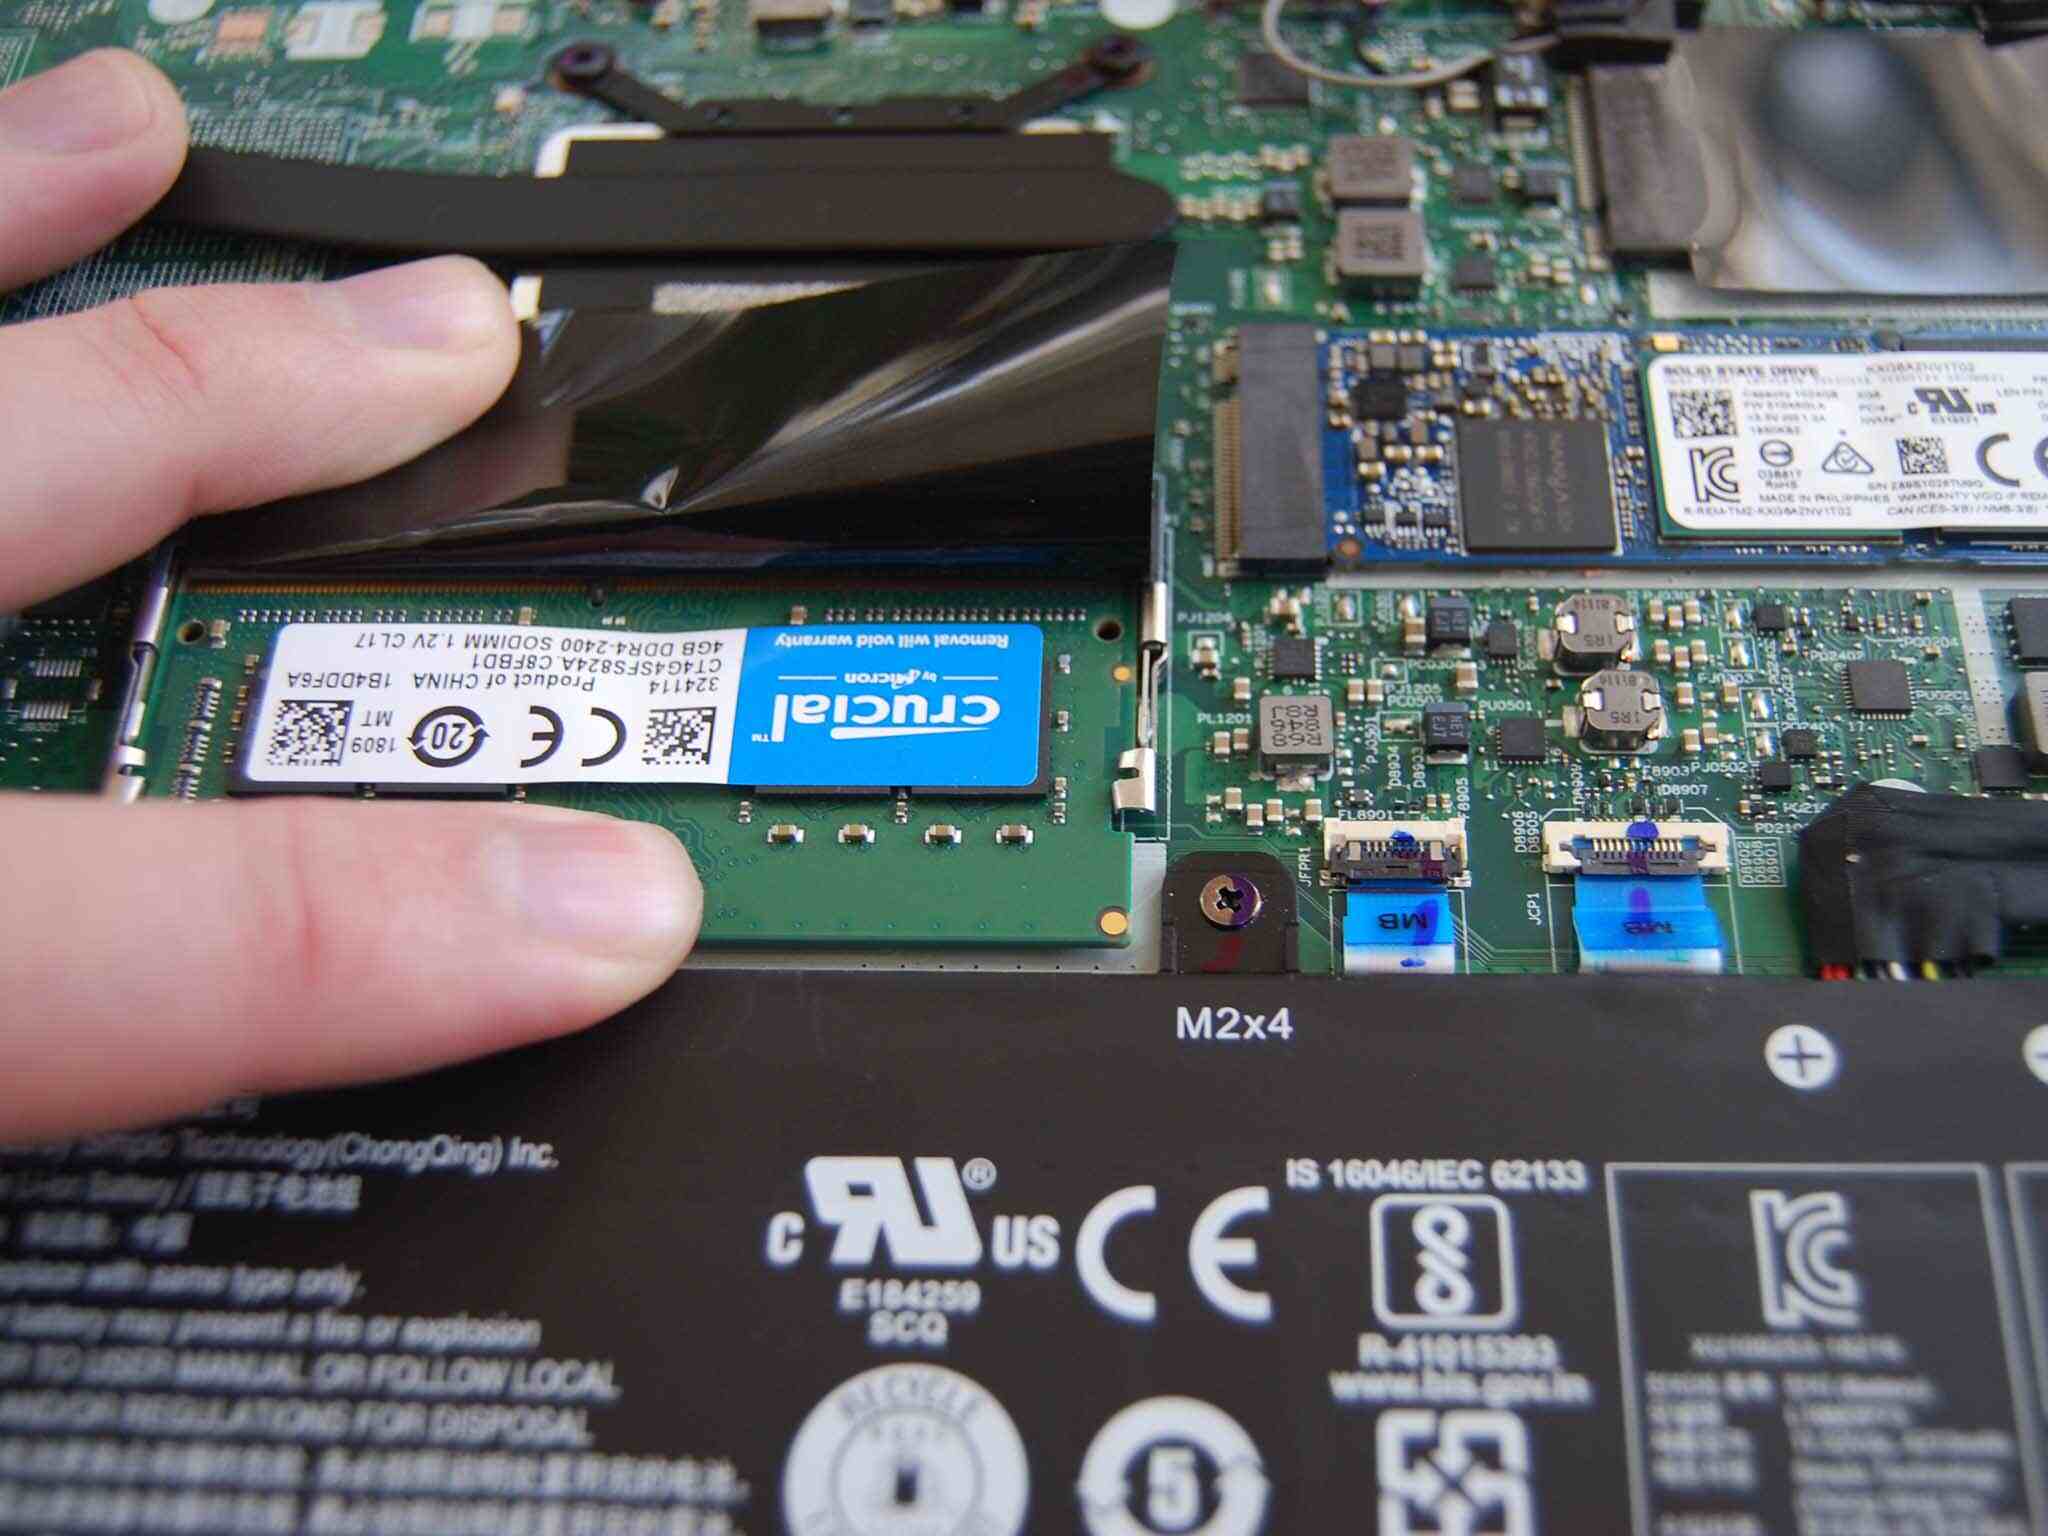
Step 7: Remove the existing RAM module
With the RAM slot cover open, you can now proceed to remove the existing RAM module from your Lenovo laptop. Removing the old RAM is necessary to make space for the new module you will be installing.
Follow these steps to remove the existing RAM module:
- Handle the module with care: Before touching the RAM module, make sure to ground yourself by touching a grounded metal surface or wearing an anti-static wristband. This helps prevent any potential damage from electrostatic discharge.
- Locate the retaining clips or arms: The RAM module is held in place by retaining clips or arms on either side. These can be gently pushed aside to release the module.
- Release the retaining clips: Press outward on the retaining clips or arms until they move away from the sides of the RAM module.
- Remove the existing RAM module: Once the retaining clips are released, the RAM module should pop up at a slight angle. Carefully lift the module out of the slot, holding it by the edges, and set it aside in a safe location.
It is important to note that some laptops may have different mechanisms for securing the RAM module, such as screws or latches. Consult your laptop’s user manual or refer to online resources specific to your model if you encounter any variations.
When removing the RAM module, avoid touching the golden contacts on the bottom. These are sensitive and can be easily damaged by fingerprints or debris. If you accidentally touch them, use a clean, lint-free cloth to gently wipe them clean.
Once the existing RAM module is removed, place it in an anti-static bag or a safe location for storage. This ensures that it is protected from static electricity or physical damage, and also allows you to reinstall it if needed in the future.
By successfully removing the existing RAM module, you’re one step closer to upgrading the RAM on your Lenovo laptop. Next, you’ll be inserting the new RAM module in the empty slot to enhance your laptop’s performance and capabilities.
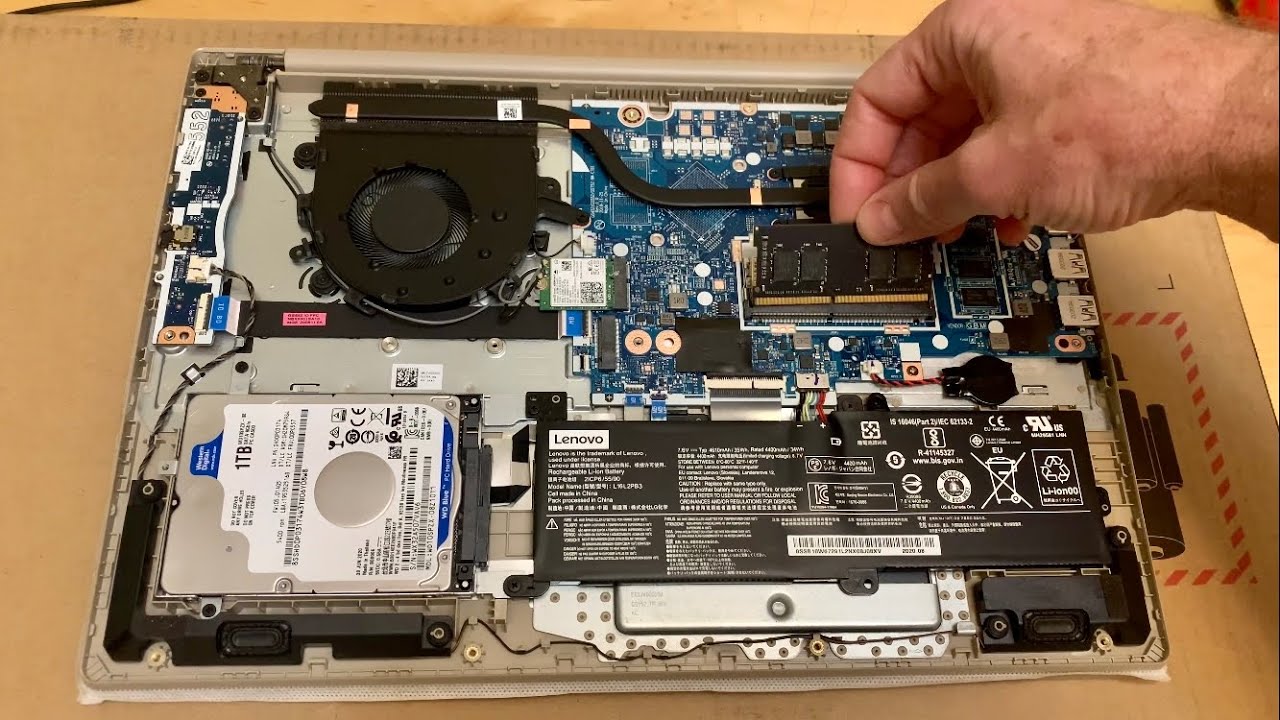
Step 8: Insert the new RAM module
Now that you have removed the existing RAM module, it’s time to insert the new RAM module into the empty slot on your Lenovo laptop. Adding the new module will increase the memory capacity of your laptop and improve its overall performance.
Follow these steps to insert the new RAM module:
- Ensure the module is compatible: Double-check that the new RAM module you are inserting is compatible with your Lenovo laptop. It should match the type and maximum capacity specified in your laptop’s user manual or manufacturer’s website.
- Handle the new module with care: As before, make sure you ground yourself by touching a grounded metal surface or wearing an anti-static wristband to prevent any static electricity from damaging the module.
- Align the module with the slot: Hold the new RAM module by the edges and align the notch or notches on the bottom with the corresponding tab(s) inside the RAM slot. Check for any markings or indicators on the slot that show how the module should be oriented.
- Insert the module at an angle: With the module aligned, insert it into the RAM slot at an angle, with the golden contacts facing downward. Gently push the module down and into the slot until it sits flat and the retaining clips on each side securely hold it in place.
- Apply equal pressure: Use your thumbs or fingers to firmly and evenly apply pressure to both ends of the module until it is fully seated in the RAM slot. You may hear a subtle click when the retaining clips engage.
It’s important to note that the process may vary slightly depending on your specific Lenovo laptop model. If you encounter any difficulties during the insertion, refer to your laptop’s user manual or reach out to Lenovo support for assistance.
Once the new RAM module is securely inserted into the slot, congratulations! You have successfully added more memory to your Lenovo laptop. The next step is to ensure that the module is properly secured in place and ready for use.
Step 9: Secure the RAM module in place
After inserting the new RAM module into the slot, it’s important to ensure that it is securely fastened in place. This will prevent any issues or instability during use and ensure optimal performance from your Lenovo laptop.
Follow these steps to secure the RAM module in place:
- Check the retaining clips: Ensure that the retaining clips on both sides of the RAM slot are fully engaged and holding the module securely. They should lock into place and keep the module from moving.
- Apply gentle pressure: Use your thumbs or fingers to apply gentle pressure to both ends of the module. This helps to ensure that it is fully seated and properly aligned within the slot.
- Listen for a click: As you apply pressure, listen for a subtle click sound, which indicates that the retaining clips have properly engaged with the module. This provides an additional confirmation that the module is securely in place.
- Inspect the module: Take a moment to visually inspect the module to ensure that it is sitting flat, with no visible gaps or misalignment. The golden contacts should not be exposed and should be fully inserted into the slot.
It’s worth noting that some laptops may have different mechanisms to secure the RAM module, such as screws or latches. If your Lenovo laptop requires additional steps to secure the module, refer to your user manual or consult online resources specific to your model.
By properly securing the RAM module in place, you can have confidence that it is ready to deliver improved performance and enhanced multitasking capabilities to your Lenovo laptop. The final steps involve closing the RAM slot cover and ensuring that all components are properly reassembled.
Step 10: Close the RAM slot cover
With the new RAM module securely in place, it’s time to close the RAM slot cover on your Lenovo laptop. Closing the cover not only protects the RAM module but also ensures that all components are properly reassembled and ready for use.
Follow these steps to close the RAM slot cover:
- Align the cover: Position the RAM slot cover over the RAM slots, ensuring that it aligns properly with the screw holes and fits snugly into place.
- Insert the screws: Using a small Phillips screwdriver, carefully insert and tighten the screws into the screw holes. Be careful not to overtighten the screws, as this could damage the cover.
- Secure all screws: Repeat the process for all screws, making sure that each one is securely fastened. This will help ensure that the RAM slot cover is properly closed and held in place.
Once you have closed the RAM slot cover and secured all the screws, visually inspect the cover to ensure that it is flush with the laptop’s bottom panel and sits evenly. Make sure there are no gaps or misalignment.
If you encounter any difficulties during the closing process or notice any issues with the RAM slot cover, refer to your laptop’s user manual or reach out to Lenovo support for further guidance.
With the RAM slot cover successfully closed, you have completed the physical installation of the new RAM module on your Lenovo laptop. The final steps involve reassembling the laptop battery (if applicable), powering on the laptop, and testing the new RAM.
Step 11: Reinstall the laptop battery (if applicable)
If your Lenovo laptop has a removable battery that you removed earlier in the RAM upgrade process, it’s now time to reinstall the battery. Reinstalling the battery will allow you to power on and fully utilize your upgraded laptop with the new RAM module.
Follow these steps to reinstall the laptop battery:
- Inspect the battery: Before reinstalling the battery, check for any visible damage or signs of wear. Ensure that the battery is clean and free from dust or debris.
- Align the battery: Hold the battery in your hand and align the metal contacts on the battery with the corresponding contacts inside the battery compartment. Make sure the battery is in the correct orientation.
- Slide the battery in: Gently slide the battery into the battery compartment, applying gentle pressure until it is fully seated. You may hear a click or feel a slight resistance when the battery is properly inserted.
- Secure the battery: Once the battery is properly inserted, use your fingers to press it down and ensure it is securely in place. It should not move or wiggle inside the compartment.
If your Lenovo laptop does not have a removable battery, you can skip this step and proceed to the next one. Non-removable batteries are designed to remain in the laptop and are not meant to be removed by the user.
It’s crucial to handle the battery with care to avoid any damage or accidental drops. If you’re having trouble reinstalling the battery or notice any abnormalities, consult your laptop’s user manual or contact Lenovo support for assistance.
With the battery successfully reinstalled (if applicable), you’re now ready to power on your Lenovo laptop and test the new RAM module to ensure it is working correctly.
Step 12: Turn on the laptop and test the new RAM
With the RAM upgrade complete and all components properly reassembled, it’s time to power on your Lenovo laptop and test the new RAM module. Testing the new RAM will confirm that it is working correctly and that your laptop is benefiting from the increased memory capacity.
Follow these steps to turn on the laptop and test the new RAM:
- Ensure the laptop is still unplugged: Double-check that your laptop is still disconnected from any power sources before proceeding.
- Reinsert the laptop battery (if applicable): If you had removed the laptop battery earlier during the RAM upgrade process, make sure it is properly reinserted.
- Press the power button: Press the power button on your laptop to turn it on. Wait patiently for it to boot up and reach the desktop screen.
- Check the new RAM capacity: Once your laptop has finished booting up, go to the operating system’s system information or task manager to check the new RAM capacity. It should reflect the increased capacity of the new RAM module.
- Test performance: To test the performance improvement, you can run multiple applications simultaneously or perform resource-intensive tasks that previously caused performance issues. Pay attention to any noticeable improvements in speed, responsiveness, and multitasking capabilities.
- Monitor stability: During the testing phase, keep an eye on the laptop’s stability. Look out for any system crashes, freezes, or unusual behavior that could indicate compatibility issues or faulty RAM. If any issues arise, consult a professional or contact Lenovo support for further assistance.
By testing the new RAM module, you can ensure that the upgrade was successful and that your Lenovo laptop is now benefiting from the increased memory capacity.
If everything is functioning as expected and there are no stability issues or performance concerns, congratulations! You have successfully completed the RAM upgrade process on your Lenovo laptop. Enjoy the improved performance and enhanced multitasking capabilities that the new RAM brings.
However, if you encounter any issues or have concerns about the new RAM module, it’s always best to seek professional assistance. Technicians or Lenovo support can provide further guidance and troubleshoot any potential problems.
Conclusion
Upgrading the RAM on your Lenovo laptop can be a game-changer when it comes to improving performance and enhancing multitasking capabilities. By following the step-by-step process outlined in this guide, you can successfully upgrade the RAM and take full advantage of the benefits it brings.
Throughout the RAM upgrade process, it’s crucial to ensure compatibility, gather the necessary tools, and take the appropriate safety precautions. Determining the maximum RAM capacity and locating the RAM slots on your Lenovo laptop is essential for a successful upgrade.
From there, removing the existing RAM module, inserting the new RAM module, and securing it in place ensures a proper installation. Closing the RAM slot cover and, if applicable, reinstalling the laptop battery completes the physical aspects of the upgrade.
Finally, turning on the laptop and testing the new RAM module confirms that the upgrade was successful and that your Lenovo laptop now benefits from increased memory capacity and improved performance.
Remember to consult your laptop’s user manual or reach out to Lenovo support if you encounter any difficulties or have specific questions about your laptop model’s RAM upgrade process.
By investing the time and effort to upgrade the RAM on your Lenovo laptop, you can enjoy smoother multitasking, faster application loading times, and an overall improved computing experience.
So, go ahead and give your Lenovo laptop the boost it deserves by upgrading the RAM. With the right tools, knowledge, and careful execution, you’ll be on your way to unlocking the full potential of your device.