Introduction
Welcome to the ultimate guide on upgrading the RAM of your Lenovo ThinkPad! If you’ve noticed that your laptop is running slow or struggling to handle multiple tasks simultaneously, then increasing its RAM capacity can significantly enhance its performance. By following the steps outlined in this guide, you can easily upgrade the RAM on your Lenovo ThinkPad and experience a noticeable boost in speed.
Random Access Memory (RAM) is a crucial component of your laptop’s hardware that affects its ability to run applications smoothly. By increasing the RAM, you provide the computer with additional temporary storage space to store and process data, reducing the reliance on slower disk storage. This increase in capacity allows your ThinkPad to handle more tasks simultaneously, resulting in improved multitasking capabilities and overall system performance.
In this guide, we will take you step-by-step through the process of upgrading the RAM on a Lenovo ThinkPad, from preparing for the upgrade to testing the new installation. We’ll cover important aspects such as checking compatibility, opening the laptop, identifying the RAM slots, removing the old RAM, inserting the new RAM, and closing the laptop securely. By the end of this guide, you’ll have all the knowledge and confidence you need to successfully upgrade your ThinkPad’s RAM.
Before we dive into the process, it’s essential to note that upgrading the RAM on a ThinkPad may void any existing warranty or coverage. So, if your laptop is still under warranty, it’s advisable to check with the manufacturer or authorized service center before proceeding with the upgrade. With that in mind, let’s get started with preparing for the RAM upgrade to unleash the full potential of your Lenovo ThinkPad!
Preparing for the Upgrade
Before diving into the process of upgrading the RAM on your Lenovo ThinkPad, there are a few essential steps to take to ensure a smooth and successful upgrade. Here’s what you need to do before getting started:
- Gather the necessary tools: To proceed with the RAM upgrade, you will need a small Phillips screwdriver, an anti-static wrist strap, and a clean, well-lit workspace. Make sure you have these items on-hand before beginning the process.
- Backup your data: As a precautionary measure, it’s crucial to back up any important data on your ThinkPad. Although the RAM upgrade itself shouldn’t impact your data, accidents can happen during the process. Taking a few minutes to back up your files guarantees that no data will be lost in case something unexpected occurs.
- Review the manufacturer’s documentation: Lenovo provides detailed documentation for their ThinkPad models, including instructions on how to upgrade various components, including RAM. Before proceeding, it’s advisable to review the official manual or online resources specific to your ThinkPad model. This step will help familiarize you with the process and any model-specific considerations.
- Ensure a static-free environment: Static electricity can damage sensitive electronic components, so it’s essential to work in a static-free environment. You can mitigate the risk by wearing an anti-static wrist strap throughout the process. Additionally, working on a non-static surface, such as a wooden table or an anti-static mat, can further minimize the chance of static discharge.
- Disconnect the power and remove the battery: Prior to opening your ThinkPad, it’s crucial to disconnect the power supply and remove the battery. This step ensures your safety and prevents any potential damage to the laptop. Most ThinkPads have a quick release mechanism for the battery, but if you’re unsure, refer to the manufacturer’s documentation for guidance.
By following these preparatory steps, you’ll set yourself up for a successful RAM upgrade on your Lenovo ThinkPad. With your tools gathered, data backed up, documentation reviewed, and the necessary precautions taken, you’re now ready to proceed with the actual upgrade process. In the next section, we will explore how to check the compatibility of the new RAM and verify that it meets the requirements for your ThinkPad model.
Checking Compatibility
Before purchasing a new RAM module for your Lenovo ThinkPad, it’s crucial to ensure compatibility with your laptop model. Here are the steps to check the compatibility:
- Check the ThinkPad model: Start by identifying the exact model of your ThinkPad. You can find this information on the underside of the laptop or by accessing the system information through the operating system. Knowing the correct model is crucial for finding the appropriate RAM specifications.
- Determine the maximum RAM capacity: Next, find out the highest amount of RAM your ThinkPad model can support. This information can be found in the official manufacturer documentation, such as the user manual or specifications sheet. It’s essential to know the maximum capacity to ensure you do not exceed it when purchasing a new RAM module.
- Identify the RAM type and speed: Different ThinkPad models support different types and speeds of RAM. Consult the manufacturer documentation or the official website to determine the RAM type and speed compatible with your ThinkPad. Common RAM types include DDR3, DDR4, and DDR4 SO-DIMM. Ensure compatibility by matching the type and speed of the existing RAM or the specifications mentioned for your ThinkPad model.
- Consider the form factor: ThinkPads can accommodate various form factors, such as standard DIMMs or smaller SO-DIMMs for more compact models. Verify the form factor required for your ThinkPad model to ensure the RAM module you purchase fits correctly.
- Identify the number of slots: Take note of the number of RAM slots available in your ThinkPad. This information determines the configuration options available for upgrading the RAM. Some laptops have only one slot, while others may have two or more. Knowing the number of slots helps determine whether you should replace the existing RAM module or add an additional one.
By following these steps, you can ensure compatibility between the new RAM module and your Lenovo ThinkPad. Remember to double-check all the specifications before making a purchase. Now that you have confirmed the compatibility, it’s time to proceed with the physical installation of the RAM module. In the next section, we will discuss how to safely shut down your laptop and disconnect any external devices before starting the upgrade process.
Shutting Down and Disconnecting
Before starting the physical installation of the new RAM module on your Lenovo ThinkPad, it’s important to properly shut down the laptop and disconnect any external devices. Follow these steps:
- Save and close all open programs: Begin by saving any unsaved work and closing all open programs. This ensures your data is saved and prevents any potential issues during the shut down process.
- Disconnect from power: Unplug the power adapter from your ThinkPad and remove any other peripherals connected to it, such as USB flash drives or external hard drives.
- Remove the battery (if applicable): If your ThinkPad has a removable battery, you should remove it at this stage. Refer to the manufacturer’s documentation for instructions on how to safely remove the battery. If your ThinkPad model does not have a removable battery, proceed to the next step.
- Press and hold the power button: Press and hold the power button for a few seconds to completely shut down the laptop. This step ensures that any remaining power is drained, preventing any potential electrical issues during the installation process.
- Disconnect external devices: If you have any external devices connected to your ThinkPad, such as monitors, keyboards, or mice, disconnect them to avoid any accidental damage or interference during the upgrade.
- Ground yourself: Before touching any internal components of your laptop, it’s essential to ground yourself to prevent static discharge. You can do this by wearing an anti-static wrist strap or by touching a grounded metal object, such as a doorknob or a metal table leg.
By properly shutting down your ThinkPad and disconnecting any external devices, you minimize the risk of damage and ensure a safe and smooth upgrade process. Now that you’ve taken these necessary steps, you’re ready to open your ThinkPad and access the RAM slots. In the next section, we will guide you on how to open the laptop and identify the RAM slots.
Opening the Laptop
Opening your Lenovo ThinkPad is a crucial step in the RAM upgrade process. Follow these steps carefully to access the internal components:
- Place the laptop upside down: Flip your ThinkPad over, so the bottom of the laptop is facing up. Ensure you have a clean, stable surface to work on.
- Locate and remove the bottom panel: Look for the panel(s) on the bottom of your ThinkPad that provides access to the internal components. The specific location may vary depending on your ThinkPad model, but commonly, there is a single large panel or multiple smaller panels held in place by screws. Use a Phillips screwdriver to remove the screws securing the panel(s).
- Put the screws aside: As you remove the screws, place them in a safe location, such as a small container or magnetic tray. Keeping track of the screws is essential to ensure you can reassemble the laptop correctly later.
- Take off the bottom panel: Once you have removed all the screws, carefully lift and remove the bottom panel from the laptop. Be gentle to avoid damaging any internal components.
- Locate the RAM slots: With the bottom panel removed, you should now have a clear view of the internal components. Look for the RAM slots, which are rectangular slots typically located near the center of the laptop. They are usually labeled or color-coded for easy identification.
- Take note of any existing RAM modules: Before proceeding with the upgrade, observe how many RAM modules are currently installed and note their positions. This information will help you determine whether you need to replace or add RAM modules.
By carefully following these steps, you can easily access the internal components of your Lenovo ThinkPad and locate the RAM slots. Remember to handle the laptop with care, keeping track of the screws and gently removing the bottom panel. In the next section, we’ll dive into identifying the RAM slots and preparing to remove the old RAM module(s).
Identifying the RAM Slots
Once you have opened your Lenovo ThinkPad and gained access to the internal components, the next step is to identify the RAM slots. Follow these steps to locate the RAM slots and determine the configuration of your current RAM:
- Observe the internal layout: Take a close look at the internal layout of your ThinkPad. The RAM slots are typically rectangular in shape and are located near the center or side of the laptop’s motherboard. They may be positioned vertically or horizontally depending on your ThinkPad model.
- Look for labels or markings: Some laptop manufacturers label or mark the RAM slots for easy identification. Look for any labels such as “RAM” or markings denoting the position of the slots. Additionally, some laptops may have color-coded RAM slots to indicate the proper installation sequence.
- Take note of the number of RAM slots: Count the number of RAM slots available in your ThinkPad. This information will help you determine the upgrade options available to you. Some laptops have only one or two slots, while others may have more, allowing for greater RAM expansion.
- Identify the current RAM configuration: Observe how many RAM modules are currently installed in your ThinkPad and note their positions. Some laptops come with one pre-installed RAM module, while others may have multiple modules. It’s important to determine the current configuration to plan your RAM upgrade accordingly.
- Check the specifications of the current RAM: Take note of the specifications of the RAM module(s) currently installed, such as the type (e.g., DDR3, DDR4), capacity (e.g., 4GB, 8GB), and speed (e.g., 2400MHz, 3200MHz). This information will help you choose the right RAM module(s) for your upgrade.
By carefully observing the internal layout and examining the labels and markings, you can easily identify the RAM slots in your Lenovo ThinkPad. Taking note of the number of slots, current RAM configuration, and specifications will help you plan your RAM upgrade effectively. In the next section, we will guide you through the process of removing the old RAM module(s) safely.
Removing the Old RAM
Now that you have identified the RAM slots in your Lenovo ThinkPad, it’s time to remove the old RAM module(s) in preparation for the upgrade. Follow these steps to safely remove the old RAM:
- Ensure the laptop is powered off and disconnected: Before handling any internal components, make sure your ThinkPad is completely powered off and disconnected from the power source. This ensures your safety and prevents any potential damage.
- Ground yourself: To avoid any static discharge that could harm the laptop’s components, ensure you are properly grounded. Wear an anti-static wrist strap or touch a grounded metal object before proceeding.
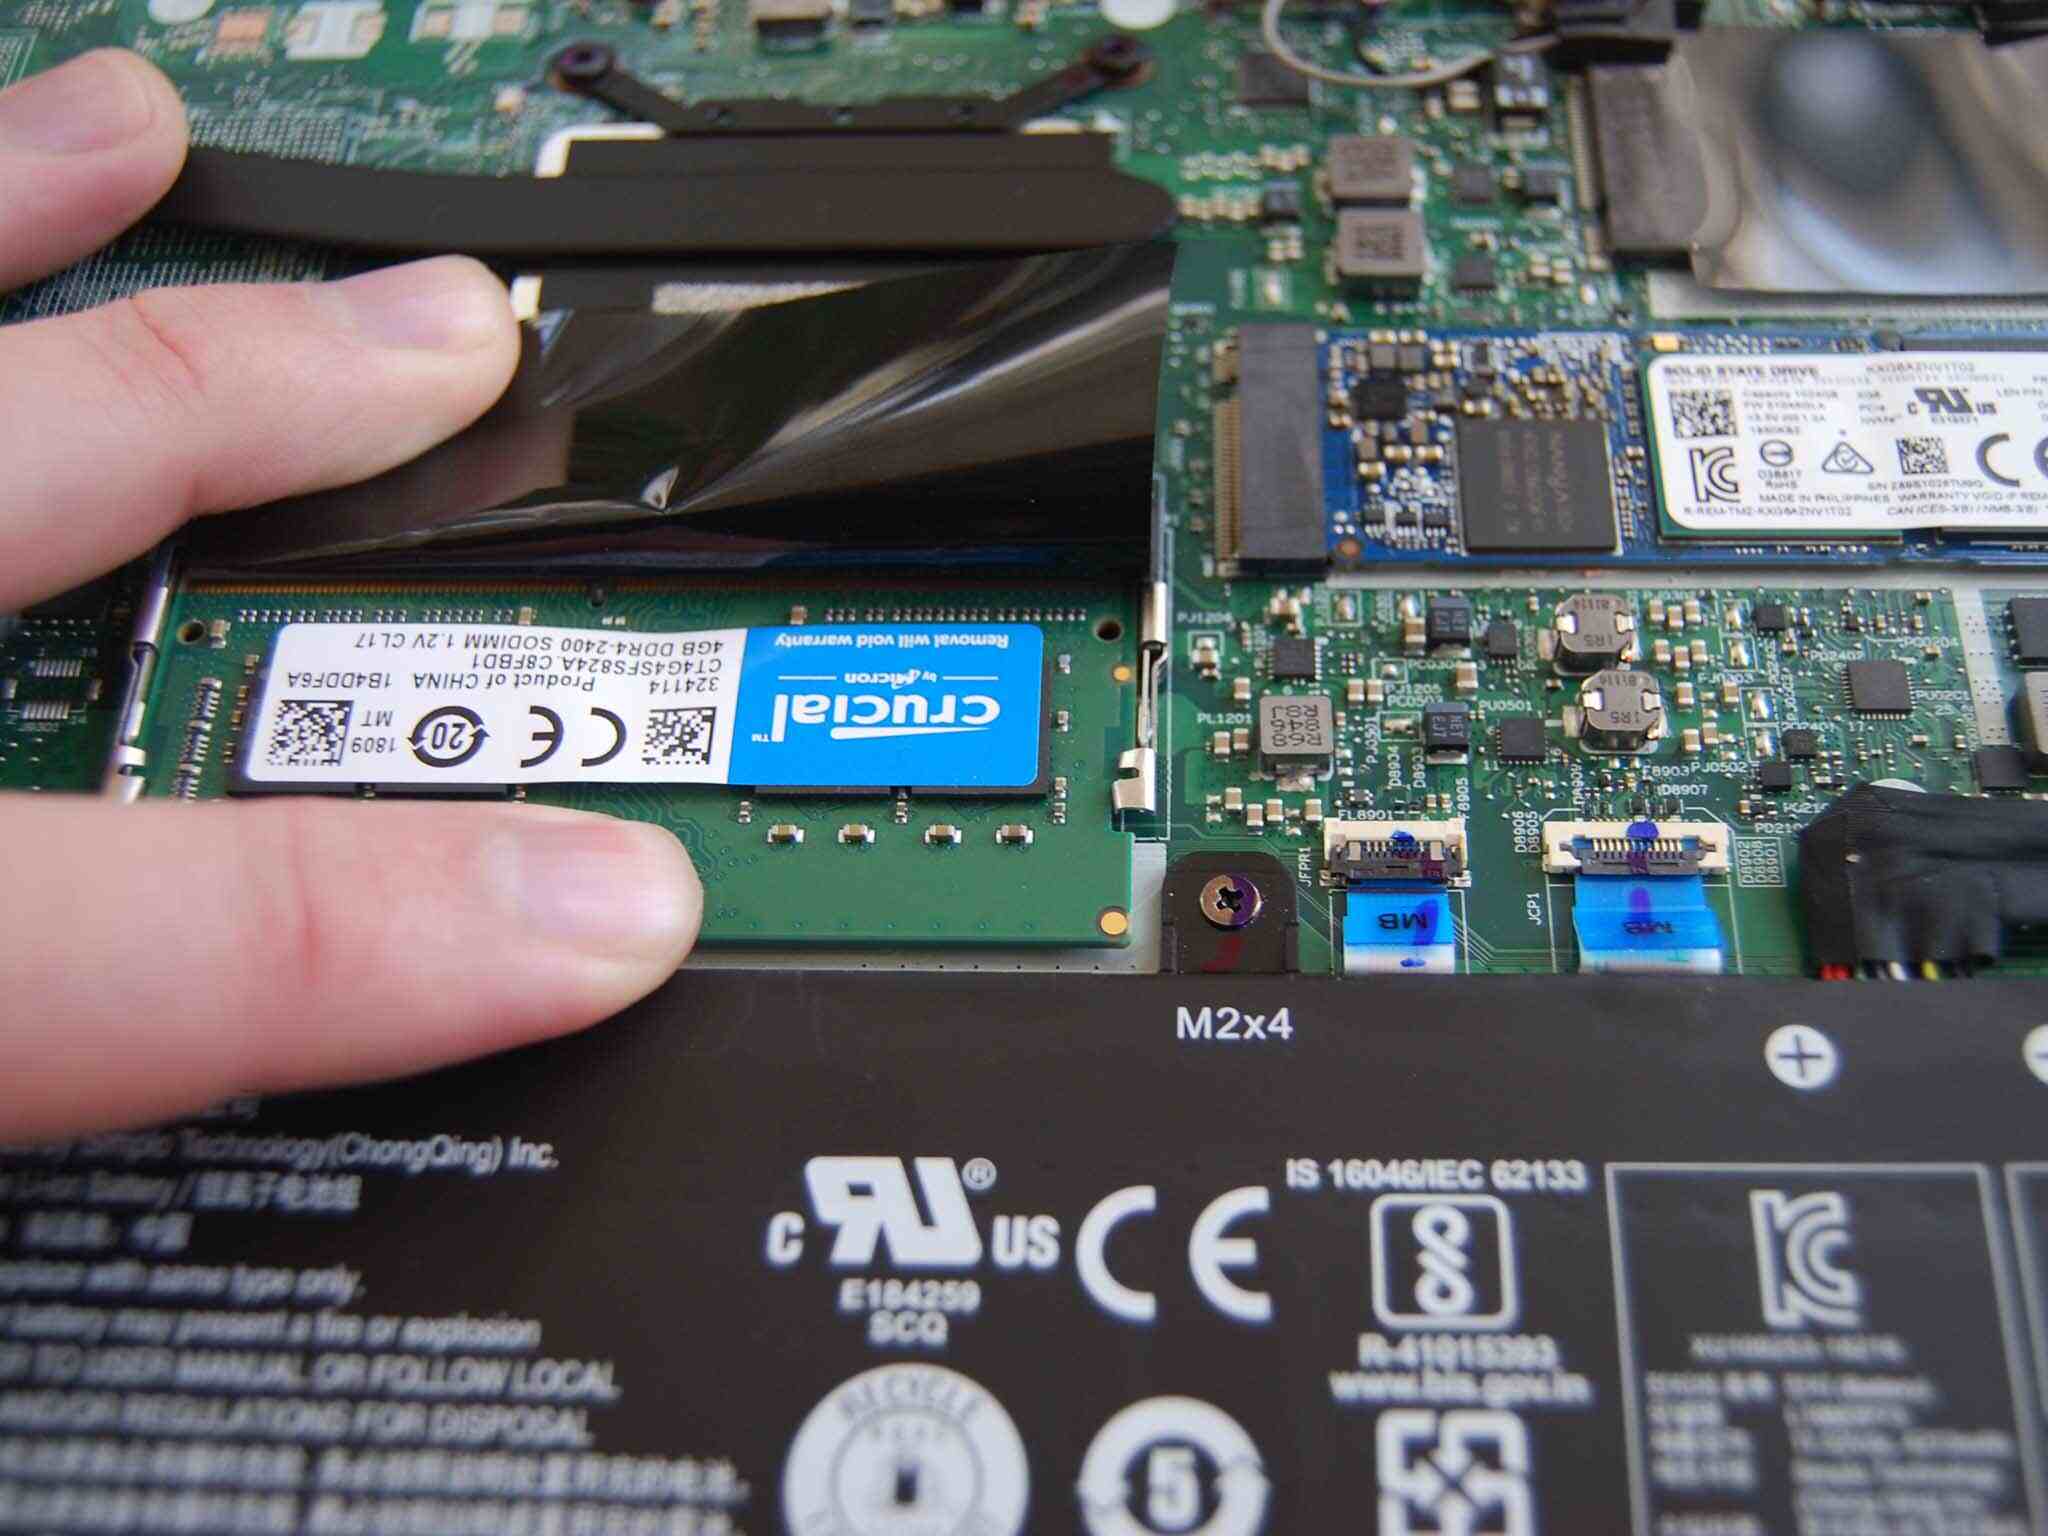
- Locate the retention clips: Identify the retention clips that hold the RAM module(s) in place. These clips are typically located on either side of the module or at the top and bottom. Gently pull these clips away from the module to release it.
- Remove the old RAM module: Once the retention clips are released, the old RAM module will pop up slightly. Carefully hold the module by its edges and pull it straight out of the slot. Avoid touching the gold contacts on the module as much as possible.
- Place the old RAM module in an anti-static bag: To protect the old RAM module from static electricity and potential damage, place it in an anti-static bag. These can be purchased online or at electronic stores. Alternatively, wrap the module in an anti-static cloth.
- Repeat for additional RAM modules (if applicable): If you have multiple RAM modules installed, repeat the previous steps for each module, removing them one at a time. Note down the order in which the modules were removed so you can reinstall them correctly later.
By following these steps, you can safely remove the old RAM module(s) from your Lenovo ThinkPad. Remember to handle the module(s) with care, avoiding any unnecessary contact with the gold contacts. Placing the old module(s) in an anti-static bag or wrapping them in an anti-static cloth ensures their protection. In the next section, we will discuss how to insert the new RAM module(s) into the vacant slots.
Inserting the New RAM
With the old RAM module(s) removed from your Lenovo ThinkPad, it’s time to insert the new RAM module(s) into the vacant slots. Follow these steps carefully to ensure a proper installation:
- Take the new RAM module out of its packaging: Remove the new RAM module from its anti-static bag or wrapping. Hold the module by its edges to avoid touching the gold contacts.
- Locate the RAM slot: Identify the vacant RAM slot where you will be inserting the new module. Align the notch on the module with the corresponding notch on the slot to ensure proper alignment.
- Insert the RAM module at a 45-degree angle: Holding the RAM module at a slight angle, carefully insert it into the slot. Push it in until the module is fully seated and the retention clips on both sides click into place. Ensure that the module is securely inserted and level with the slot.
- Apply even pressure to secure the module: Once the RAM module is inserted, apply even pressure to both ends of the module until the retention clips fully secure it. You should feel a slight resistance as the clips lock in place.
- Repeat for any additional RAM modules (if applicable): If you are installing multiple RAM modules, repeat the previous steps for each module, ensuring they are properly aligned and securely inserted into their respective slots.
- Verify the installation: Once all the new RAM modules are installed, double-check that they are properly seated in the slots and that the retention clips are fully secured. Ensure that the modules are level and aligned correctly.
By following these steps, you can successfully insert the new RAM module(s) into your Lenovo ThinkPad. Remember to handle the modules with care, avoid touching the gold contacts, and ensure they are properly aligned and securely seated in the slots. With the new RAM installed, the next step is to close the laptop and test the upgrade. We will discuss this in detail in the next section.
Closing the Laptop
Once you have successfully installed the new RAM module(s) in your Lenovo ThinkPad, it’s time to close the laptop and secure the internal components. Follow these steps to ensure a proper closure:
- Retrieve the bottom panel: Locate the bottom panel that you removed earlier and ensure it is clean and free of any dust or debris. If necessary, use a soft cloth or compressed air to remove any particles from the panel.
- Align the bottom panel: Position the bottom panel back onto the laptop, aligning it with the screw holes and the edges of the laptop’s chassis. Ensure that no cables or connectors are caught beneath the panel.
- Insert and tighten the screws: Using the Phillips screwdriver, reinsert and tighten the screws that secure the bottom panel in place. Start with the corners and work your way around, ensuring even and firm tightening of each screw. Be careful not to over-tighten them, as it could damage the screws or strip the threads.
- Verify the closure: Once all the screws are tightened, gently press down on the edges of the bottom panel to ensure it is securely in place. Make sure there are no gaps or loose sections.
- Reconnect the battery (if applicable): If you removed the battery during the upgrade process and your ThinkPad has a removable battery, follow the manufacturer’s instructions to reinsert and secure it back into place.
- Connect the power and external devices: Reconnect the power adapter to your ThinkPad and, if necessary, reconnect any external devices you previously disconnected. Ensure that all connections are secure.
By following these steps, you can safely and securely close your Lenovo ThinkPad after the RAM upgrade. Make sure the bottom panel is properly aligned, all screws are tightened without over-tightening, and the battery (if applicable) is reconnected. With the laptop closed, it’s time to move on to the next section and test the RAM upgrade to ensure its success.
Testing the Upgrade
After upgrading the RAM in your Lenovo ThinkPad, it’s important to test the new installation to ensure that it was successful and the laptop is functioning optimally. Follow these steps to test the RAM upgrade:
- Power on the ThinkPad: Press the power button to turn on your ThinkPad. Allow it to boot up and reach the desktop or login screen.
- Monitor system performance: As you use your laptop, pay attention to its performance and responsiveness. Open multiple applications or tasks simultaneously to assess how well your ThinkPad handles them. Notice if there is any noticeable improvement in multitasking abilities or overall speed.
- Check system information: Access the system information on your ThinkPad to verify that the new RAM is recognized and configured correctly. This information can usually be found in the BIOS settings or through the operating system’s system information panel.
- Run memory-intensive programs: Launch memory-intensive programs or applications, such as video editing software or virtual machines, to test how well your ThinkPad handles their memory requirements with the upgraded RAM. Monitor performance and ensure smooth operation without significant slowdowns or freezes.
- Perform a RAM stress test (optional): If you want to thoroughly evaluate the stability and performance of your upgraded RAM, you can run a RAM stress test. There are various software tools available that can test the RAM’s stability under high loads and check for any errors or issues.
- Repeat tests over time: It’s a good idea to periodically test your ThinkPad’s performance over time to ensure that the new RAM continues to function properly. Regularly monitor its responsiveness and speed to identify any potential issues early on.
By following these steps and conducting thorough testing, you can verify the success of the RAM upgrade on your Lenovo ThinkPad. Monitoring system performance, checking system information, and running memory-intensive tasks will help you assess the effectiveness of the new RAM. If any issues or abnormalities arise, double-check the installation and compatibility or seek further assistance. With the successful RAM upgrade, your ThinkPad is now equipped to handle more demanding tasks and provide a smoother overall user experience.
Conclusion
Congratulations on successfully upgrading the RAM of your Lenovo ThinkPad! By following the steps outlined in this comprehensive guide, you have taken a significant step towards improving the performance and multitasking capabilities of your laptop. Increasing the RAM capacity provides your ThinkPad with additional temporary storage space, allowing it to handle more tasks simultaneously and improving overall system performance.
Throughout this guide, we covered essential aspects of the RAM upgrade process, from preparing for the upgrade and checking compatibility to opening the laptop, identifying the RAM slots, removing the old RAM, inserting the new RAM, closing the laptop securely, and testing the upgrade.
Remember to take necessary precautions when working with internal laptop components, such as grounding yourself and ensuring a static-free environment. Properly identifying the RAM slots, selecting compatible RAM modules, and securely installing them into the vacant slots are crucial steps for a successful upgrade. Additionally, testing the new RAM to ensure proper functionality and stability is essential to fully benefit from the upgrade.
It’s important to note that upgrading the RAM on your ThinkPad may void any existing warranty or coverage. If your laptop is still under warranty, it’s advisable to check with the manufacturer or authorized service center before proceeding with the upgrade.
Upgrading the RAM is just one of many ways to enhance the performance of your laptop. Keep your ThinkPad well-maintained and consider other optimization techniques, such as updating drivers, managing startup programs, and regularly cleaning out unnecessary files, to optimize its performance further.
By upgrading the RAM, you have unlocked the full potential of your Lenovo ThinkPad, allowing it to handle more demanding tasks and provide a smoother user experience. Enjoy the improved multitasking capabilities and enhanced overall performance that comes with the upgraded RAM!