Introduction
Welcome to this guide on how to add RAM to your Lenovo laptop. If you’ve noticed that your laptop is running slower than usual or struggling to handle multiple applications, adding more RAM can be a cost-effective way to boost its performance.
Random Access Memory (RAM) plays a crucial role in a laptop’s performance by providing temporary storage for data that the CPU needs to access quickly. By increasing the amount of RAM in your laptop, you can improve its multitasking capabilities, speed up program loading times, and enhance overall system responsiveness.
Before we dive into the step-by-step process, it’s important to note that not all laptops can have their RAM upgraded. Some models come with soldered RAM modules, which means they are permanently attached to the motherboard and cannot be replaced or expanded. However, many Lenovo laptops have accessible RAM slots that allow for easy upgrades.
In this guide, we’ll walk you through the process of checking your laptop’s compatibility, gathering the necessary tools, locating the RAM slots, removing existing RAM if needed, inserting the new RAM module, securing it in place, and verifying that the laptop recognizes the added RAM. We’ll also provide troubleshooting tips for common issues that may arise during the upgrade process.
Adding RAM to your Lenovo laptop can breathe new life into your computer and help it handle more demanding tasks. So, let’s jump in and get started on upgrading your laptop’s RAM!
Checking Compatibility
Before you start upgrading the RAM on your Lenovo laptop, it’s essential to ensure that the new RAM module you purchase is compatible with your laptop’s specifications. Here are the steps to check compatibility:
- Check the maximum RAM capacity: Look up your laptop’s model on the Lenovo website or refer to the user manual to find the maximum amount of RAM your laptop can support. This information will help you determine the maximum size and number of RAM modules you can install.
- Check the RAM type and speed: Find out the type and speed of RAM your laptop requires. The most common types are DDR3 and DDR4, and they come in different speed ratings, such as 1333MHz or 2400MHz. Make sure to match the type and speed specified by your laptop’s manufacturer.
- Check the form factor: Determine the physical size and form factor of the RAM module your laptop supports. Common form factors include SO-DIMM (Small Outline Dual Inline Memory Module) for laptops and DIMM (Dual Inline Memory Module) for desktops. Ensure that the module you purchase matches the form factor of your laptop.
- Check the voltage: Some laptops require specific voltage levels for the RAM modules to function correctly. Check if your laptop has any voltage requirements for RAM compatibility and ensure that the module you choose meets those specifications.
Once you have gathered this information, you can confidently shop for RAM modules that are compatible with your Lenovo laptop. Keep in mind that it’s advisable to purchase RAM modules from reputable manufacturers to ensure reliability and compatibility.
Checking compatibility is crucial as using incompatible RAM modules can result in system instability, performance issues, or even permanent damage to your laptop. By following these steps, you can ensure a seamless RAM upgrade process that will enhance your laptop’s performance without any compatibility concerns.
Gathering the Necessary Tools
Before diving into the process of adding RAM to your Lenovo laptop, it’s essential to gather the necessary tools. Having the right tools at hand will make the upgrade process smoother and more efficient. Here are the tools you’ll need:
- Screwdriver: Depending on your laptop model, you may need a small Phillips or Torx screwdriver to remove the panel that grants access to the RAM slots. Check the laptop’s user manual or online resources to determine the type of screwdriver required.
- Antistatic wrist strap (optional): While not mandatory, using an antistatic wrist strap can help protect the laptop’s sensitive components from electrostatic discharge (ESD). If you have one available, it’s recommended to wear it to reduce the risk of potential damage caused by static electricity.
- Clean cloth or compressed air canister: It’s always wise to have a clean cloth or compressed air canister to remove any dust or debris that might have accumulated inside the laptop’s internals. Keeping the laptop clean helps maintain optimal performance and ensures a seamless upgrade process.
- New RAM module: Of course, you’ll need the new RAM module that you’ve determined is compatible with your Lenovo laptop. Make sure it’s properly packaged and protected to avoid any damage during shipping or handling.
- Static-free work surface: Find a suitable work surface that is free of static electricity, such as a wooden table or a non-metallic desk. This will help prevent any accidental discharge that could damage the RAM module or other components.
By having these tools ready before you begin, you’ll be prepared to tackle the RAM upgrade process without any unnecessary delays. It’s always a good idea to gather everything you need in one place to create a focused and efficient work environment.
Powering Down the Laptop
Before you start working on your Lenovo laptop to add RAM, you need to ensure that the laptop is powered down and disconnected from any power sources. Follow these steps to power down your laptop:
- Save your work: Before shutting down your laptop, save any unsaved work and close all open applications. This will prevent data loss and ensure a smooth startup after the RAM upgrade.
- Shut down the operating system: Click on the “Start” menu in the bottom left corner of your screen, then select “Shut down” from the options. Alternatively, you can press the “Windows key + X” and choose “Shut down or sign out” and then select “Shut down”. Wait for your operating system to shut down completely.
- Disconnect external devices: Unplug any external devices, such as USB drives, printers, or external monitors, from your laptop. This will prevent any accidental damage to these devices during the upgrade process and make it easier to handle the laptop.
- Disconnect the power adapter: Unplug the power adapter from the laptop and also remove the battery if it’s removable. This step is crucial to ensure your safety and prevent any electrical damage during the RAM installation.
Once you have completed these steps, you can be confident that your laptop is safely powered down and ready for the RAM upgrade. Take a moment to double-check that there are no power sources connected to your laptop before proceeding to the next steps.
Note that powering down the laptop helps to prevent any potential electrical shock or damage to both you and the laptop’s internal components. It is always important to prioritize safety and take the necessary precautions before working on any hardware upgrades.
Locating the RAM Slots
Once you have powered down your Lenovo laptop, the next step is to locate the RAM slots. These slots are where you will insert the new RAM module. Here’s how you can find the RAM slots:
- Refer to the user manual: If you have the user manual that came with your laptop, it’s a great resource to find the location of the RAM slots. Look for a section that provides information on the internal components or hardware upgrades.
- Search online resources: If you don’t have the user manual or prefer an online guide, you can search for your specific Lenovo laptop model online. Look for the official Lenovo support website or reputable tech forums where you can find specific instructions and visuals on locating the RAM slots.
- Inspect the bottom panel: In many Lenovo laptop models, the RAM slots are located on the bottom panel of the laptop. Look for a small rectangular or square panel that can be easily removed. This panel is typically secured by screws or clips. It is important to note that the location of the RAM slots may vary depending on the laptop model.
- Check keyboard or top panel: In some laptop models, the RAM slots are located under the keyboard or beneath a top panel. Carefully remove the keyboard or top panel by following the specific instructions for your laptop model. Please take extra caution to avoid damaging any components during this process.
Once you have located the RAM slots, take note of how many slots are available and whether any of them are already occupied by an existing RAM module. This information will help you plan the RAM upgrade and determine if you need to remove any existing modules before inserting the new one.
Remember to handle the laptop with care and follow any instructions or guidelines provided by Lenovo for your specific model. Taking the time to locate the RAM slots accurately will ensure a smooth upgrade process and minimize the risk of accidentally damaging the laptop or other internal components.
Removing the Existing RAM (if applicable)
Before inserting the new RAM module, it’s important to check if your Lenovo laptop has any existing RAM modules that need to be removed. Some laptops may come with one or more pre-installed RAM modules, while others may have empty slots ready for upgrades. Here’s how you can remove the existing RAM, if applicable:
- Power down and disconnect: Ensure that your laptop is powered down and disconnected from any power sources before proceeding with this step. This is important for your safety and to prevent any electrical damage to the laptop or its components.
- Locate the existing RAM modules: Refer to the earlier section on locating the RAM slots to find the existing RAM modules in your laptop. They are typically small rectangular or square modules inserted into the RAM slots.
- Release the locking mechanism: Look for the small metal retaining clips or levers on each side of the RAM module. Gently pull these clips away from the sides or push them outward to release the module. The module should pop up at an angle once released.
- Remove the RAM module: Hold the module by its edges and carefully lift it out of the RAM slot at the angle it popped up. Avoid touching the gold contacts on the bottom of the module to prevent damage from static electricity or oils on your fingers.
If your laptop has multiple RAM modules, repeat the above steps for each module that you need to remove. Keep in mind that you may need to remove existing modules to make room for the new RAM module or to upgrade to higher-capacity modules.
Once you have removed the existing RAM module(s), set them aside in a safe place. If you plan to sell or reuse them, be sure to handle them with care and store them in an anti-static bag or container to prevent any damage.
It’s important to note that not all laptops may have removable or upgradable RAM. Some models come with soldered RAM that is permanently attached to the motherboard and cannot be replaced or upgraded. If your laptop falls into this category, you will not find any removable RAM modules.
By following these steps, you can safely remove existing RAM modules from your Lenovo laptop, if applicable, in preparation for installing the new RAM module.
Inserting the New RAM Module
Now that you’ve removed any existing RAM modules, if applicable, it’s time to insert the new RAM module into your Lenovo laptop. Follow these steps to ensure a successful installation:
- Handle the new RAM module carefully: Remove the new RAM module from its packaging without touching the gold contacts on the bottom. Hold it by its edges to prevent any static electricity discharge or damage.
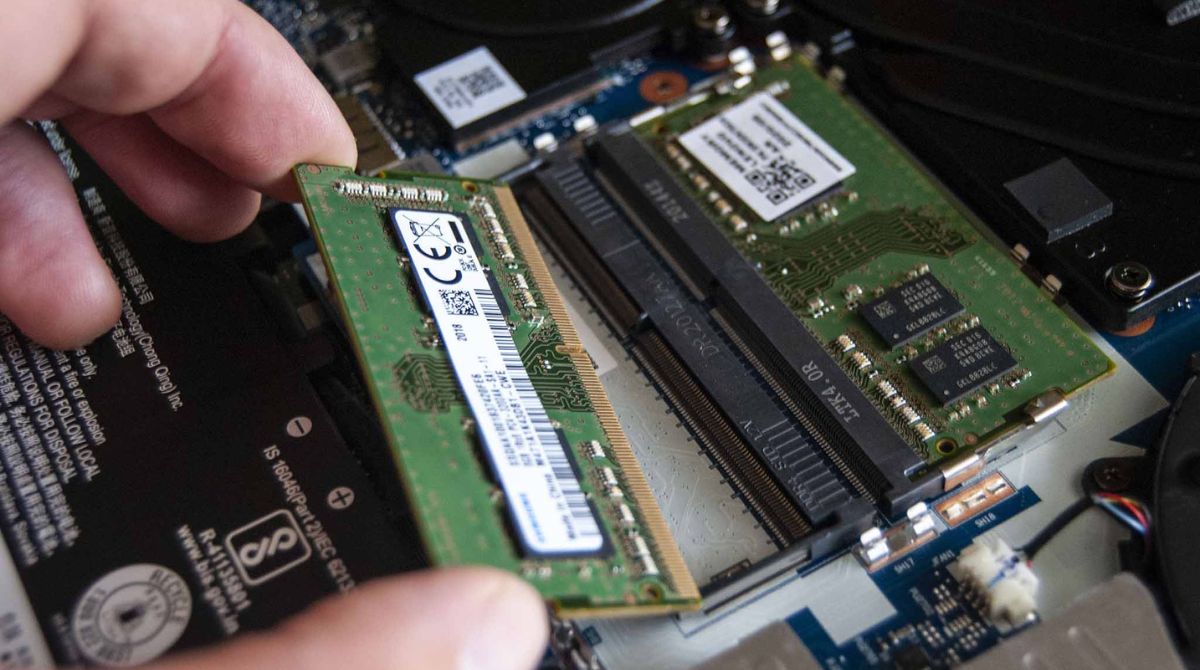
- Align the notch: On the bottom edge of the RAM module, you’ll notice a small notch or gap. This is called the notch key. Align the notch key on the RAM module with the corresponding slot key in the RAM slot of your laptop. This ensures that the module will fit in the slot in the correct orientation.
- Insert the RAM module at an angle: With the notch key aligned, insert the RAM module into the RAM slot at about a 30-degree angle. Make sure to insert it firmly and evenly until it is fully seated in the slot.
- Apply gentle pressure: Once the RAM module is fully inserted into the slot, apply gentle downward pressure on both sides of the module to secure it in place. You should hear a click or feel a slight resistance when the module is properly seated.
It’s important to note that some laptops may require different insertion angles or methods, so refer to the user manual or online resources specific to your Lenovo laptop model for detailed instructions.
If you are adding multiple RAM modules, repeat the above steps for each module, ensuring that you align the notch keys correctly and firmly insert each module.
With the new RAM module(s) securely inserted, the laptop is now ready for the final steps of the RAM upgrade process. In the next section, we will discuss how to secure the RAM module(s) in place and power on the laptop.
Securing the RAM Module
After inserting the new RAM module(s) into the RAM slots of your Lenovo laptop, it’s important to secure them in place to ensure they stay firmly connected. Follow these steps to properly secure the RAM module:
- Check alignment: Double-check that the notch key on the RAM module is aligned with the slot key in the RAM slot. This ensures that the module is inserted correctly and will be securely fastened.
- Apply even pressure: Using your fingers or the edge of your palm, apply even pressure on both sides of the RAM module, gently pushing it down towards the motherboard. This will help seat the module snugly in the slot.
- Listen for a click: As you apply pressure, you should hear a click or feel a slight resistance. This indicates that the RAM module is properly secured in place and fully connected to the motherboard.
- Check for any play: With the RAM module secured, gently wiggle it back and forth using light pressure. There should be minimal or no movement. If you notice any significant movement, remove the module and reinsert it, ensuring it is correctly aligned and firmly pushed down.
It’s important to ensure that the RAM module is securely fastened to avoid any connection issues or instability. A loose module may cause system errors or prevent the laptop from recognizing the added RAM.
Once you have secured the RAM module(s), take a moment to visually inspect the RAM slots. Ensure that all modules are seated properly and aligned evenly. Verify that all retention clips or levers are in the locked position to hold the modules securely in place.
With the RAM module(s) securely installed and properly aligned, you’re now ready to power on your Lenovo laptop and confirm that the new RAM is recognized and functioning correctly.
Powering on the Laptop
Now that you have successfully installed the new RAM module(s) in your Lenovo laptop, it’s time to power it on and ensure that the system recognizes the added memory. Follow these steps to power on your laptop:
- Double-check the connections: Before powering on the laptop, ensure that all cables and components are properly connected. Verify that the power adapter is securely plugged in and the battery, if removable, is inserted correctly.
- Press the power button: Locate the power button on your laptop, usually located on the top or side panel. Press and hold the power button for a few seconds until you see the laptop’s startup sequence or the manufacturer’s logo on the screen.
- Wait for the operating system to load: After turning on the laptop, wait for the operating system (such as Windows or macOS) to load. This process may take a few minutes, depending on your laptop’s specifications.
- Check system information: Once the operating system has loaded, go to the system settings or use a system information tool to verify that the new RAM is recognized by the laptop. The system information should display the total amount of RAM installed, including the newly added module(s).
If the new RAM is recognized and the total amount of memory is correct, congratulations! You have successfully upgraded the RAM in your Lenovo laptop. You can now enjoy improved performance and better multitasking capabilities.
If the new RAM is not recognized or there are any error messages, double-check that the RAM module(s) are correctly inserted and secured in the slots. Ensure that the module(s) are compatible with your laptop’s specifications, including type, speed, and capacity.
If you continue to experience issues, consider consulting the Lenovo support website, user forums, or contacting their customer support for further assistance. They can provide specific troubleshooting steps or determine if there are any underlying hardware or software compatibility issues.
By following these steps, you can power on your Lenovo laptop and confirm that the new RAM module(s) are functioning correctly. Enjoy the improved performance and enhanced multitasking capabilities that the upgraded RAM brings!
Verifying the New RAM is Recognized
After powering on your Lenovo laptop with the newly installed RAM module(s), it’s important to verify that the system recognizes and correctly utilizes the added memory. Here are some steps to help you verify the new RAM is recognized:
- Access system information: Open the system information tool on your laptop. This can usually be found in the Control Panel or by right-clicking on the “My Computer” or “This PC” icon and selecting “Properties”.
- Check total installed memory: Look for the total installed memory or RAM information in the system information. It should display the total amount of RAM installed in your laptop. Ensure that the displayed amount matches the capacity of the newly added RAM module(s).
- Run a memory diagnostic tool: Consider running a memory diagnostic tool to further ensure the functionality and compatibility of the new RAM. Windows users can use the built-in Windows Memory Diagnostic Tool, while third-party tools like Memtest86 can be used for more in-depth testing. These tools can help identify any potential issues with the RAM modules.
- Monitor system performance: Observe your laptop’s performance after the RAM upgrade. Pay attention to any noticeable improvements in multitasking capabilities, application load times, and overall system responsiveness. If you experience smoother performance with reduced instances of lag or slowdowns, it indicates that the new RAM is recognized and functioning properly.
If the system information displays the correct amount of installed RAM and you notice improved performance, congratulations! The new RAM module(s) are recognized and effectively enhancing your laptop’s capabilities.
However, if the system information does not display the expected RAM capacity or you encounter any performance issues, double-check the following:
- Ensure the RAM module(s) are securely inserted and properly aligned in the slots.
- Confirm that the RAM module(s) meet the laptop’s compatibility requirements in terms of type, speed, and capacity.
- Consider switching the RAM module(s) to different slots to rule out any issues with a specific slot.
- If the problems persist, consult the Lenovo support website or contact their customer support for further assistance.
Verifying the new RAM is recognized is essential to ensure that the upgrade was successful and that your Lenovo laptop is making full use of the added memory. Enjoy the improved performance and enhanced multitasking capabilities that the upgraded RAM brings!
Troubleshooting Common Issues
While upgrading the RAM in your Lenovo laptop is generally a straightforward process, there may be instances where you encounter common issues. Here are some troubleshooting steps to help you address these issues:
- RAM not recognized: If your laptop doesn’t recognize the newly installed RAM, ensure that it is properly inserted and aligned in the slots. Try removing the module and reinserting it firmly, ensuring that it clicks into place. You can also test the module in a different slot to check for compatibility or slot issues.
- System instability or crashes: If you’re experiencing system instability or frequent crashes after the RAM upgrade, it could indicate compatibility issues. Make sure that the RAM module(s) meet your laptop’s specifications (type, speed, and capacity). If the problem persists, try using a different RAM module to determine if the issue lies with the module itself.
- Blue screen errors: If you encounter blue screen errors after the RAM upgrade, it could indicate compatibility or configuration issues. Check that the RAM module is correctly seated in the slot, and try adjusting the configuration settings in the BIOS. Updating the laptop’s BIOS to the latest version may also resolve compatibility issues.
- System slowdown or performance issues: If you notice a decrease in performance or sluggishness after the RAM upgrade, ensure that the RAM modules are the correct type and speed for your laptop. Also, check for any background processes or software conflicts that may be affecting system performance. Update device drivers and software as needed to optimize performance.
If you continue to experience issues or are unsure about troubleshooting steps, it’s recommended to consult the Lenovo support website, user forums, or contact their customer support for further assistance. They can provide specific guidance based on your laptop model and help resolve any hardware or compatibility issues.
It’s worth noting that upgrading laptop hardware, including RAM, may void warranty if not conducted according to manufacturer guidelines. Always check your laptop’s warranty terms and consider seeking professional assistance if you’re unsure or uncomfortable with performing the upgrade yourself.
By troubleshooting common issues, you can ensure that the RAM upgrade in your Lenovo laptop is successful, and your system performs optimally with the added memory.
Conclusion
Congratulations on successfully completing the RAM upgrade in your Lenovo laptop! By following the steps outlined in this guide, you have enhanced the performance and capabilities of your laptop, allowing for smoother multitasking, faster program loading times, and improved overall system responsiveness.
We began by emphasizing the importance of checking compatibility to ensure that the RAM module(s) you purchase are suitable for your specific Lenovo laptop model. We then discussed the necessary tools needed for the upgrade, including a screwdriver, antistatic wrist strap (optional but recommended), clean cloth or compressed air canister, and, most importantly, the new RAM module(s) itself.
You learned how to properly power down your laptop, locate the RAM slots, remove any existing RAM modules (if applicable), insert the new RAM module(s) securely, and verify that the system recognizes the added memory. Troubleshooting common issues was also covered to address any potential challenges you might encounter during the process.
Remember, it’s crucial to handle the RAM modules with care, ensuring that they are properly aligned, securely inserted, and correctly recognized by the system. If you experience any issues or have concerns about compatibility or performance, it’s recommended to consult the Lenovo support resources or contact their customer support for further assistance.
Lastly, always prioritize safety and follow manufacturer guidelines when working on your laptop’s hardware. If you are uncertain about performing the RAM upgrade yourself, it’s advisable to seek professional help or consult with an authorized technician to ensure that the upgrade is done correctly and without voiding any warranties.
Now that you have expanded your laptop’s memory, take full advantage of the improved performance and enjoy a seamless computing experience. Whether you’re a student, professional, or casual user, the upgraded RAM will contribute to a more efficient and enjoyable laptop experience for years to come.