Introduction
Welcome to our comprehensive guide on how to upgrade your M.2 SSD! If you’re looking to enhance the performance and storage capacity of your computer, upgrading your M.2 SSD is a fantastic option. In this article, we will walk you through each step of the process, ensuring a smooth and successful upgrade.
An M.2 SSD, also known as a Next Generation Form Factor (NGFF) SSD, is a compact and high-speed storage device that connects directly to your motherboard. It offers faster data transfer rates and improved performance compared to traditional hard drives or SATA SSDs. So, if you’re looking to speed up your system, reduce loading times, and increase storage capacity, upgrading to an M.2 SSD is a great choice.
However, we understand that the idea of upgrading your M.2 SSD might be intimidating, especially if you’re not familiar with computer hardware. That’s why we’ve created this guide to provide you with all the information and guidance you need.
Before we dive into the nitty-gritty of the upgrade process, let’s take a moment to discuss why you might want to upgrade your M.2 SSD in the first place.
What is an M.2 SSD?
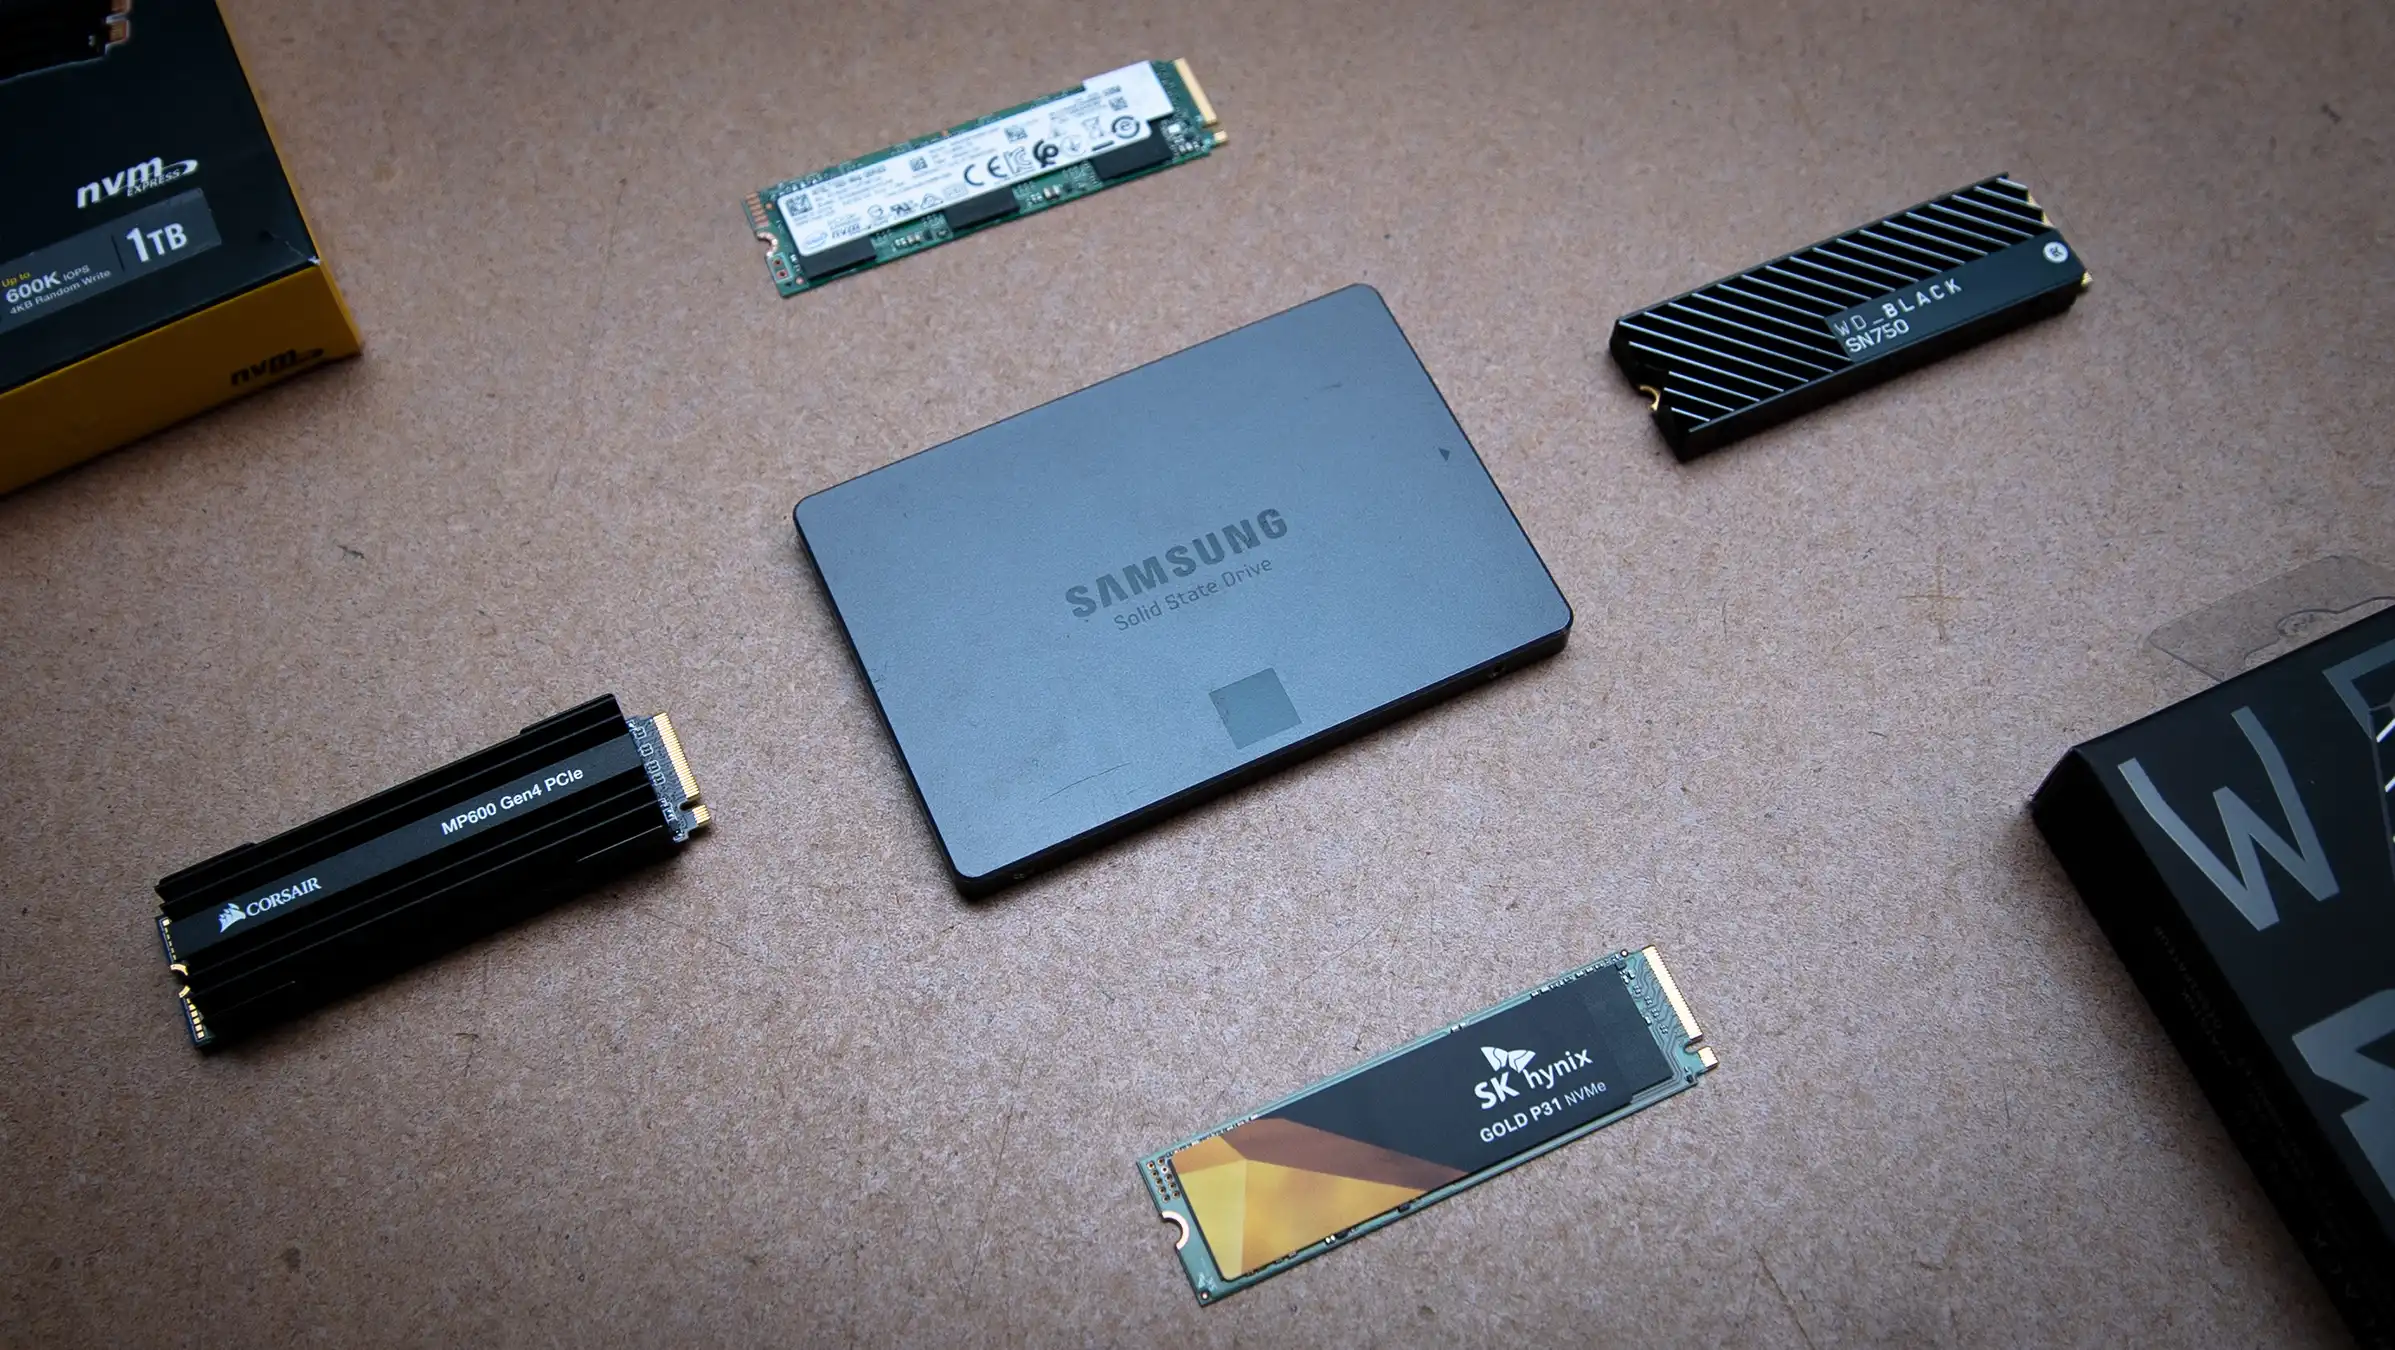
An M.2 solid-state drive (SSD) is a type of storage device that is small in size but big on speed and performance. It is designed to fit directly into your motherboard, providing a compact and efficient solution for storing and accessing your data.
Unlike traditional hard disk drives (HDDs) or even SATA SSDs, M.2 SSDs use a form factor called Next Generation Form Factor (NGFF). This form factor allows the SSD to be much smaller in size, making it ideal for modern laptops and compact desktop computers.
M.2 SSDs come in different sizes or lengths, such as 2242, 2260, or 2280, which refer to the dimensions of the drive in millimeters. The most common size is 2280, measuring 22 millimeters in width and 80 millimeters in length. However, it’s important to check your motherboard’s specifications to ensure compatibility before purchasing an M.2 SSD.
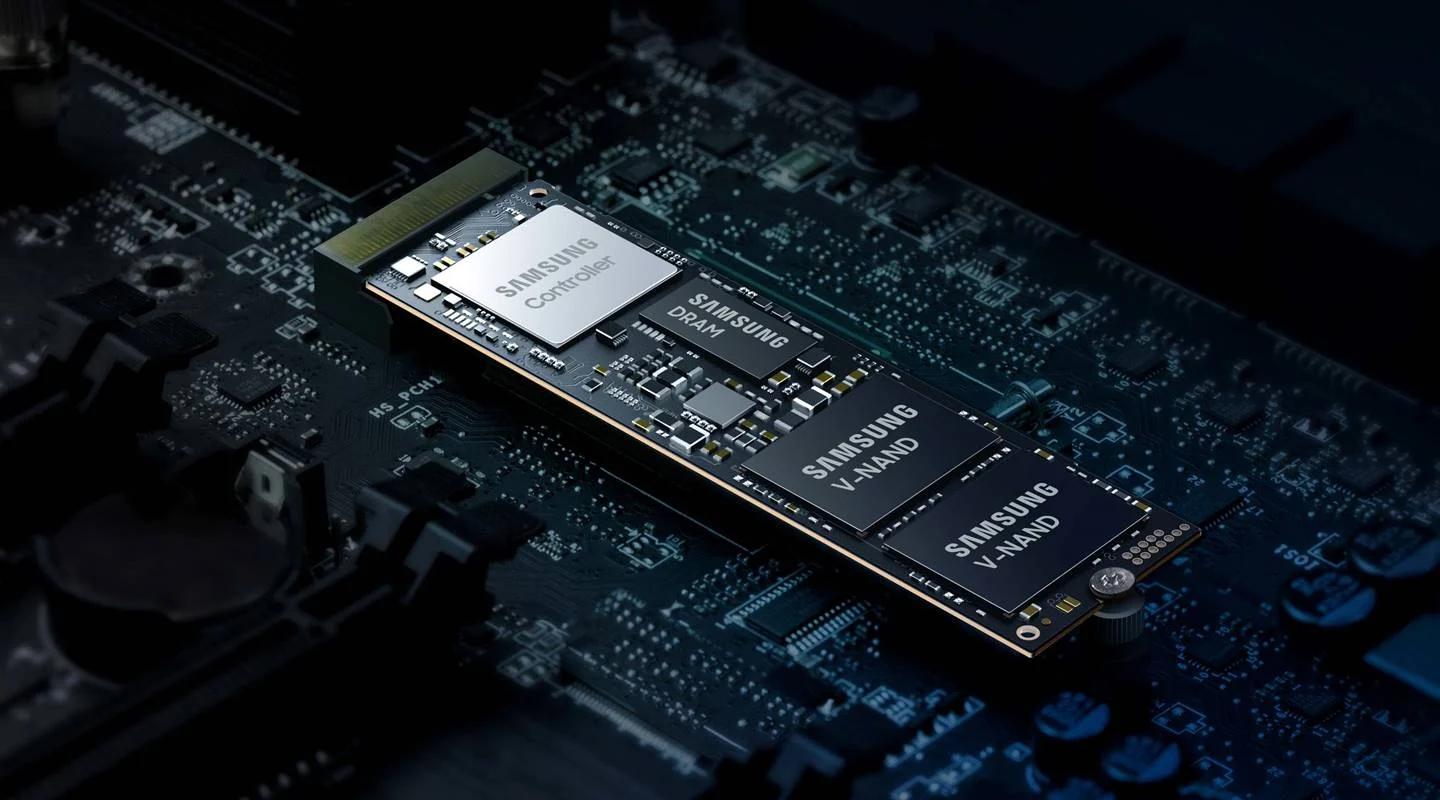
One of the main advantages of an M.2 SSD is its speed. These drives leverage the PCI Express (PCIe) interface to deliver incredibly fast data transfer rates, allowing for quicker boot times, faster application launches, and reduced file loading times. In fact, M.2 SSDs can offer read and write speeds that are several times faster than traditional hard drives.
Another key advantage of M.2 SSDs is their reliability and durability. Unlike mechanical hard drives, which rely on spinning disks and moving parts, SSDs have no moving components. This means they are more resistant to shocks, vibrations, and physical damage, making them a great choice for portable devices.
Additionally, M.2 SSDs consume less power and produce less heat compared to traditional storage devices. This makes them not only energy-efficient but also helps in maintaining optimal operating temperatures for your system.
In summary, an M.2 SSD is a compact, high-speed, and reliable storage device that can greatly enhance the performance and capabilities of your computer. Whether you’re a gamer, a content creator, or a casual user, upgrading to an M.2 SSD is a worthwhile investment that can take your computing experience to the next level.
Why Upgrade Your M.2 SSD?
Upgrading your M.2 SSD offers several compelling benefits that can greatly enhance your computing experience. Let’s explore some of the key reasons why you might want to consider upgrading:
1. Increased Speed and Performance: One of the primary motivations to upgrade your M.2 SSD is the significant boost in speed and performance it can provide. With faster read and write speeds, you’ll experience quicker boot times, shorter application load times, and improved overall system responsiveness. Whether you’re a gamer, a video editor, or a professional working with large datasets, upgrading your M.2 SSD will greatly enhance your productivity and efficiency.
2. Expanded Storage Capacity: If your current M.2 SSD is running out of space, upgrading to a higher-capacity drive will give you more room to store your files, programs, and multimedia content. This is particularly crucial for content creators and users who work with large files, such as 4K videos or high-resolution images. By upgrading to a larger-capacity M.2 SSD, you won’t have to worry about running out of storage space anytime soon.
3. Improved Gaming Experience: Gamers can greatly benefit from upgrading their M.2 SSD. With faster loading times, games will launch more quickly, and you’ll experience reduced stuttering and lag during gameplay. This is especially important for competitive gaming, where every millisecond counts. Additionally, upgrading to a higher-capacity M.2 SSD allows you to store more games on your system, giving you a larger library to enjoy without sacrificing performance.
4. Enhanced Multitasking Abilities: If you frequently run multiple demanding applications simultaneously, upgrading your M.2 SSD can significantly improve your multitasking capabilities. With faster read and write speeds, you’ll experience smoother transitions between programs, quicker file transfers, and reduced wait times when accessing large files. This is particularly useful for professionals in fields like graphic design, video editing, and 3D rendering.
5. Future-Proofing Your System: Technology is constantly evolving, and staying up to date is essential to ensure your system can handle the latest advancements. By upgrading your M.2 SSD, you ensure that your computer is equipped with the latest storage technology, allowing you to take advantage of future improvements in speed and performance. This can extend the lifespan of your system and delay the need for a full-scale upgrade.
In summary, upgrading your M.2 SSD offers tangible benefits, including increased speed, expanded storage capacity, improved gaming experience, enhanced multitasking abilities, and future-proofing your system. Whether you’re a gamer, a content creator, or a power user, upgrading your M.2 SSD is a worthwhile investment that will enhance your overall computing experience.
Preparing for the Upgrade
Before diving into the physical installation of your new M.2 SSD, it’s important to take a few preparatory steps to ensure a smooth and successful upgrade. These steps will help you gather the necessary tools and equipment, backup your important data, and safely shut down your computer. Let’s go over the essential preparations:
1. Gathering the Necessary Tools and Equipment: Take some time to gather the tools and equipment you’ll need for the upgrade. This typically includes a screwdriver (to open your computer case if necessary), an antistatic wrist strap (to prevent static discharge), and, of course, your new M.2 SSD. Additionally, ensure that you have access to your computer’s user manual or online documentation for specific instructions related to your model.
2. Backing Up Important Data: Before making any changes to your storage configuration, it’s crucial to back up your important data. Transfer your files, documents, and any other critical information to an external hard drive, cloud storage, or another secure location. This step ensures that even in the unlikely event of data loss during the upgrade process, your important files will remain safe and accessible.
3. Shutting Down and Unplugging Your Computer: Now that your data is safely backed up, it’s time to shut down your computer and unplug it from the power source. This step is essential to prevent any potential electrical accidents and protect both your computer and yourself. Make sure to shut down your operating system properly before proceeding to avoid any data corruption or loss.
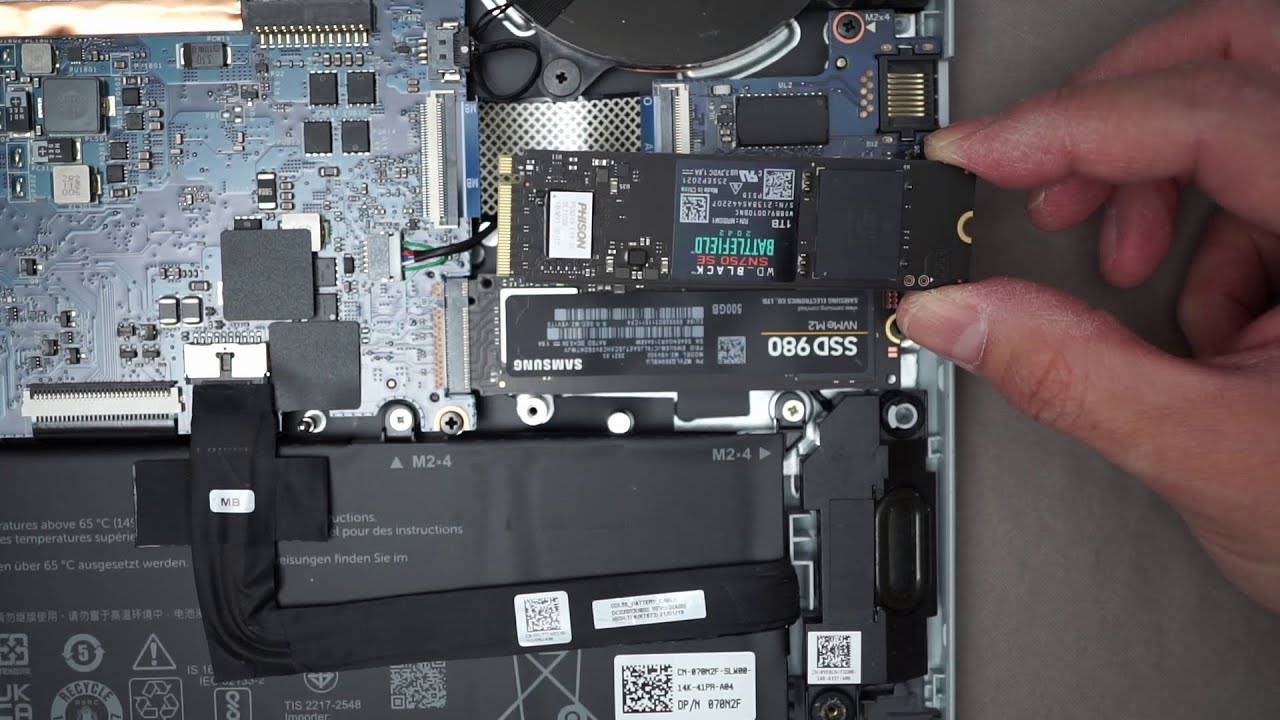
4. Locating and Accessing Your M.2 SSD: Depending on your computer’s make and model, the location of the M.2 SSD slot may vary. Consult your user manual or online documentation to locate the M.2 slot. In some cases, you may need to remove the computer case or a cover panel to access the M.2 SSD slot. Ensure you follow the manufacturer’s instructions to access the slot safely.
5. Removing the Old M.2 SSD: If you are upgrading from an existing M.2 SSD, carefully remove it from the slot by gently pushing on the securing clip and lifting the drive away. Be mindful of any screws or fasteners holding the drive in place and safely set them aside for future use.
6. Installing the New M.2 SSD: With the old M.2 SSD removed, it’s time to install the new one. Align the notches on the M.2 SSD with those on the M.2 slot and firmly insert it at a slight angle. Gently press down until the drive is fully seated, and the securing clip engages and holds the drive in place. Take care not to apply excessive force, as M.2 SSDs are delicate.
7. Securing the New M.2 SSD in Place: Depending on your computer’s design, you may need to secure the M.2 SSD with a screw or fastener. If required, carefully insert and tighten the screw to hold the drive securely in place. Refer to your user manual or online documentation for specific instructions on securing the M.2 SSD.
In summary, preparing for the upgrade involves gathering the necessary tools and equipment, backing up your data, safely shutting down your computer, locating and accessing the M.2 SSD slot, removing the old M.2 SSD if present, installing the new M.2 SSD, and securely fastening it in place. These essential steps will ensure that you’re ready to proceed with the physical installation of your M.2 SSD.
Gathering the Necessary Tools and Equipment
Before you begin the M.2 SSD upgrade process, it’s important to gather the necessary tools and equipment. Having the right tools on hand will ensure a smooth and efficient upgrade. Here are the essential items you’ll need:
1. Screwdriver: Depending on your computer’s design, you may need a small Phillips or flathead screwdriver. This tool will be used to open your computer case if necessary, as well as secure the M.2 SSD in place, if required. Check the specifications of your computer model or refer to the user manual to determine the screwdriver type needed.
2. Antistatic Wrist Strap: To protect your computer from electrostatic discharge (ESD), it’s recommended to wear an antistatic wrist strap. ESD can potentially damage sensitive electronic components, so grounding yourself with an antistatic wrist strap helps prevent any harmful discharge when handling your M.2 SSD or other computer hardware.
3. New M.2 SSD: Of course, you’ll need the new M.2 SSD that you wish to install. Ensure that you have purchased a compatible M.2 SSD that matches the specifications and size requirements of your computer’s M.2 slot. Check your computer’s documentation or online resources to determine the maximum M.2 size and supported interface (SATA or PCIe).
4. User Manual or Online Documentation: It’s always a good idea to have access to your computer’s user manual or online documentation. These resources provide valuable information on the location of the M.2 slot, specific installation instructions, and any other important details related to your computer’s hardware. Check the manufacturer’s website or search for your computer’s model number to find the relevant documents.
5. Storage Media (External Hard Drive or Cloud Storage): Before proceeding with the upgrade, it’s vital to back up your important data. Gather an external hard drive, cloud storage, or any other reliable storage media to transfer and store your files. This ensures that your data remains safe and accessible throughout the upgrade process.
6. Cleaning Supplies (Optional): While not essential, having some cleaning supplies available can be beneficial. Dust and debris can accumulate inside your computer during the installation process, so having compressed air or lint-free cloths can help you keep your computer clean and free from any potential issues caused by a buildup of dirt.
By gathering these necessary tools and equipment before starting the M.2 SSD upgrade, you’ll be fully prepared to tackle the installation process efficiently and minimize any potential disruptions. It’s always better to be prepared and have everything you need readily available, ensuring a smooth transition to your upgraded M.2 SSD.
Backing Up Important Data
Before proceeding with any hardware upgrades, it is essential to back up your important data. This precautionary measure ensures that your files, documents, and other valuable information are safe in case of any unforeseen issues during the M.2 SSD upgrade process. Here are the steps to follow when backing up your data:
1. Determine What Data Needs to be Backed Up: Take a moment to identify the files and folders that contain important data on your computer. These may include personal documents, photos, videos, music, emails, and any other files that you don’t want to lose during the upgrade process.
2. Choose a Backup Method: Decide on the backup method that suits your needs and preferences. There are several options available, such as using an external hard drive, cloud storage services, network-attached storage (NAS) devices, or even creating a disk image using specialized backup software. Choose a method that provides sufficient storage capacity and ensures the safety and accessibility of your data.
3. External Hard Drive Backup: If you have an external hard drive, connect it to your computer and copy the important files and folders directly to the external drive. Organize your data in a way that makes it easy to navigate and restore later if needed. Be sure to check that the external hard drive has enough free space to accommodate all your important files.
4. Cloud Storage Backup: Cloud storage services like Dropbox, Google Drive, or OneDrive offer convenient options to store your data securely online. Upload your important files and folders to the cloud storage service of your choice. This method ensures that your data is accessible from anywhere and provides an additional layer of data protection against hardware failures or accidents.
5. Disk Imaging: Creating a disk image allows you to create a complete copy of your entire computer’s storage drive, including the operating system and installed software. This method is useful if you want to have a complete backup of your system in case of a catastrophic failure or for easy restoration to its prior state. Many disk imaging software solutions are available, such as Acronis True Image, Macrium Reflect, and Clonezilla.
6. Verify and Test the Backup: Once you have completed the backup, take a few minutes to verify that the files have been successfully copied and accurately preserved. Open a few files from the backup location to make sure they are accessible and intact. It’s better to be safe than sorry when it comes to safeguarding your important data.
7. Regularly Update your Backup: It is good practice to regularly update your backup to ensure that any new or modified files are included. Set up a schedule for regular backups or consider using automated backup software to streamline the process. This way, you can always have an up-to-date copy of your important data.
By following these steps to back up your important data, you can proceed with the M.2 SSD upgrade confidently, knowing that your files are safely stored and easily recoverable. Backing up your data provides peace of mind and protects against the potential loss of irreplaceable information during the upgrade process.
Shutting Down and Unplugging Your Computer
Before you begin working on your computer’s internal components, it’s crucial to shut down and disconnect the power. Taking these essential steps will protect both you and your computer from potential electrical accidents. Here’s how to safely shut down and unplug your computer:
1. Save and Close Your Work: Before shutting down your computer, save any open files or projects you are working on. Make sure to close all open applications and programs to prevent data loss or corruption.
2. Shut Down Your Operating System: Go to the Start menu (Windows) or Apple menu (Mac) and select the option to shut down your operating system. Wait for the shutdown process to complete, and ensure that the power indicator lights on your computer have turned off.
3. Unplug All Peripherals: Disconnect any external devices or peripherals attached to your computer, such as USB drives, printers, scanners, or external monitors. This step ensures that no devices draw power or interfere with your upgrade process.
4. Turn Off the Power Supply: Locate the power supply switch on the back of your computer case or the power strip if you are using one. Flip the switch to the “Off” position to cut off the electricity supply completely. This step prevents any accidental power surges during the upgrade process.
5. Disconnect the Power Cord: Unplug the power cord connecting your computer to the electrical outlet. Gently pull the plug from the socket, making sure not to tug on the cord itself. This step eliminates any residual electrical charge and ensures complete disconnection from the power source.
6. Confirm Power Disconnection: To be absolutely sure there is no residual power, wait for a few minutes before proceeding with the M.2 SSD upgrade. This precautionary measure ensures that any remaining electrical charge dissipates completely and reduces the risk of electrical shocks.
By following these steps to shut down and unplug your computer, you create a safe environment for working on your internal components. Always prioritize safety and take the necessary precautions to prevent electrical accidents or damage during the M.2 SSD upgrade process.
Locating and Accessing Your M.2 SSD
Locating and accessing your M.2 SSD is an important step in the upgrade process. Depending on your computer model, the M.2 SSD slot’s location may vary. Here’s how you can find and access your M.2 SSD:
1. Consult Your Computer’s Documentation: The first step is to refer to your computer’s user manual or online documentation provided by the manufacturer. These resources will provide specific instructions tailored to your computer model. Look for information related to the location of the M.2 slot.
2. Open Your Computer Case (If Required): In some instances, you may need to open your computer case to access the M.2 SSD slot. Use a screwdriver to remove the screws securing the case panels. Place the screws in a safe location to avoid misplacing them, as you will need them later when reassembling the computer.
3. Locate the M.2 Slot: Once you have access to the computer’s internal components, locate the M.2 slot. It is a small, rectangular-shaped slot typically found on the motherboard. The slot may be labeled as “M.2” or have a similar designation, making it easier to identify.
4. Identify the M.2 Key: M.2 slots come with different key types, such as B-key, M-key, or B+M-key. It is important to determine the specific key type supported by your computer’s M.2 slot. This information will help you choose a compatible replacement M.2 SSD (if necessary).
5. Refer to Color Coding (Optional): Some motherboards may color-code the M.2 slots. For instance, they might mark one slot as primary and another as secondary. Check your computer’s documentation or motherboard markings to identify any color codes and corresponding slot designations.
6. Note the M.2 Size: Make note of the specific M.2 size supported by your computer. M.2 SSDs come in various lengths, such as 2242, 2260, or 2280, which represent the dimensions of the drive in millimeters. Ensure that the replacement M.2 SSD you choose matches the supported size to ensure proper compatibility.
7. Take Precautions: While accessing the M.2 SSD slot, it is essential to observe proper anti-static precautions. Wear an anti-static wrist strap and handle the M.2 SSD carefully to avoid any static discharge that could harm the drive or other components.
By consulting your computer’s documentation, opening the computer case if necessary, locating the M.2 slot, identifying the M.2 key, checking for color coding, and noting the M.2 size, you can easily find and access your M.2 SSD. Following these guidelines ensures a smooth and successful M.2 SSD upgrade process.
Removing the Old M.2 SSD
Before installing a new M.2 SSD, it’s important to remove the old one (if present) from the M.2 slot. Removing the old M.2 SSD will make way for the new drive and ensure a proper and efficient installation. Here’s how you can safely remove the old M.2 SSD:
1. Preparation: Ensure that your computer is shut down, unplugged, and that you have taken proper anti-static precautions, such as wearing an anti-static wrist strap. This ensures the safety of both yourself and your computer components during the removal process.
2. Locate the Old M.2 SSD: Identify the slot where the old M.2 SSD is installed. It will be a small slot on the motherboard, typically labeled “M.2” or similar. If you’re unsure, refer to your computer’s documentation or follow the cabling from the existing M.2 SSD to locate the slot.
3. Remove the Screw (If Applicable): Some M.2 slots may have a small screw securing the M.2 SSD in place. If your computer has such a screw, carefully remove it using an appropriate screwdriver. Place the screw in a safe location, as you may need it later when securing the new M.2 SSD.
4. Release the Retaining Clip: On most M.2 slots, a retaining clip or latch holds the M.2 SSD in place. Gently push the clip down or to the side (depending on the design) to release it. This will loosen the grip on the M.2 SSD and allow you to remove it smoothly.
5. Remove the M.2 SSD: Once the retaining clip is released, carefully lift the old M.2 SSD from the slot. Hold it by its edges and avoid touching the connectors or circuitry. Slowly and gently rock the M.2 SSD back and forth while pulling it straight out of the slot. Avoid any excessive force or sudden movements that could damage the drive or the slot.
6. Store the Old M.2 SSD (Optional): If the removed M.2 SSD is still in good working condition and you have no further use for it, you may choose to store it in an anti-static bag or container for future purposes or to sell or donate it to someone else.
7. Keep the Environment Clean: After removing the old M.2 SSD, take a moment to clean the M.2 slot and the surrounding area inside your computer case. Use compressed air or a soft, anti-static cloth to remove any dust or debris that may have accumulated. A clean environment helps ensure optimal performance for the new M.2 SSD.
By following these steps, you can safely remove the old M.2 SSD from your computer. Take your time and handle the M.2 SSD with care to prevent any damage to the drive or the motherboard. With the old M.2 SSD successfully removed, you’re now ready to proceed with the installation of the new M.2 SSD.
Installing the New M.2 SSD
Now that you have removed the old M.2 SSD, it’s time to install the new one. By following these steps, you can ensure a smooth and successful installation of your new M.2 SSD:
1. Confirm Compatibility: Double-check that the new M.2 SSD you have purchased is compatible with your computer’s M.2 slot. Ensure that it matches the supported size (e.g., 2242, 2260, or 2280) and key type (e.g., B-key, M-key, or B+M-key) specified in your computer’s documentation.
2. Align the Notches: Orient the new M.2 SSD correctly by matching the notches on the M.2 SSD with those on the M.2 slot. These notches ensure proper alignment and ensure that the M.2 SSD is inserted in the correct orientation.
3. Insert the M.2 SSD: Holding the new M.2 SSD by its edges, gently insert it into the M.2 slot at a slight angle. Make sure the connector pins on the M.2 SSD are inserted into the corresponding socket on the M.2 slot. Be careful not to apply excessive force or bend the connectors.
4. Press Down Firmly: Once the M.2 SSD is properly aligned and partially inserted, apply gentle and even pressure to the top surface of the drive. This will fully seat the M.2 SSD into the slot. You should feel the M.2 SSD go in smoothly until it is fully inserted and comes into contact with the M.2 slot.
5. Secure the M.2 SSD (If Applicable): Depending on your computer’s design, you might need to secure the M.2 SSD with a screw or fastener. If a screw hole is present on the M.2 SSD or nearby on the motherboard, align the screw hole on the SSD with the corresponding hole on the motherboard and gently tighten the screw using a screwdriver.
6. Note Any Retaining Clips: Some M.2 slots might have a retaining clip or latch that needs to be repositioned to secure the M.2 SSD in place. If applicable, make sure the clip or latch is in the correct position and securely holds the M.2 SSD in place.
7. Verify Connectivity and Alignment: After installing the new M.2 SSD, check for proper connectivity and alignment. Ensure that the M.2 SSD is fully inserted and the connectors are making contact. Verify that the M.2 SSD is parallel to the motherboard and firmly seated in the M.2 slot.
8. Replace the Computer Case: If you have opened the computer case, carefully reattach the case panels and secure them in place using the screws. Make sure everything is properly aligned and tightened, but avoid overtightening, as it may cause damage to the case or components.
By following these steps, you can successfully install the new M.2 SSD in your computer. Take your time, exercise caution, and ensure proper alignment and connectivity. With the new M.2 SSD installed, you’re ready to proceed with securing it in place and reassembling your computer.
Securing the New M.2 SSD in Place
After successfully installing the new M.2 SSD into the slot, it’s important to secure it properly to ensure a stable and reliable connection. Depending on your computer’s design, you may need to use screws or fasteners to secure the M.2 SSD in place. Here’s how you can secure the new M.2 SSD:
1. Check for Screw Holes: Examine the M.2 SSD and the area surrounding the slot to determine if there are screw holes present. Some motherboards or M.2 slots may feature dedicated mounting points for securing the M.2 SSD. If you find screw holes, ensure that they align with the corresponding holes on the M.2 SSD.
2. Align the Screw Holes: If there are screw holes on the M.2 SSD and the motherboard, align them properly. Position the M.2 SSD so that the screw holes on the SSD match up with the screw holes on the motherboard. Take care not to overtighten the screws, as it may damage the M.2 SSD or the motherboard.
3. Secure the M.2 SSD: With the screw holes aligned, gently insert the screw(s) into the holes and tighten them using a screwdriver. Ensure that the screws are firmly secured but be cautious not to overtighten them. If a specific torque value is provided in your computer’s documentation, follow those guidelines to avoid damage.
4. Verify Stability: Once the screw(s) are tightened, verify the stability of the M.2 SSD. Gently wiggle the M.2 SSD to ensure that it is securely fastened. There should be minimal to no movement if the M.2 SSD is properly secured. If you encounter any excessive movement, double-check the screws and their tightness.
5. Reconfirm Connectivity: After securing the M.2 SSD, reconfirm that the connectors are properly seated and making contact. Press down gently on the M.2 SSD to ensure a solid connection and to ensure that it hasn’t shifted out of place during the securing process.
6. Check Retaining Clips or Latches (If Applicable): Some M.2 slots feature retaining clips or latches that provide additional security. If your motherboard has such clips or latches, make sure they are in the correct position and securely hold the M.2 SSD in place. Ensure that the clips or latches are engaged properly to prevent any accidental disconnection of the M.2 SSD.
7. Note Motherboard Standoffs (If Applicable): In cases where the M.2 slot is positioned above another motherboard component, such as a PCIe slot, ensure that the installation of the M.2 SSD does not interfere with any existing motherboard standoffs, as they are crucial for proper grounding and stability.
By following these steps, you can securely fasten the new M.2 SSD in place. Properly securing the M.2 SSD ensures that it stays firmly connected and minimizes the risk of accidental disconnection or movement. With the M.2 SSD securely in place, you can proceed with reassembling your computer and preparing for the next steps in the upgrade process.
Reassembling Your Computer
With the new M.2 SSD installed and secured, it’s time to reassemble your computer. Proper reassembly ensures that all components are in their correct positions and allows for smooth and effective operation. Follow these steps to reassemble your computer:
1. Retrieve Case Panels: If you removed any case panels during the upgrade process, locate them and ensure they are free from dust or debris. Clean them if necessary, using a soft, lint-free cloth or compressed air.
2. Align and Attach Case Panels: Carefully align the case panels with the corresponding openings on your computer case. Slide or snap the panels into place, ensuring that they fit snugly. Use the screws you previously removed to secure the panels. Be cautious not to overtighten the screws, as it may damage the case.
3. Connect Peripherals and Cables: Reconnect any peripherals or cables that you disconnected earlier, such as monitors, keyboards, mice, USB devices, and audio devices. Double-check that the connections are secure and properly aligned.
4. Reattach Power Cord: Plug the power cord back into the electrical outlet and ensure it is firmly connected to the power supply unit. Double-check that the power supply switch is in the “Off” position before proceeding to the next step.
5. Confirm Hardware Connections: Inspect all internal hardware connections, such as SATA cables, power cables, PCIe cards, and RAM modules. Ensure that they are securely attached and properly seated in their respective slots. Reconnect any components if necessary.
6. Check Cooling System: If you removed any cooling equipment, such as fans or heat sinks, during the upgrade process, ensure they are properly reinstalled. Verify that all fans are connected to the appropriate headers and that there are no loose or obstructed cables that could interfere with airflow.
7. Clean Exterior: Take a moment to wipe down the exterior of your computer case using a clean, lint-free cloth. Remove any fingerprints, dust, or smudges that may have accumulated during the upgrade process.
8. Perform a Visual Inspection: Before powering on your computer, visually inspect the internal components to ensure everything is in place and there are no loose cables or obvious signs of damage. Correct any issues you may identify before proceeding.
By following these steps, you can successfully reassemble your computer after installing the new M.2 SSD. Taking the time to ensure proper reassembly helps to maintain the integrity of your computer and ensures that all components work together seamlessly. With your computer reassembled, you can now move on to power it on and proceed with the next steps in the upgrade process.
Powering on Your Computer
With your computer reassembled after the M.2 SSD upgrade, it’s time to power it back on. Following the proper power-on procedure ensures a smooth startup and allows you to proceed with the remaining steps. Here’s how to power on your computer:
1. Double-Check Connections: Before powering on, double-check all connections inside and outside your computer, including power cables, peripherals, and monitor connections. Ensure that everything is securely attached and properly aligned.
2. Flip the Power Supply Switch: Locate the power supply switch at the back of the computer case or the power strip. Flip the switch to the “On” position to restore power to your computer.
3. Press the Power Button: Locate the power button on the front of your computer case or laptop. Press the power button firmly to turn on your computer. The power button may have an illuminated indicator that lights up when your computer is powered on.
4. Observe the Boot-up Sequence: As your computer powers on and starts up, pay attention to the screen and any LED indicators on your computer. You may see the manufacturer’s logo, a startup screen, or a series of messages indicating the boot-up process. This initial boot-up process may take a few moments.
5. Monitor System Initialization: During startup, your computer will initialize the system components and perform self-tests. Monitor the progress on the screen and look for any error messages or prompts for user intervention. If any issues arise, refer to your computer’s documentation or seek assistance to troubleshoot and resolve the problem.
6. Access the BIOS or UEFI Settings (If Necessary): Depending on your computer’s configuration, you may need to access the BIOS (Basic Input/Output System) or UEFI (Unified Extensible Firmware Interface) settings. Follow the on-screen instructions to enter the settings and ensure that the computer recognizes and properly detects your new M.2 SSD.
7. Check the Operating System: Once your computer successfully boots up, check that the operating system recognizes the new M.2 SSD. Go to the operating system’s storage settings or disk management utility to verify that the M.2 SSD appears as a recognized storage device.
8. Test System Performance and Functionality: Perform various tasks, such as opening applications, accessing files, and performing basic operations to test the functionality and performance of the new M.2 SSD. Monitor system performance, load times, and file transfer speeds to determine if the upgrade has had the desired impact.
By following these steps, you can effectively power on your computer after the M.2 SSD upgrade. Monitoring the boot-up process and checking system recognition of the new M.2 SSD ensures that the upgrade was successful. Now that your computer is powered on and functioning, you can proceed with formatting and initializing the new M.2 SSD.
Formatting and Initializing the New M.2 SSD
After installing a new M.2 SSD in your computer, it’s necessary to format and initialize the drive before you can use it to store data. This process prepares the M.2 SSD for use by creating a file system and allocating space for data storage. Here’s how you can format and initialize the new M.2 SSD:
1. Access Disk Management (Windows) or Disk Utility (Mac): On Windows, right-click on the Start button and select “Disk Management.” On Mac, go to “Applications,” then “Utilities,” and open “Disk Utility.”
2. Locate the New M.2 SSD: In the Disk Management or Disk Utility window, find the new M.2 SSD. It should be listed as a new or unallocated disk.
3. Initialize the M.2 SSD: Right-click on the new M.2 SSD and select “Initialize Disk” (Windows) or “Initialize…” (Mac). Choose the appropriate options for partition style and scheme, such as MBR (Master Boot Record) or GPT (GUID Partition Table).
4. Create a New Partition: Once the M.2 SSD is initialized, right-click on the unallocated space and select “New Simple Volume” (Windows) or “Partition” (Mac). Follow the on-screen prompts to set the partition size, assign a drive letter or name, and select the file system format (e.g., NTFS for Windows or APFS for Mac).
5. Format the M.2 SSD: After creating a new partition, select the formatting options. Choose the desired file system format (e.g., NTFS, exFAT, or FAT32 for Windows; APFS, HFS+, or FAT32 for Mac) and provide a volume label if desired. Accept the default allocation unit size unless you have specific requirements.
6. Confirm and Apply the Changes: Review the formatting options and click “Finish” or “Apply” to initiate the formatting and initialization process. Depending on the size of the M.2 SSD, the process may take a few moments to complete.
7. Verify the Newly Formatted M.2 SSD: Once the formatting is complete, the M.2 SSD should appear as a new drive with the assigned drive letter or name. Verify that it is correctly recognized in the operating system’s file explorer or Finder.
8. Test the M.2 SSD: To ensure that the newly formatted M.2 SSD is functioning correctly, you can perform a simple test by copying and accessing files on the drive. Verify that data can be written to and read from the M.2 SSD without any issues.
By following these steps, you can successfully format and initialize the new M.2 SSD, making it ready for data storage. Confirm that the M.2 SSD appears as an accessible drive in your operating system, and ensure its functionality by performing basic read and write tests. With the M.2 SSD formatted and initialized, you are now ready to go ahead with restoring your backed-up data to the new drive.
Restoring Your Backed-Up Data
After successfully formatting and initializing the new M.2 SSD, it’s time to restore your backed-up data. By following these steps, you can efficiently transfer your files, documents, and important data to the newly formatted M.2 SSD:
1. Locate Your Backup: Access the backup location where you stored your files and data. This could be an external hard drive, cloud storage, or another storage medium.
2. Copy and Paste: From the backup location, select the files or folders you want to restore to the new M.2 SSD. Copy them and navigate to the newly formatted M.2 SSD.
3. Paste Files onto M.2 SSD: Paste the copied files from the backup location onto the M.2 SSD. You can either paste them directly into the root directory of the M.2 SSD or create folders to organize your files based on your preference.
4. Verify File Integrity: After pasting the files, take a moment to verify the integrity of the restored files. Open a few files and check that they open correctly and contain the expected data. This step ensures that no data corruption or loss occurred during the restoration process.
5. Organize and Categorize: If you have a large number of files, take the opportunity to organize them in a way that makes sense to you. Create folders based on categories such as documents, photos, music, videos, etc. This will make it easier to find and access files in the future.
6. Check Applications and Software: If you had any software or applications installed on your previous storage device, you may need to reinstall them onto the new M.2 SSD. Check the software’s website or your installation files to ensure that you have the necessary setup files and license keys to reinstall the applications as needed.
7. Test Accessibility and Functionality: After restoring your backed-up data to the new M.2 SSD, test the accessibility and functionality of the files and applications. Open various files and run applications to make sure they are working as expected and that you can access your data without any issues.
8. Create a New Backup: Now that your data is successfully restored to the new M.2 SSD, take the opportunity to create a new backup of your important files. Regularly backing up your data is crucial for ensuring its safety and having a reliable copy in case of any future system issues or failures.
By following these steps, you can efficiently restore your backed-up data onto the newly formatted M.2 SSD. Taking the time to verify the integrity of the files and ensuring the functionality of applications ensures that your data is accessible and intact on the new drive. With your files restored, you can now enjoy the improved storage capacity and performance of your upgraded M.2 SSD.
Testing the New M.2 SSD
After completing the installation, formatting, and restoration process, it’s essential to test the functionality and performance of the new M.2 SSD. By performing thorough tests, you can ensure that the drive is working optimally and meets your expectations. Here are some tests you can carry out to evaluate the new M.2 SSD:
1. Performance Benchmarking Tools: Utilize performance benchmarking tools, such as CrystalDiskMark or ATTO Disk Benchmark, to measure the read and write speeds of the new M.2 SSD. Compare the results to the manufacturer’s specifications to verify if the drive is performing as expected.
2. File Transfer Speeds: Copy a large file or folder from one location on the M.2 SSD to another location. Observe the transfer speed and ensure it meets your expectations. Faster transfer speeds indicate improved performance, allowing for quicker and more efficient file operations.
3. System Boot Time: Restart your computer or power it on from a shutdown state. Monitor the time it takes for your operating system to boot up. A noticeable reduction in boot time compared to your previous storage device indicates the improved speed and responsiveness of the new M.2 SSD.
4. Application Launch Speed: Open various applications and monitor the time it takes for them to launch. Compare the speed to your previous storage device and evaluate the improved loading times. Snappier application launches indicate the enhanced performance of the M.2 SSD.
5. Random Access and Seek Times: Test the random access and seek times of the M.2 SSD by opening files, browsing folders, and navigating through directories. Evaluate the speed and responsiveness of the drive when accessing different files or performing various file operations.
6. Stability and Reliability: Use your computer and the M.2 SSD for a prolonged period to assess its stability and reliability. Monitor for any unexpected errors, crashes, or data corruption issues. A stable and reliable M.2 SSD ensures a smooth user experience and reduces the risk of data loss.
7. Gaming Performance (if applicable): If you are a gamer, test the performance of games installed on the new M.2 SSD. Measure the loading times, frame rates, and overall gaming experience compared to your previous storage device. Smooth and improved gaming performance is an indicator of the M.2 SSD’s capabilities.
8. Temperature and Power Consumption: Monitor the temperature and power consumption of the M.2 SSD during different operations. Utilize software like HWiNFO or SSD-specific utilities to track the drive’s temperature and power draw. Ensure that the drive operates within acceptable temperature ranges and consumes an appropriate amount of power.
By conducting these tests, you can evaluate the performance, reliability, and functionality of the new M.2 SSD. Identifying any potential issues early on allows for timely troubleshooting and ensures that the drive operates optimally. With a thorough testing process, you can confidently integrate the new M.2 SSD into your system and enjoy the benefits of improved storage performance.
Conclusion
Congratulations! You have successfully completed the process of upgrading your M.2 SSD. By following each step in this comprehensive guide, you were able to gather the necessary tools, back up your important data, remove the old M.2 SSD, install the new M.2 SSD, and configure it for use. Testing the functionality and performance of the new M.2 SSD ensures that it meets your expectations and enhances your overall computing experience.
Upgrading to an M.2 SSD offers numerous benefits, including increased speed, enhanced storage capacity, improved multitasking abilities, and future-proofing your system. With faster read and write speeds, quicker boot times, and reduced loading times, you can enjoy a more responsive and efficient computing experience.
Remember, taking proper precautions, such as wearing an antistatic wrist strap and observing safe handling practices, is crucial when working with computer components. Prioritizing safety ensures the protection of both yourself and your computer from potential accidents.
As you enjoy the improved storage performance and capabilities of your new M.2 SSD, it’s essential to regularly back up your data to prevent any potential loss. Continuously make backups to an external hard drive, cloud storage, or another reliable storage medium. This practice ensures the safety and accessibility of your important files in case of any future issues.
Thank you for choosing this guide as your trusted resource for upgrading your M.2 SSD. We hope that the information provided has been comprehensive, helpful, and easy to understand. Now that you have completed the upgrade, you can embrace the benefits of faster speeds, increased storage capacity, and improved performance in your computing endeavors.
Happy computing!