Introduction
Welcome to our guide on how to uninstall an antivirus program. Antivirus software plays a crucial role in protecting our computers from malware, viruses, and other security threats. However, there may come a time when you need to uninstall your antivirus software for various reasons. Whether you want to switch to a different antivirus program or troubleshoot issues with your current one, the process of uninstalling an antivirus can vary depending on the software you are using.
In this article, we will walk you through the steps to properly uninstall an antivirus program. Before we delve into the details, it’s important to note that removing an antivirus program requires careful execution. Improper uninstallation can leave behind residual files, cause conflicts with other software, or leave your computer vulnerable to security threats. Therefore, it’s crucial to follow the recommended steps to ensure a clean and thorough removal.
Throughout this guide, we will provide step-by-step instructions for uninstalling an antivirus program using both the control panel and the software itself. We will also discuss the importance of disabling real-time protection and running an antivirus removal tool to ensure a complete uninstallation. Additionally, we will touch on checking for residual files and provide tips on installing a new antivirus program to keep your computer protected.
Whether you’re a novice computer user or a tech-savvy individual, this guide is designed to assist you in safely and effectively uninstalling your antivirus software. So, let’s get started with the first step: disabling real-time protection.
Why Uninstall an Antivirus?
There are several reasons why you might need to uninstall an antivirus program. Understanding these reasons can help you make an informed decision and ensure that you follow the appropriate steps. Here are a few common scenarios where uninstalling an antivirus software becomes necessary:
- Switching to a Different Antivirus: You might want to switch to a different antivirus program either due to personal preference or to try out different features and capabilities.
- Conflicts with Other Software: Some antivirus programs may conflict with other applications on your computer, causing performance issues or crashes. Uninstalling the antivirus can help resolve these conflicts.
- Upgrading to a Newer Version: When upgrading to a newer version of the same antivirus software, it is often recommended to uninstall the old version before installing the new one to ensure a clean installation.
- Troubleshooting Issues: If you are experiencing problems with your current antivirus software, uninstalling it and performing a fresh installation can sometimes resolve the issue.
- System Performance: In some cases, antivirus software can impact system performance, causing your computer to run slower. Uninstalling the antivirus can help improve overall system performance.
It’s important to note that while uninstalling an antivirus software can be necessary, it temporarily leaves your computer exposed to potential security threats. It’s advisable to have a plan in place to install a new antivirus program as soon as the uninstallation is complete to ensure continuous protection.
Now that we have explored some common reasons for uninstalling an antivirus software, let’s move on to the next section – “Before You Uninstall an Antivirus,” where we will discuss a few important considerations to keep in mind before proceeding with the uninstallation process.
Before You Uninstall an Antivirus
Before you proceed with uninstalling an antivirus program, there are a few important considerations to keep in mind. Taking these steps will help ensure a smooth and successful uninstallation process:
- Create a Backup: Before making any changes to your computer, it’s always a good idea to create a backup of your important files and data. This precautionary measure will provide peace of mind in case anything goes wrong during the uninstallation process.
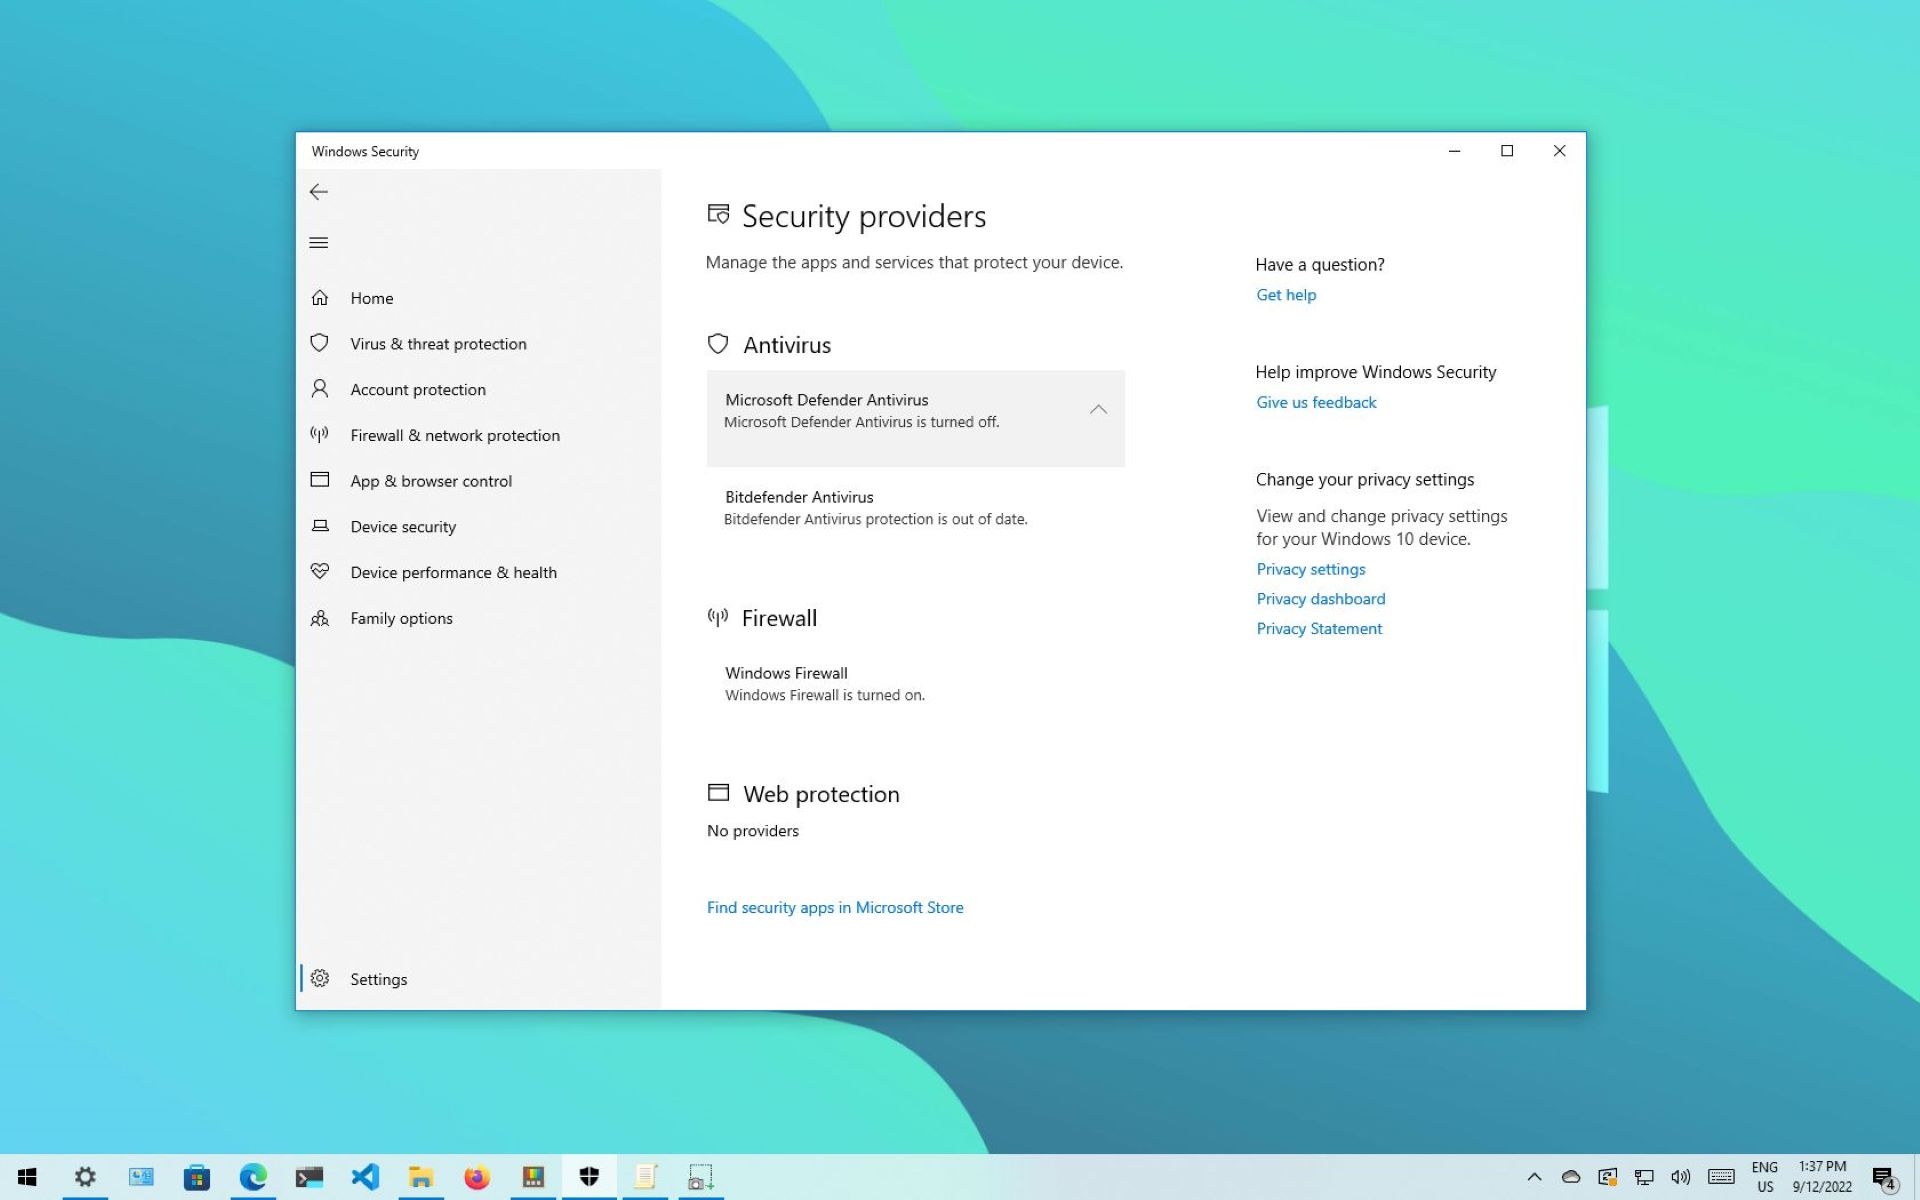
- Disable Real-Time Protection: Real-time protection is a feature that continuously scans your computer for malware and viruses. Before uninstalling the antivirus software, it is crucial to disable this feature to prevent it from interfering with the removal process.
- Check for Automatic Updates: Some antivirus programs may have automatic update settings enabled. It’s important to disable these updates to avoid any interruptions during the uninstallation process. Refer to the antivirus software documentation for instructions on how to disable automatic updates.
- Review Documentation: Take the time to review the documentation or support resources provided by the antivirus software provider. They may offer specific instructions or tools for uninstallation, ensuring a clean removal.
- Save License Information: If you plan to install a new antivirus program, make sure to save the license information or key for the new software. This will streamline the installation process and ensure that you can activate the new antivirus without any issues.
By following these precautions and ensuring that you have everything you need beforehand, you can save time and minimize potential complications during the uninstallation process. Once you have taken these steps, you are ready to proceed with uninstalling the antivirus program.
In the next section, we will explore step-by-step instructions for disabling real-time protection, one of the essential steps in uninstalling an antivirus software. Read on to learn more!
Step #1: Disable Real-Time Protection
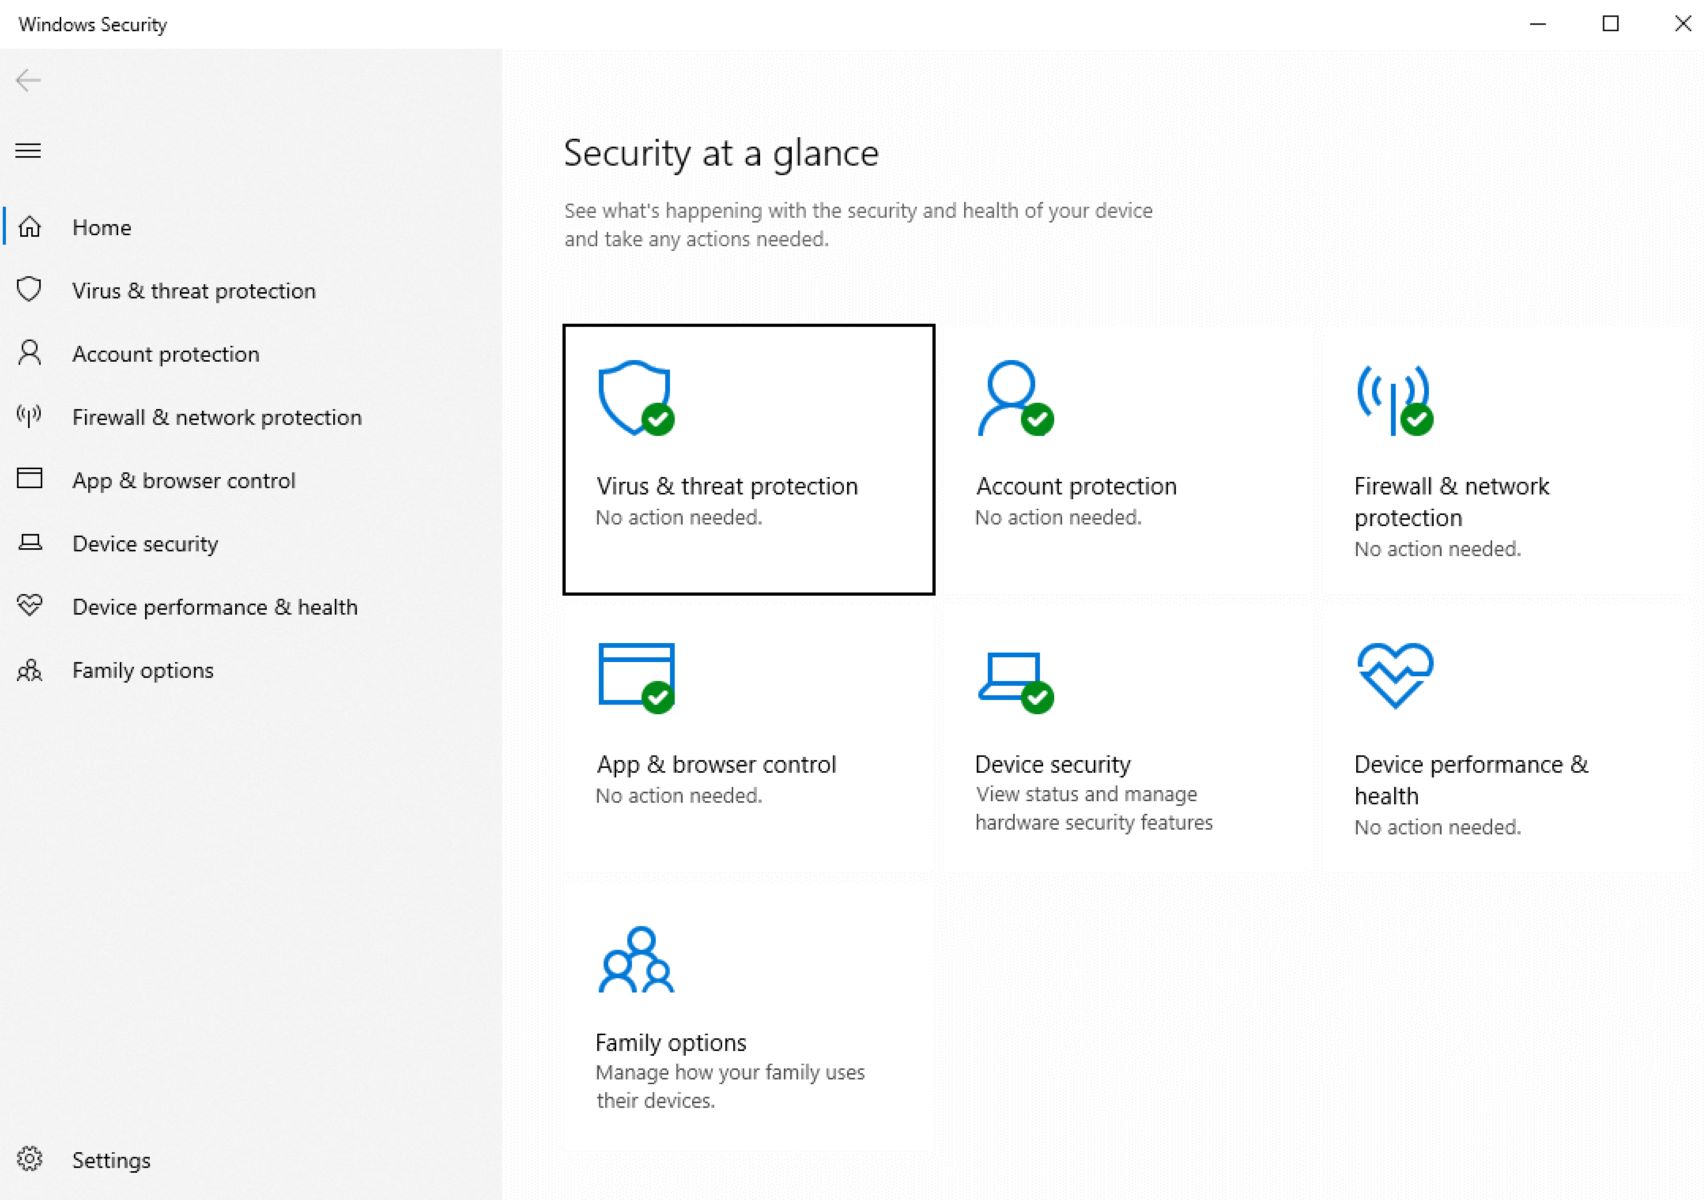
The first step in uninstalling an antivirus program is to disable the real-time protection feature. Real-time protection continuously scans your computer for malware and viruses in the background. Disabling this feature ensures that the antivirus software is not actively blocking or interfering with the uninstallation process. Here’s how to disable real-time protection:
- Locate the antivirus software icon in your system tray, which is typically located at the bottom right corner of your screen. Right-click on the icon to access the software’s main menu.
- In the menu that appears, look for an option related to “real-time protection” or “real-time scanning.” The specific wording may vary depending on the antivirus program you are using.
- Select the option to disable or temporarily turn off real-time protection. This action will vary depending on the antivirus software you are using, but it is usually represented by a checkbox or toggle switch.
- Confirm your selection, if prompted, to disable real-time protection.
Once you have disabled the real-time protection, it’s crucial to keep in mind that your computer is temporarily vulnerable to malware and viruses. Avoid visiting suspicious websites, downloading files from untrusted sources, or opening unknown email attachments until you have a new antivirus software installed.
Now that real-time protection is disabled, you are ready to proceed to the next step: uninstalling the antivirus software. In the following section, we will provide step-by-step instructions on how to uninstall the program using the control panel.
Step #2: Uninstalling Through Control Panel
Uninstalling an antivirus program through the Control Panel is a common method that works for many antivirus software. Here are the step-by-step instructions on how to uninstall an antivirus through the Control Panel:
- Click on the “Start” menu in the bottom-left corner of your screen and select “Control Panel”.
- In the Control Panel window, locate the category labeled “Programs” and click on “Uninstall a program”.
- A list of installed programs will be displayed. Find your antivirus software from the list. The antivirus program may have a recognizable name, such as “Avast,” “Norton,” or “McAfee.”
- Click on the antivirus program, and then click on the “Uninstall” or “Change/Remove” button.
- Follow the on-screen prompts to proceed with the uninstallation process. You may be asked to confirm the action or provide additional information.
- Once the uninstallation process is complete, restart your computer to ensure that any remaining components or processes related to the antivirus software are fully removed.
Note that the specific steps may vary slightly depending on your version of Windows and the antivirus software you are uninstalling. If you encounter any difficulties during the uninstallation process, refer to the antivirus software’s documentation or support resources for further guidance.
Congratulations! You have successfully uninstalled the antivirus program using the Control Panel. In the next section, we will discuss an alternative method for uninstallation: using the antivirus software itself.
Step #3: Uninstalling Using the Antivirus Software
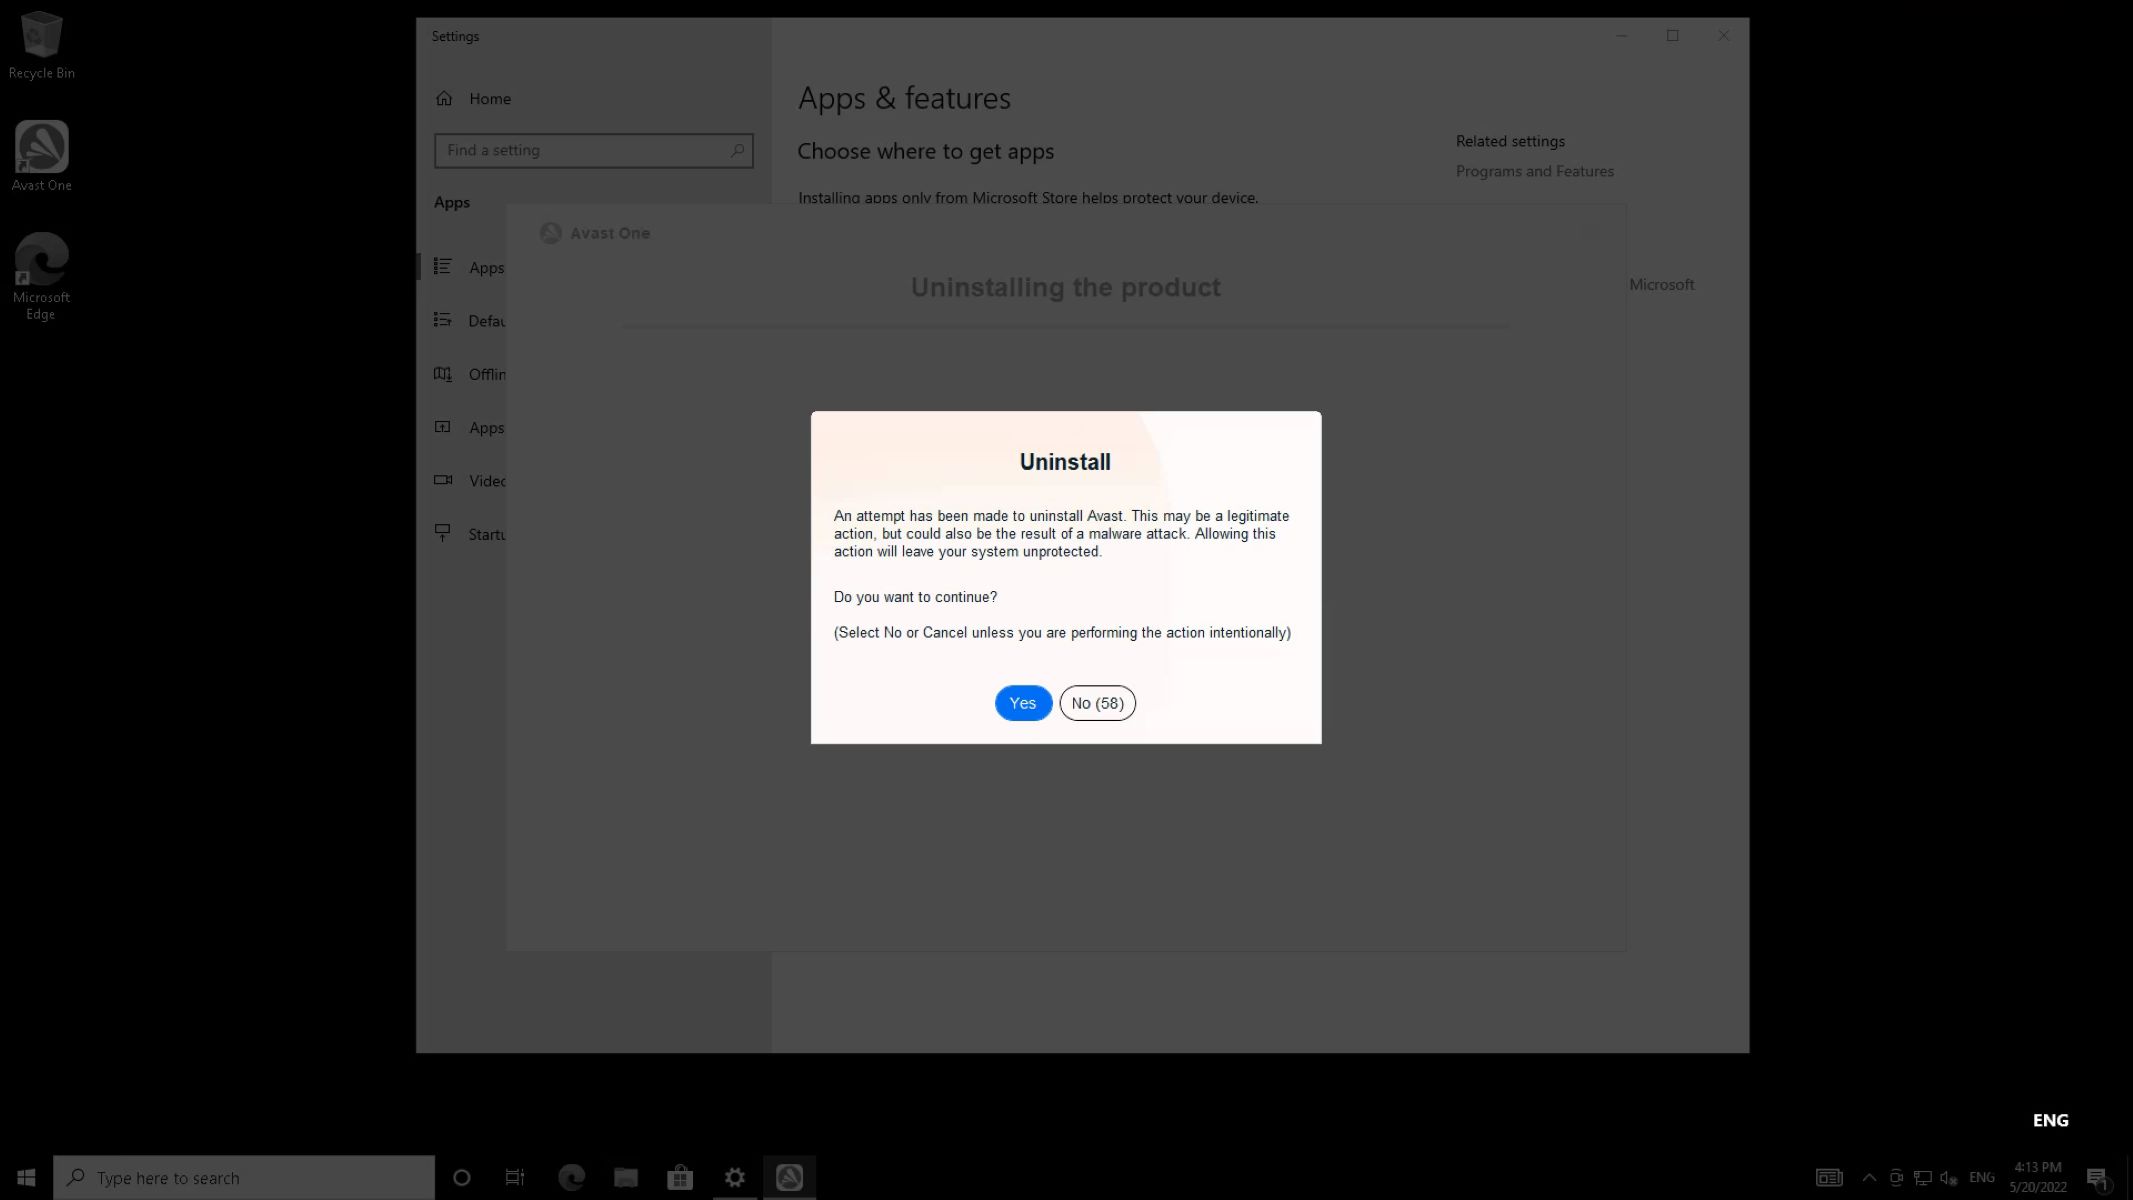
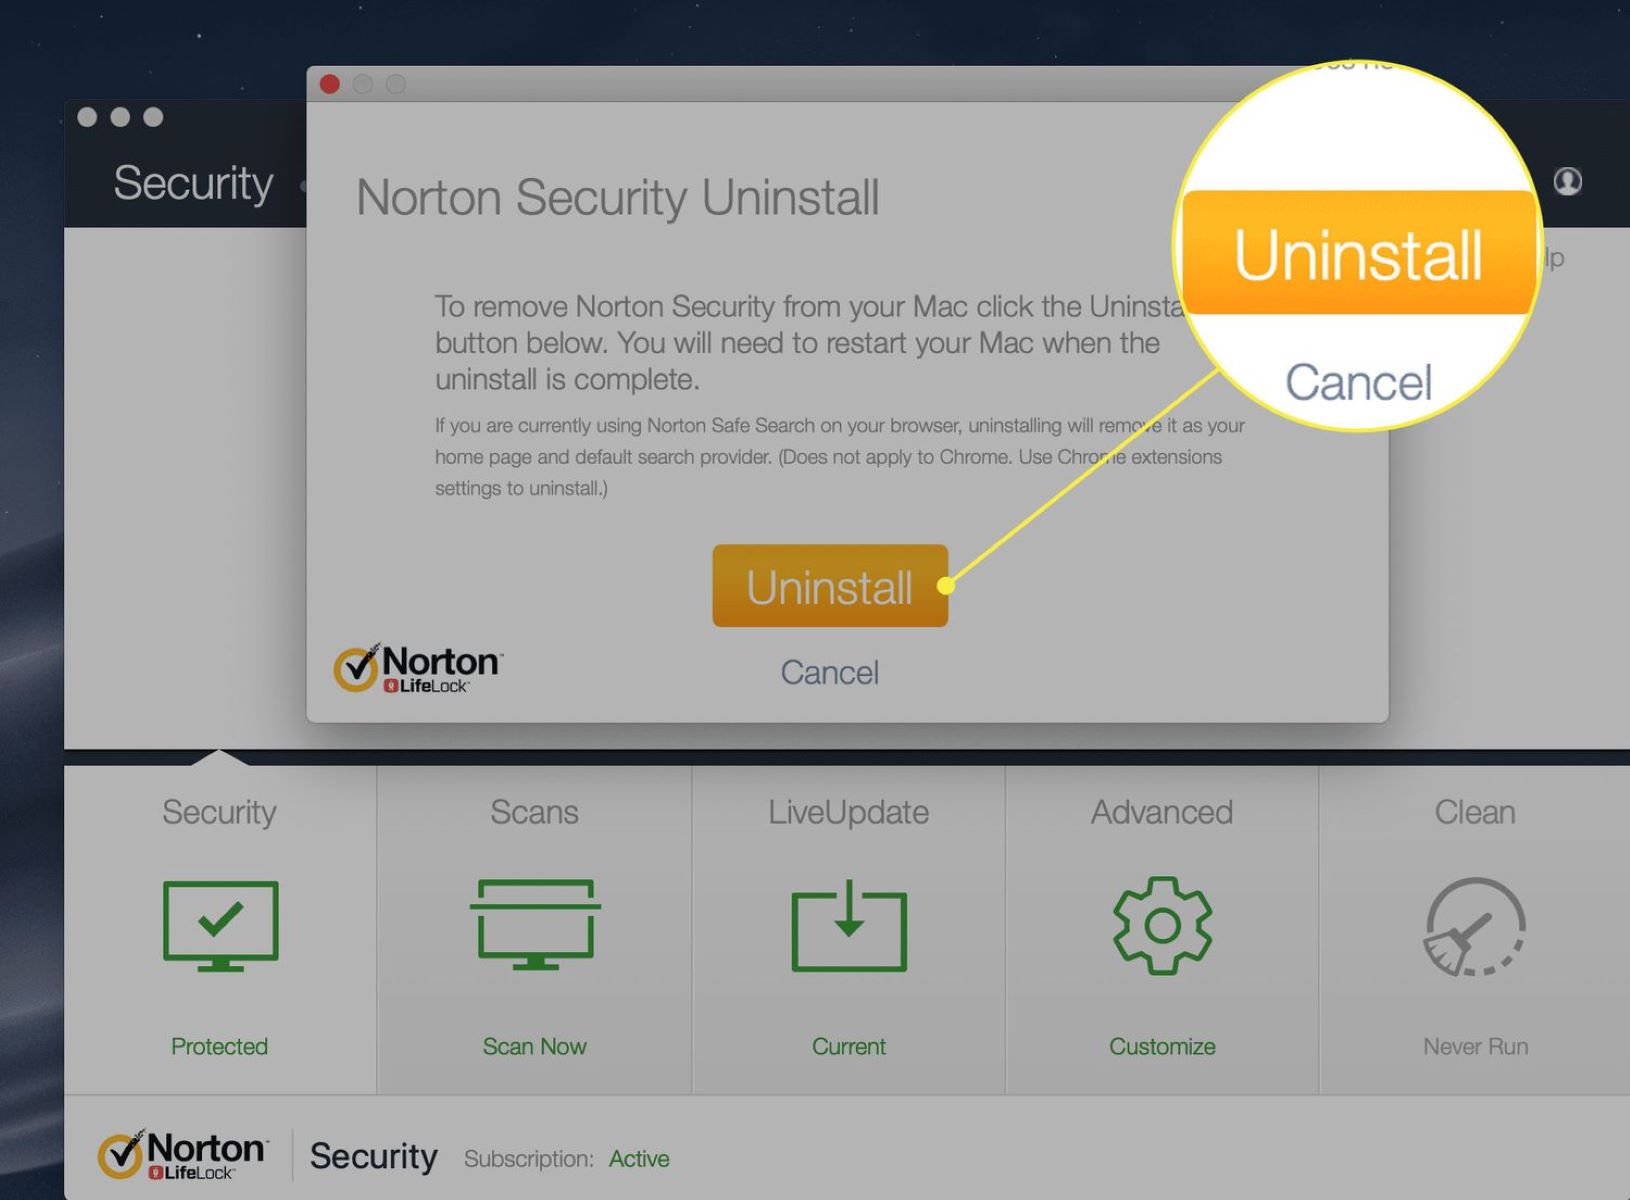
If you are unable to uninstall your antivirus program through the Control Panel or prefer an alternative method, you can often uninstall it using the antivirus software itself. Many antivirus programs provide an uninstallation option within their settings or program menu. Here’s how to uninstall an antivirus program using the software itself:
- Open the antivirus program by double-clicking on its desktop icon or searching for it in the Start menu.
- Look for the program’s settings or options menu. This is typically represented by a gear or cogwheel icon.
- Navigate to the section of the settings related to uninstallation, removal, or general program options.
- Within this menu, locate an option to uninstall or remove the antivirus software.
- Click on the uninstallation option and follow the prompts to proceed with the uninstallation process.
- Once the uninstallation is complete, restart your computer to ensure that any residual components or background processes related to the antivirus software are properly removed.
Remember, the exact steps for uninstalling using the antivirus software may vary depending on the specific program you are using. If you encounter any difficulties or need further guidance, refer to the antivirus software’s documentation or contact their customer support for assistance.
By following these steps, you have successfully uninstalled the antivirus program using the software itself. The next step involves running an antivirus removal tool to ensure the complete removal of any stubborn files or registry entries. We will discuss this step in the following section.
Step #4: Running the Antivirus Removal Tool
Running an antivirus removal tool is an important step in ensuring the complete removal of any residual files or registry entries left behind by the antivirus program. Antivirus vendors often provide dedicated removal tools that are specifically designed to remove their software from your computer. Here’s how to run an antivirus removal tool:
- Visit the official website of the antivirus software you have uninstalled. Look for a section or support page that provides removal or cleanup tools.
- Search for the specific antivirus removal tool provided by the vendor. It may be labeled as an “uninstall utility” or “removal tool.”
- Download the removal tool to your computer.
- Run the removal tool by double-clicking on the downloaded file. This will launch the removal tool’s interface.
- Follow the on-screen instructions to complete the removal process. The tool will scan your computer for any remaining files, folders, or registry entries associated with the antivirus software and remove them.
- Once the removal process is complete, restart your computer to ensure that all remnants of the antivirus program are completely eliminated.
Note that the process for running an antivirus removal tool may vary depending on the specific software you are using. If you encounter any difficulties or have any questions, refer to the documentation or support resources provided by the antivirus software vendor.
Congratulations! You have successfully completed the step of running the antivirus removal tool. In the next section, we will discuss the importance of restarting your computer after uninstalling an antivirus program.
Step #5: Restart Your Computer
After uninstalling an antivirus program and running the removal tool, it is important to restart your computer. Restarting allows any lingering processes or system configurations related to the antivirus software to be fully cleared from memory. Here’s why restarting your computer is an essential step:
- Complete Removal: Restarting your computer ensures that any remaining files, registry entries, or background processes associated with the antivirus program are fully eliminated. This helps to prevent any conflicts or issues when you install a new antivirus software.
- System Optimization: Restarting your computer can help optimize system performance by refreshing system resources and clearing any temporary files or cached data that may have accumulated during the uninstallation process.
- Restoring Default Settings: Restarting your computer helps to reset any system settings that may have been temporarily modified or affected by the antivirus software. This ensures that your computer is in its default state, ready for the next steps.
- Ensuring Smooth Operation: By restarting your computer, you allow the operating system to initialize all necessary components and services, providing a clean slate for your computer to function properly.
Once your computer has restarted, it is now ready for the next steps, such as checking for residual files and installing a new antivirus program.
In the upcoming section, we will discuss how to check for any lingering residual files left behind by the antivirus software. This step is crucial to ensure a complete removal before installing a new antivirus program.
Step #6: Checking for Residual Files
After uninstalling an antivirus program and restarting your computer, it’s important to check for any residual files or remnants that may have been left behind. These residual files can take up disk space, cause conflicts with new antivirus software, or even pose security risks. Here’s how to check for residual files:
- Open the Windows File Explorer by pressing the Windows key + E on your keyboard.
- In the File Explorer window, navigate to the following locations one by one:
C:\Program FilesorC:\Program Files (x86)C:\ProgramDataC:\Users\YourUsername\AppData\LocalC:\Users\YourUsername\AppData\Roaming
- Look for folders related to the uninstalled antivirus software. These folders may have the software’s name or the vendor’s name in them.
- Select and delete any folders or files associated with the uninstalled antivirus software. Be cautious not to delete any system or important files.
- Empty your computer’s Recycle Bin to permanently delete the files and free up disk space.
It’s important to note that the file paths mentioned above are common locations where antivirus software may leave residual files. However, the specific locations may vary depending on the antivirus program you uninstalled. If you are unsure about which files or folders to delete, it’s always a good idea to consult the antivirus software’s documentation or support resources for more specific instructions.
By checking for and removing any residual files, you ensure a clean uninstallation and create a clean slate for installing a new antivirus program.
In the next and final step, we will discuss the importance of installing a new antivirus program to maintain the security and protection of your computer.
Step #7: Installing a New Antivirus
Now that you have successfully uninstalled the previous antivirus program and taken care of any residual files, it’s crucial to install a new antivirus software to ensure the continued security and protection of your computer. Here’s how to install a new antivirus program:
- Research and choose a reputable and trusted antivirus software that suits your needs. Consider factors such as the software’s features, performance, user interface, and customer reviews.
- Visit the official website of the antivirus software you have chosen and locate the download page.
- Download the installation file by selecting the appropriate version for your operating system.
- Once the download is complete, locate the installation file and double-click on it to run the installer.
- Follow the on-screen prompts and agree to any terms or conditions presented during the installation process.
- Customize the installation settings if desired, such as selecting specific scan options or configuring scheduled scans.
- Allow the installation process to complete. This may take a few minutes depending on the size of the antivirus program.
- Once the installation is finished, restart your computer to ensure that all necessary components are properly initialized.
- After the restart, launch the newly installed antivirus program and perform an initial scan of your computer to identify and eliminate any existing threats.
- Configure the antivirus software according to your preferences, such as setting up real-time scanning or enabling specific security features.
- Regularly update the antivirus software to ensure that your computer is protected against the latest threats.
It’s essential to select an antivirus program that meets your specific security needs and regularly update it to keep pace with the ever-evolving landscape of online threats. Remember, having an up-to-date and reliable antivirus software is a crucial aspect of maintaining a secure and protected computer environment.
Congratulations! You have now completed the final step of installing a new antivirus program. Your computer is now equipped with the necessary security measures to safeguard against malware and other security threats.
Conclusion
Uninstalling an antivirus program may become necessary for various reasons, such as switching to a different antivirus software, resolving conflicts, or troubleshooting issues. However, it’s important to ensure a proper and complete uninstallation to avoid any lingering files or vulnerabilities on your computer.
In this comprehensive guide, we have covered the essential steps to safely and effectively uninstall an antivirus program. From disabling real-time protection to uninstalling through the Control Panel or using the antivirus software itself, we have provided step-by-step instructions for each stage of the process.
We also emphasized the importance of running an antivirus removal tool, restarting your computer to clear any remaining traces, checking for residual files, and installing a new antivirus program to maintain the security and protection of your computer.
Remember, it’s crucial to follow these steps carefully and consider the specific instructions provided by your antivirus software provider. By doing so, you can confidently navigate the process of uninstalling and installing antivirus programs, ensuring your computer remains protected from malware, viruses, and other security threats.
Thank you for reading this guide on how to uninstall an antivirus program. We hope that you found it informative and useful. Should you have any further questions or concerns, reach out to the respective antivirus software’s support team for assistance. Stay safe and enjoy a secure computing experience!