Introduction
Welcome to the world of Windows 11! This latest version of Microsoft’s operating system brings a breath of fresh air with its sleek design and intuitive user interface. If you’re new to Windows 11 or are simply looking to explore its features, you may be wondering how to turn on Bluetooth.
Bluetooth technology enables wireless communication between your Windows 11 device and other compatible devices such as speakers, headphones, smartphones, and more. It allows you to conveniently transfer files, stream audio, and connect peripherals without the hassle of wires.
In this article, we will walk you through four easy methods to turn on Bluetooth in Windows 11. Whether you prefer using the Quick Settings menu, the Action Center, the Start menu, or the Settings app, we’ve got you covered. Let’s dive right in!
Before we begin, it’s important to note that the steps may vary slightly depending on your specific device and version of Windows 11. However, the overall process remains similar across different devices.
Method 1: Using the Quick Settings Menu
The Quick Settings menu in Windows 11 provides a convenient way to access various system settings, including Bluetooth. Follow these simple steps to enable Bluetooth using the Quick Settings menu:
- Click on the ‘Action Center’ icon located on the right side of the taskbar. You can also use the shortcut key Windows key + A to open the Action Center.
- In the Action Center, you will find a section called ‘Quick Settings’. Look for the Bluetooth icon, which resembles a stylized ‘B’.
- If the Bluetooth icon is grayed out, it means Bluetooth is currently turned off. Click on the Bluetooth icon to enable it.
- Once enabled, the Bluetooth icon will turn blue, indicating that Bluetooth is now on. You can now connect your Windows 11 device to other Bluetooth-enabled devices.
That’s it! You have successfully turned on Bluetooth using the Quick Settings menu. This method offers a quick and hassle-free way to enable Bluetooth without having to navigate through various settings menus.
Keep in mind that the availability and location of the Quick Settings menu may differ depending on your device and settings configuration. However, the general steps outlined above should guide you in enabling Bluetooth using this method.
Method 2: Using the Action Center
If you prefer using the Action Center for accessing system settings, you can also enable Bluetooth from there. Here’s how:
- Click on the ‘Action Center’ icon located on the right side of the taskbar. You can also use the shortcut key Windows key + A to open the Action Center.
- In the Action Center, you will find a section labeled ‘Quick Actions’. Look for the ‘Bluetooth’ tile.
- If the Bluetooth tile shows ‘Off’, click on it to enable Bluetooth. The tile will change to ‘On’ indicating that Bluetooth is now activated.
By following these simple steps, you can easily enable Bluetooth using the Action Center in Windows 11. This method provides a straightforward way to toggle Bluetooth on and off, making it convenient for quick access to the feature.
It’s worth noting that the available options and layout of the Action Center may vary depending on your specific device and settings configuration. However, you should be able to locate the Bluetooth tile and enable Bluetooth using this method on most Windows 11 devices.
Method 3: Using the Start Menu
The Start menu in Windows 11 offers another convenient method to turn on Bluetooth. Follow these steps to enable Bluetooth using the Start menu:
- Click on the ‘Start’ button located in the bottom-left corner of the screen or press the Windows key on your keyboard to open the Start menu.
- In the Start menu, you will find various app tiles and a search bar at the top. Type ‘Bluetooth’ in the search bar.
- From the search results, click on the ‘Bluetooth & other devices settings’ option. This will open the Bluetooth settings page in the Windows Settings app.
- In the Bluetooth settings page, toggle the switch to turn on Bluetooth. The switch will turn blue, indicating that Bluetooth is now active.
That’s it! You have successfully enabled Bluetooth using the Start menu in Windows 11. This method provides a straightforward way to access the Bluetooth settings and turn it on.
Keep in mind that the layout and options in the Start menu may vary depending on your device and settings configuration. However, by following the steps above, you should be able to navigate to the Bluetooth settings and enable Bluetooth using the Start menu.
Method 4: Using the Settings App
If you prefer a more in-depth control over your Windows 11 settings, you can enable Bluetooth using the Settings app. Here’s how:
- Click on the ‘Start’ button located in the bottom-left corner of the screen or press the Windows key on your keyboard to open the Start menu.
- In the Start menu, locate and click on the ‘Settings’ icon, which resembles a gear. This will open the Settings app.
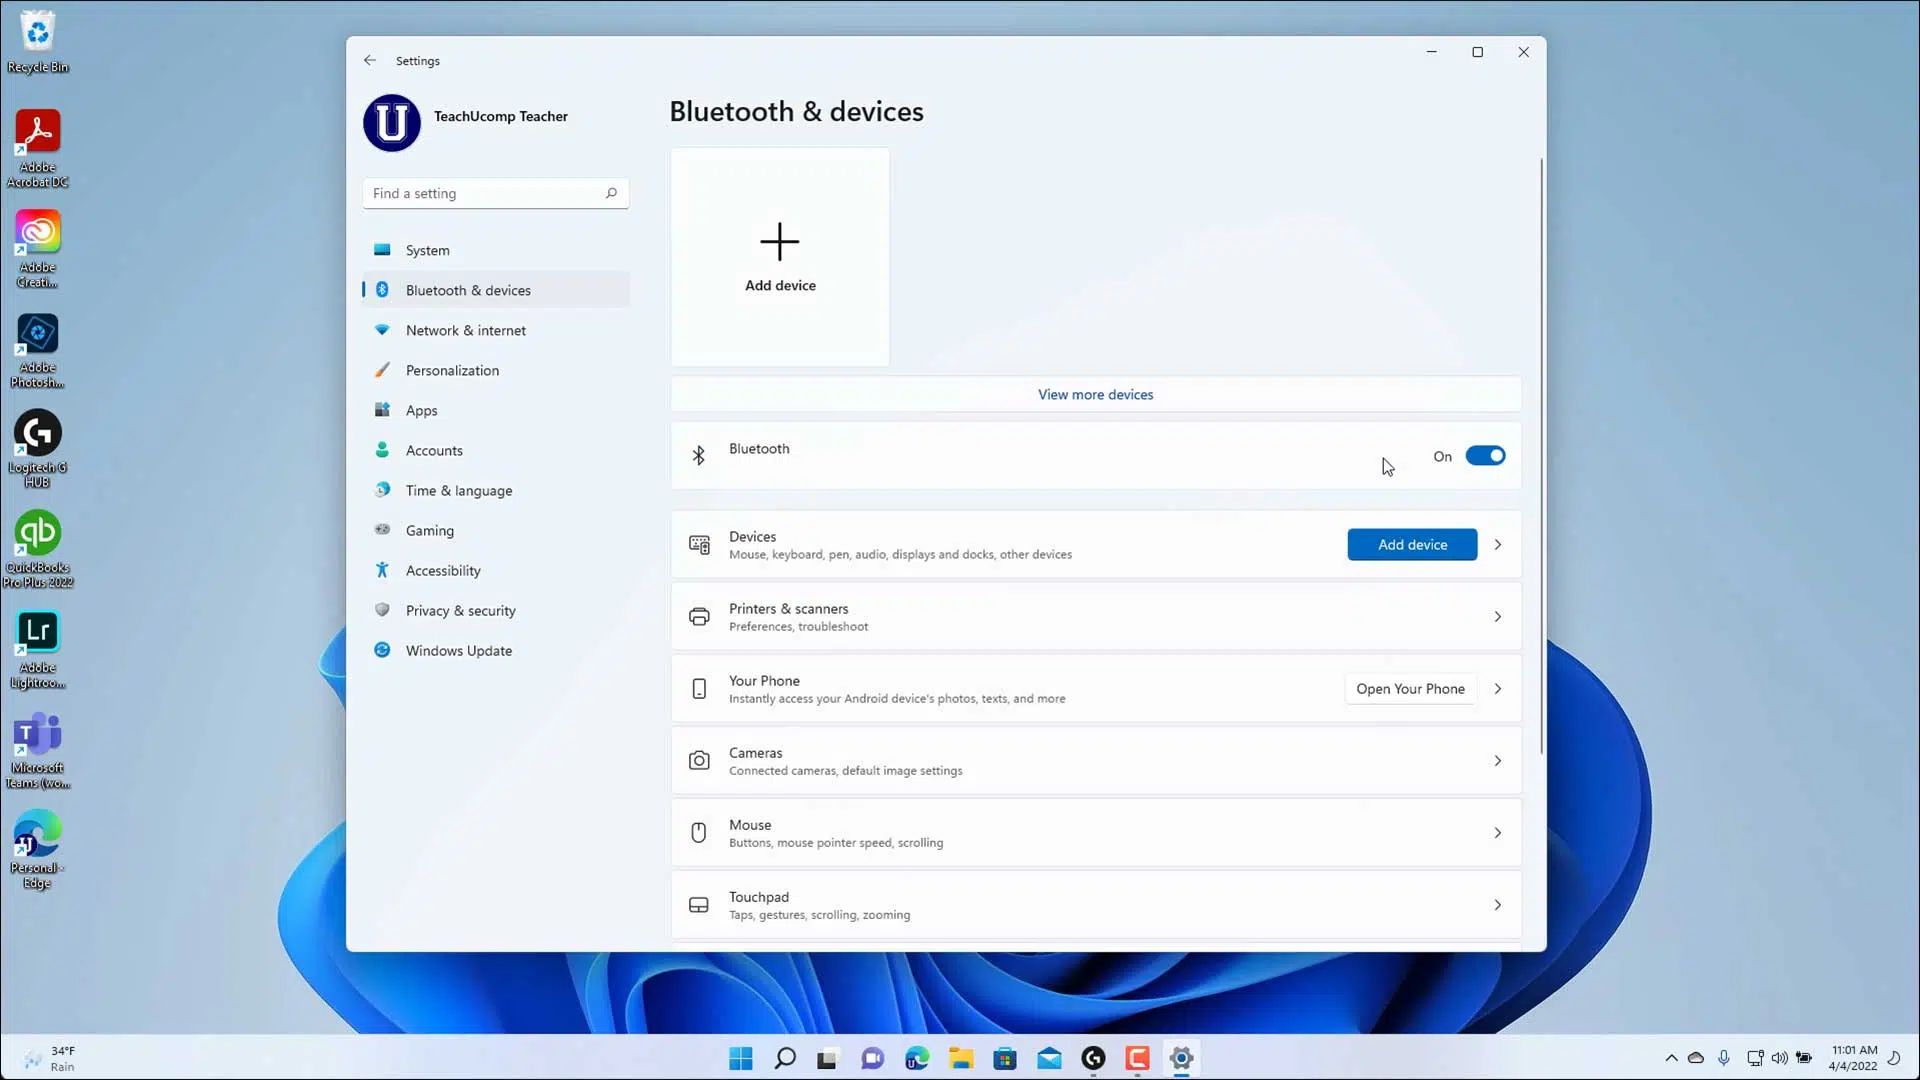
- In the Settings app, click on the ‘Devices’ category. This will take you to the devices settings page.
- On the left sidebar, click on the ‘Bluetooth & devices’ option.
- In the right pane, toggle the switch under the ‘Bluetooth’ section to turn it on. The switch will turn blue, indicating that Bluetooth is now enabled.
By following these steps, you can easily enable Bluetooth using the Settings app in Windows 11. The Settings app provides a comprehensive interface for managing various system settings, including Bluetooth.
It’s important to note that the layout and options in the Settings app may vary slightly depending on your device and settings configuration. However, the general steps outlined above should guide you in accessing the Bluetooth settings and enabling Bluetooth using the Settings app.
Conclusion
Enabling Bluetooth on your Windows 11 device is a simple process that offers you the convenience of wireless connectivity. In this article, we presented four methods to turn on Bluetooth in Windows 11: using the Quick Settings menu, the Action Center, the Start menu, and the Settings app.
The Quick Settings menu and the Action Center provide quick and easy access to toggle Bluetooth on and off, while the Start menu and the Settings app offer more in-depth control over your device’s settings.
It’s important to note that the specific steps may slightly vary depending on your device and settings configuration, but the general process remains the same across Windows 11 devices.
By following the instructions outlined in this article, you can easily enable Bluetooth on your Windows 11 device and enjoy the benefits of wireless connectivity. Whether you want to connect wireless headphones, transfer files, or connect peripherals, Bluetooth makes it all possible.
So, go ahead and explore the wireless world with Bluetooth on your Windows 11 device. With just a few clicks, you can connect and enjoy a seamless wireless experience.