Introduction
Welcome to the world of Samsung Galaxy S7, a powerful and feature-packed smartphone that offers a seamless user experience. One of the great features of the Samsung Galaxy S7 is its autocorrect function, which helps to enhance your typing accuracy by automatically correcting misspelled words as you type. Autocorrect can be a real time-saver, especially when you’re texting or typing emails on the go.
In this article, we will guide you through the process of turning on autocorrect on your Samsung Galaxy S7. Whether you’re a new user or just need a refresher, we’ve got you covered. By the end of this guide, you’ll be tapping away on your device with confidence, knowing that autocorrect is there to assist you.
Before we dive into the steps, it’s worth noting that the exact location of the autocorrect settings may vary slightly depending on the version of Android your device is running and any customizations made by your mobile carrier. However, the general process remains the same, and we’ll guide you through the most common path to enable autocorrect.
Step 1: Open the Settings App
The first step towards turning on autocorrect on your Samsung Galaxy S7 is to open the Settings app. The Settings app is where you can access and modify various system settings to customize your device according to your preferences.
To open the Settings app, locate the app drawer on your home screen. It is usually represented by an icon with gears or sliders. Tap on the app drawer icon to open it and look for the “Settings” app among the list of available apps. Once you find it, tap on the “Settings” app to launch it.
Alternatively, you can swipe down from the top of your screen to open the notification panel and tap on the gear icon in the top right corner of the screen to directly access the Settings app. This method is especially useful if the Settings app is frequently accessed.
Once you have opened the Settings app, you are ready to proceed to the next step in enabling autocorrect on your Samsung Galaxy S7.
Step 2: Select Language and Input
After opening the Settings app on your Samsung Galaxy S7, the next step is to select the “Language and Input” option. This option allows you to customize the language settings and input methods for your device.
To access the Language and Input settings, scroll down the Settings menu until you find the “System” section. Tap on “Language and Input” to enter the Language and Input settings.
Next, you may need to scroll down again to find the “Virtual Keyboard” or “On-screen Keyboard” option. Different versions of Samsung’s user interface may have different names for this section, so keep an eye out for similar options.
Once you locate the Virtual Keyboard or On-screen Keyboard option, tap on it to access the settings for your device’s keyboard.
Now that you have entered the Language and Input settings, you can proceed to the next step where you will select the Samsung Keyboard for further customization.
Step 3: Choose Samsung Keyboard
Within the Language and Input settings of your Samsung Galaxy S7, you will find a list of available keyboards on your device. In this step, we will guide you through the process of choosing the Samsung Keyboard as your primary keyboard.
Tap on the “Virtual Keyboard” or “On-screen Keyboard” option within the Language and Input settings to access the available keyboard options. Depending on your device’s configuration, you may see multiple keyboards listed, including third-party keyboard apps.
Look for the “Samsung Keyboard” option in the list and select it by tapping on it. This step will ensure that you are customizing the settings for the default keyboard app that comes with your Samsung Galaxy S7.
Once you have selected the Samsung Keyboard, you may see additional settings and options specific to this keyboard. Feel free to explore these settings and make any desired modifications, such as adjusting the keyboard layout, enabling or disabling haptic feedback, or changing the keyboard theme.
Now that you have chosen the Samsung Keyboard as your default keyboard, you are ready to move on to the next step where you will find the option to enable autocorrect.
Step 4: Tap on Auto Spell Check
Once you have selected the Samsung Keyboard as your primary keyboard, it’s time to locate the option to enable autocorrect. In this step, we will guide you through the process of finding the Auto Spell Check setting.
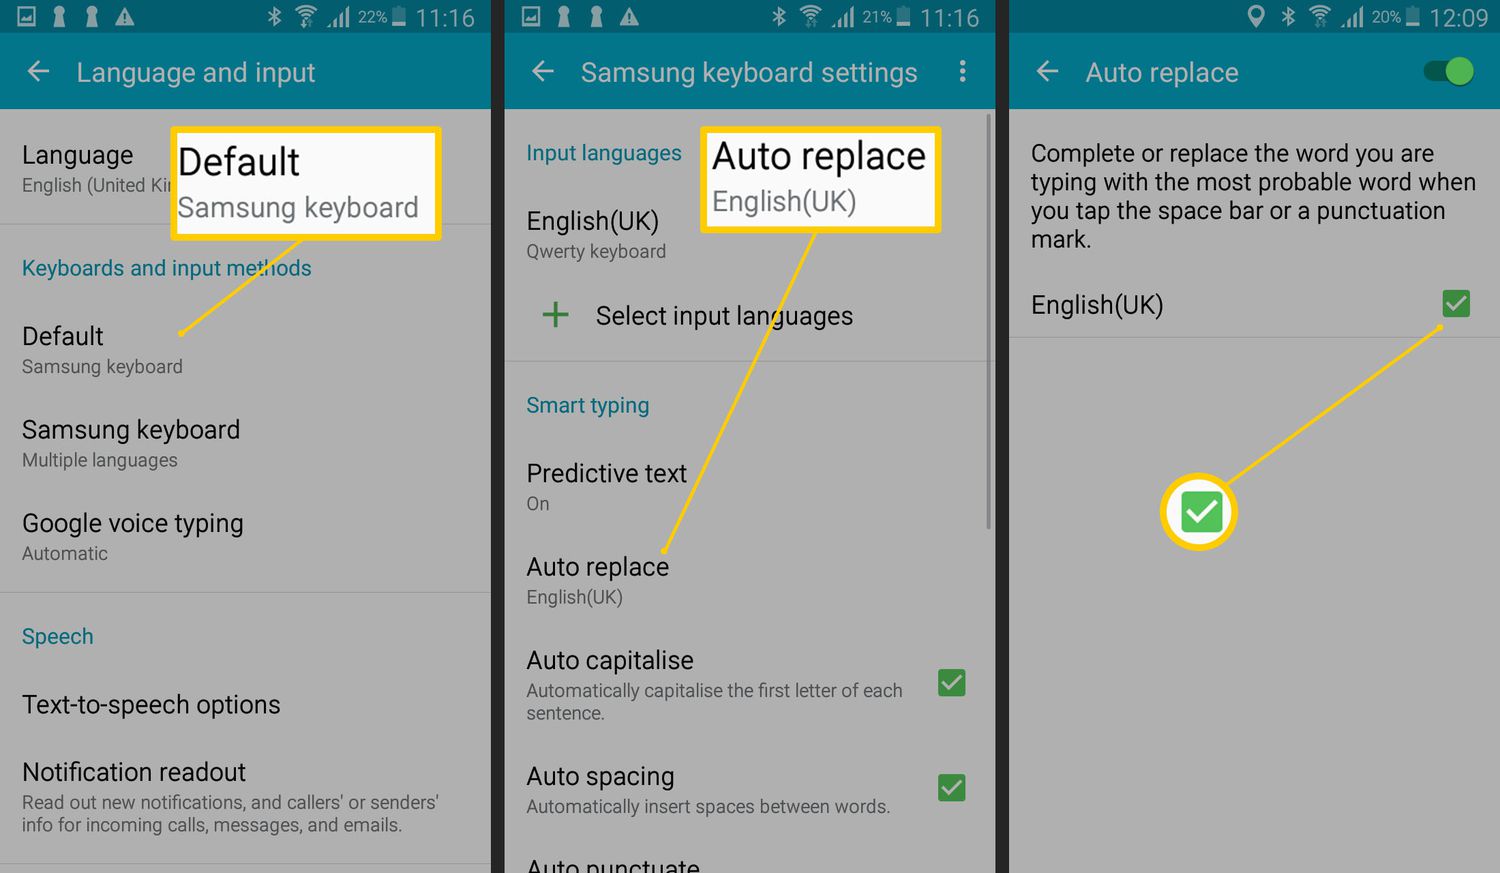
Within the Samsung Keyboard settings, scroll down until you find the option labeled “Smart Typing” or “Text Correction”. This option is where various text-related features, including autocorrect, are typically grouped.
Tap on “Smart Typing” or “Text Correction” to access the corresponding settings. Inside this menu, you may see options such as “Predictive Text”, “Auto Replace”, and “Auto Capitalize”. These settings allow you to further customize your typing experience.
Look for the “Auto Spell Check” option within the Smart Typing or Text Correction settings. This is the option responsible for enabling or disabling autocorrect on your Samsung Galaxy S7.
Tap on the Auto Spell Check option to access its settings. Here, you can enable or disable autocorrect as per your preference. If the option is already enabled, you can skip this step and proceed to the next one.
Make sure that the Auto Spell Check option is toggled on, indicating that autocorrect is enabled. Once you have enabled autocorrect, your Samsung Galaxy S7 will automatically correct any misspelled words as you type.
With autocorrect enabled, you are ready to move on to the final step, where we will ensure that the autocorrect feature is working properly.
Step 5: Enable Autocorrect
In this final step, we will ensure that the autocorrect feature is enabled on your Samsung Galaxy S7. Enabling autocorrect will allow your device to automatically correct misspelled words as you type, improving your typing accuracy and efficiency.
After enabling the Auto Spell Check option in the previous step, return to the main Samsung Keyboard settings menu. You can do this by tapping the back button or using the navigation provided within the settings app.
Once you are back in the Samsung Keyboard settings menu, look for the option labeled “Auto Correction” or “Autocorrect”. This option controls the autocorrect functionality of your keyboard.
Tap on the Auto Correction or Autocorrect option to access its settings. Here, you will find a toggle switch that allows you to enable or disable autocorrect.
Make sure that the toggle switch is in the “On” or “Enabled” position, indicating that autocorrect is enabled. If it is already enabled, you can skip this step and proceed to testing the autocorrect feature.
With autocorrect enabled, your Samsung Galaxy S7 is now ready to automatically correct any misspelled words as you type. Enjoy the benefits of accurate and efficient typing with the help of this handy feature.
Now that you have successfully enabled autocorrect, you can start composing messages, emails, social media posts, or any other text input with confidence, knowing that autocorrect will assist you in producing error-free content.
Remember that autocorrect is designed to assist you, but it may not always make the correct suggestions. Therefore, it’s important to review your text before sending or publishing to ensure accuracy.
Conclusion
Congratulations! You have successfully turned on and enabled autocorrect on your Samsung Galaxy S7. By following the steps outlined in this guide, you can now enjoy the benefits of improved typing accuracy and efficiency as autocorrect automatically corrects any misspelled words as you type.
Autocorrect can be a real time-saver, especially when you’re on the go and need to quickly compose messages, emails, or other forms of written communication. With autocorrect enabled, you can rely on your Samsung Galaxy S7 to automatically fix any typos, ultimately saving you both time and effort.
Remember, autocorrect is designed to assist you, but it may not always provide the correct suggestions. Therefore, it’s important to proofread your text before sending or publishing to ensure accuracy. Additionally, personal and unique words or names may not appear in the autocorrect dictionary, so watch out for those instances.
Now that you have successfully configured autocorrect on your Samsung Galaxy S7, you can confidently type away with the peace of mind that any spelling mistakes will be swiftly corrected. Happy typing!