Introduction
Noise cancellation has become a must-have feature for many audio enthusiasts, especially when it comes to premium wireless earbuds like the AirPods Pro. With noise cancellation, you can enjoy your favorite music or podcasts without the distractions of the outside world. However, there may be times when you prefer to turn off noise cancellation to be more aware of your surroundings or to conserve battery life.
But what if you’re an Android user with AirPods Pro? Since AirPods Pro is primarily designed for Apple devices, turning off noise cancellation on Android may seem like a challenge. Fear not, as we have a solution for you. In this article, we will guide you through the steps to turn off noise cancellation on your AirPods Pro while using an Android device.
Before we proceed with the steps, it’s worth noting that you’ll need to have the latest firmware version on your AirPods Pro for this method to work. Also, keep in mind that noise cancellation settings on Android may vary depending on the app or device you’re using. But don’t worry; we’ll be using a third-party app that simplifies the process.
So, if you’re ready to take control of your AirPods Pro and disable noise cancellation on your Android device, follow along as we walk you through the steps. With just a few simple adjustments, you’ll be able to enjoy your AirPods Pro without noise cancellation whenever you desire.
Why Would You Want to Turn Off Noise Cancellation?
While noise cancellation can greatly enhance your audio experience by blocking out external sounds, there are a few reasons why you might want to turn it off on your AirPods Pro when using them with your Android device.
1. Environmental Awareness: Noise cancellation technology works by using built-in microphones to detect ambient sounds and generate inverse sound waves to cancel them out. While this is great for immersing yourself in music or enjoying a phone call, it can also hinder your awareness of your surroundings. If you’re in a busy street, public transportation, or any situation where you need to be fully aware of your environment, turning off noise cancellation can help you stay alert.
2. Battery Conservation: Noise cancellation relies on advanced technology that consumes additional power. If you’re using your AirPods Pro for an extended period, like during a long flight or road trip, disabling noise cancellation can help conserve battery life. This way, you can enjoy your audio without the need to recharge your AirPods Pro frequently.
3. Personal Preference: Some individuals may find that noise cancellation affects their perception of sound quality or causes discomfort. Preferences can vary from person to person, and you may simply prefer the natural sound or feel of your AirPods Pro without noise cancellation.
It’s important to note that while noise cancellation can be useful in many scenarios, there are instances where turning it off can be more beneficial. Fortunately, with the help of the AirBattery app, you can easily toggle the noise cancellation feature on your AirPods Pro from your Android device settings. Let’s move on to the steps to accomplish this.
Step 1: Check Firmware Version
Before proceeding with the process of disabling noise cancellation on your AirPods Pro, it’s essential to ensure that your AirPods Pro are running the latest firmware version. The firmware updates usually include bug fixes, performance improvements, and additional features.
To check the firmware version of your AirPods Pro, you can follow these steps:
1. Make sure your AirPods Pro are connected to your Android device via Bluetooth.
2. Open the settings app on your Android device.
3. Navigate to the “Connected devices” or “Bluetooth” settings section.
4. Find your AirPods Pro in the list of connected devices and tap on them.
5. Look for the firmware version information. It should be listed under the device name or in a separate firmware section.
6. Compare the firmware version with the latest firmware version available from Apple’s official website. If there is a newer version available, you may need to update your AirPods Pro before proceeding further.
Note: Firmware updates for AirPods Pro are typically released over-the-air and are automatically installed when your AirPods Pro are connected to an iOS device. However, since you’re using AirPods Pro with an Android device, you may need to update the firmware manually.
Once you’ve confirmed that your AirPods Pro are running the latest firmware version, you can proceed to the next step, which involves installing the AirBattery app on your Android device.
Step 2: Install the AirBattery App
To conveniently control the noise cancellation feature on your AirPods Pro from your Android device, we will be using the AirBattery app. This app provides additional functionality and settings specifically designed for AirPods and AirPods Pro when used with Android devices.
To install the AirBattery app, follow these steps:
1. Open the Google Play Store on your Android device.
2. In the search bar, type “AirBattery” and press Enter or tap the search icon.
3. From the search results, locate the AirBattery app and tap on it to open the app page.
4. On the app page, tap on the “Install” button.
5. Review the permissions required by the app, and if you’re comfortable with them, tap on the “Accept” button.
6. Wait for the installation process to complete. Once the app is installed, you’ll see the “Open” button. Tap on it to launch the app.
The AirBattery app is now installed on your Android device. This app will allow you to access and control various features of your AirPods Pro, including noise cancellation. With the app installed, you’re ready to proceed to the next step, where we’ll guide you through connecting your AirPods Pro to your Android device.
Step 3: Connect Your AirPods Pro to Your Android Device
Now that you have the AirBattery app installed on your Android device, it’s time to connect your AirPods Pro. Follow the steps below to establish a Bluetooth connection between your AirPods Pro and your Android device:
1. Open the Settings app on your Android device.
2. Navigate to the “Connected devices” or “Bluetooth” settings section.
3. Make sure Bluetooth is turned on. If not, toggle the switch to enable it.
4. On your AirPods Pro, place them in their case and keep the lid open.
5. Locate the pairing button on the back of the AirPods Pro case.
6. Press and hold the pairing button until the LED indicator on the front of the case starts flashing white.
7. On your Android device, tap on the “Scan” or “Pair new device” button. Your Android device should detect the AirPods Pro.
8. Tap on the AirPods Pro name to start the pairing process.
9. Follow any additional on-screen prompts to complete the pairing process.
Once the pairing is successful, you will see a notification on your Android device confirming the connection. You should now be able to use your AirPods Pro with your Android device.
Now that your AirPods Pro are successfully connected, let’s move on to the next step, where we’ll show you how to open the AirBattery app and access the noise cancellation settings.
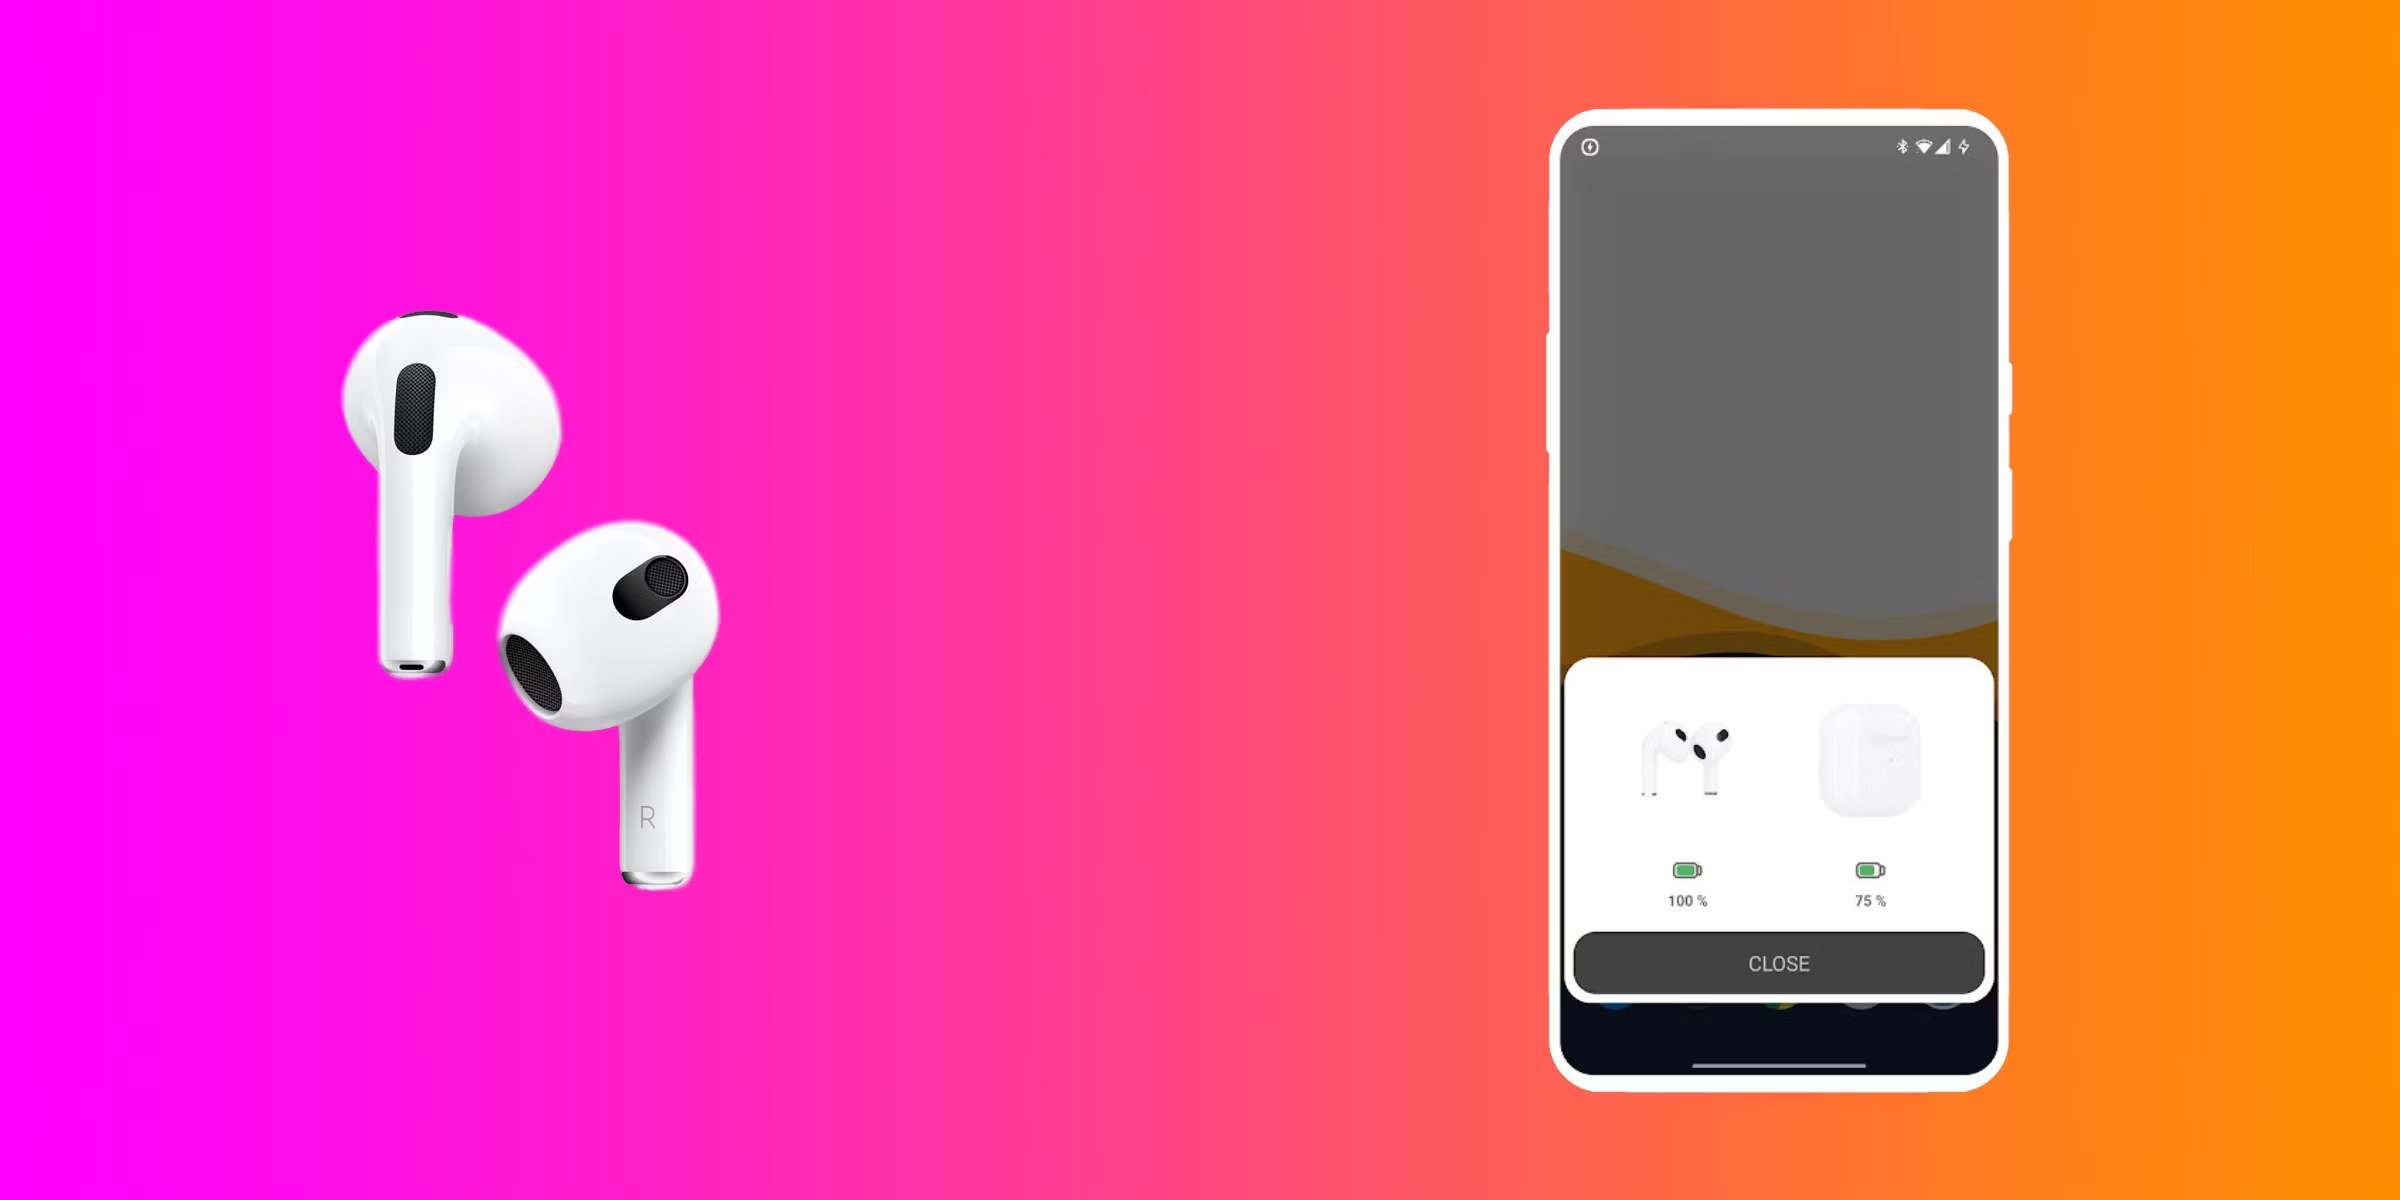
Step 4: Open the AirBattery App
With your AirPods Pro successfully connected to your Android device, it’s time to open the AirBattery app and access the noise cancellation settings. Here’s how you can do it:
1. Locate the AirBattery app on your Android device’s home screen or app drawer.
2. Tap on the AirBattery app icon to launch it.
3. Once the app is open, you will see the battery status of your AirPods Pro displayed on the screen. This includes the battery level of both the left and right earbuds, as well as the battery level of the charging case.
4. Scroll down within the app until you find the “Device settings” section.
5. Tap on the “Device settings” option to access additional settings for your AirPods Pro.
6. Within the device settings, you will find various options related to your AirPods Pro, including the noise cancellation setting.
By opening the AirBattery app, you now have access to a range of additional features and settings for your AirPods Pro, including the ability to control and adjust the noise cancellation feature.
Now that you have the AirBattery app open and ready, let’s proceed to the next step, where we’ll guide you on how to disable the noise cancellation on your AirPods Pro using the app’s settings.
Step 5: Disable Noise Cancellation
Now that you have the AirBattery app open and ready, you can easily disable noise cancellation on your AirPods Pro. Here’s how you can do it:
1. Within the AirBattery app’s device settings, look for the option labeled “Noise Control” or “Noise Cancellation.”
2. Tap on the “Noise Control” option to access the noise cancellation settings.
3. In the noise control settings, you will typically find a slider or toggle switch that allows you to enable or disable noise cancellation.
4. To turn off noise cancellation, simply slide the toggle switch to the “Off” position or tap on the option to disable it.
5. Once you’ve disabled noise cancellation, the AirBattery app will save your preference, and your AirPods Pro will now play audio without the noise cancellation feature.
This convenient and straightforward method enables you to toggle the noise cancellation setting on your AirPods Pro directly from your Android device, providing you with more control and flexibility over your audio experience.
With noise cancellation turned off, you can now enjoy your AirPods Pro without the external sounds being actively canceled out. Whether you want to be more aware of your surroundings or simply prefer a different audio experience, you have the freedom to choose.
Remember that you can always re-enable noise cancellation through the AirBattery app whenever you desire.
In the next section, we’ll briefly summarize the steps we’ve covered and conclude the guide to turning off noise cancellation on AirPods Pro when using an Android device.
Conclusion
Turning off noise cancellation on your AirPods Pro when using an Android device might seem like a challenge at first, but with the help of the AirBattery app, it becomes a simple process. By following the steps outlined in this guide, you can easily disable noise cancellation and customize your audio experience according to your preferences or specific situations.
We started by emphasizing the reasons why you might want to turn off noise cancellation, such as environmental awareness, battery conservation, and personal preference. These factors may influence your decision to disable noise cancellation at times.
Next, we walked through each step of the process. We covered checking the firmware version of your AirPods Pro, installing the AirBattery app on your Android device, connecting your AirPods Pro to your Android device via Bluetooth, opening the AirBattery app, and finally, disabling noise cancellation within the app settings.
With noise cancellation turned off, you can have a more aware listening experience, extend your AirPods Pro’s battery life, or fine-tune the audio to your liking.
Remember to explore the AirBattery app further, as it offers additional features and settings for your AirPods Pro, including battery status and gestures customization.
Now that you have the knowledge and tools to disable noise cancellation on your AirPods Pro when using an Android device, you can enjoy a more personalized audio experience. Whether you’re in a bustling environment or simply prefer a different audio ambiance, you have the freedom to adjust your AirPods Pro according to your needs.
So go ahead, take control of your AirPods Pro, and enjoy your favorite audio content with the noise cancellation feature on or off, depending on your preference.