How To Turn Off Face ID On iPhone
Face ID is a convenient and secure way to unlock your iPhone and authenticate app purchases using facial recognition technology. However, there may be situations where you prefer to disable Face ID for privacy reasons or to prevent accidental unlocks. Here’s a step-by-step guide on how to turn off Face ID on your iPhone.
Before we proceed, it’s important to note that disabling Face ID will require you to use your passcode instead for unlocking your device or authorizing app transactions.
To disable Face ID on your iPhone:
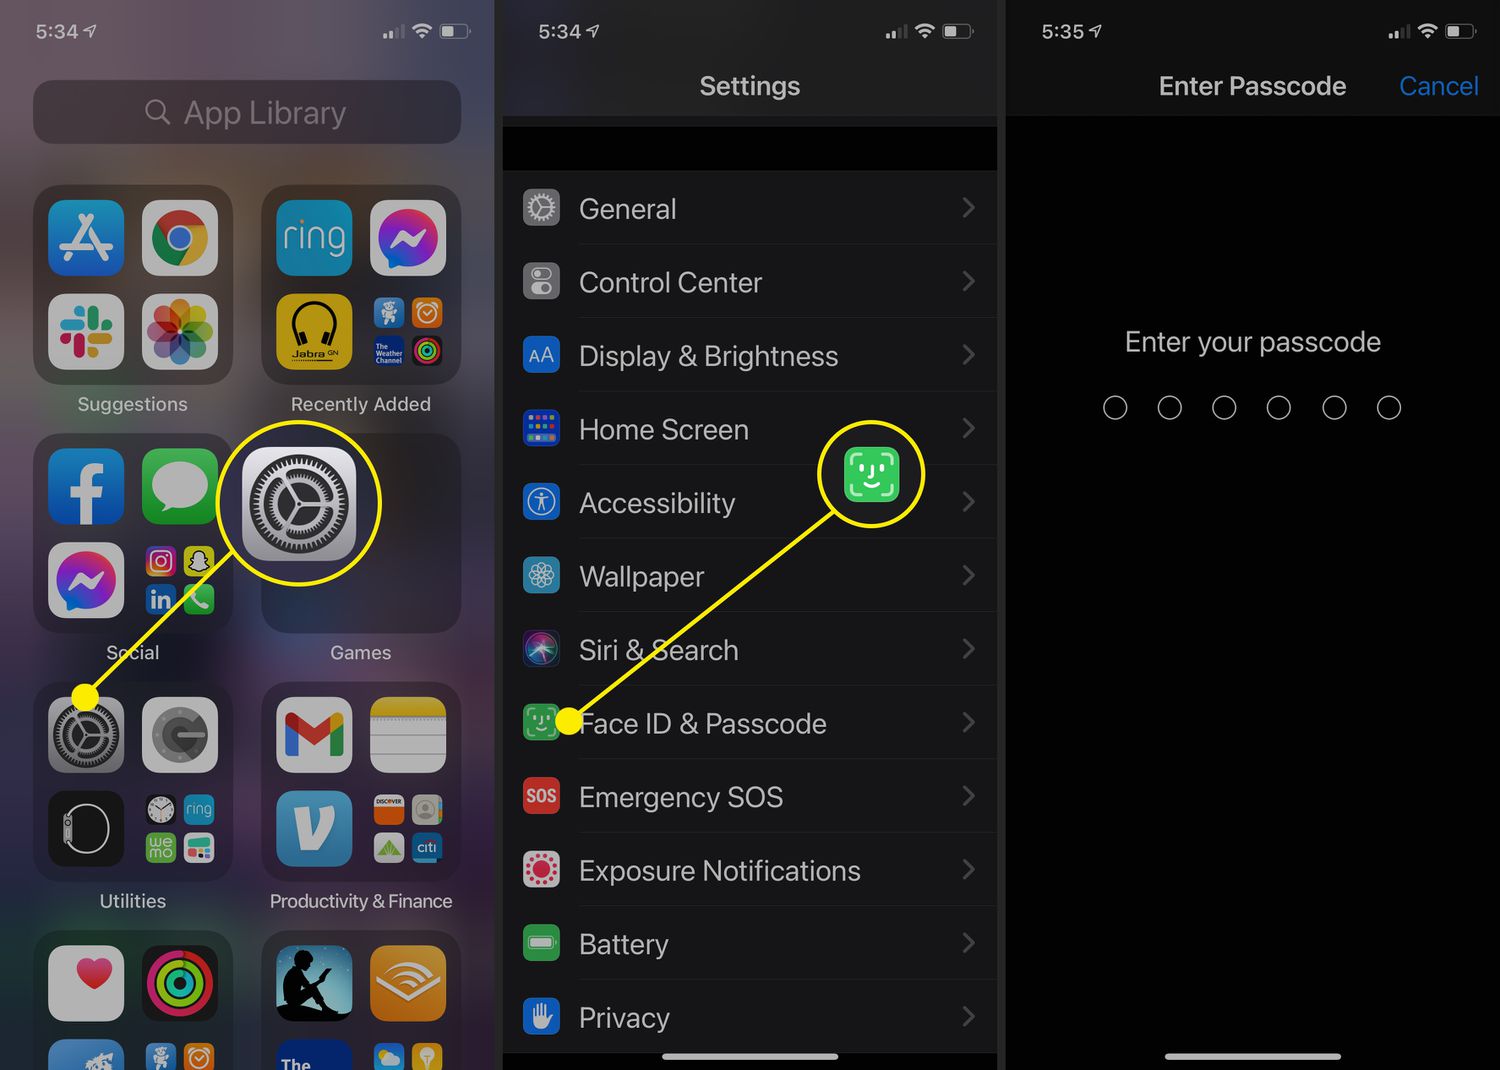
- Open the Settings app on your iPhone.
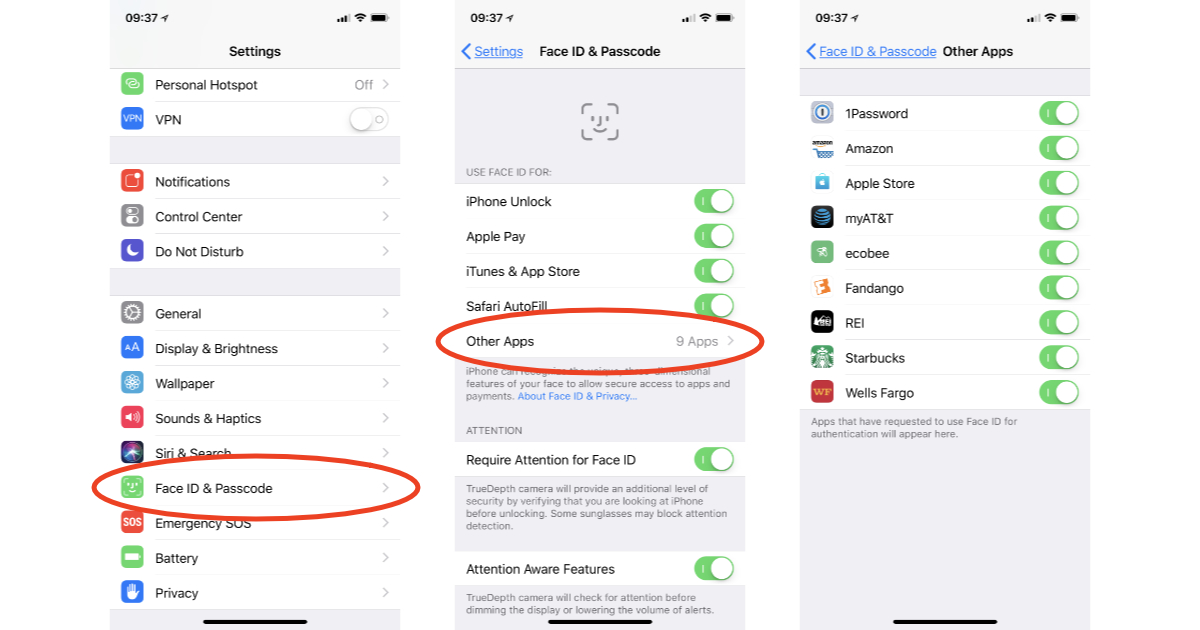
- Scroll down and tap on “Face ID & Passcode.”
- Enter your passcode to proceed.
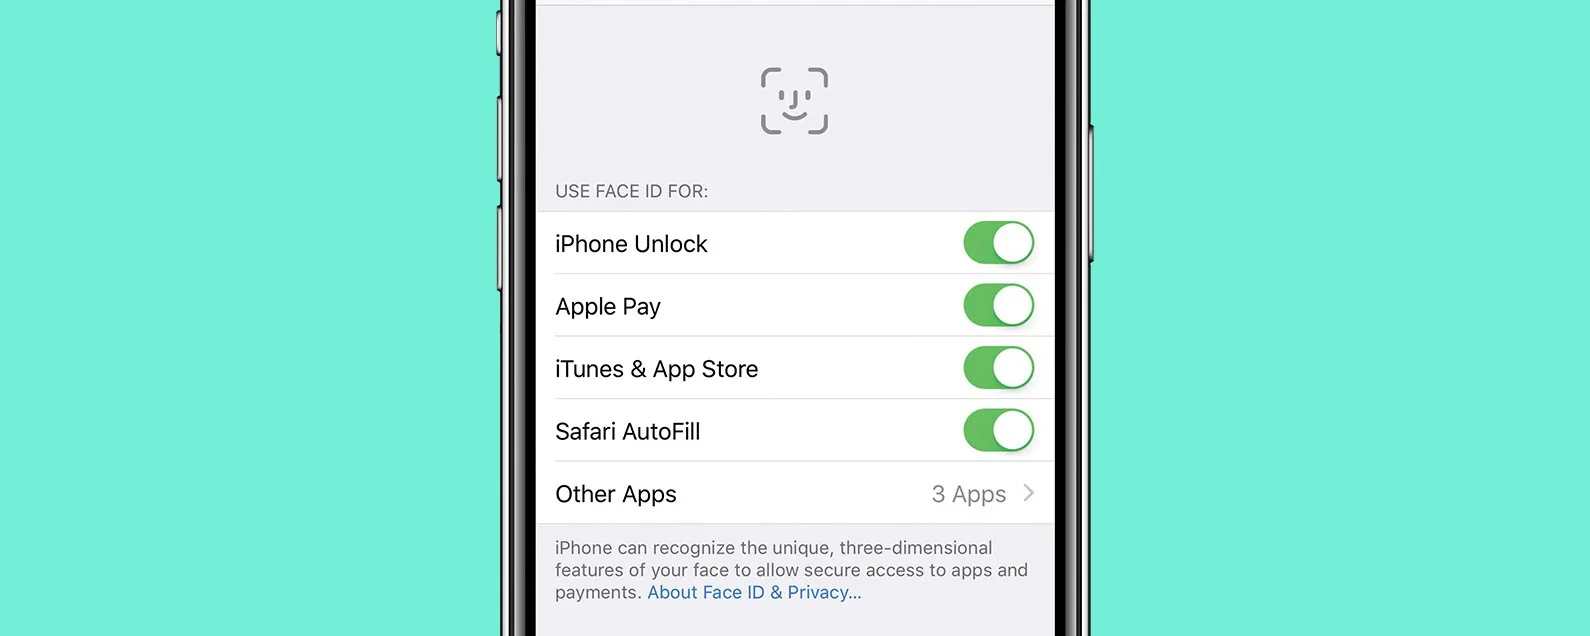
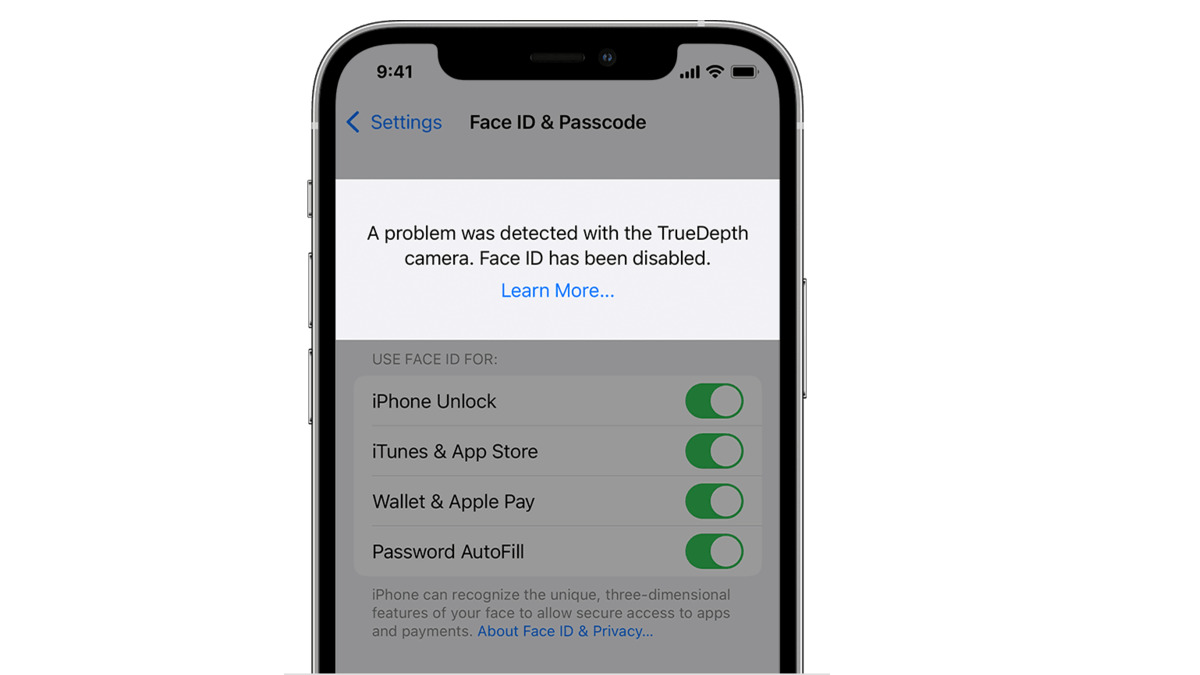
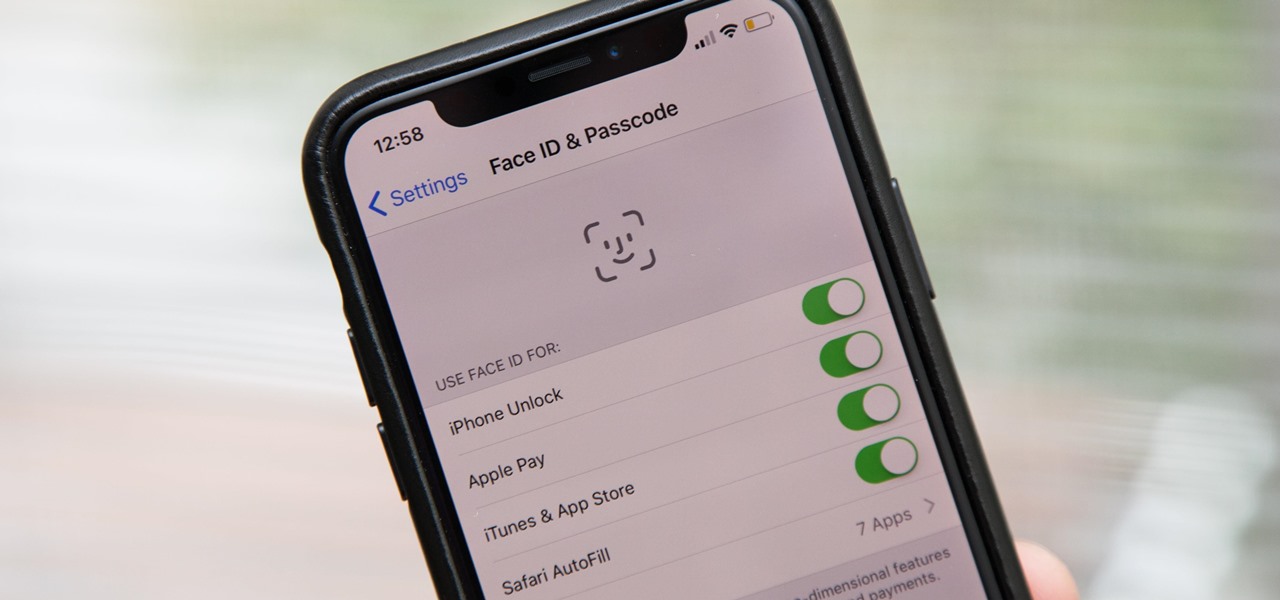
- Under the “Use Face ID For” section, you will find several toggles.
- To disable Face ID completely, toggle off the “iPhone Unlock” option.
- If you want to disable Face ID for app purchases, toggle off the “iTunes & App Store” option.
Once you have turned off Face ID for the desired options, your iPhone will no longer use facial recognition to unlock the device or authorize app purchases.
It’s worth mentioning that if you have multiple fingerprints saved in Touch ID, disabling Face ID will not affect the functionality of Touch ID. You can still use your fingerprint to unlock your iPhone or authorize app transactions.
If you want to temporarily disable Face ID without completely turning it off, you can do so by pressing and holding the side button and either volume button until the “Slide to Power Off” screen appears. This will temporarily disable Face ID until you unlock your iPhone again.
Additionally, you have the option to disable Face ID for specific apps. To do this:
- Go to the “Face ID & Passcode” settings as mentioned earlier.
- Scroll down and under the “Other Apps” section, you will see a list of apps that support Face ID authentication.
- Toggle off the switch next to the app for which you want to disable Face ID.
By disabling Face ID for specific apps, you will need to authenticate with your passcode whenever you want to access those apps.
Lastly, if you want to disable Face ID for Emergency SOS on your iPhone:
- Head to the “Emergency SOS” settings in the “Face ID & Passcode” section.
- Toggle off the switch next to “Auto Call” under the “Emergency SOS” section.
This will prevent Face ID from automatically calling emergency services when you press and hold the side button and either volume button.
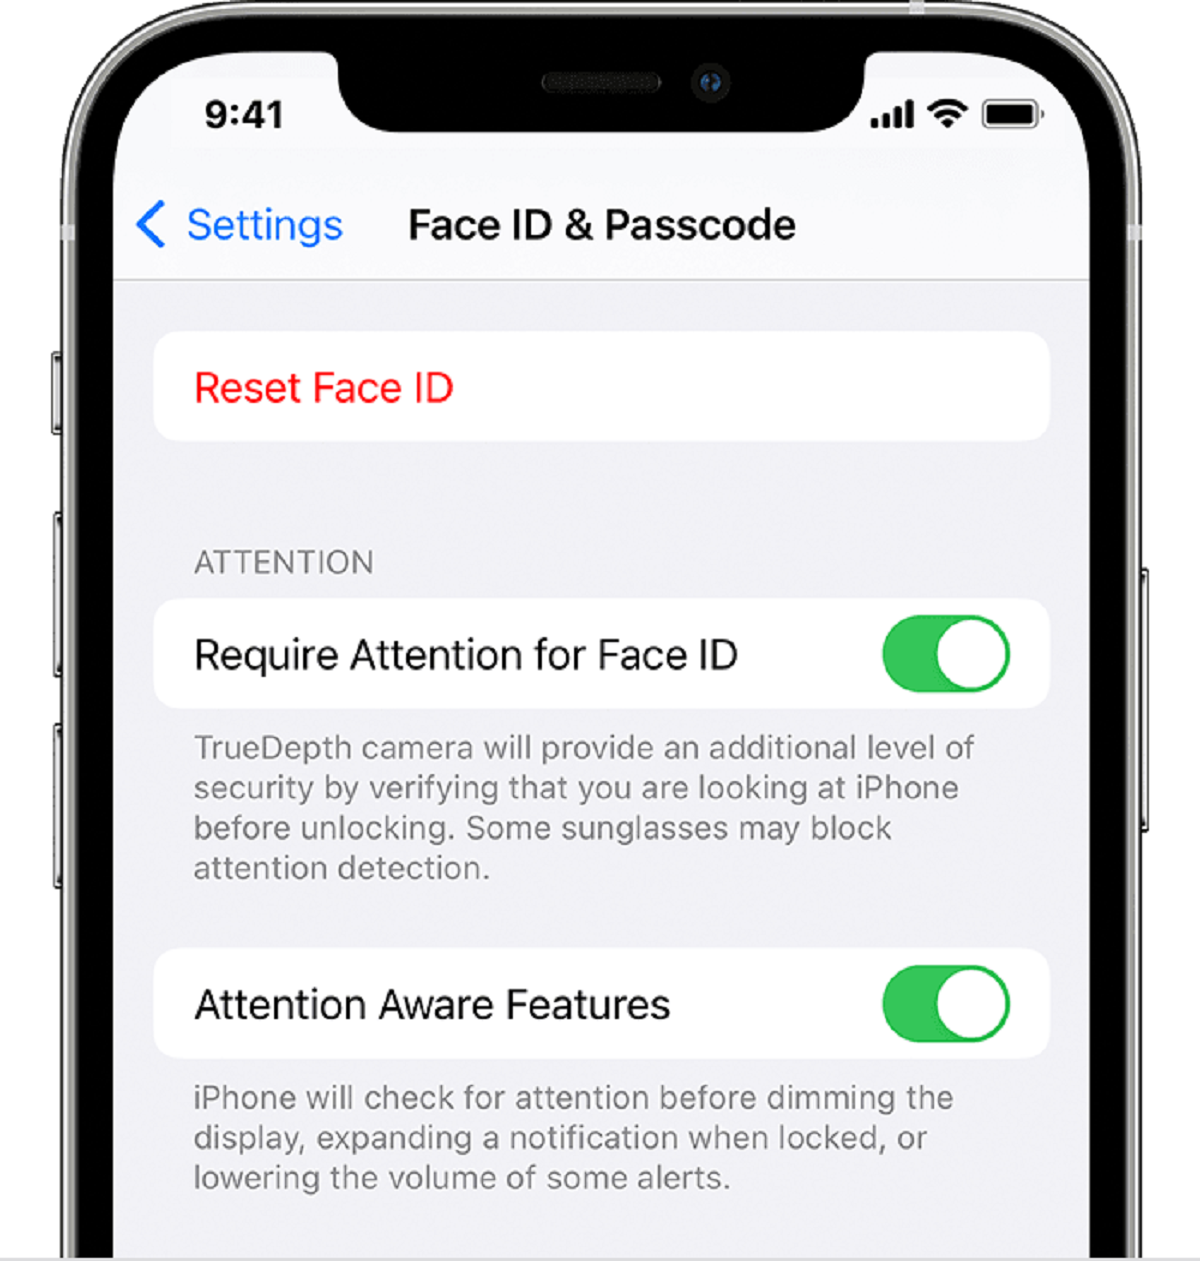
If you wish to turn off the attention-aware features of Face ID, like requiring eye contact for unlocking, you can do so by going to the “Face ID & Passcode” settings and toggling off the “Attention Aware Features” option.
Now that you know how to turn off Face ID on your iPhone, you can customize your device’s security settings to suit your preferences and needs.
Introduction
With the advent of facial recognition technology, Apple introduced Face ID as a secure and convenient way to unlock your iPhone and authorize app purchases. By scanning your face, Face ID provides a seamless user experience. However, there may be occasions when you wish to temporarily or permanently disable the Face ID feature.
Disabling Face ID can be useful for a variety of reasons. You might want to preserve your privacy by relying solely on a passcode to unlock your iPhone. Alternatively, you may want to disable Face ID to prevent accidental unlocks, especially in situations where someone else may have access to your device.
In this article, we will guide you through the steps to disable Face ID on your iPhone, whether temporarily or for specific purposes. We’ll also explore how to disable Face ID for individual apps or Emergency SOS. Additionally, we’ll provide instructions on turning off the attention-aware features of Face ID.
It’s important to note that by disabling Face ID, you will need to rely on your passcode for device unlocking and app authentication. This added layer of security ensures that unauthorized individuals cannot access your iPhone without your permission.
Now, let’s dive into the various methods you can use to turn off Face ID on your iPhone and customize your device’s security settings to your preference.
Why Disable Face ID?
While Face ID offers a convenient and secure way to unlock your iPhone, there are several reasons why you may want to disable this feature:
- Privacy: Disabling Face ID ensures that your facial data is not being used for authentication purposes, providing an additional layer of privacy and control over your personal information.
- Accidental Unlocks: In certain situations, such as when you are handing your phone to someone else or placing it face up on a surface, there is a risk of unintentional unlocks. Disabling Face ID eliminates this concern.
- Emergency Situations: You may want to disable Face ID for Emergency SOS to prevent accidental emergency calls from being made when you press and hold the side button and either volume button.
- Preference for Passcode: Some individuals prefer using a passcode to unlock their iPhone, as they find it more secure or simply prefer the traditional method.
- Specific App Controls: When you disable Face ID for specific apps, you can ensure that those apps can only be accessed using your passcode, providing an additional layer of security for sensitive or confidential information.
By disabling Face ID, you have more control over the security and accessibility of your iPhone. Whether it’s for privacy reasons, preventing accidental unlocks, or having a preference for passcodes, disabling Face ID allows you to customize and tailor your device’s authentication settings to suit your individual needs and preferences.
How to Turn Off Face ID on iPhone
If you have decided to disable Face ID on your iPhone, follow these simple steps:
- Open the Settings app: Locate and tap on the Settings app on your iPhone’s home screen. It is represented by a gear icon.
- Tap on “Face ID & Passcode”: Scroll down and look for “Face ID & Passcode” in the settings menu. Tap on it to proceed.
- Enter your passcode: You will be prompted to enter your passcode to access the Face ID & Passcode settings. Enter your passcode to continue.
- Disable Face ID options: Under the “Use Face ID For” section, you will find a list of options that utilize Face ID. To turn off Face ID completely, toggle off the “iPhone Unlock” option. This will require you to use your passcode to unlock your iPhone.
- Disable Face ID for app purchases: If you want to disable Face ID specifically for app purchases, toggle off the “iTunes & App Store” option. This ensures that you will need to enter your passcode instead of using Face ID to authorize app transactions.
By following these steps, you can easily disable Face ID on your iPhone and switch to using your passcode for unlocking your device and authorizing app purchases.
It’s important to note that disabling Face ID does not affect the functionality of Touch ID, if your iPhone model supports it. If you have fingerprints registered in Touch ID, you can still use them to unlock your device and authorize app transactions even after disabling Face ID.
Disabling Face ID provides you with increased control over your device’s security and lets you choose the authentication method that best suits your needs and preferences.
How to Temporarily Disable Face ID
There may be occasions when you want to temporarily disable Face ID on your iPhone, such as when you’re in a situation where you don’t want your face to be recognized. Fortunately, there is a quick method to temporarily disable Face ID:
- Press and hold the side button and either volume button: Simultaneously press and hold the side button (also known as the power button) and either the volume up or volume down button on your iPhone. Keep holding them until the “Slide to Power Off” screen appears.
- Slide to power off: On the “Slide to Power Off” screen, you will see a slider at the top, allowing you to power off your iPhone. However, you don’t need to power off your device.
- Cancel the shut down: Instead of sliding the power button, release the buttons you were holding. This will cancel the shutdown process.
By following these steps, you have temporarily disabled Face ID on your iPhone. This means that the next time you want to unlock your device or authorize an app transaction, you will need to use your passcode instead of relying on Face ID.
It’s essential to note that temporarily disabling Face ID does not disable it permanently. Once you unlock your iPhone with your passcode, Face ID will automatically re-enable itself for future use.
This method provides a quick and convenient way to temporarily suspend Face ID without needing to navigate through the settings menu. It’s particularly useful in situations where you want to ensure that Face ID won’t unlock your iPhone, such as when you’re interacting with someone else or when you’re temporarily in an environment that might trigger unintended unlocks.
Keep in mind that if you want to disable Face ID more permanently, you should follow the steps outlined in the earlier section on turning off Face ID on your iPhone.
How to Disable Face ID for Specific Apps
If you prefer to disable Face ID for specific apps on your iPhone, follow these steps:
- Open the Settings app: Locate and open the Settings app on your iPhone.
- Tap on “Face ID & Passcode”: Scroll down and tap on “Face ID & Passcode” to access the Face ID settings.
- Enter your passcode: Enter your passcode when prompted to proceed to the Face ID settings.
- Navigate to “Other Apps”: Scroll down to the “Other Apps” section, where you will find a list of apps that support Face ID authentication.
- Toggle off the app switch: To disable Face ID for a specific app, simply toggle off the switch next to the app’s name in the list.
By following these steps, you can selectively disable Face ID for specific apps on your iPhone. Once Face ID is disabled for an app, you will need to authenticate with your passcode to access it.
This feature is particularly useful for apps that contain sensitive or private information that you want to ensure remains secure. By disabling Face ID for these specific apps, you add an additional layer of protection against unauthorized access.
It’s important to note that not all apps support Face ID authentication. Only apps that have integrated Face ID functionality will appear in the “Other Apps” section of the Face ID settings. If an app does not show up in this section, it means that it does not utilize Face ID for authentication and cannot be disabled for Face ID use.
If you ever change your mind and decide to re-enable Face ID for a specific app, simply go back to the Face ID settings, locate the app in the “Other Apps” section, and toggle on the switch next to the app’s name.
By taking advantage of this feature, you can customize the Face ID settings on your iPhone to fit your specific security preferences and ensure that certain apps require your passcode for access.
How to Disable Face ID for Emergency SOS
Emergency SOS is a critical feature on iPhones that allows you to quickly call for help in emergency situations. By default, when you press and hold the side button and either volume button, your iPhone will automatically call emergency services. However, if you wish to disable Face ID for Emergency SOS, follow these steps:
- Open the Settings app: Locate and open the Settings app on your iPhone.
- Tap on “Face ID & Passcode”: Scroll down and tap on “Face ID & Passcode” to access the Face ID settings.
- Enter your passcode: Enter your passcode when prompted to proceed to the Face ID settings.
- Scroll to “Emergency SOS”: Scroll down to the “Emergency SOS” section within the Face ID settings.
- Toggle off “Auto Call”: To disable Face ID for Emergency SOS, simply toggle off the switch next to “Auto Call.”
Once you have disabled Face ID for Emergency SOS, your iPhone will no longer automatically call emergency services when you press and hold the side button and either volume button.
This feature can be useful if you often accidentally trigger Emergency SOS on your iPhone and want to prevent any unintentional emergency calls.
It’s important to note that disabling Face ID for Emergency SOS does not disable the Emergency SOS feature itself. You can still access Emergency SOS manually by quickly pressing the side button five times or by using the Emergency SOS slider on the Lock screen.
If you ever wish to re-enable Face ID for Emergency SOS, simply go back to the Face ID settings and toggle on the switch next to “Auto Call” within the “Emergency SOS” section.
By customizing the Face ID settings for Emergency SOS, you can prevent accidental emergency calls while still having access to this essential safety feature on your iPhone.
How to Turn Off Attention Aware Features
Attention Aware Features is a component of Face ID that makes your iPhone’s facial recognition system more secure by requiring eye contact for it to unlock. However, if you prefer to turn off this feature, follow these steps:
- Open the Settings app: Locate and open the Settings app on your iPhone.
- Tap on “Face ID & Passcode”: Scroll down and tap on “Face ID & Passcode” to access the Face ID settings.
- Enter your passcode: Enter your passcode when prompted to proceed to the Face ID settings.
- Look for “Attention Aware Features”: Scroll down within the Face ID settings until you find the “Attention Aware Features” option.
- Toggle off the switch: To turn off Attention Aware Features, simply toggle off the switch next to the “Attention Aware Features” option.
By turning off Attention Aware Features, your iPhone’s Face ID will no longer require eye contact for it to unlock. This means that you can unlock your device even if your eyes are closed or you’re looking away from the screen.
It’s important to note that while turning off Attention Aware Features may offer convenience, it may also slightly reduce the overall security of Face ID, as someone could potentially unlock your iPhone by pointing it towards your face even without your attention. Therefore, it’s recommended to consider the trade-off between convenience and security when deciding to disable this feature.
If you ever change your mind and decide to re-enable Attention Aware Features, simply go back to the Face ID settings and toggle on the switch next to “Attention Aware Features.”
By personalizing the Attention Aware Features setting, you can customize your iPhone’s Face ID to adapt to your preferences and convenience.
Conclusion
Face ID is a powerful and convenient feature on the iPhone that allows for seamless device unlocking and app authentication using facial recognition technology. However, there may be instances where you want to disable Face ID for various reasons, such as preserving privacy, preventing accidental unlocks, or customizing your device’s security settings.
In this article, we have explored how to turn off Face ID on your iPhone, both temporarily and permanently. Disabling Face ID can be done easily through the Settings app, where you have the option to toggle off Face ID for device unlocking, app purchases, and specific apps. Additionally, we discussed how to disable Face ID for Emergency SOS and turn off the attention aware features to enhance user experience.
Remember that by disabling Face ID, you will need to rely on your passcode for unlocking your iPhone and authorizing app transactions. This added layer of security ensures that only authorized individuals can access your device and sensitive information.
By following the steps outlined in this article, you can customize your iPhone’s Face ID settings to match your specific preferences and needs. Whether it’s for privacy concerns, preventing accidental unlocks, or enhancing convenience, the ability to disable Face ID empowers you to take control of your device’s authentication methods.
Keep in mind that it’s essential to strike a balance between convenience and security when considering whether to disable certain Face ID features. Evaluating your individual needs and preferences will allow you to make informed choices about which Face ID options to enable or disable.
With the knowledge gained from this article, you can confidently manage and customize Face ID on your iPhone to enhance your overall user experience and security.