Introduction
Welcome to the era of online meetings and video conferences! With the increasing popularity of remote work and virtual collaboration, platforms like Zoom have become essential tools for conducting meetings and connecting with colleagues and clients from anywhere in the world. While Zoom offers a user-friendly interface and a host of features, it’s important to ensure that everything is working smoothly before diving into an important meeting.
In this guide, we will walk you through the process of testing Zoom before a meeting to avoid any technical glitches and ensure a seamless experience for all participants. By taking a few minutes to run these checks, you can save yourself and others from potential frustrations and delays during a meeting.
Testing Zoom may sound like a tedious task, but it’s a crucial step to guarantee a successful meeting. By following this guide, you will be able to verify your system requirements, check your network connection, test your audio and microphone, evaluate your video and camera, confirm the screen sharing functionality, ensure recording capabilities, explore the chat feature, assess breakout rooms, and validate polling and survey options.
So, let’s dive in and learn how to test Zoom before a meeting to ensure a smooth and productive virtual gathering!
Checking System Requirements
Before engaging in a Zoom meeting, it’s crucial to verify that your system meets the necessary requirements for a smooth user experience. Here are a few steps to check your system compatibility:
1. Operating System: Ensure that your computer or device is running on a compatible operating system. Zoom supports Windows, macOS, Linux, iOS, and Android.
2. Processor and RAM: Check the minimum processor and RAM requirements for your operating system. Generally, a dual-core processor and at least 4GB of RAM are recommended for optimal performance.
3. Internet Connection: A stable and high-speed internet connection is crucial for video conferencing. Ensure that you have a reliable broadband or Wi-Fi connection with a minimum speed of 1.5 Mbps for both upload and download.
4. Web Browser: If you prefer using Zoom through a web browser, check that you have a supported version. Zoom is compatible with popular browsers such as Google Chrome, Mozilla Firefox, Microsoft Edge, and Safari.
5. Zoom Client: If you plan to use the Zoom desktop client, make sure you have the latest version installed on your device. You can download the Zoom client directly from the official Zoom website.
6. Audio and Video Devices: Test your speakers, microphone, and camera to ensure they are functioning correctly. Connect any external devices and check their compatibility with Zoom.
By verifying these system requirements, you can avoid potential technical issues during your Zoom meeting. It’s essential to update your operating system, web browser, and Zoom client regularly to enjoy the latest features and security patches.
Remember, checking system requirements is the first step towards ensuring a smooth Zoom experience. Let’s move on to the next section to learn how to test your network connection.
Checking Network Connection
A stable and reliable internet connection is crucial for a successful Zoom meeting. Before joining or hosting a meeting, it’s important to check your network connection to ensure smooth audio and video transmission. Here’s how you can check your network connection:
1. Internet Speed: Use a reputable online speed test tool to measure your internet speed. The recommended minimum speed for video conferencing is 1.5 Mbps download and upload. If your internet speed is below this threshold, consider upgrading your connection or switching to a different network.
2. Bandwidth Usage: Close any unnecessary applications or programs that might consume a significant amount of bandwidth. Applications like file-sharing programs or video streaming services can negatively impact your network performance during a meeting.
3. Wired or Wi-Fi Connection: If possible, connect your computer directly to your router using an Ethernet cable. Wired connections tend to be more stable and offer better performance compared to Wi-Fi connections, especially in areas with weak wireless signals.
4. Signal Strength: If you’re using Wi-Fi, check the signal strength on your device. Ensure that you’re close to your router or access point for a stronger and more stable connection. Consider repositioning your device or using a Wi-Fi signal booster if you’re experiencing weak signals.
5. Network Congestion: Check if there are any ongoing downloads, uploads, or bandwidth-intensive activities happening on your network. These activities can cause network congestion and lead to poor audio and video quality during your Zoom meeting.
6. Firewalls and Security Settings: Ensure that your network firewall or security settings are not blocking Zoom’s access to the internet. If necessary, add Zoom to the list of trusted applications in your firewall settings.
By performing these network connection checks, you can identify and resolve any potential issues that might hinder your Zoom meeting experience. If you face consistent network connectivity issues, consider reaching out to your internet service provider for assistance.
Now that you’ve checked your network connection, let’s move on to testing your audio and microphone settings.
Testing Audio and Microphone
Clear and uninterrupted audio is essential for effective communication during a Zoom meeting. It’s crucial to test your audio and microphone settings to ensure that everyone can hear you clearly. Here’s how you can properly test your audio and microphone:
1. Speaker Test: Start by playing a short audio or video clip to check if your speakers or headphones are working correctly. Make sure the volume is set to an appropriate level and adjust it if necessary.
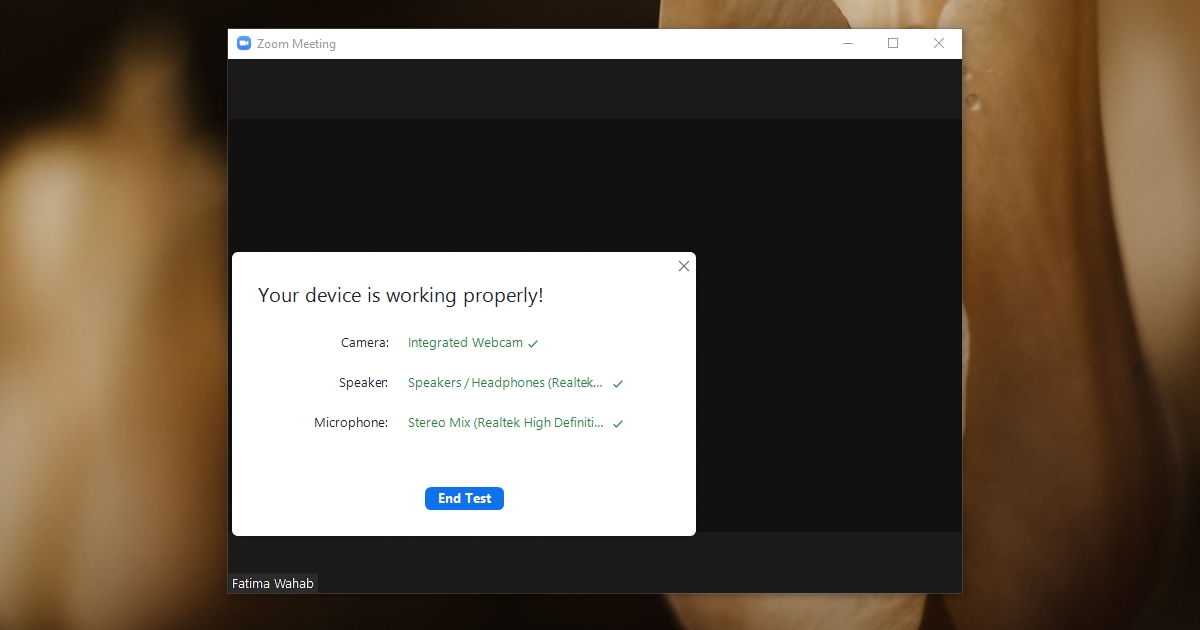
2. Microphone Test: Open the Zoom desktop client or web browser version and go to the “Settings” menu. Navigate to the “Audio” section and click on “Test Speaker and Microphone” to access the audio settings test. Follow the on-screen instructions to check if your microphone is functioning properly. Speak into the microphone and check the audio input level to ensure it’s picking up your voice clearly.
3. External Devices: If you’re using an external microphone or headset, ensure that it’s properly connected to your device. Check if the correct input device is selected in the Zoom settings to ensure that the audio is captured from the correct source.
4. Audio Settings Adjustment: Zoom provides various audio settings options to enhance your audio quality. Experiment with the settings such as echo cancellation, noise suppression, and audio enhancements to find the optimal configuration for your setup.
5. Audio Test Meeting: Zoom offers a feature called “Audio Test Meeting” in the settings menu. Click on “Join Audio” during this test meeting to verify your audio and microphone settings in a simulated meeting environment.
6. Test Call: You can also conduct a test call with a friend or colleague before your actual meeting to ensure that your audio and microphone are working correctly. This will allow you to make any necessary adjustments to improve the audio quality.
By taking the time to properly test your audio and microphone, you can avoid any audio-related issues during your Zoom meeting. Remember to be mindful of your surroundings, minimize background noise, and speak clearly to ensure effective communication.
Now that you’ve tested your audio and microphone, let’s move on to the next section and explore how to test your video and camera settings.
Testing Video and Camera
A clear and functional camera is essential for visual communication during a Zoom meeting. Before joining or hosting a meeting, it’s important to test your video and camera settings to ensure that you appear clearly to other participants. Here’s how you can properly test your video and camera:
1. Camera Verification: Check if your camera is properly connected to your device. Ensure that it’s not obstructed or covered by any objects. If you’re using an external camera, make sure it’s plugged in and recognized by your computer.
2. Zoom Camera Settings: Open the Zoom desktop client or web browser version and go to the “Settings” menu. Navigate to the “Video” section to access your camera settings. Select your preferred camera device from the options available.
3. Video Preview: You can preview your video feed in the Zoom settings to check the camera’s functionality. If you can see yourself clearly in the preview, it indicates that your camera is working properly.
4. Appearance and Lighting: Pay attention to your appearance and the lighting in the room. Ensure that you are well-lit and that the lighting does not cause shadows or overexposure in the video feed. Consider adjusting the positioning of lights or using natural light sources for better visibility.
5. Camera Angles and Framing: Experiment with different camera angles and adjust the framing to find the most flattering and professional view. Position the camera at eye level and ensure that your face is clearly visible within the frame. Maintain eye contact with the camera as much as possible during the meeting.
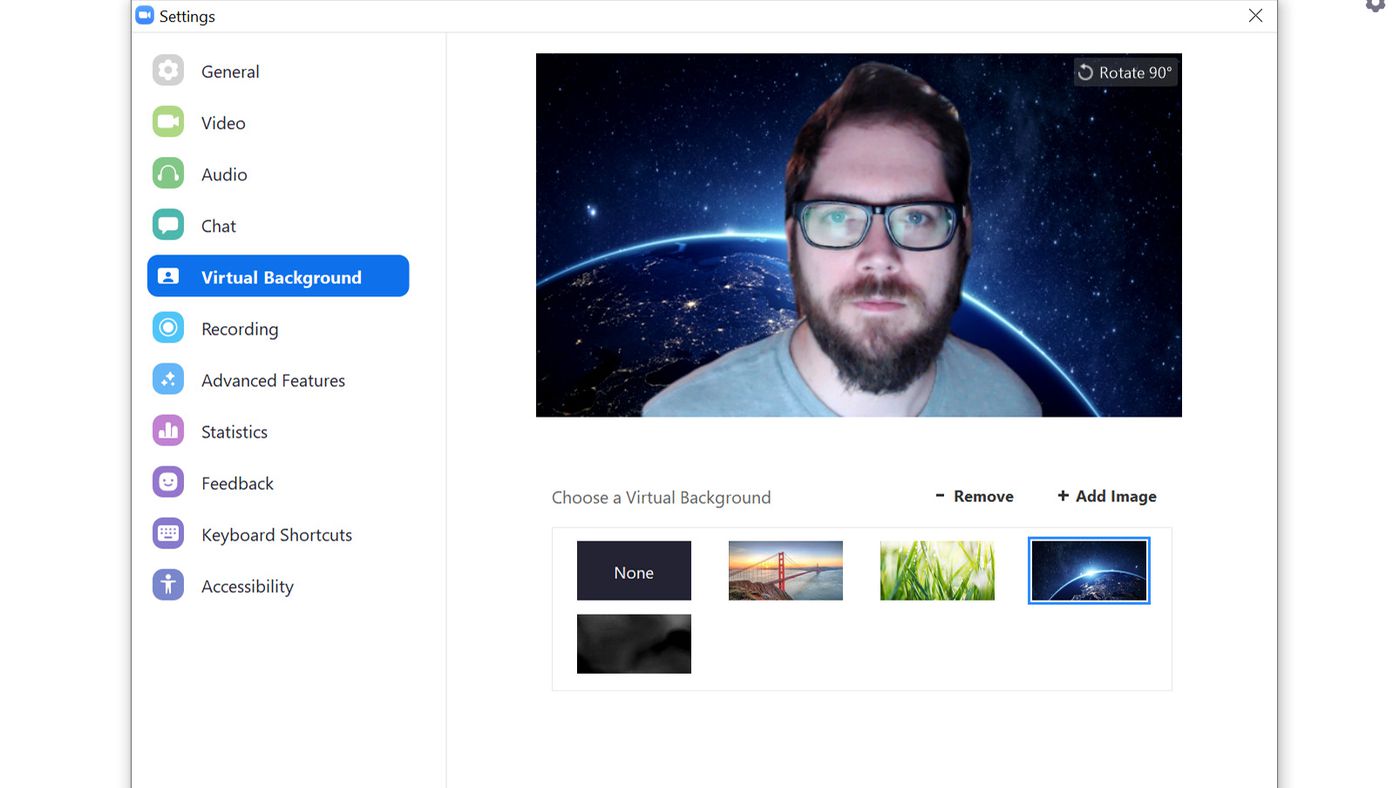
6. Background: Check your background to ensure it’s appropriate and clean. You can choose to use Zoom’s virtual background feature or simply create a neat and clutter-free background in your physical surroundings.
7. Virtual Background: If you opt for a virtual background, test it beforehand to ensure that it doesn’t appear distorted or pixelated. Use a solid colored or appropriate background image for a professional look.
By properly testing your video and camera settings, you can present yourself professionally and avoid any video-related issues during your Zoom meeting. Remember to maintain good posture, have a confident and engaging presence, and avoid any distracting movements.
Now that you’ve tested your video and camera, let’s move on to the next section and explore how to check the screen sharing feature.
Checking Screen Sharing
The screen sharing feature in Zoom allows you to share your screen with other participants, making it an essential tool for presentations and collaborative work. Before your meeting, it’s important to test the screen sharing functionality to ensure a smooth and seamless experience. Here’s how you can check the screen sharing feature:
1. Screen Sharing Settings: Open the Zoom desktop client or web browser version and go to the “Settings” menu. Navigate to the “Screen Sharing” section to ensure that screen sharing is enabled and set to the desired settings.
2. Screen Sharing Test: Start a test meeting or join a practice session to test the screen sharing feature. Click on the “Share Screen” button and select the specific window, application, or screen you want to share. Ensure that the content is displayed correctly to the participants.
3. Annotation Tools: During the screen sharing test, explore the annotation tools available in Zoom. Check if you can draw, highlight, or point out specific areas on the shared screen. Familiarize yourself with the options to make your presentations more engaging.
4. Permissions: If you’re a participant in a meeting, ensure that the meeting host has granted you the permission to share your screen. If you’re the host, verify that you have the necessary permissions to initiate screen sharing.
5. Audio Sharing: Test the audio sharing feature if you need to include sound from your computer while sharing your screen. Check if the audio is being transmitted correctly to the participants and if they can hear it clearly.
6. Multiple Monitors: If you have multiple monitors connected to your device, test screen sharing on each monitor to ensure that all participants can see the shared content correctly.
By thoroughly testing the screen sharing feature, you can troubleshoot any issues in advance and ensure a seamless experience for both presenters and participants. It’s important to be prepared and confident in using the screen sharing functionality, as it plays a vital role in collaborative meetings and presentations.
Now that you’ve checked the screen sharing feature, let’s move on to testing the recording capabilities of Zoom.
Testing Recording
The recording feature in Zoom allows you to capture important meetings, presentations, or training sessions for future reference or sharing with others. Before your meeting, it’s essential to test the recording capabilities to ensure that you can successfully record your session. Here’s how you can test the recording feature in Zoom:
1. Recording Settings: Open the Zoom desktop client or web browser version and go to the “Settings” menu. Navigate to the “Recording” section to configure your recording settings. Choose the desired location to save your recordings and select the preferred recording format.
2. Start a Test Meeting: Initiate a test meeting or join a practice session to simulate a meeting environment. Once the meeting has started, click on the “Record” button located at the bottom of the Zoom window.
3. Recording Indicator: Observe the recording indicator, which appears at the top left corner of the Zoom meeting window, to ensure that the session is being recorded. A red dot signifies that the recording is in progress.
4. Verify Recording: Throughout the test meeting, engage in various activities such as sharing your screen, using video and audio features, and utilizing other Zoom functionalities. Monitor the recording to ensure that all elements, including audio, video, shared screen, and participant interactions, are being captured accurately.
5. Stop Recording: Once you’re satisfied with the test meeting or have completed the desired recording, click on the “Stop Recording” button. The recording will automatically be saved to the designated location on your device.
6. Playback Recording: After stopping the recording, locate the saved recording file and play it to make sure that the content and audio are clear and of the expected quality.
By testing the recording capabilities in Zoom, you can ensure that your important meetings or presentations are successfully captured for future reference. It’s important to check the recording functionality before any important meetings to remedy any potential issues and avoid losing valuable content.
Now that you’ve tested the recording feature, let’s move on to exploring how to test the chat feature in Zoom.
Testing the Chat Feature
The chat feature in Zoom allows participants to communicate through text messages during a meeting. It serves as a convenient way to share links, ask questions, or provide additional information without interrupting the flow of the conversation. Before your meeting, it’s important to test the chat feature to ensure that it is functioning correctly. Here’s how you can properly test the chat feature in Zoom:
1. Chat Window: Open the Zoom desktop client or web browser version and join a test meeting. Locate the chat window, which is usually located at the bottom of the Zoom meeting screen.
2. Chat Options: Familiarize yourself with the various chat options available. You can choose to chat with everyone in the meeting, privately message specific participants, or send a message to the entire group.
3. Send Test Messages: Start by sending a test message to the meeting participants. Verify that your message is delivered and displayed correctly in the chat window. You can type a simple greeting or ask participants to respond to confirm that the chat function is working properly.
4. Emojis and Reactions: Explore the emoji and reaction options in the chat feature. Test the available emojis by sending them in the chat and confirm that they are visible to other participants.
5. File Sharing: Test the file sharing capability in the chat feature. You can send a test file to yourself or a participant to ensure that files can be shared and received without any issues.
6. Link Sharing: Share a test link in the chat to confirm that hyperlinks are clickable and open in a new browser window as expected.
7. Message Moderation: If you’re the meeting host, test the moderation settings for the chat feature. Ensure that you can moderate and manage messages, delete inappropriate content, and control who can send messages in the meeting.
By thoroughly testing the chat feature, you can ensure smooth communication and collaboration during your Zoom meeting. The chat feature can be particularly useful for participants who may have difficulty speaking or for sharing important information without interrupting the speakers.
Now that you’ve tested the chat feature, let’s move on to exploring how to test breakout rooms in Zoom.
Testing Breakout Rooms
Breakout rooms in Zoom allow you to split your meeting into smaller groups, where participants can engage in focused discussions or group activities. Testing the breakout rooms feature before your meeting ensures that you can successfully create and manage breakout rooms. Here’s how you can properly test breakout rooms in Zoom:
1. Breakout Room Setup: Open the Zoom desktop client or web browser version and start a test meeting. Navigate to the “Breakout Rooms” option in the meeting controls to set up the breakout room feature.
2. Create Breakout Rooms: Create multiple breakout rooms based on the desired number of groups. Assign participants to each room, either manually or automatically, depending on your preference. Ensure that participants are allocated correctly to their respective rooms.
3. Join a Breakout Room: As the host or participant, join one of the breakout rooms to test if you can successfully enter the room and communicate with others within it. Verify that audio, video, and screen sharing are functioning properly within the breakout room.
4. Move Participants: As the host, test your ability to move participants between breakout rooms. Move yourself or other participants to different rooms to confirm that the feature works as intended.
5. Bring Participants Back: Practice bringing participants back from the breakout rooms to the main meeting. Ensure that attendees are seamlessly reconnected with the main meeting and can participate again in the larger group discussion.
6. Manage Breakout Rooms: Test your ability to manage breakout rooms as the host. Explore features such as broadcasting messages to all rooms, starting a timer for group activities, or sending invitations to join breakout rooms.
7. Monitor Breakout Rooms: If you’re the host, check your ability to monitor breakout rooms. Use the gallery view or the breakout room manager to view each participating group and ensure that they are engaging in their discussions or activities.
By thoroughly testing the breakout rooms feature, you can ensure a seamless and efficient experience for participants during your Zoom meeting. This feature is particularly useful for facilitating small group interactions, brainstorming sessions, or collaborative activities among participants.
Now that you’ve tested breakout rooms, let’s move on to exploring how to test polls and surveys in Zoom.
Testing Polls and Surveys
Polls and surveys in Zoom offer a valuable way to gather feedback, gauge participants’ opinions, and facilitate interactive engagement during meetings. Testing the polls and surveys feature before your meeting ensures that you can effectively conduct and analyze polls and surveys. Here’s how you can properly test polls and surveys in Zoom:
1. Poll Creation: Open the Zoom desktop client or web browser version and start a test meeting. Access the meeting controls and navigate to the “Polls” option to create a test poll. Design a simple poll question and prepare the response options.
2. Launch Poll: During the test meeting, click on the “Polls” button and launch the test poll. Ensure that the poll is visible to participants and that they can select their desired response from the provided options.
3. Collect Responses: Monitor the test poll as participants submit their responses. Verify that the poll’s results are accurately displayed in real-time, allowing you to gauge participants’ opinions or preferences.
4. Customize Polls: Explore the options to customize your polls in Zoom. You can modify the poll question, add or remove response options, set time limits for participants to respond, or create multiple polls for different segments of your meeting.
5. Survey Creation: In addition to polls, test the creation of surveys in Zoom. Access the “Survey” option in the meeting controls and prepare a test survey with relevant questions. Set appropriate response formats such as multiple choice, rating scales, or open-ended questions.
6. Launch Survey: Similar to polls, launch the test survey during the test meeting. Participants should be able to see and respond to the survey questions. Verify that the survey responses are collected accurately and displayed for analysis.
7. Analyze Results: After collecting poll and survey responses, review and analyze the results within Zoom. Determine how the data can be used to make informed decisions or provide valuable insights.
By thoroughly testing the polls and surveys feature, you can engage participants, solicit feedback, and gather valuable information during your Zoom meeting. This helps to enhance participation and make data-driven decisions based on the responses received.
Now that you’ve tested polls and surveys, you have completed the essential checks to ensure a smooth and successful Zoom meeting. Remember to implement these tests before each meeting to avoid any technical issues and maximize the benefits of using Zoom as a collaboration tool.
Conclusion
Testing Zoom before a meeting is a crucial step to ensure a seamless and productive virtual gathering. By following the steps outlined in this guide, you can verify your system requirements, check your network connection, test audio and microphone settings, evaluate video and camera functionality, confirm screen sharing capabilities, explore recording options, try out the chat feature, assess breakout rooms, and utilize polls and surveys. These tests help identify and troubleshoot any technical issues beforehand, ensuring a smooth and efficient meeting experience for all participants.
Checking your system requirements ensures that your device is compatible with Zoom and can handle the software’s demands, while testing your network connection guarantees a stable and reliable internet connection. Verifying audio and microphone settings helps ensure clear and uninterrupted communication, and testing video and camera functionality ensures that participants can visually engage with one another effectively.
The screen sharing feature allows you to share content seamlessly, while recording capabilities enable the capture of essential meetings or presentations for future reference. The chat feature simplifies communication during a meeting, and breakout rooms facilitate small group discussions or activities. Lastly, the polls and surveys feature enhances engagement and enables gathering valuable feedback from participants.
By performing these tests, you can mitigate potential technical difficulties and focus on the content and purpose of your meeting. Additionally, familiarizing yourself with Zoom’s features and options allows you to maximize its potential for collaboration and productivity.
In a rapidly evolving digital landscape, these tests will help you adapt to remote work and effectively utilize Zoom as a powerful tool for communication and collaboration. Remember to regularly update the Zoom client and stay informed about any new features or updates to ensure you are using the latest version with improved functionality and security.
So, before your next Zoom meeting, take a few minutes to follow these steps and ensure a smooth and successful virtual gathering. Embrace the possibilities of remote collaboration, create meaningful connections, and make the most out of your Zoom experience!