Introduction
Welcome to the world of computer cooling, where keeping your CPU from overheating is essential for optimal performance and longevity. The CPU, or Central Processing Unit, is the brain of your computer, and it generates a significant amount of heat during its operation. To dissipate this heat, a CPU cooler is necessary.
In this guide, we will delve into the various types of CPU coolers available, discuss how to determine which type you have, and explore different ways to identify your CPU cooler. Whether you are a tech enthusiast, a computer builder, or simply curious about your PC’s cooling system, this article will provide you with the information you need.
CPU coolers come in different shapes, sizes, and technologies, each with its own pros and cons. The two main categories of CPU coolers are air coolers and water coolers. Air coolers use fans and heatsinks to dissipate heat, while water coolers utilize liquid cooling to achieve the same goal.
Additionally, many computers come with a stock cooler, which is a basic CPU cooling solution provided by the CPU manufacturer. These stock coolers are often adequate for general use but may not be sufficient for heavy workloads or overclocking.
Now, you might be wondering how to tell which type of CPU cooler you have. There are a few methods you can use to determine this. By physically examining your computer’s components, using software monitoring tools, or consulting online documentation, you can unlock the mystery of your CPU cooler.
In the following sections, we will explore each of these methods in detail and guide you through the process of identifying your CPU cooler. So, let’s jump in and find out what type of CPU cooler is keeping your processor cool!
Types of CPU Coolers
When it comes to CPU cooling, there are three main types of coolers: air coolers, water coolers, and stock coolers. Let’s take a closer look at each type.
Air Coolers: Air coolers are the most common and affordable type of CPU coolers. They consist of a heatsink, which is a metal component with fins that dissipate heat, and one or more fans that blow air over the heatsink to cool it down. Air coolers are easy to install and maintain, and they come in various sizes to fit different computer cases. They are ideal for most users, especially those who don’t engage in heavy gaming or demanding tasks.
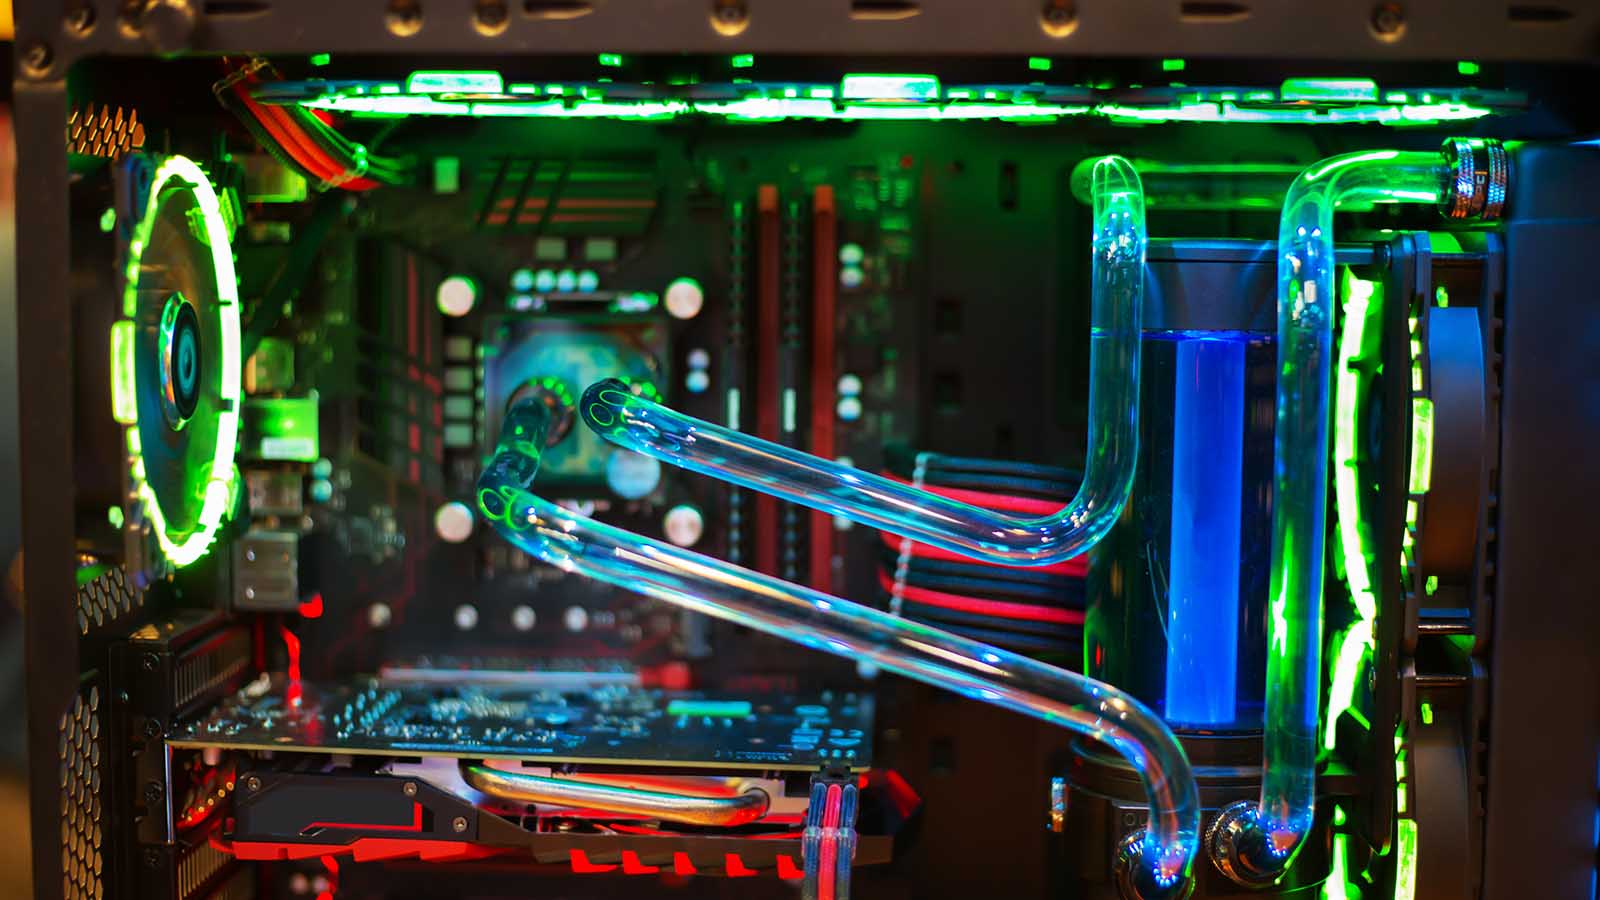
Water Coolers: Water coolers, also known as liquid coolers, provide more efficient and effective cooling compared to air coolers. They use a closed-loop system that circulates coolant through tubes and a radiator. The coolant absorbs heat from the CPU and carries it to the radiator, where it is cooled by fans before being pumped back into the loop. Water coolers are typically more expensive and require proper installation and maintenance. They are preferred by enthusiasts and gamers who engage in heavy overclocking or high-performance tasks.
Stock Coolers: Stock coolers are the cooling solution that comes bundled with the CPU when you purchase it. These coolers are designed specifically for the CPU model and are sufficient for basic usage. However, they are generally not as effective as aftermarket coolers and may struggle to keep the CPU cool under heavy loads. If you’re not planning to overclock or put your system under heavy stress, the stock cooler should be sufficient. But for more demanding tasks, upgrading to an aftermarket cooler is recommended.
Each type of CPU cooler has its advantages and disadvantages, so it’s important to consider your specific needs and budget when choosing a cooler for your system. The type of cooler you have will determine factors such as cooling performance, noise level, and compatibility with your computer case.
Now that we’ve covered the different types of CPU coolers, let’s move on to the next section, where we’ll discuss how to check which type of CPU cooler you have.
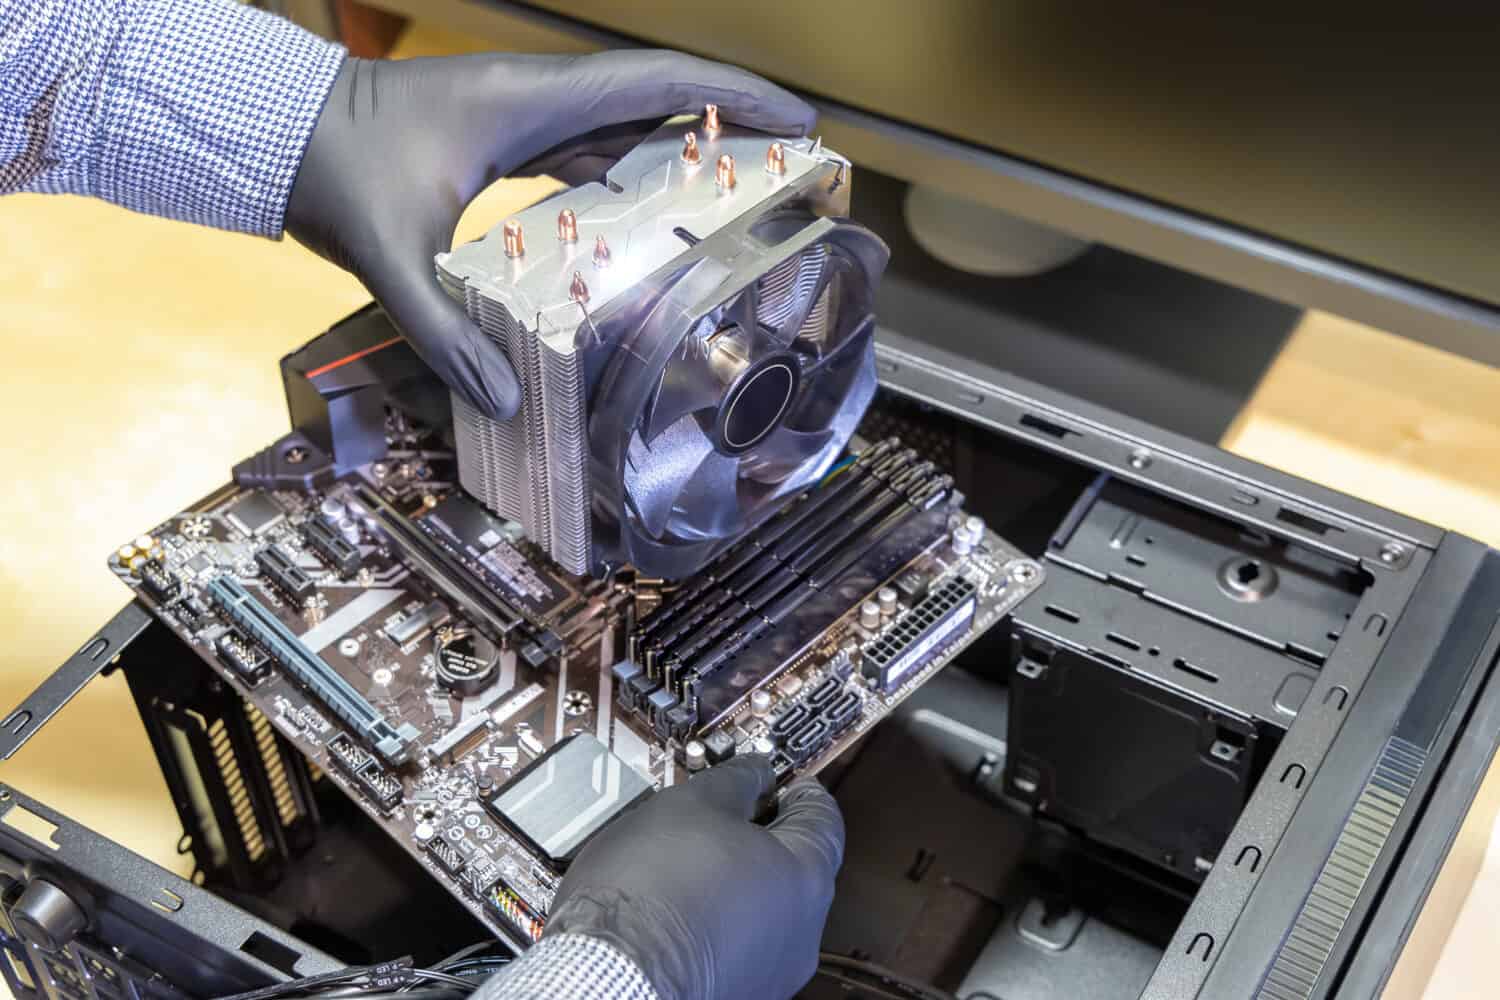
Air Coolers
Air coolers are a popular and cost-effective cooling solution for CPUs. They are designed with a heatsink and one or more fans to cool down the processor. Let’s take a closer look at the features and advantages of air coolers.
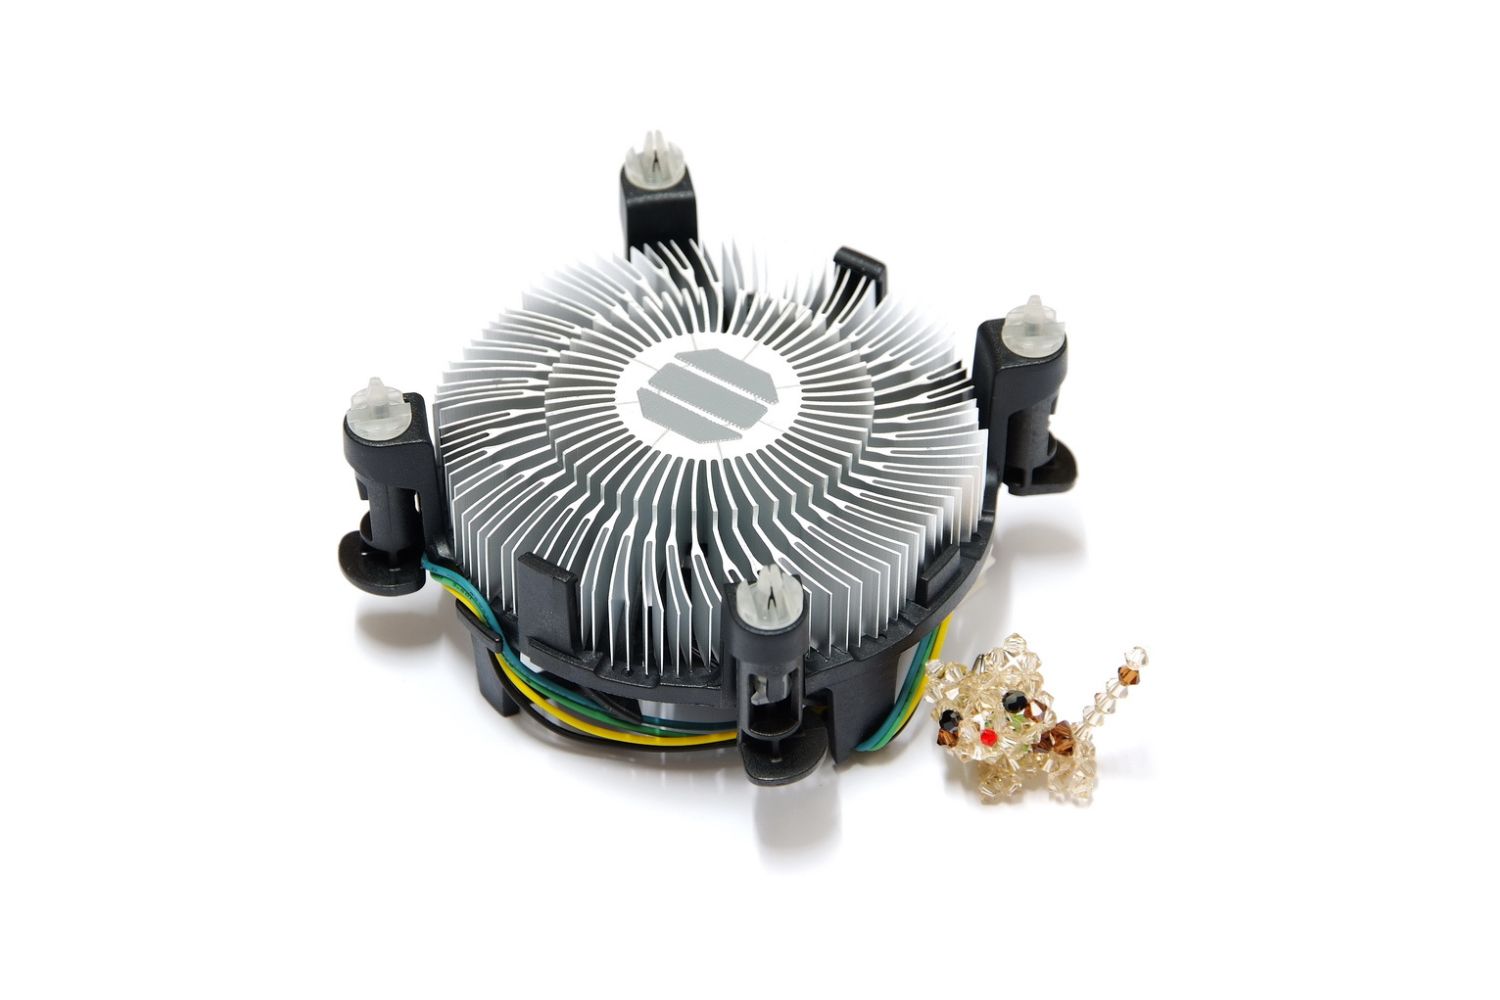
Heatsink: The heatsink is the main component of an air cooler. It is typically made of aluminum or copper, which have excellent heat conductivity. The heatsink is designed with fins that increase the surface area for better heat dissipation. The heat generated by the CPU is transferred to the heatsink through a thermal interface material.
Fans: Air coolers utilize fans to blow air over the heatsink, speeding up the heat dissipation process. The fans draw cool air from the surroundings and push it through the heatsink, carrying away the heat. The number and size of fans can vary depending on the cooler’s design. Some air coolers have a single fan, while others feature dual fans or even a combination of larger and smaller fans.
Compatibility: Air coolers come in various sizes to accommodate different computer cases. It’s essential to ensure that the cooler you choose is compatible with your case and motherboard. The height, width, and weight of the cooler should be considered to prevent any clearance or installation issues. Most cooler manufacturers provide compatibility details on their websites, making it easier for you to find the right fit for your system.
Performance: Air coolers provide efficient cooling for CPUs, especially for users who don’t engage in heavy overclocking or demanding tasks. They are designed to handle the heat generated by CPUs, preventing overheating and maintaining stable performance. While not as efficient as water coolers in extreme cooling scenarios, air coolers offer a reliable and affordable cooling solution for the majority of PC users.
Noise Level: The noise level of an air cooler depends on factors such as fan speed, fan size, and design. While some coolers prioritize silent operation by using larger, slower-spinning fans, others focus on maximizing cooling performance with higher fan speeds. It’s important to consider the noise level of the cooler and choose one that matches your preference for a quiet or performance-oriented system.
Overall, air coolers are a practical choice for most users, providing efficient cooling at an affordable price point. They are easy to install and maintain, making them ideal for both beginners and experienced PC builders. However, if you require more advanced cooling capabilities or plan on pushing your CPU to its limits, you might want to consider water coolers as an alternative.
Now that we’ve explored air coolers in detail, let’s move on to the next section, where we’ll discuss water coolers and their benefits.
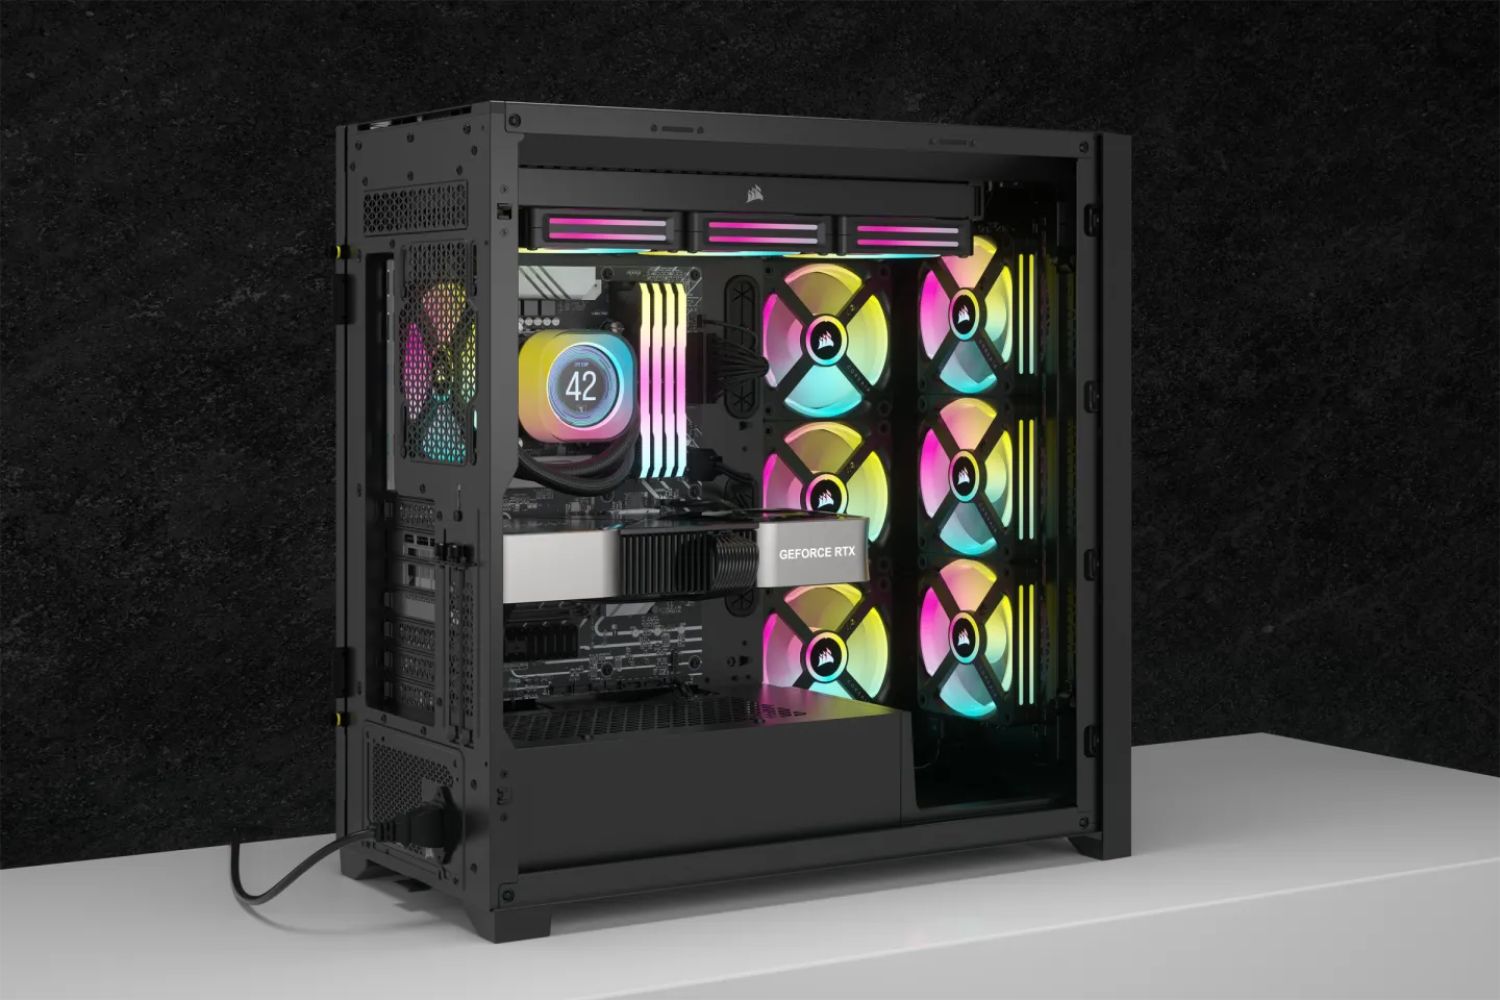
Water Coolers
Water coolers, also known as liquid coolers or all-in-one (AIO) coolers, offer a more advanced and efficient cooling solution compared to air coolers. They utilize a closed-loop system that circulates liquid coolant to dissipate heat from the CPU. Let’s dive deeper into the features and advantages of water coolers.
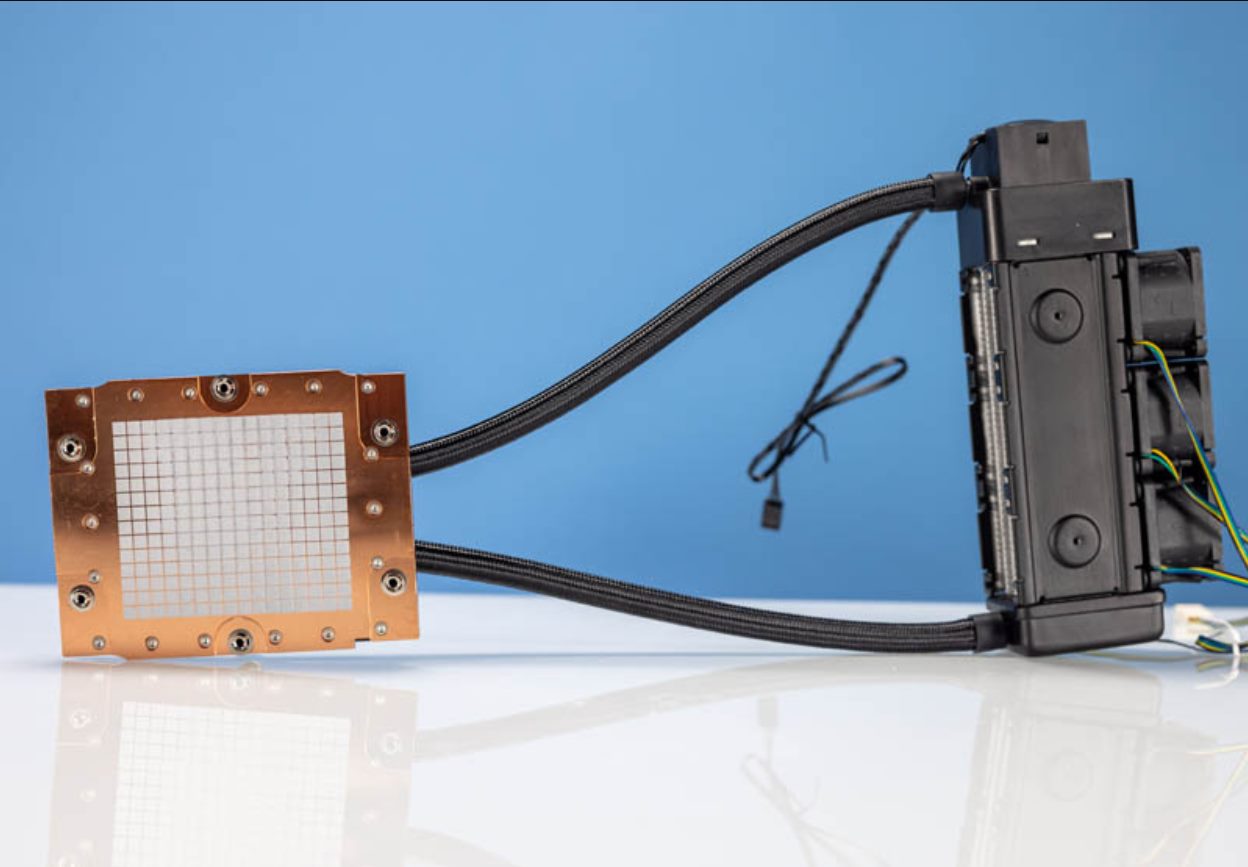
Radiator and Pump: At the heart of a water cooler is the radiator and pump unit. The radiator, usually made of aluminum, is responsible for dissipating heat from the liquid coolant. It is equipped with one or more fans to enhance heat dissipation. The pump, situated within the CPU block, circulates the coolant through the system, ensuring efficient heat transfer and maintaining optimal temperatures.
Efficiency and Performance: Water coolers offer superior cooling performance compared to air coolers, especially when it comes to handling heavy workloads, overclocking, or high-performance gaming. The liquid coolant carries heat away from the CPU more effectively, resulting in lower temperatures and better overall system stability. Water cooling is particularly beneficial for processors with a higher thermal output or for users who demand maximum performance.
Flexibility and Customization: Water coolers provide flexibility when it comes to positioning the radiator and fans within your PC case. The compact CPU block allows for easier installation and frees up space around the CPU socket. Additionally, water cooling systems offer customization options, such as RGB lighting or tube color choices, for users who want to customize the appearance of their PC.
Quiet Operation: Water coolers tend to operate more quietly than air coolers, especially at higher loads. The absence of a large, fast-spinning fan directly on the CPU contributes to a reduced noise level. This makes water coolers an excellent choice for users who prioritize a quiet computing experience or want to minimize fan noise in their system.
Complexity and Maintenance: While water coolers offer superior cooling performance, they do require more installation and maintenance compared to air coolers. Proper mounting of the radiator, CPU block, and fans is crucial to ensure efficient cooling. Additionally, periodic maintenance such as checking coolant levels, cleaning the radiator fins, and ensuring proper fan operation is necessary to maintain optimal performance. However, all-in-one water coolers are designed for ease of use and require less maintenance compared to custom water cooling setups.
Water coolers are a preferred choice for enthusiasts, gamers, and professionals who seek top-notch cooling performance and are willing to invest in a higher-end cooling solution. They offer excellent temperature control, quieter operation, and the ability to handle heavy workloads with ease. However, it’s important to consider factors such as case compatibility, installation complexity, and budget when deciding on a water cooler for your system.
Now that we’ve explored water coolers, let’s move on to the next section, where we’ll discuss stock coolers and their relevance in CPU cooling.
Stock Coolers
Stock coolers, also known as OEM coolers, are the default cooling solutions that come bundled with CPUs. These coolers are provided by the CPU manufacturer and are designed to be a basic cooling option for the average user. Let’s dive into the features and considerations of stock coolers.
Compatibility: Stock coolers are specifically designed for the CPU they come bundled with, ensuring optimal compatibility. They are commonly available for mainstream processors from manufacturers such as Intel and AMD. When purchasing a CPU, check if a stock cooler is included in the package.
Adequate Cooling: Stock coolers are typically sufficient for general computing tasks and light usage scenarios. They are designed to cool the CPU under normal operating conditions without causing overheating issues. If you have a standard computer setup and don’t engage in heavy workloads or overclocking, a stock cooler should provide adequate cooling performance.
Cost Savings: Stock coolers come at no additional cost to the consumer as they are included with the CPU purchase. This makes them an affordable option for users who are on a tight budget or don’t require advanced cooling capabilities. By using a stock cooler, you can save money that would otherwise be spent on purchasing an aftermarket cooling solution.
Limited Cooling Performance: Stock coolers have limitations when it comes to handling demanding tasks or high-performance applications. They are not designed to handle heavy workloads or extreme overclocking. When the CPU is pushed beyond its normal operating conditions, the stock cooler may struggle to dissipate the increased heat efficiently, leading to higher temperatures and potential performance throttling.
Noise Level: While stock coolers aim to provide a balance between cooling performance and noise level, they are often associated with higher noise levels compared to aftermarket coolers. The fans included in stock coolers may produce more noticeable noise when operating at higher speeds. If a quiet computing experience is a priority, considering an aftermarket cooler with better noise control may be a suitable option.
Overall, stock coolers serve as a practical solution for average users who don’t engage in heavy workloads or seek maximum cooling performance. They offer a cost-effective way to cool the CPU while ensuring compatibility and basic cooling needs are met. However, if you plan to push your system to its limits or require better cooling performance, upgrading to an aftermarket cooler may be necessary.
Now that we’ve explored stock coolers, let’s move on to the next section, where we’ll discuss different methods to determine which type of CPU cooler you have.
Checking Your CPU Cooler
Now that we’ve discussed the different types of CPU coolers, let’s explore how you can determine which type of cooler you have installed in your system. There are a few methods you can use to check your CPU cooler, including physical examination, software monitoring, and online documentation. Let’s dive into each method:
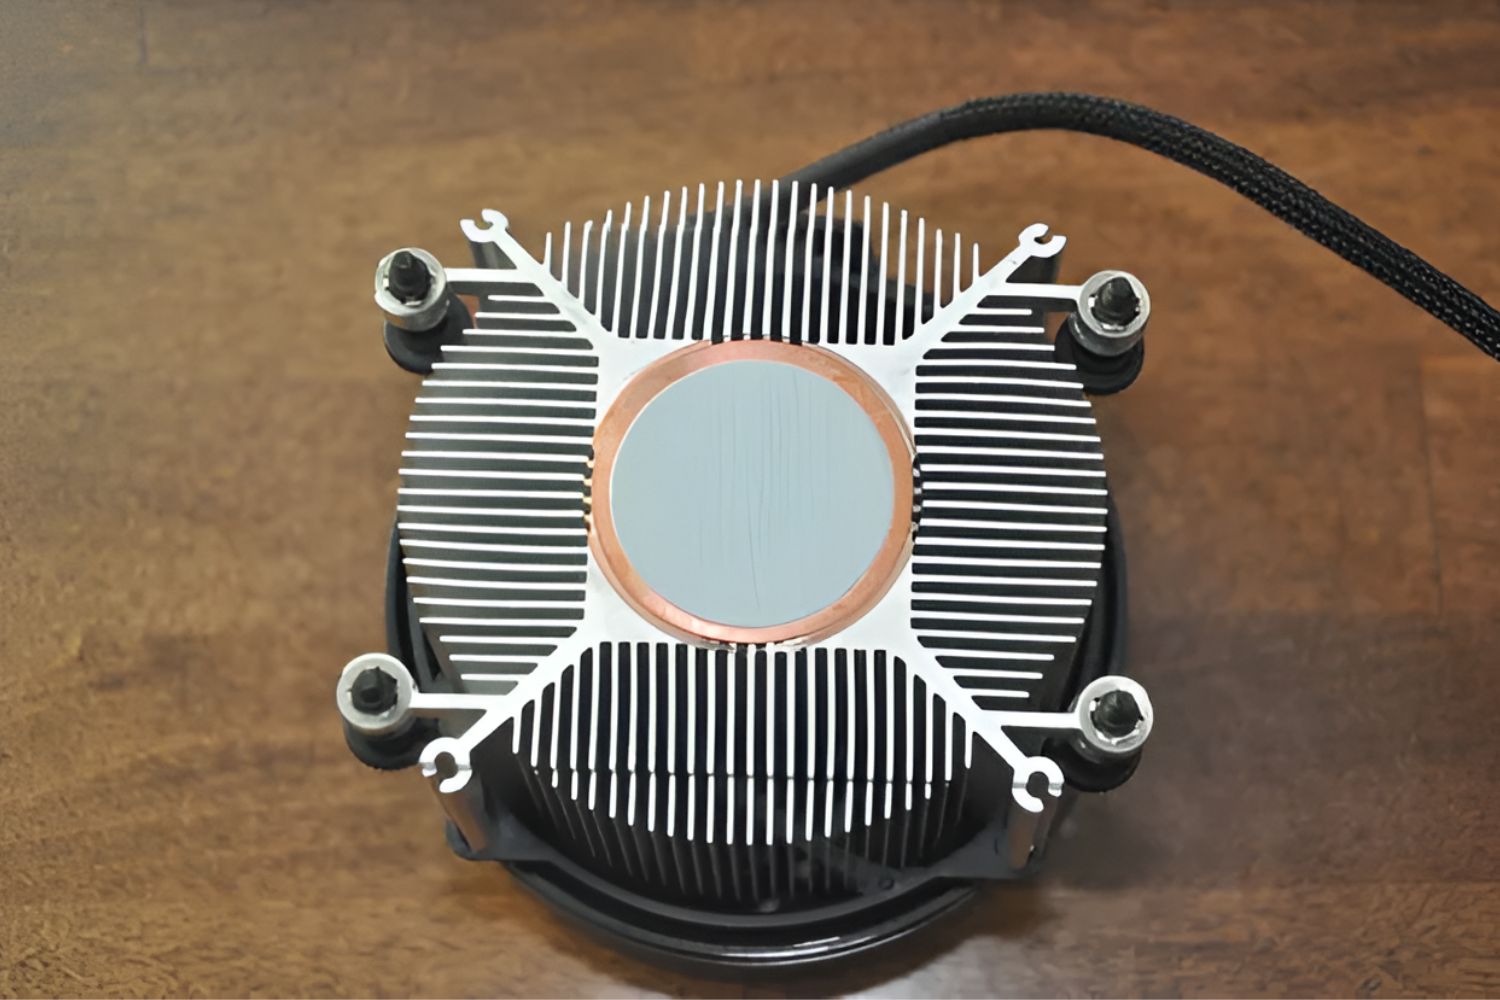
Physical Examination: The most straightforward method is to physically examine your computer’s components. Open up your computer case and locate the CPU cooler. Look for a large heatsink with fins and fans attached to it. Air coolers will have a prominent heatsink with one or more fans, while water coolers will have a radiator connected to the CPU block with tubes. Take note of the size, design, and any branding or model names on the cooler, as these can provide additional clues about its type.
Software Monitoring: Another method to determine your CPU cooler is to use software monitoring tools. Several software programs, such as CPU-Z and HWMonitor, can display detailed information about your system’s hardware. These tools can provide data on the CPU temperature, fan speeds, and even the specific model of your CPU cooler. By analyzing this information, you can identify whether you have an air cooler or water cooler, and sometimes even the exact model.
Online Documentation: If you are unable to physically examine your CPU cooler or access software monitoring tools, you can consult online documentation. This is particularly helpful if you have a stock cooler from a specific CPU manufacturer, as they often provide detailed information about their products on their websites. By searching for the model name of your CPU, you can find official documentation and specifications that indicate the type of cooler included with that CPU.
By using a combination of these methods, you can determine the type of CPU cooler installed in your system. Remember to note down any relevant information, such as the brand, model, and size of the cooler, as this can be useful for future reference or if you plan to upgrade your cooler in the future.
Now that we’ve covered how to check your CPU cooler, let’s move on to the next section, where we’ll explore the process of physically removing the cooler from your CPU.
Physical Examination
One of the simplest ways to determine the type of CPU cooler you have is through a physical examination of your computer’s components. By opening up your computer case and inspecting the cooler, you can gather valuable information about its type, design, and brand. Here’s how you can perform a physical examination to identify your CPU cooler:
Locating the Cooler: Begin by opening your computer case access panel. The CPU cooler is typically located near the CPU socket on the motherboard. Look for a large heatsink with fins and fans attached to it. In the case of an air cooler, it will be noticeable due to its size and the presence of one or more fans. For water coolers, look for a radiator connected to the CPU block with tubes.
Examining the Heatsink: Take a closer look at the heatsink of the CPU cooler. Notice its size, design, and construction material. Air coolers generally have large heatsinks made of aluminum or copper, which are designed to efficiently dissipate heat. Water coolers, on the other hand, have smaller heatsinks attached to the CPU block, as the main heat dissipation happens in the radiator.
Noting Fan Configuration: Pay attention to the number and configuration of fans on the CPU cooler. Air coolers typically have one or more fans mounted on the heatsink, with some models sporting dual fans for enhanced cooling performance. Water coolers usually have one or more fans connected to the radiator for heat dissipation.
Examining Labels and Branding: Look for any labels, branding, or model names on the CPU cooler. These can be helpful in determining the brand and specific model of the cooler. Make note of this information as it can be useful for troubleshooting or if you plan to upgrade to a different cooler in the future.
By conducting a thorough physical examination of your CPU cooler, you can gather valuable information about its type and specific features. This method is particularly useful if you don’t have access to software monitoring tools or online documentation.
Now that we’ve covered the physical examination method, let’s move on to the next section, where we’ll explore software monitoring as another method to determine the type of CPU cooler you have.
Software Monitoring
Another method to determine the type of CPU cooler you have is through software monitoring tools. These tools provide detailed information about your computer’s hardware, including the CPU temperature, fan speeds, and specific model of your CPU cooler. By using software monitoring, you can gather accurate data about your cooler without the need for physical examination. Here’s how you can utilize software monitoring to identify your CPU cooler:
Install Monitoring Software: Start by installing a reputable monitoring software such as CPU-Z, HWMonitor, or Core Temp. These programs are widely available and provide in-depth details about your system’s hardware components.
Accessing Hardware Information: Launch the monitoring software and navigate to the CPU or sensor tab to view the relevant hardware information. Look for details related to the CPU cooler, such as the fan speeds and temperatures. Typically, the software will provide information about the specific model of your cooler, enabling you to identify its type.
Identifying the Cooler Model: Look for the specific model or brand name of the CPU cooler in the monitoring software. If the software displays this information, it can help you determine whether you have an air cooler or water cooler. Additionally, you might find additional details about the cooler’s specifications, such as the number of fans or the type of heat dissipation method used.
Referencing Manufacturer Documentation: If the monitoring software does not provide specific details about your cooler, you can use the model or brand name to search for manufacturer documentation online. CPU cooler manufacturers often provide comprehensive information about their products on their websites, including details about specific models and their characteristics.
Software monitoring offers a convenient and accurate method to identify your CPU cooler without the need for physical examination. It provides real-time data and insightful details about the cooler’s performance and specifications, helping you make informed decisions about your system.
Now that we’ve covered software monitoring, let’s move on to the next section, where we’ll explore online documentation as another method to determine the type of CPU cooler you have.
Online Documentation
Online documentation can be a valuable resource when trying to determine the type of CPU cooler you have. CPU manufacturers often provide detailed information about their stock coolers or reference coolers on their websites. By consulting online documentation, you can find specific details about the cooler and understand its features. Here’s how you can utilize online documentation to identify your CPU cooler:
Identify the CPU Model: Start by identifying the specific model of your CPU. You can find this information by checking your system specifications or using software tools like CPU-Z or HWMonitor. Take note of the model name or number, as it will help you search for the corresponding online documentation.
Visit the Manufacturer’s Website: Once you have the CPU model, visit the website of the CPU manufacturer, such as Intel or AMD. Navigate to the support or product section of the website, where you can find documentation and specifications.
Search for CPU Specifications: Look for the CPU model you identified and search for its specifications. The documentation should provide a detailed list of the CPU’s features, including information about the stock cooler or reference cooler included with the CPU. This will help you determine the type of cooler you have.
Review Cooler Specifications: Within the documentation, carefully review the specifications of the CPU cooler listed. Pay attention to details such as the cooler’s type (air or water), dimensions, fan speeds, and any other relevant information. This will help you narrow down the specific type of cooler installed in your system.
Online documentation is a reliable source of information and can provide insights into the type and characteristics of your CPU cooler. The documentation provided by CPU manufacturers is often comprehensive and includes detailed specifications, enabling you to make an accurate determination.
Now that we’ve explored online documentation, let’s move on to the next section, where we’ll discuss how to physically remove the CPU cooler for further examination or replacement.
Removing the Cooler
If you need to further examine your CPU cooler or replace it with a different one, you’ll need to know how to remove it properly. Here’s a step-by-step guide on how to remove the cooler from your CPU:
Gather the Required Tools: Before you begin, make sure you have the necessary tools on hand. You’ll typically need a screwdriver, thermal paste remover (isopropyl alcohol), and cleaning materials, such as lint-free cloths.
Power Down and Disconnect: Power off your computer and unplug it from the wall outlet. Disconnect any peripheral devices and remove the side panel of your computer case to access the internal components.
Disconnect Fan Power: Locate the power connector of the CPU cooler fan and gently unplug it from the motherboard. Take note of how the connector is attached in case you need to reattach it later.
Unscrew the Cooler Bracket: Depending on the type of cooler, there may be a bracket or retention mechanism securing it to the CPU socket. Use a screwdriver to carefully unscrew any screws or release any clips holding the cooler bracket in place. Take your time and ensure you don’t exert excessive force that could damage the CPU or motherboard.
Detach the Heatsink: Once the bracket is loosen or removed, gently twist or wiggle the CPU cooler to break the thermal bond created by the thermal paste. Slowly lift the cooler away from the CPU, ensuring that you don’t apply too much force that could potentially damage the CPU socket or other components.
Clean and Prep for Reinstallation: After removing the cooler, clean the CPU and heatsink surface using thermal paste remover and a lint-free cloth. Ensure both surfaces are free of any residue or debris before applying new thermal paste.
Reinstallation or Replacement: If you are planning to reinstall the same cooler, follow the manufacturer’s instructions for proper installation. Apply a small amount of thermal paste to the CPU, place the cooler back on top, and secure it using the bracket or retention mechanism. If you are replacing the cooler, carefully install the new cooler following the respective manufacturer’s instructions.
It’s important to exercise caution and patience throughout the process to avoid any damage to your CPU, motherboard, or cooler. If you are unsure of any step, consult the documentation provided by the CPU or cooler manufacturer or seek assistance from an experienced individual.
Now that we’ve covered the process of removing the CPU cooler, you have the knowledge to safely proceed with further examination or replacement.
Conclusion
Understanding what kind of CPU cooler you have is crucial for maintaining the optimal performance and temperature of your computer. In this article, we discussed the different types of CPU coolers, including air coolers, water coolers, and stock coolers. Each type has its own advantages and considerations, ranging from cost-effectiveness to high-performance cooling capabilities.
We also explored various methods for determining the type of CPU cooler you have. From physically examining your computer’s components to using software monitoring tools and referencing online documentation, these methods provide valuable insights into your cooler’s specifications without requiring extensive technical knowledge.
If you are unsure about the type of cooler you have or need to further examine or replace it, performing a physical examination or using software monitoring tools can help you gather accurate information. Similarly, referring to online documentation can provide specific details about the cooler model and its features.
Lastly, we discussed the process of removing a CPU cooler, emphasizing the importance of proper handling and caution to prevent any damage during the process. Whether you are cleaning your cooler, applying new thermal paste, or upgrading to a new cooler, following the recommended steps will ensure a successful and safe removal or installation.
By understanding the type of CPU cooler you have and taking appropriate actions to maintain and improve its performance, you can ensure that your CPU operates within safe temperature ranges and maximizes its potential in various tasks, from everyday computing to demanding gaming or intensive workloads.
We hope this article has helped you in identifying and understanding your CPU cooler. So, go ahead, check your CPU cooler, and enjoy a well-cooled and high-performing computer system!