Introduction
The Samsung Galaxy S4 is a popular smartphone known for its sleek design and impressive features. However, like any electronic device, there may come a time when you need to take it apart for repair or component replacement. Whether you have a broken screen, faulty battery, or malfunctioning camera, knowing how to disassemble your Samsung Galaxy S4 can be incredibly useful.
In this guide, we will walk you through the step-by-step process of taking apart your Samsung Galaxy S4. Before we begin, it’s important to note that disassembling your phone may void any warranties, so proceed with caution. It’s also recommended to have a clean workspace with plenty of natural light to help you see the components clearly.
We will outline the required tools you’ll need, such as a small Phillips screwdriver, plastic spudger, and tweezers. Additionally, we will cover each step in detail, including how to remove the back cover, battery, screws, SIM card, and SD card. You’ll also learn how to disconnect cables and connectors, remove the motherboard, separate the LCD display, and replace components like the rear-facing camera.
By following this guide, you’ll gain the knowledge and confidence to safely disassemble your Samsung Galaxy S4 and perform repairs or component replacements on your own. Whether you’re an aspiring DIY enthusiast or simply want to understand how your phone works, this guide will provide you with valuable insights into the inner workings of the Samsung Galaxy S4.
So, without further ado, let’s get started on the journey of exploring the internals of your Samsung Galaxy S4!
Tools Required
Before delving into the process of disassembling your Samsung Galaxy S4, it’s essential to have the necessary tools on hand. Here are the tools you’ll need to successfully take apart your device:
- Small Phillips Screwdriver: To unscrew the screws holding the components in place, you’ll need a small Phillips screwdriver. Ensure it fits the size of the screws on your Galaxy S4.
- Plastic Spudger: A plastic spudger is a non-conductive tool that helps pry open connectors and separate components without causing damage. It’s suitable for removing the back cover and disconnecting cables.
- Tweezers: Tweezers are handy for handling small, delicate components, such as connectors and screws. They provide precision and ensure you don’t drop or misplace any parts during the disassembly process.
- Opening Picks: Opening picks are thin and flexible tools that can be used to pry open the phone’s casing without causing scratches or dents. They are especially useful for separating the LCD display from the frame.
- Heat Gun or Hair Dryer: In some cases, you may need to apply heat to loosen adhesive and facilitate the removal of certain components. A heat gun or hair dryer on a low setting can be used for this purpose. Exercise caution and avoid overheating.
- Anti-static Wristband: While not mandatory, an anti-static wristband is recommended to protect your phone’s internal components from static electricity. It helps prevent accidental damage caused by static discharge from your body.
Gathering the necessary tools before starting the disassembly process will make the task more efficient and decrease the likelihood of damaging your Samsung Galaxy S4.
Now that you have an understanding of the tools required, it’s time to proceed with the first step in the disassembly process: powering off the device.
Step 1: Power Off the Device
Before you begin disassembling your Samsung Galaxy S4, it’s crucial to power off the device to avoid any potential damage or injury. Here’s how you can safely power off your Galaxy S4:
- Press and hold the Power button, located on the right side of the device.
- A menu will appear on the screen.
- Tap on “Power Off” or “Turn Off” from the options provided.
- Confirm the action by selecting “OK” or “Yes” if prompted.
Once you have successfully powered off your Samsung Galaxy S4, you can proceed to the next step of removing the back cover.
It’s important to note that working on an electronic device involves a certain level of risk. Ensure that you are careful and take precautions to avoid static electricity and accidental damage to components during the disassembly process.
Now that your device is powered off, let’s move on to the next step – removing the back cover.
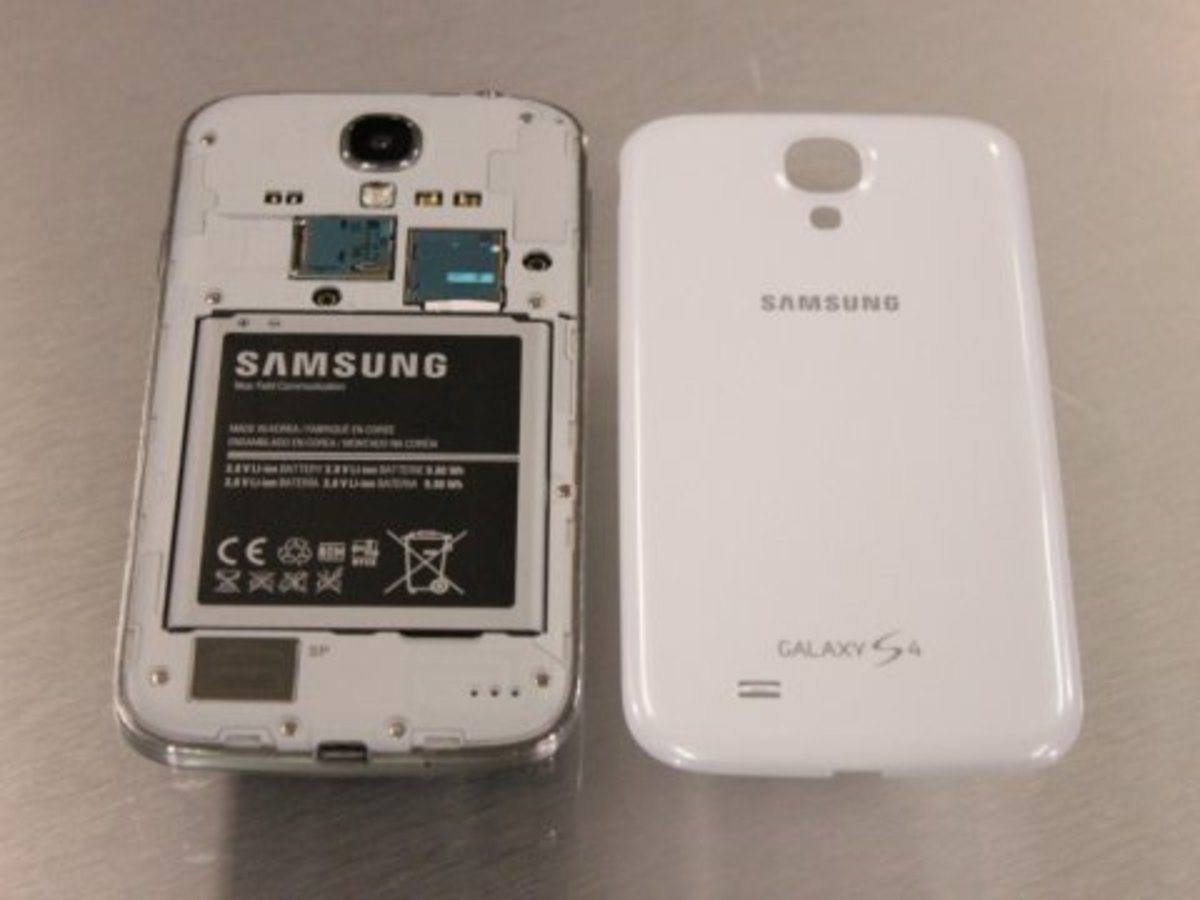
Step 2: Remove the Back Cover
Now that your Samsung Galaxy S4 is powered off, it’s time to remove the back cover. The back cover houses the battery and provides access to the internal components of the device. Follow these steps to safely remove the back cover:
- Hold your Galaxy S4 securely with both hands to ensure a stable grip.
- Locate the small notch or groove on the bottom edge of the device.
- Insert your fingernail or a plastic spudger into the notch.
- Gently pry the back cover away from the device.
- Work your way around the edges of the device, carefully separating the back cover from the chassis.
- Continue to gently pry and lift the back cover until it is completely detached from the device.
Once the back cover is removed, you will have access to the battery and various internal components of your Samsung Galaxy S4. Take care not to force or bend the back cover during the removal process, as this could cause damage.
If you encounter any resistance while trying to remove the back cover, double-check that you have located all the notches and gently apply more pressure using your fingernail or a plastic spudger.
With the back cover successfully removed, you are one step closer to accessing the internal components. Next, we will tackle the battery removal process.
Step 3: Remove the Battery
With the back cover of your Samsung Galaxy S4 removed, the next step is to remove the battery. The battery powers your device and is easily accessible once the back cover is taken off. Follow these steps to safely remove the battery:
- Locate the battery, which is the rectangular-shaped component near the top of the device.
- Identify the two plastic tabs on either side of the battery.
- Gently lift up on the tabs to start prying the battery away from the adhesive securing it to the device.
- Once the battery is loosened, carefully lift it up and out of the device.
- Ensure you keep the battery steady and avoid bending or damaging the connectors.
If you encounter any difficulty in lifting the battery, avoid using excessive force as this could damage the battery or other components. Instead, try using a plastic spudger or prying tool to gently loosen the battery from the adhesive.
During the battery removal process, it’s essential to handle the battery with care. Avoid puncturing or exposing the battery to extreme temperatures, as this could lead to a malfunction or safety hazard. If the battery is damaged or swollen, it should be disposed of properly and replaced with a new one.
With the battery successfully removed, you now have access to the internal components of your Samsung Galaxy S4. This opens up the opportunity to repair or replace faulty components if needed.
Next, we will move on to the process of unscrewing the screws that secure the internal components.
Step 4: Unscrew the Screws
Now that the battery has been safely removed from your Samsung Galaxy S4, it’s time to unscrew the screws that secure the internal components. By removing these screws, you’ll be able to access and disconnect the various cables and connectors within your device. Follow these steps to properly unscrew the screws:
- Identify the screws holding the components in place. These screws are typically located near the edges and corners of the device.
- Using a small Phillips screwdriver, carefully turn each screw counterclockwise to loosen them.
- Place the screws in a safe and organized location, as you will need to reassemble the device later.
- Keep track of the different screw sizes and locations, as they may vary depending on the specific model of the Samsung Galaxy S4.
While unscrewing the screws, it is important to apply even pressure and avoid using excessive force. If a screw feels resistant, double-check that you are using the correct size of the Phillips screwdriver and that you are turning it in the correct direction.
Remember to keep the screws organized and easily accessible to ensure a smooth reassembly process. It can be helpful to use a magnetic mat or a small container with compartments to keep the screws organized and prevent them from rolling away.
With the screws successfully unscrewed and removed, you are now ready to move on to the next step of the disassembly process: removing the SIM card and SD card from your Samsung Galaxy S4.
Step 5: Remove the SIM Card and SD Card
After unscrewing the screws, the next step in disassembling your Samsung Galaxy S4 is to remove the SIM card and SD card. These removable storage options are important for data storage and connectivity. Follow these steps to safely remove the SIM card and SD card:
- Locate the SIM card slot on the side of your device. It is typically located near the battery compartment.
- Using a SIM card removal tool, a paperclip, or a small pointed object, gently push into the small hole next to the SIM card slot.
- The SIM card tray will pop out slightly.
- Gently pull the SIM card tray out of the device.
- Remove the SIM card from the tray if desired by pushing it out with your finger.
- Repeat the same steps for removing the SD card, if present. The SD card slot is usually located near the SIM card slot.
- Remember to handle the SIM card and SD card with care to avoid damage. Avoid touching the metal contacts on the SIM card as this could affect its functionality.
It’s important to note that removing the SIM card and SD card is not necessary for all disassembly or repair tasks. However, if you’re planning to replace or repair components that may interfere with these cards, it’s advisable to remove them to prevent any accidental damage.
With the SIM card and SD card successfully removed, you’ve completed an essential part of the disassembly process. Now, we’ll move on to the next step: disconnecting the cables and connectors inside the device.
Step 6: Disconnect the Cables and Connectors
Now that you’ve removed the SIM card and SD card from your Samsung Galaxy S4, it’s time to disconnect the cables and connectors that secure the internal components. By disconnecting these cables, you’ll be able to access and remove the various parts of your device. Follow these steps to safely disconnect the cables and connectors:
- Locate the cables and connectors within your device. These are typically ribbon cables or flex cables that connect different components to the motherboard.
- Inspect each cable and connector carefully to identify the method of disconnection.
- For ribbon cables, gently lift up the small plastic tab or lever securing the cable in place.
- Once the tab is lifted, carefully slide the cable out of the connector.
- For flex cables, you may need to unlock the connector by lifting a small latch or sliding a plastic piece.
- Once the connector is unlocked, gently pull the flex cable out of the connector.
- Take note of the location and orientation of each cable and connector to ensure proper reconnection during reassembly.
It’s crucial to exercise caution while disconnecting the cables and connectors to avoid damaging them or the motherboard. Apply gentle pressure and avoid using excessive force to prevent any accidental breakage or disconnection.
As you disconnect the cables and connectors, make sure to keep track of each one and organize them in a logical and systematic manner. Labelling or taking pictures of the cables and connectors can be helpful for reference during the reassembly process.
With the cables and connectors successfully disconnected, you are now one step closer to accessing and removing the individual components of your Samsung Galaxy S4. In the next step, we will guide you on how to remove the motherboard.
Step 7: Remove the Motherboard
With the cables and connectors safely disconnected from your Samsung Galaxy S4, it’s time to remove the motherboard. The motherboard is the central component that houses the processor, memory, and other vital parts of your device. Follow these steps to properly remove the motherboard:
- Locate the motherboard, which is the large circuit board that is interconnected with various components of your device.
- Identify the screws or mounting points securing the motherboard to the device.
- Using a small Phillips screwdriver, carefully unscrew the screws or remove any clips or brackets holding the motherboard in place.
- Once the screws are removed or clips are released, lift the motherboard gently from one side and gradually remove it from the device.
- During the removal process, ensure that no cables or connectors are still attached to the motherboard.
- Handle the motherboard with care, avoiding any unnecessary stress or damage to the components.
It’s important to note that the motherboard is a sensitive component, and mishandling it can result in irreversible damage to your device. Make sure to handle it by the edges and avoid touching any of the delicate electronic components or connectors.
As you remove the motherboard, be mindful of any adhesive or connectors that may still be attached to the device. Take your time and ensure a smooth and careful removal process.
With the motherboard successfully removed, you have gained access to the individual components of your Samsung Galaxy S4. This enables you to perform repairs or component replacements as needed.
Next, we will move on to the process of separating the LCD display from the frame of your device.
Step 8: Separate the LCD Display
Once the motherboard has been safely removed from your Samsung Galaxy S4, the next step is to separate the LCD display from the frame. This process is necessary if you need to replace a cracked or malfunctioning display. Follow these steps to properly separate the LCD display:
- Inspect the edges of your device to identify any adhesive holding the LCD display to the frame.
- Apply gentle heat to the edges of the display using a heat gun or hairdryer on a low setting. This helps soften the adhesive and make it easier to remove.
- Once the adhesive has been warmed, use a plastic spudger or an opening pick to carefully pry the LCD display away from the frame.
- Start from one corner and gradually work your way around the edges, applying even pressure to separate the display from the frame.
- Take your time during this process to avoid damaging the LCD display or the frame.
- Be cautious not to apply excessive force, as this could cause cracks or distortions in the display.
If you encounter resistance while separating the LCD display, reapply heat to the area and try again. Ensure that you are working slowly and methodically to avoid any accidents.
Once the LCD display is detached from the frame, carefully set it aside in a safe location while you continue with any necessary repairs or component replacements.
Separating the LCD display can be a delicate process that requires patience and precision. If you are not confident in your skills, it is advisable to seek professional help or refer to specialized repair guides for your specific device model.
Now that you have successfully separated the LCD display, you can proceed with the next step, which is removing the rear-facing camera.
Step 9: Remove the Rear-Facing Camera
After separating the LCD display from the frame of your Samsung Galaxy S4, the next step is to remove the rear-facing camera. If you’re experiencing issues with the camera or need to replace it, follow these steps to safely remove the rear-facing camera:
- Locate the rear-facing camera module, which is typically positioned near the top of the device.
- Identify the small screws or brackets holding the camera module in place.
- Using a small Phillips screwdriver, carefully unscrew the screws or remove any clips securing the camera module.
- Gently lift the camera module from its position, detaching it from any adhesive or connectors.
- Ensure that no cables or connectors are still attached to the camera module before fully removing it.
When handling the rear-facing camera module, be cautious not to touch the lens or any sensitive components. It’s best to hold it by the edges and avoid exerting unnecessary force.
If you’re replacing the camera module, ensure that the new module is compatible with your Samsung Galaxy S4 model. Follow the reverse procedure to install the new camera module securely.
It’s important to note that the rear-facing camera module is a delicate component, and mishandling it can result in damage or poor image quality. Take your time and exercise caution throughout the removal and installation process.
With the rear-facing camera successfully removed, you can proceed with replacing or repairing the camera module, or continue with any other necessary repairs or component replacements.
Next, we’ll move on to the next step: replacing or repairing other components of your Samsung Galaxy S4 as needed.
Step 10: Replace or Repair Components
After removing the rear-facing camera, you have the opportunity to replace or repair various components of your Samsung Galaxy S4. This step allows you to address issues such as a malfunctioning screen, faulty battery, or damaged connectors. Follow these guidelines to replace or repair components:
- Identify the specific component you need to replace or repair, such as the screen, battery, charging port, or other internal parts.
- Refer to repair guides or instructional videos specific to your Samsung Galaxy S4 model for detailed instructions on replacing or repairing the component.
- Ensure you have the necessary replacement part or repair tools before proceeding.
- Follow the provided instructions carefully, ensuring appropriate handling and installation of the new part.
- If repairing a component, inspect for any visible damage, loose connections, or signs of wear.
- Use any necessary tools, such as tweezers or a soldering iron, while exercising caution to avoid further damage.
- If replacing a component, disconnect any cables or connectors attached to the old component and safely remove it from the device.
- Reverse the steps to install the new component, ensuring proper alignment and connection.
- Handle the new component with care, following any specific instructions or precautions provided.
It’s important to note that component replacement or repair requires a certain level of technical skill. If you do not feel comfortable or confident in your abilities, it’s recommended to seek professional assistance from a qualified technician.
When working with replacement parts, ensure they are compatible with your Samsung Galaxy S4 model to avoid any complications or compatibility issues.
With the component successfully replaced or repaired, you can proceed to the reassembly process to put your Samsung Galaxy S4 back together.
Next, we will guide you through the last step: reassembling your Samsung Galaxy S4.
Step 11: Reassemble the Phone
After completing the necessary component replacements or repairs on your Samsung Galaxy S4, it’s time to reassemble the phone. Reassembling the device involves carefully putting all the removed parts back together in the correct order. Follow these steps to reassemble your Samsung Galaxy S4:
- Refer to any notes, labels, or pictures you took during the disassembly process to ensure proper placement and alignment of components.
- Start by reconnecting any cables and connectors to their respective ports on the motherboard. Be gentle and ensure they are securely plugged in.
- Place the motherboard back into its designated place in the frame, aligning it with the screw holes.
- Secure the motherboard using the previously removed screws or clips, being careful not to overtighten.
- Continue reattaching any other components that were removed, such as the rear-facing camera, the LCD display, and any other internal parts.
- Ensure that all components are in their proper positions, and any adhesive or clips are securely reattached.
- Once all the internal components have been reassembled, it’s time to put the battery back into the device. Align the battery and carefully place it in its original position.
- Reattach the back cover of your Samsung Galaxy S4 by aligning it with the edges of the device and gently pressing it into place.
- Listen for a clicking sound or ensure that the back cover is flush with the device, indicating that it is properly secured.
During the reassembly process, take your time and double-check that all the connections, screws, and components are properly aligned and secured. It’s crucial to avoid forcing any parts or overtightening screws, as this could cause damage or affect the functionality of the device.
Once you are confident that everything is reassembled correctly, power on your Samsung Galaxy S4 and check that all the components and features are functioning properly.
Congratulations! You have successfully reassembled your Samsung Galaxy S4 after replacing or repairing components. Remember to dispose of any old or damaged parts in an environmentally-friendly manner.
With your device fully assembled and in working order, you can now enjoy using your Samsung Galaxy S4 with its restored functionality and performance.
Conclusion
Disassembling and reassembling your Samsung Galaxy S4 may seem like a daunting task, but armed with the right tools and knowledge, it can be a rewarding and gratifying experience. From removing the back cover to disconnecting cables, unscrewing components, and replacing or repairing parts, this guide has provided you with a step-by-step process to confidently take apart your device.
By following the instructions outlined in this guide, you can safely access and address various issues with your Samsung Galaxy S4, whether it’s a cracked screen, faulty battery, or malfunctioning camera. Knowing how to disassemble your device not only gives you the ability to perform repairs but also offers a deeper understanding of its internal structure and functionality.
While the process can be technically challenging, it’s important to approach it with patience and care. Take your time, refer to repair guides or instructional videos specific to your device model if needed, and always prioritize safety. Remember to handle delicate components with caution, avoid using excessive force, and keep track of all screws and connectors for a smooth reassembly process.
If you ever feel uncertain during any step of the disassembly or reassembly process, it’s advisable to seek professional help from a trained technician or authorized service center. They can provide expert guidance and ensure that your device is handled properly.
By successfully repairing or replacing components, you can extend the lifespan and functionality of your Samsung Galaxy S4, saving you time and money compared to purchasing a new device.
Now that you have the knowledge and skills to disassemble and reassemble your Samsung Galaxy S4, you are empowered to take control of your device’s maintenance and repair. Harnessing this knowledge will not only benefit you in the present but may also serve as a foundation for future DIY repair projects.
Remember, however, that disassembling your device may void any warranties, so proceed with caution and evaluate the risks involved.
Good luck with your Samsung Galaxy S4 disassembly and repair journey!