Introduction
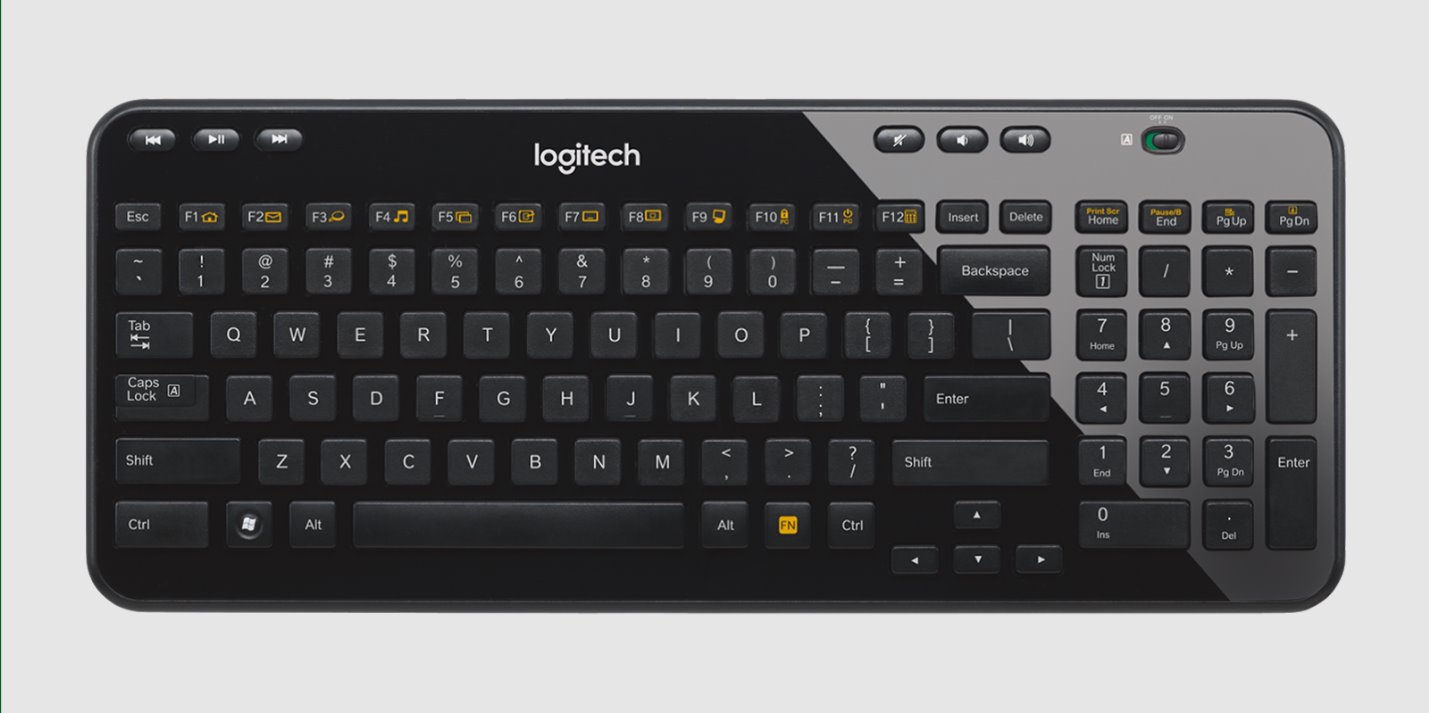
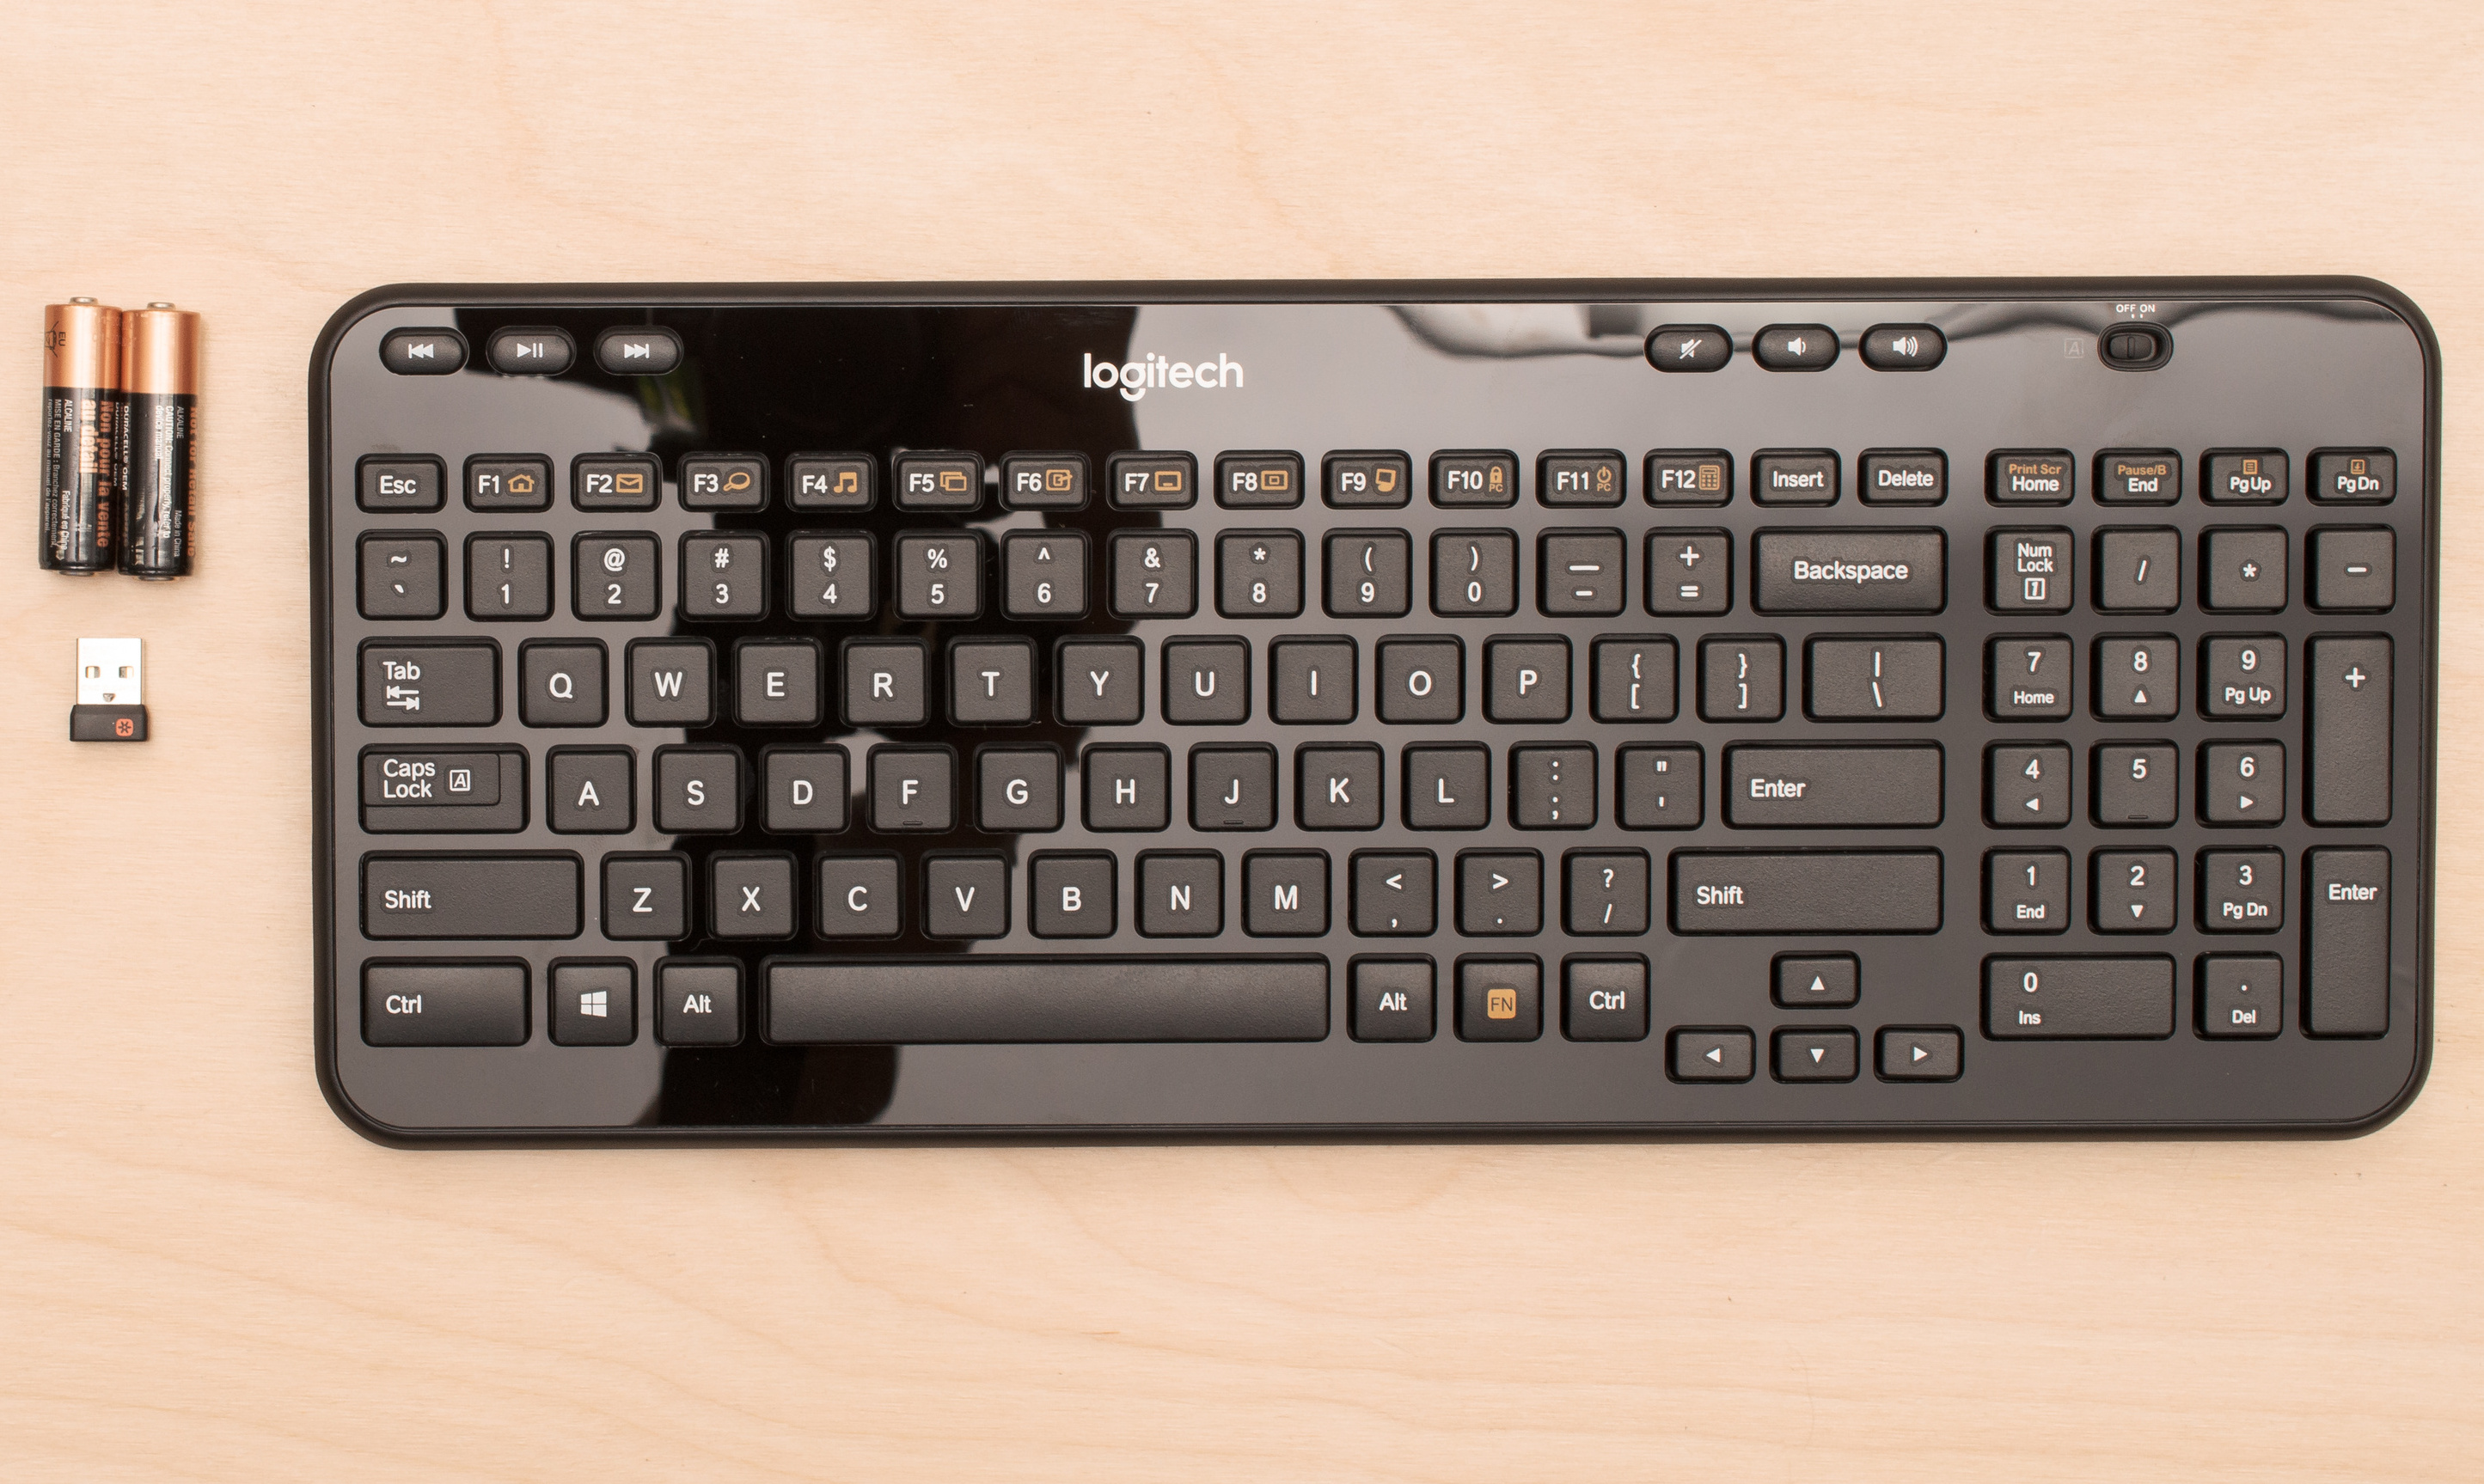
Welcome to this tutorial on how to take apart a Logitech K360 Keyboard. The Logitech K360 Keyboard is a popular wireless keyboard known for its compact size and comfortable typing experience. However, over time, it might need cleaning or repairs that require disassembling the keyboard. Knowing how to take apart the Logitech K360 Keyboard can be beneficial in such situations.
Before we begin, it’s essential to note that disassembling your keyboard may void any warranties, so proceed at your own risk. Also, make sure you have enough time and workspace to perform the disassembly process comfortably.
In this guide, we will go through step-by-step instructions on how to take apart a Logitech K360 Keyboard and provide tips on cleaning and reassembling the keyboard components. By following these steps, you will be able to access the internal components of the keyboard, including the keycaps, circuit board, and other components, allowing you to clean or repair the keyboard effectively.
Let’s get started by gathering the necessary tools you will need for this disassembly process.
Tools Needed
Before beginning the disassembly process, it’s important to gather the necessary tools to ensure a smooth and successful keyboard disassembly. Here are the tools you will need:
- Small Flathead Screwdriver: This tool will be used to remove the keycaps and unscrew any screws holding the keyboard together.
- Plastic Spudger or Opening Tool: This tool will help in prying open the keyboard casing without causing damage.
- Anti-static Wrist Strap: While not mandatory, wearing an anti-static wrist strap can help minimize the risk of static electricity damaging the sensitive electronic components within the keyboard.
- Cleaning Solution and Microfiber Cloth: These will be used to clean the keycaps and other keyboard components.
- Cotton Swabs: Cotton swabs are useful for cleaning hard-to-reach areas and removing any dust or debris.
- Bowl or Container: This will be used to hold the keycaps and screws during disassembly, ensuring they are not lost.
It’s important to have these tools readily available before starting the disassembly process. In addition to these tools, it’s recommended to have a well-lit workspace with enough room for the keyboard and the disassembled components.
Now that you have gathered the necessary tools, let’s move on to the first step in taking apart the Logitech K360 Keyboard: removing the keycaps.
Step 1: Removing the Keycaps
The first step in disassembling the Logitech K360 Keyboard is to remove the keycaps. This will give you access to the screws and allow you to proceed with the further disassembly process. Here’s how you can remove the keycaps:
- Turn off the Keyboard: Before you start, make sure to turn off the keyboard or remove the batteries to prevent any accidental input.
- Identify the Keycaps to Remove: Take a close look at the keyboard and identify the keycaps that need to be removed. Common reasons for removing keycaps include cleaning, replacing damaged keycaps, or accessing the screws beneath them.
- Use a Small Flathead Screwdriver: Take the small flathead screwdriver and gently insert it under the edge of the keycap. Gently lift the screwdriver to pop the keycap off the keyboard. Repeat this process for each keycap you want to remove.
- Organize the Keycaps: As you remove the keycaps, it’s important to keep them organized. Place them in a safe bowl or container to prevent any loss or damage.
It’s vital to be gentle while removing the keycaps to avoid bending or breaking them. If you encounter resistance, double-check if there are any additional clips holding the keycaps in place and release them. Some keycaps may require slightly more force to remove, but exercise caution to prevent any unnecessary damage to the keys or keyboard.
Once you have removed all the desired keycaps, you are now ready to move on to the next step: removing the battery cover.
Step 2: Removing the Battery Cover
After removing the keycaps, the next step in disassembling the Logitech K360 Keyboard is to remove the battery cover. The battery cover is typically located on the underside of the keyboard and securely holds the batteries in place. Here’s how you can remove the battery cover:
- Flip the Keyboard Upside Down: Turn the keyboard upside down, so the bottom side is facing upwards. This will expose the battery compartment.
- Locate the Battery Cover: Look for the battery cover on the underside of the keyboard. It is usually labeled with a battery symbol or has an indentation for easy access.
- Remove the Battery Cover: Depending on the design, the battery cover may have a slider, a latch, or be held in place by screws. Slide the cover open, release the latch, or unscrew the cover to remove it.
- Take Out the Batteries (Optional): If you plan to clean or repair the keyboard extensively, you may choose to remove the batteries at this point. This will prevent the keyboard from accidentally turning on during the disassembly process.
Once the battery cover is removed, keep it in a safe place along with the keycaps. It’s essential to handle the battery cover with care to avoid any damage or loss.
With the battery cover removed, you are now ready to move on to the next step: unscrewing the screws that secure the keyboard together.
Step 3: Unscrewing the Screws
Now that you have removed the keycaps and battery cover, it’s time to proceed with unscrewing the screws that hold the Logitech K360 Keyboard together. These screws secure the keyboard’s casing and provide access to the internal components. Follow these steps to unscrew the screws:
- Locate the Screws: Flip the keyboard back to its normal position and examine the underside. Look for the screws that hold the keyboard casing together. These screws are usually small and may be located near the corners or along the edges of the keyboard.
- Use a Small Flathead Screwdriver: Take your small flathead screwdriver and carefully insert the tip into the screw head. Gently turn the screwdriver counterclockwise to loosen and unscrew the screws. Make sure to keep track of the screws, as you will need them to reassemble the keyboard later.
- Remove All the Screws: Continue unscrewing all the screws until they are entirely removed. Set the screws aside in a secure place, ensuring they do not get lost or mixed up with other components.
Depending on the specific model of the Logitech K360 Keyboard, the number of screws may vary. Some keyboards have more screws than others, so be thorough in locating and removing all the screws to ensure a successful disassembly process.
With the screws removed, you are now ready to move on to the next step: opening the keyboard to access the internal components.
Step 4: Opening the Keyboard
After unscrewing the screws, it’s time to open the Logitech K360 Keyboard and gain access to its internal components. Opening the keyboard requires caution and precision to avoid damaging any parts. Follow these steps to open the keyboard:
- Gently Pry Open the Keyboard Casing: Take a plastic spudger or opening tool and carefully insert it into the seam between the top and bottom halves of the keyboard. Gently apply pressure and slowly pry open the casing. Work your way around the edges, releasing any clips or latches that hold the casing together.
- Be Patient and Gentle: It’s important to be patient and gentle during this process as excessive force can lead to breakage or damage. Take your time and ensure all clips and latches are released before attempting to fully open the keyboard.
- Separate the Keyboard Halves: Once all the clips and latches are released, carefully separate the top and bottom halves of the keyboard. Be mindful of any cables or ribbon connectors that may still be attached.
At this stage, you should have successfully opened the Logitech K360 Keyboard. Take a moment to inspect the internal components, including the circuit board, rubber dome switches, and any other elements that may require cleaning or repair.
Now that the keyboard is open, it’s crucial to proceed with caution in the next step: disconnecting the ribbon cable.
Step 5: Disconnecting the Ribbon Cable
With the Logitech K360 Keyboard opened, the next step is to disconnect the ribbon cable. The ribbon cable connects the keyboard circuit board to the main body of the keyboard. It’s necessary to disconnect the ribbon cable to fully separate the keyboard components and access individual parts for cleaning or repair. Follow these steps to disconnect the ribbon cable:
- Locate the Ribbon Cable: Look for the ribbon cable that connects the circuit board to the main body of the keyboard. It is a flat, flexible cable with copper-colored connectors at both ends.
- Identify the Connector: Pay attention to the connector holding the two ends of the ribbon cable together. There may be a latch or clip securing it in place.
- Release the Connector: To disconnect the ribbon cable, carefully lift or unlock the latch or clip. Gently pull both ends of the cable apart to disconnect them. Take care not to pull on the cable itself, but rather on the connectors.
Once the ribbon cable is disconnected, you can set aside the keyboard body and focus on the circuit board and other components for further cleaning or repair. Be sure to handle the ribbon cable with care to avoid any damage or tearing.
Now that the ribbon cable is disconnected, we can move on to the next step: removing the circuit board from the Logitech K360 Keyboard.
Step 6: Removing the Circuit Board
Now that the ribbon cable is disconnected, it’s time to remove the circuit board from the Logitech K360 Keyboard. The circuit board is the central component that houses the keys, electronics, and other vital elements. Removing the circuit board allows for a more thorough cleaning or repair process. Here’s how you can remove the circuit board:
- Inspect the Circuit Board: Take a moment to examine the circuit board and identify any screws or connectors that hold it in place. Pay attention to the location of these components.
- Unscrew any Screws: If there are screws securing the circuit board, use a small flathead screwdriver to carefully unscrew them. Keep the screws in a safe place to avoid misplacing them.
- Disconnect any Connectors: Look for any additional connectors or cables attaching the circuit board to the keyboard. Gently disconnect these connectors by lifting or releasing the clips or latches that secure them.
- Remove the Circuit Board: With the screws removed and the connectors disconnected, carefully lift the circuit board out of the keyboard body. Take care not to bend or damage it during this process.
Once the circuit board is removed, you can proceed with cleaning or repair tasks specific to the board itself. Ensure you handle the circuit board with caution, as it contains delicate components that can be easily damaged.
Now that the circuit board is out, let’s move on to the next step: cleaning the keyboard components.
Step 7: Cleaning the Keyboard Components
With the circuit board and other keyboard components removed, it’s time to clean them thoroughly. Over time, dust, debris, and grime can accumulate on the keycaps, circuit board, and other parts, affecting their performance. Follow these steps to clean the keyboard components:
- Clean the Keycaps: Take the keycaps that you removed earlier and gently wash them in warm, soapy water. Use a soft cloth or sponge to remove any dirt or stains. Rinse the keycaps thoroughly and let them dry completely before reattaching them to the keyboard.
- Dust or Vacuum the Circuit Board: Use compressed air or a soft brush to remove any dust or debris from the circuit board. Alternatively, you can use a small vacuum cleaner with an appropriate attachment to carefully remove the dust. Be gentle to avoid damaging any components on the board.
- Clean the Keyboard Casing: Wipe the inside of the keyboard casing using a microfiber cloth lightly dampened with a cleaning solution. Be sure to remove any fingerprints, smudges, or dust particles. Take extra care around sensitive areas such as the circuit board connectors or cable routing paths.
- Inspect and Clean Other Components: Inspect other components such as rubber dome switches, metal stabilizers, or sliders. Clean them using a cotton swab dipped in isopropyl alcohol or a specialized electronics cleaning solution. Ensure that these components are dry before reinstalling them.
Remember to exercise caution while cleaning the components to avoid damage. Avoid submerging any electronic parts in water or using abrasive cleaners, as they may cause irreversible damage.
Now that you have cleaned the keyboard components, it’s time to move on to the final step: putting everything back together.
Step 8: Putting Everything Back Together
Now that you have cleaned and repaired any necessary components of the Logitech K360 Keyboard, it’s time to put everything back together. Follow these steps to reassemble the keyboard:
- Reattach the Circuit Board: Carefully place the circuit board back into the keyboard body, ensuring that it fits correctly and aligns with the screw holes and connector slots.
- Reconnect the Ribbon Cable: Take the ribbon cable and align the connectors. Gently push the two ends together until they are securely connected. Ensure that the latch or clip is properly engaged.
- Screw the Keyboard Casing: If you had removed any screws from the keyboard casing, use the small flathead screwdriver to reinsert and tighten them. Make sure that all screws are tightened securely but not over-tightened.
- Reinstall the Keycaps: Take the clean and dry keycaps and place them back onto the keyboard. Press each keycap firmly until you hear or feel it snap into place. Ensure that all keycaps are correctly aligned and none are upside down or crooked.
- Replace the Battery Cover: If you had removed the battery cover earlier, now is the time to put it back in place. Align the cover with the corresponding slots or latch, and carefully slide, close, or screw it back onto the keyboard.
Once you have completed these steps, take a moment to test the keyboard’s functionality. Ensure that all keys are working correctly and that everything is securely assembled. If you encounter any issues, double-check your steps and make any necessary adjustments.
With the Logitech K360 Keyboard fully reassembled and in working condition, you can start enjoying its comfortable typing experience again.
Congratulations! You have successfully completed the process of taking apart and reassembling your Logitech K360 Keyboard. Remember, if at any point you feel unsure or uncomfortable, it’s always best to seek professional assistance or consult Logitech’s official support channels.
Conclusion
Disassembling and cleaning a Logitech K360 Keyboard can be a valuable skill to have, enabling you to maintain and troubleshoot your keyboard effectively. By following the step-by-step process outlined in this guide, you can easily remove the keycaps, battery cover, screws, and open the keyboard to access the internal components such as the circuit board. Cleaning these components thoroughly can help improve the keyboard’s performance and extend its lifespan.
Remember to exercise caution throughout the disassembly and reassembly process to avoid damaging any components. Take your time, be gentle, and keep track of screws and small parts to ensure a successful reassembly. If you encounter any difficulties or are uncertain about a step, consult Logitech’s official support channels or seek professional assistance.
We hope this guide has been helpful in guiding you through the process of disassembling and cleaning your Logitech K360 Keyboard. By taking good care of your keyboard, you can enjoy a comfortable and reliable typing experience for a long time to come.
Happy typing!