Introduction
Welcome to our guide on how to take a screenshot on a Samsung Galaxy device. Whether you own a Samsung Galaxy S21, Note 20, or any other model in the Galaxy series, capturing a screenshot is a handy feature that allows you to save and share important information, memorable moments, or any content displayed on your device’s screen.
Screenshots can be immensely useful for various purposes, including sharing funny conversations, capturing inspiring quotes, documenting software issues for troubleshooting, or saving receipts for online purchases. With multiple methods available, you can easily take screenshots on your Samsung Galaxy device without the need for any additional apps or equipment.
In this article, we will walk you through six different methods to take a screenshot on a Samsung Galaxy device, ranging from using physical buttons to utilizing the device’s unique features like palm swipe gestures and the S-Pen (Note devices only). We will also discuss using the Edge panel, taking screenshots with the help of Bixby Voice Assistant, and the option of using third-party apps if you prefer.
So, whether you are a seasoned Samsung Galaxy user looking to learn new screenshot techniques or a new device owner who wants to explore the available options, our comprehensive guide will cover everything you need to know. Let’s dive in and discover the various methods to capture screenshots on your Samsung Galaxy device.
Method 1: Using the Physical Buttons
One of the most straightforward ways to take a screenshot on a Samsung Galaxy device is by using the physical buttons. This method works on almost all Samsung Galaxy models, including the latest ones like the S21 or Note 20. Here’s how you can do it:
- Position your screen: Ensure that the screen you want to capture is displayed.
- Press the buttons: Simultaneously press and hold the volume down button and the power button on the right side of your device. Hold them for a few seconds until you see a quick animation or hear a camera shutter sound.
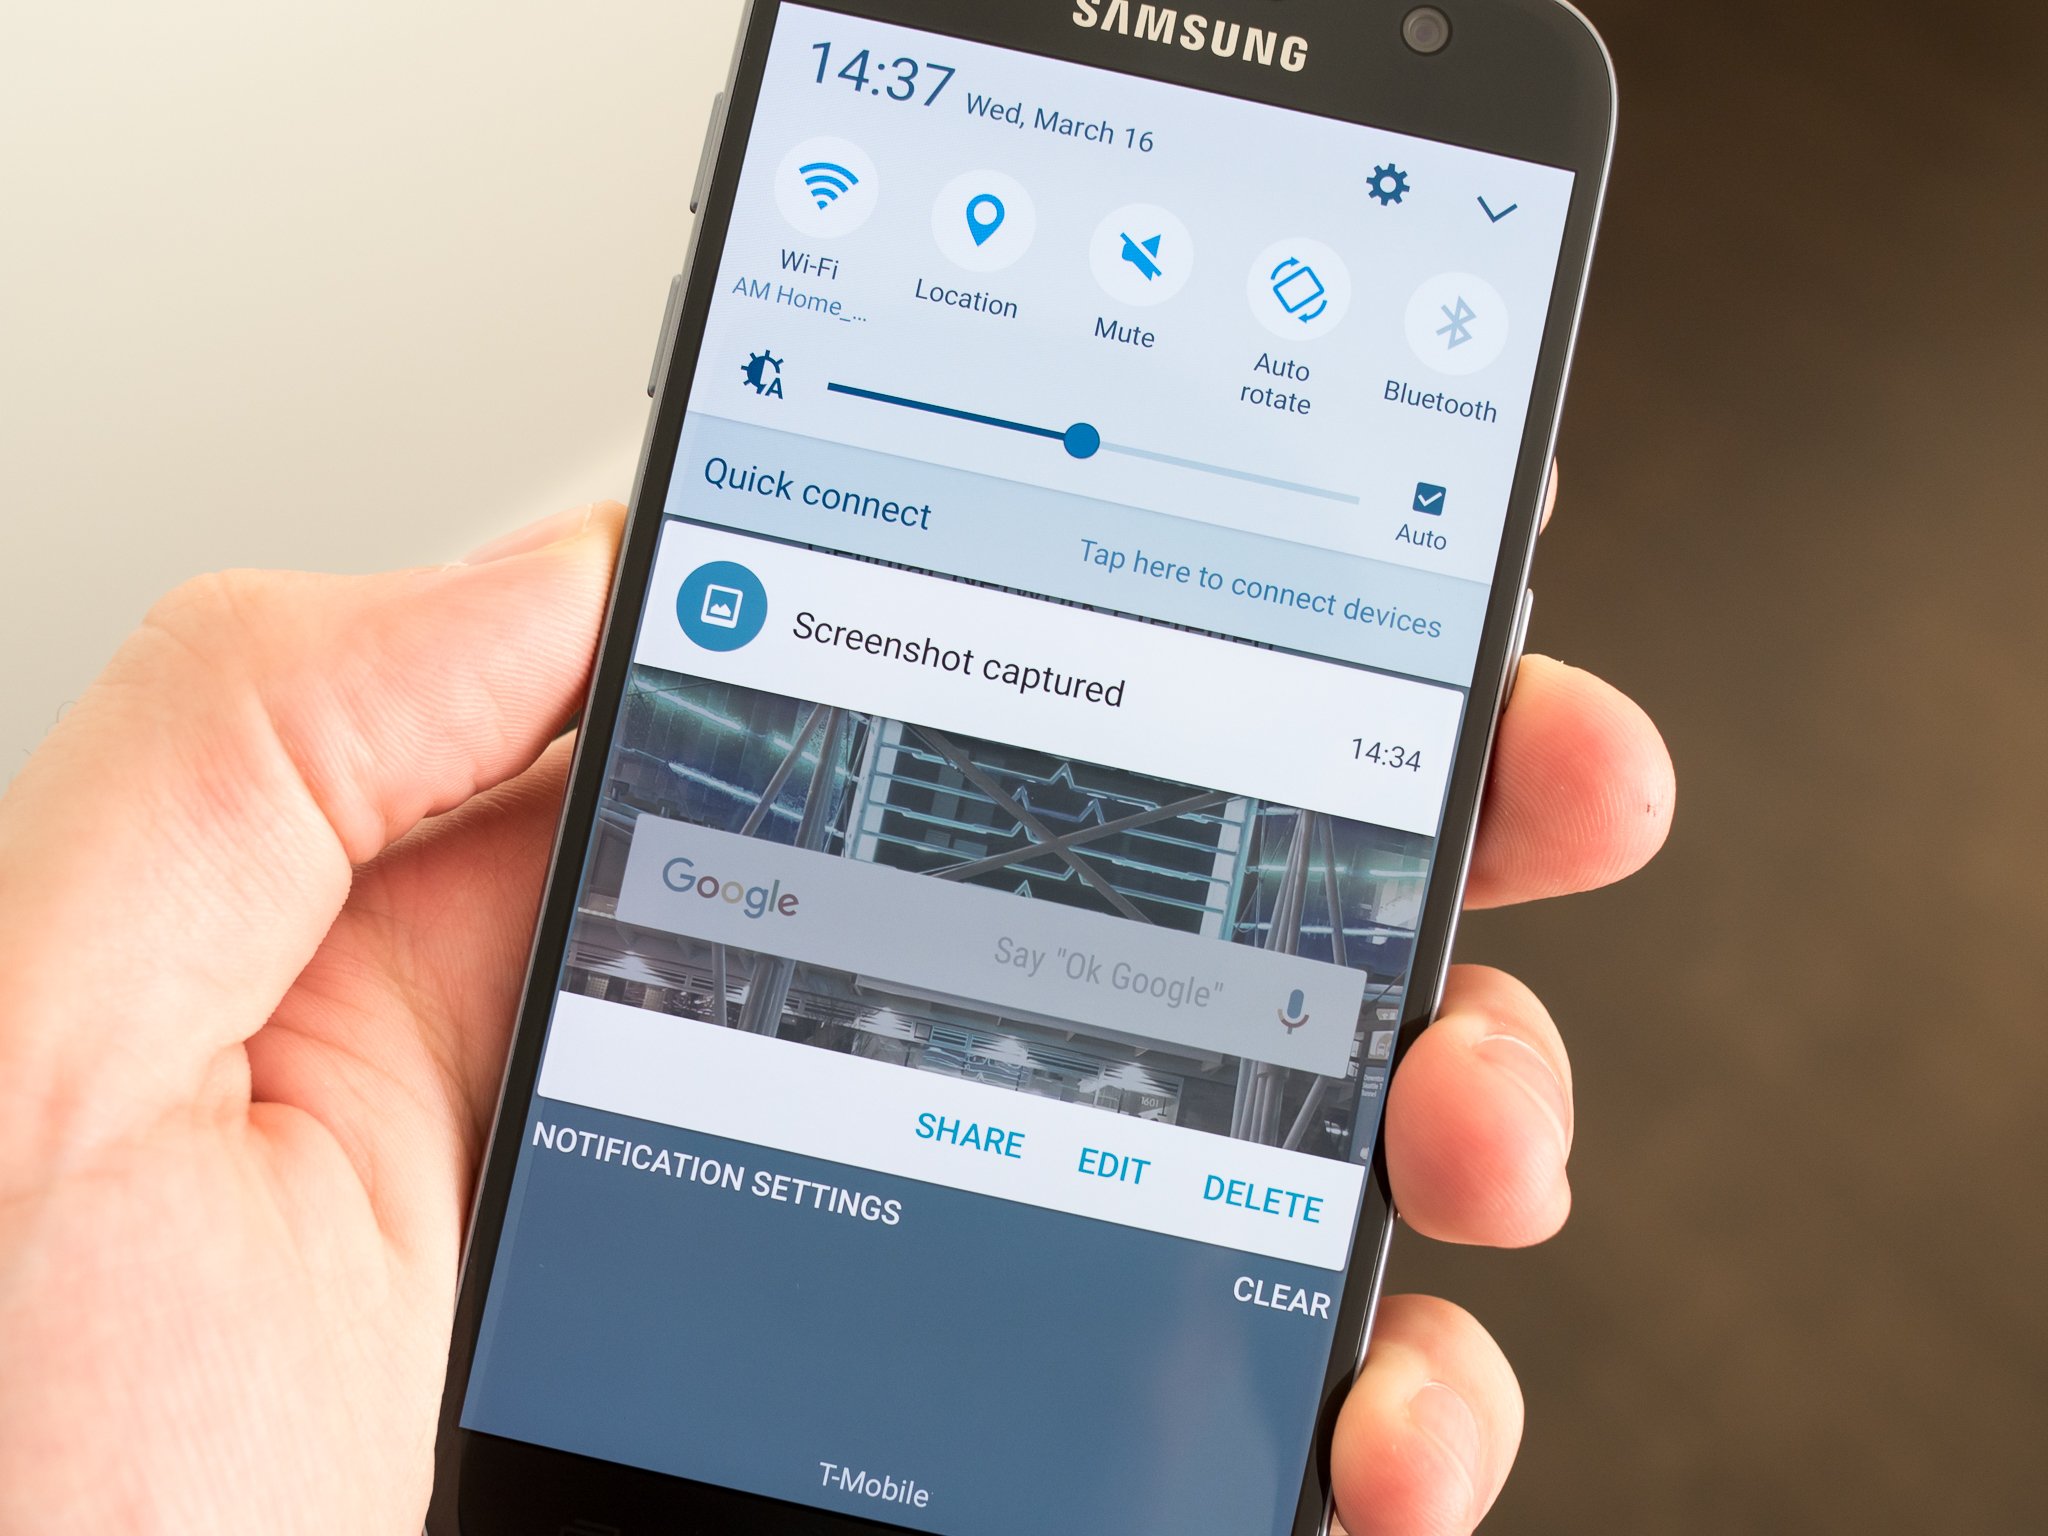
- View your screenshot: The screenshot will be saved in your device’s gallery or “Photos” app. You can access it by going to the “Gallery” or “Photos” app from your home screen or app drawer. Open the “Screenshots” folder to find your recently captured screenshot.
Using the physical buttons to take a screenshot provides a quick and seamless experience. It is especially useful when you need to capture a screenshot of a game, video, or any other content that requires your full attention and cannot utilize other gestures or features.
Keep in mind that the exact combination of buttons may vary slightly depending on your Samsung Galaxy model and software version. If the above combination doesn’t work for you, try slightly different button combinations like power button + home button or power button + volume up button. If you’re unsure about the button combination for your specific device, you can refer to the user manual or search online for the specific instructions.
Now that you know how to take a screenshot using the physical buttons on your Samsung Galaxy device, you can easily capture important information or share interesting moments with just a few simple clicks. Let’s move on to the next method and explore different ways to take screenshots on your Samsung Galaxy device.
Method 2: Palm Swipe Gesture
If you prefer a more hands-free approach to taking screenshots on your Samsung Galaxy device, you can utilize the palm swipe gesture feature. This feature allows you to capture a screenshot by swiping your hand across the screen. Follow these steps to enable and use the palm swipe gesture:
- Enable the palm swipe gesture: Go to the Settings app on your Samsung Galaxy device.
- Find “Advanced features” or “Motions and gestures” (may vary depending on your device model).
- Look for the “Palm swipe to capture” option and toggle it on.
- Position your hand: Make sure your hand is positioned vertically with your fingers slightly spread apart.
- Swipe across the screen: With the enabled palm swipe gesture, swipe your hand from right to left or left to right across the screen. Be sure to make contact with the screen.
- Confirm the screenshot: If successful, you will see a quick animation or hear a camera shutter sound, indicating that the screenshot has been captured.
- Access the screenshot: Like with Method 1, your screenshot will be saved in the “Screenshots” folder within your device’s gallery or “Photos” app.
The palm swipe gesture feature offers a convenient way to capture screenshots without the need to press physical buttons. It works well when you have one hand free or when using your device one-handed. However, make sure to swipe across the screen smoothly and with the right amount of pressure to ensure accurate capturing.
If you have trouble activating the palm swipe gesture or the feature isn’t available on your Samsung Galaxy device, double-check the settings and ensure that it is enabled. Some older or budget-friendly models may not have this feature included.
Now that you’ve learned how to capture screenshots using the palm swipe gesture, you can effortlessly grab screenshots with a simple swipe of your hand. Let’s explore additional methods to capture screenshots on your Samsung Galaxy device in the next section.
Method 3: Using the S-Pen (Note devices only)
If you own a Samsung Galaxy Note device that comes with an S-Pen, you have an additional method for taking screenshots. The S-Pen offers a convenient way to capture screen images without touching the device’s screen. Here’s how you can take a screenshot using the S-Pen:
- Remove the S-Pen: Take out the S-Pen from its designated slot on your Samsung Galaxy Note device.
- Hover over the screen: Hold the S-Pen near the screen and hover it over the content you want to capture.
- Press the button: On the side of the S-Pen, there is a button. Press and hold that button while hovering the S-Pen over the screen.
- Screen capture: When you press the button on the S-Pen, the screen will be captured, and you will see a quick animation or hear a camera shutter sound.
- Access the screenshot: The screenshot will be saved in the “Screenshots” folder within your device’s gallery or “Photos” app, just like the previous methods.
The S-Pen provides a versatile tool for Samsung Galaxy Note users, allowing them to take screenshots with precision and ease. This method can be particularly useful for capturing specific sections of a webpage, drawing annotations on the screen, or quickly jotting down notes.
Keep in mind that this method is specific to Samsung Galaxy Note devices that come with an S-Pen. Other Samsung Galaxy models do not have an S-Pen, so you won’t be able to use this method on those devices.
Now that you know how to take a screenshot using the S-Pen on your Samsung Galaxy Note device, you can conveniently capture important information or capture creative ideas with the help of this handy accessory. Let’s move on to the next method and explore further options for taking screenshots on your Samsung Galaxy device.
Method 4: Using the Edge Panel
If you own a Samsung Galaxy device with an Edge Panel feature, you can take advantage of this convenient tool to capture screenshots quickly. The Edge Panel provides a handy shortcut for various functions, including taking screenshots. Follow these steps to use the Edge Panel for capturing screenshots:
- Enable the Edge Panel: Swipe from the edge of your device’s screen to open the Edge Panel. If you haven’t set up the Edge Panel yet, you can enable it through the device settings.
- Add the Smart Select panel: Within the Edge Panel, look for an option to add panels or customize the Edge Panel settings. Find the Smart Select panel and enable it.
- Open the Smart Select panel: Once the Smart Select panel is enabled, you can access it by swiping to open the Edge Panel and selecting the Smart Select option.
- Select the screenshot mode: Within the Smart Select panel, you will find different modes for capturing screenshots. Choose the mode that suits your needs, whether it’s capturing a rectangular portion of the screen, a specific area, or a GIF.
- Capture the screenshot: Follow the on-screen instructions or use the selected mode to capture the desired screenshot.
- Save the screenshot: After capturing the screenshot, it will be saved in your device’s gallery or “Photos” app like the previous methods.
The Edge Panel feature provides a convenient and accessible way to access the Smart Select panel for taking screenshots. It eliminates the need to perform complex finger movements or memorize specific gestures. With just a few swipes and taps, you can easily capture screenshots of any desired area on your Samsung Galaxy device.
It’s important to note that the Edge Panel feature may not be available on all Samsung Galaxy models. It is primarily found on devices with curved edge displays, such as the Galaxy S series with “Edge” editions. If you don’t see the Edge Panel feature on your device, it means it is not supported.
Now that you’re familiar with using the Edge Panel to capture screenshots, you can quickly and effortlessly capture desired portions or create GIFs to save and share. Let’s proceed to the next method and explore further ways to take screenshots on your Samsung Galaxy device.
Method 5: Using Bixby Voice Assistant
If you own a Samsung Galaxy device with Bixby Voice Assistant, you can utilize this intelligent assistant to take screenshots using voice commands. With Bixby, you can simply speak a command to capture a screenshot without the need for physical buttons or gestures. Here’s how you can use Bixby Voice Assistant to take a screenshot:
- Activate Bixby Voice Assistant: Depending on your device model, you can either press and hold the Bixby button or say the “Hey, Bixby” wake-up command to activate the assistant.
- Give the command: Once Bixby is activated, say “Take a screenshot” or “Capture the screen” to instruct Bixby to capture a screenshot.
- Confirm the screenshot: Bixby will capture the screenshot, and you will receive a confirmation message or hear a notification sound indicating that the screenshot has been taken.
- Access the screenshot: Like with the other methods, your screenshot will be saved in the “Screenshots” folder within your device’s gallery or “Photos” app. You can open the gallery or app to view and manage your captured screenshots.
Using Bixby Voice Assistant to take screenshots offers a hands-free and convenient way to capture the screen without any physical interactions. This method can be particularly useful when your hands are occupied, or you prefer a voice-controlled approach.
Ensure that Bixby Voice Assistant is set up and enabled on your device. If you encounter any issues with Bixby or if the command doesn’t work as expected, double-check your Bixby settings, language settings, and ensure that you have a stable internet connection.
Now that you know how to use Bixby Voice Assistant to capture screenshots, you can easily command your Samsung Galaxy device to take screenshots using just your voice. Let’s move on to the next method and explore further options for taking screenshots on your device.
Method 6: Using Third-Party Apps
In addition to the built-in methods mentioned earlier, another option to capture screenshots on your Samsung Galaxy device is by using third-party apps. These apps offer additional functionality and customization options beyond the native screenshot features. Here’s how you can use third-party apps to take screenshots:
- Install a third-party screenshot app: Visit the Google Play Store on your Samsung Galaxy device and search for screenshot apps. Choose a reputable app that suits your preferences, such as “Screenshot Easy” or “Screen Master.”
- Grant necessary permissions: Once you’ve installed the app, open it, and follow the on-screen instructions to grant any necessary permissions or accessibility settings.
- Configure the app settings: Explore the settings of the app to customize options like capture method, screenshot quality, saving location, or adding annotations to the screenshots.
- Capture screenshots using the app: Depending on the app you installed, you can usually activate the screenshot capture feature by tapping a floating button, shaking your device, or using a specific gesture within the app.
- Access and manage your screenshots: The third-party app will save your captured screenshots, usually in a dedicated folder or within the app’s gallery. You can access and manage your screenshots within the app or by using your device’s default gallery or “Photos” app.
Using a third-party app to take screenshots provides flexibility and additional features that may not be available in the native screenshot methods. These apps often allow you to edit, crop, or share your screenshots directly from within the app itself.
Keep in mind that while third-party apps can enhance your screenshot capabilities, they might also come with ads or require in-app purchases for certain advanced features. Additionally, make sure to download apps from trusted sources and read user reviews to ensure their reliability and compatibility with your Samsung Galaxy device.
Now that you’re aware of using third-party apps to capture screenshots on your Samsung Galaxy device, you can explore various apps available in the Play Store to enhance your screenshot-taking experience. Let’s wrap up our guide and summarize the methods we’ve covered so far.
Conclusion
Capturing screenshots on your Samsung Galaxy device is a simple and essential feature that allows you to save and share important information, memorable moments, or any content displayed on your screen. Throughout this guide, we explored six methods for taking screenshots on your Samsung Galaxy device.
Method 1 showed us how to use the physical buttons to capture a screenshot quickly. Method 2 introduced the palm swipe gesture, providing a hands-free approach to taking screenshots. Method 3 was specifically for Samsung Galaxy Note users, utilizing the S-Pen to capture screenshots effortlessly. Method 4 showcased the Edge Panel feature, which offers a convenient shortcut for capturing screenshots. Method 5 focused on using Bixby Voice Assistant to capture screenshots with voice commands. Lastly, Method 6 discussed the option of using third-party apps to enhance your screenshot capabilities.
Each method has its advantages and unique features, enabling you to choose the one that best fits your preferences and specific Samsung Galaxy device. Whether you’re a long-time user or a new Samsung Galaxy owner, these methods will help you capture screenshots efficiently.
Remember to explore the different options and customize your screenshot settings according to your needs. Whether you prefer physical button presses, gestures, voice commands, or third-party apps, you can easily capture and manage screenshots on your Samsung Galaxy device.
So, go ahead and start capturing screenshots of important information, funny conversations, inspiring quotes, or any other content you come across on your device’s screen. Save and share these snapshots to enhance your productivity, creativity, and communication.
Now that you’re equipped with the knowledge of various screenshot methods, you can make the most out of your Samsung Galaxy device and capture those special moments with ease. Happy screenshotting!