Introduction
Welcome to the world of Twitch streaming! If you’re passionate about video games, creative endeavors, or just want to share your expertise with the world, then Twitch is the perfect platform for you. Streaming on Twitch allows you to connect with a wide audience, build a community, and even turn your hobby into a potential career. But where do you start?
In this guide, we will walk you through the process of starting a stream on Twitch from your PC. Whether you’re a complete beginner or have some experience with streaming, we’ve got you covered. We’ll cover everything from setting up your Twitch account to choosing the right hardware, installing broadcasting software, and going live on Twitch.
Streaming on Twitch is not just about playing games and showing off your skills – it’s about building connections with your viewers and creating an engaging and entertaining experience. We’ll also share tips on interacting with your viewers, growing your Twitch channel, and making your stream stand out.
It’s important to remember that streaming on Twitch requires some investment in terms of time, resources, and effort. However, with the right tools and strategies, you can create a successful and enjoyable streaming experience for both yourself and your audience.
So, whether you dream of becoming the next big Twitch star or just want to share your passion with like-minded individuals, let’s dive into the world of Twitch streaming and get you started on your exciting journey!
Setting Up Your Twitch Account
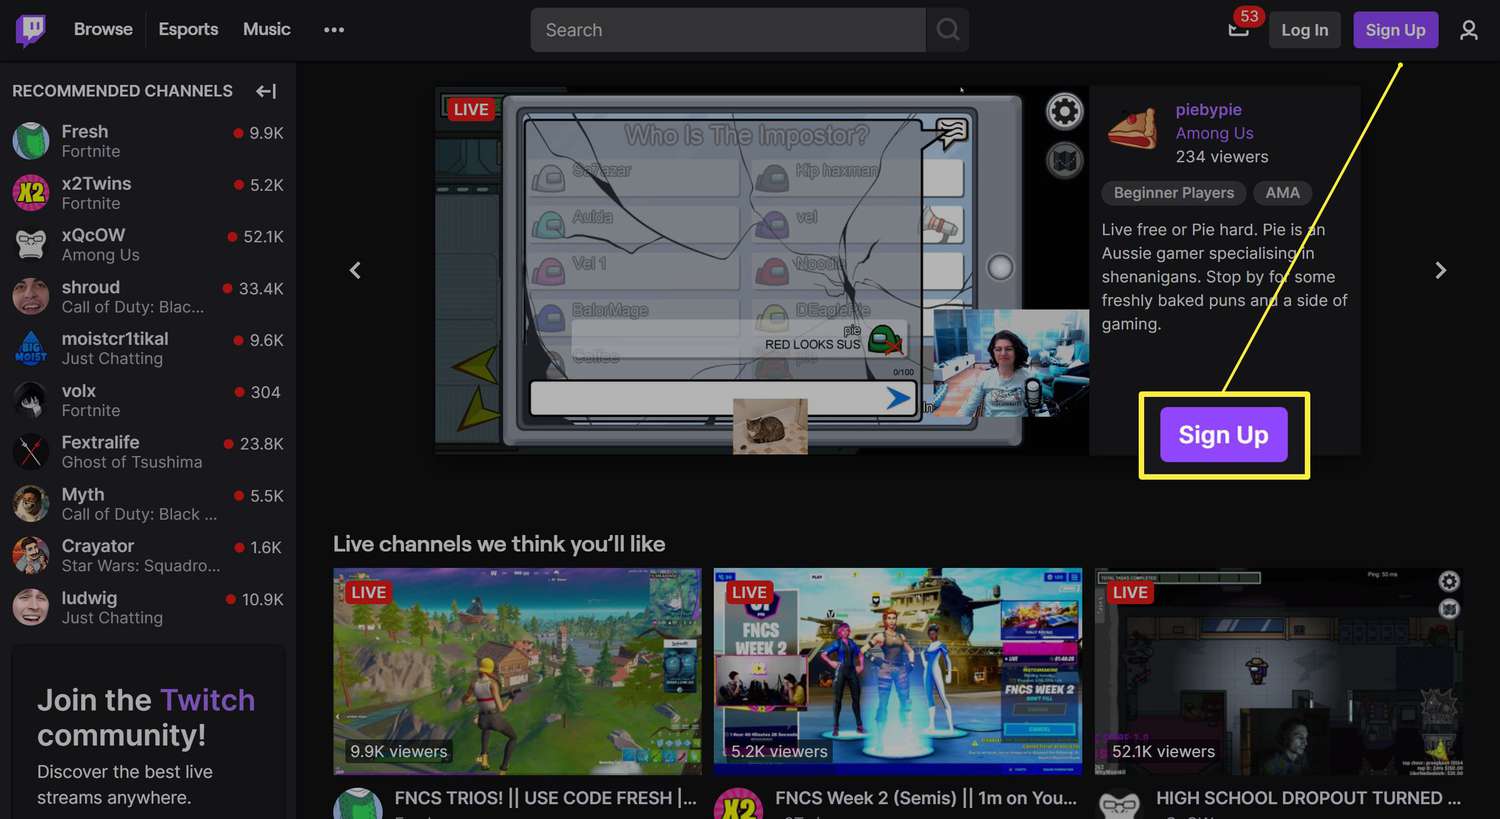
The first step to start streaming on Twitch is to create your Twitch account. Follow these steps to set up your Twitch account:
- Go to the Twitch website (twitch.tv) and click on the “Sign Up” button.
- Fill in the required information, including your username, password, email address, and date of birth. Choose a username that reflects your brand, gaming persona, or interests.
- Read and agree to Twitch’s terms of service and privacy policy.
- Complete the CAPTCHA verification to prove that you are a human.
- Click on the “Sign Up” button to create your account.
Once your Twitch account is set up, it’s time to customize your profile:
- Click on your profile icon in the top-right corner of the Twitch website and select “Settings” from the dropdown menu.
- In the “Profile Settings” section, upload a profile picture that represents you or your brand. A clear and recognizable image is recommended.
- Write a concise and engaging bio that describes who you are, what you stream, and what viewers can expect from your channel. Make sure to highlight your unique selling points.
- Customize your channel page by choosing a visually appealing banner image and add panels with information about your schedule, social media links, donation links, and any other relevant details.
- Consider selecting a setup for channel points and rewards, which can help incentivize viewers to engage with your streams.
It’s essential to create a professional and enticing Twitch account that attracts viewers and sets the tone for your streaming content. Spend some time optimizing your profile to make a positive first impression on potential viewers.
Once your Twitch account is set up and customized, you’re ready to move on to the next step: choosing the right hardware for your Twitch streaming setup.
Choosing the Right Hardware
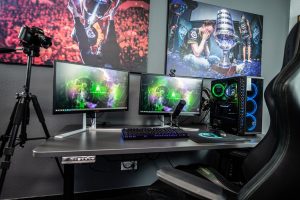
Having the right hardware is crucial for delivering high-quality streams to your Twitch audience. While you don’t need top-of-the-line equipment, investing in certain key components can significantly enhance your streaming experience. Here’s a breakdown of the essential hardware for Twitch streaming:
1. Computer: A powerful PC or laptop is essential for smooth streaming. Ensure that your computer meets the minimum system requirements for streaming software and games. Consider factors like CPU power, RAM, and storage space to handle the demands of streaming and gaming simultaneously.
2. Internet Connection: A stable and high-speed internet connection is crucial for streaming without interruptions. Aim for an upload speed of at least 5 Mbps to ensure a smooth stream. If your current internet connection falls short, consider upgrading to a better plan.
3. Webcam: Adding a webcam to your stream allows your viewers to see your reactions and adds a personal touch to your content. Look for a webcam with at least 720p resolution for crisp video quality.
4. Microphone: Clear and high-quality audio is just as important as video. Invest in a good microphone to provide your viewers with a pleasant listening experience. USB microphones are a popular option for their ease of use and decent sound quality.
5. Headset: A headset with good audio quality and a built-in microphone allows you to communicate with your viewers and interact with them during your streams. Look for comfortable and durable headsets to ensure long hours of wear without discomfort.
6. Monitor: A larger monitor or multiple monitors can help you keep track of your stream, chat, and any other additional applications you might need during your broadcasts. Having a second monitor is especially beneficial for managing your stream settings and monitoring viewer interactions.
Remember, while it’s important to have reliable and quality hardware, you don’t need to break the bank when starting out as a Twitch streamer. Start with what you have and gradually upgrade your equipment as your channel grows.
Now that you have the right hardware, it’s time to move on to the next step: installing broadcasting software.
Installing Broadcasting Software
In order to stream on Twitch, you’ll need broadcasting software that allows you to capture your screen or gameplay and send it to the Twitch servers. There are several popular options available, each with its own set of features and capabilities. Here’s how to get started:
1. Open Broadcaster Software (OBS): OBS is a free and open-source software that is widely used by Twitch streamers. It offers a range of powerful features, including customizable scenes and sources, video encoding options, and support for overlays and alerts. You can download OBS from the official website and follow the installation instructions for your operating system.
2. Streamlabs OBS: Streamlabs OBS (SLOBS) is a user-friendly version of OBS that integrates seamlessly with Streamlabs, a popular suite of tools for streamers. It has a more user-friendly interface and comes with built-in stream overlays, themes, and integration with popular streaming services like Twitch. To install SLOBS, visit the Streamlabs OBS website and download the software.
3. XSplit: XSplit is another popular broadcasting software that offers both a free and a paid version. It provides a user-friendly interface, advanced scene customization, and support for various streaming platforms. To get started with XSplit, visit the XSplit website and download the software. Note that some advanced features may be restricted to the paid version.
Once you’ve installed your broadcasting software of choice, you’ll need to configure it to stream to Twitch. Each software has its own setup process, but the general steps are similar:
1. Open the broadcasting software: Launch the software and familiarize yourself with the interface.
2. Create a new scene: Set up a scene to capture your gameplay or screen. Add sources such as game capture, display capture, webcam, and audio sources as needed.
3. Configure streaming settings: Access the streaming settings within the software and select Twitch as your streaming platform. Enter your Twitch stream key, which can be found in your Twitch account settings.
4. Set video and audio settings: Adjust video resolution, frame rate, and bitrate based on your computer’s capabilities and your internet connection. Set audio settings to ensure clear and balanced sound.
5. Test your stream: Use the software’s preview function or start a test stream to ensure everything is working as expected. Make any necessary adjustments before going live.
Installing and configuring broadcasting software is a crucial step in setting up your Twitch stream. Take some time to explore the features and settings to optimize your stream quality.
Next, we’ll move on to setting up your stream layout, including overlays and alerts, to give your stream a personalized touch.
Setting Up Your Stream Layout
Your stream layout plays a significant role in creating a visually appealing and engaging experience for your viewers. A well-designed stream layout can make your stream stand out and reflect your personal brand. Here are some key elements to consider when setting up your stream layout:
1. Overlay: An overlay is a visual element that sits on top of your gameplay or screen capture. It can include elements like your webcam, chat box, recent follower or donation alerts, and social media handles. You can create custom overlays using graphic design software like Adobe Photoshop or use ready-made templates available on platforms like Streamlabs and Nerd or Die.
2. Webcam Placement: Position your webcam overlay in a way that doesn’t obstruct important gameplay information or text on the screen. Experiment with different placements to find the one that works best for you. Many streamers prefer positioning the webcam in the bottom left or bottom right corner of the screen.
3. Chat Box: Displaying viewer chat on your stream allows for interactive and engaging conversations. You can use the built-in chat features provided by the broadcasting software or integrate third-party chat tools like Streamlabs Chat Box or Streamelements. Place the chat box in a location that is easily visible to both you and your viewers.
4. Alerts: Setting up alerts for new followers, donations, or subscribers can enhance viewer engagement. These alerts can be displayed on your stream overlay or as pop-up notifications. Customize the design and sound of your alerts to align with your stream’s branding.
5. Starting Soon/BRB Screen: Create professional-looking screens that viewers see before your stream starts or if you need to take a short break. These screens can include countdown timers, background music, and relevant information about your stream.
Remember that your stream layout should be visually appealing, but it should also be easy for viewers to understand and navigate. Avoid cluttering the screen with too many elements or using distracting animations that may take away from the gameplay or content.
Once you’ve set up your stream layout, take some time to preview it while streaming or ask for feedback from your viewers or fellow streamers. Making adjustments and fine-tuning your layout based on feedback can help create a more enjoyable viewing experience.
Now that your stream layout is ready, let’s move on to configuring the stream settings to ensure optimal performance for your Twitch stream.
Configuring Stream Settings
Configuring the stream settings is essential to ensure optimal performance and quality for your Twitch stream. Fine-tuning these settings will help prevent any technical issues and provide the best viewing experience for your audience. Here’s a step-by-step guide to configuring your stream settings:
1. Resolution: Choose an appropriate resolution for your stream. Twitch supports a variety of resolutions, but it’s recommended to stream at 720p or 1080p for a clear and crisp visual experience. Keep in mind that higher resolutions require a stronger internet connection and more processing power from your computer.
2. Bitrate: Set the bitrate for your stream. Bitrate determines the amount of data transmitted per second and directly affects the video quality. Twitch recommends using a bitrate between 3,000 and 6,000 kbps for 720p and 6,000 to 10,000 kbps for 1080p. However, consider your internet upload speed and make sure it can sustain the chosen bitrate without causing buffering issues for your viewers.
3. Video Encoder: Choose the appropriate video encoder for your streaming software. Most software options offer software x264 encoding or hardware encoding options like NVENC or AMD VCE. Software encoding tends to provide better quality, while hardware encoding can offload the processing load from your CPU, but may have slightly lower quality.
4. Audio Settings: Configure your audio settings to ensure clear and balanced sound. Use advanced audio features offered by your streaming software to fine-tune microphone volume, noise suppression, and audio filters. Consider using a separate audio track for your microphone and game audio to have better control over audio levels during editing.
5. Stream Delay: Twitch has a built-in stream delay feature that helps prevent stream sniping or unwanted real-time interactions. Consider enabling a slight delay of 10-30 seconds to maintain control over your stream and protect privacy.
6. Server Selection: Choose the Twitch server closest to your location to minimize latency and ensure a stable connection. Your streaming software should have options to select the server or ingest point you want to stream to. In some cases, the software can automatically choose the best server for you.
7. Recording Settings: If you plan on recording your streams for future editing or uploading to other platforms, configure your recording settings accordingly. Set a separate directory for your recordings and choose the desired video format, quality, and bitrate for your recordings.
Remember to save your stream settings once you’ve configured them. It’s a good idea to test your stream settings before going live to check for any issues or adjustments that may be needed.
Now that your stream settings are optimized, let’s move on to customizing stream alerts and overlays to add some visual flair to your Twitch stream.
Customizing Stream Alerts and Overlays
Customizing your stream alerts and overlays is a great way to add personal flair and enhance the visual experience for your viewers. By incorporating unique graphics and animations, you can make your stream stand out and leave a lasting impression. Here’s how you can customize your stream alerts and overlays:
1. Stream Alerts: Stream alerts are notifications that appear on your stream when certain events occur, such as a new follower, donation, or subscriber. These alerts can be customized to match your stream’s branding and style. Platforms like Streamlabs, Streamelements, and Muxy offer pre-made alert templates that you can customize with your own images, sounds, and animations. Experiment with different designs and consider creating a unified theme for all your alert types.
2. Overlays: Overlays add visual elements to your stream, such as your webcam, chat box, and other information like recent followers or donation goals. You can create custom overlays using graphic design software like Adobe Photoshop or use pre-made overlay templates from platforms like Streamlabs, Nerd or Die, or Own3d.tv. Make sure your overlays complement your stream’s branding and match the overall aesthetic you want to portray.
3. Transition Screens: Transition screens help create a smooth transition between different scenes or activities in your stream. They can include elements like your logo, a countdown timer, or a visually engaging animation. Transition screens give your stream a more professional and polished look. Consider creating transition screens for scene changes, starting or ending your stream, or other specific moments during your broadcasts.
4. Branding and Logo: Develop a unique branding for your stream by creating a logo or incorporating your existing branding into your overlays and alerts. Your logo should be simple, recognizable, and aligned with your stream’s theme or personal branding. You can use graphic design tools or seek professional help to create a logo that reflects your style and personality.
Remember to regularly update and refresh your stream alerts and overlays to keep your content engaging and visually appealing to your viewers.
Once you’ve customized your stream alerts and overlays, it’s time to test your stream connection and make sure everything works smoothly before going live on Twitch.
Testing Your Stream Connection
Before you go live on Twitch, it’s crucial to test your stream connection to ensure a smooth and uninterrupted streaming experience. Testing your stream connection allows you to detect and address any potential issues before they impact your viewers. Here’s how you can test your stream connection:
1. Internet Speed Test: Use an online internet speed test tool to check your upload speed. Twitch recommends a minimum upload speed of 5 Mbps for streaming. If your upload speed falls below this threshold, consider troubleshooting your internet connection or reaching out to your internet service provider to improve your upload speed.
2. Broadcasting Software Settings: Check your broadcasting software’s settings to confirm that your stream settings match your desired configuration. Ensure that the video resolution, bitrate, video encoder, and audio settings are properly configured based on your hardware capabilities and Twitch’s recommended settings.
3. Preview Stream: Most broadcasting software allows you to preview your stream before going live. Utilize this feature to check the appearance, audio levels, and overall performance of your stream. Make sure that your overlays, webcam placement, and other visuals are appearing as intended.
4. Test Stream: Some broadcasting software also offers a test stream option that allows you to simulate a live stream without actually going live on Twitch. Use this function to evaluate your stream’s performance and quality. Monitor how your computer handles the streaming process, check for any dropped frames, and test your audio levels to ensure everything is working properly.
5. Viewing Experience: Open your stream on a separate device or browser window to get a viewer’s perspective. Evaluate the stream quality, video and audio synchronization, and any lag or buffering issues. Check that your overlays and alerts are displaying correctly, and chat interactions are visible.
By thoroughly testing your stream connection, you can identify and resolve any technical issues that may affect the quality and experience of your stream. It’s recommended to perform these tests multiple times over several sessions to ensure consistent performance.
Once you are confident in the performance of your stream, you are ready to go live on Twitch and start interacting with your viewers.
Going Live on Twitch
Now that everything is set up and tested, it’s time to go live on Twitch and start sharing your content with the world. Going live on Twitch is an exciting moment, but it’s important to keep a few things in mind to make the most out of your streaming experience. Here’s how to go live on Twitch:
1. Prepare Your Stream: Before going live, double-check that your broadcasting software is running, your webcams and microphones are properly connected, and all your settings are configured correctly. Ensure that your streaming overlays, alerts, and chat boxes are visible and functioning as expected.
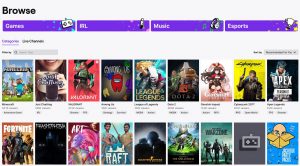
2. Select Your Stream Title and Category: Choose a compelling and descriptive title for your stream that reflects the content you will be sharing. Select the appropriate category and tags for your stream to help viewers find you. Consider using relevant keywords that are popular and related to your stream’s theme.
3. Set Stream Delay (Optional): If you want some delay between your live gameplay and its appearance on Twitch, you can enable a stream delay to prevent stream sniping or other unwanted real-time interactions. Adjust the delay time according to your preferences and needs.
4. Engage with Your Viewers: Once you’re live, greet and interact with your viewers. Pay attention to the chat and respond to messages or questions as much as possible. Encourage viewers to engage by asking for their opinions or thoughts on the game or topic you’re streaming. Building a connection with your audience is crucial for fostering a loyal and engaged community.
5. Properly Brand Your Stream: Consistently reinforce your brand throughout the stream by using your logo, overlays, and consistent visual theme. Make sure your stream layout, graphics, and style remain consistent with your branding to create a professional and memorable experience for your viewers.
6. Promote Your Stream: Utilize social media, your website, or other platforms to promote your stream. Let your followers and friends know that you’re going live on Twitch and encourage them to tune in. Engage with relevant communities and forums related to your stream’s content to attract more viewers and grow your audience.
7. Monitor Performance: Keep an eye on your streaming software’s performance indicators, such as dropped frames or audio sync issues. This will help you identify any potential issues that may affect the quality of your stream. Pay attention to how your viewers are experiencing the stream and take their feedback into account for future streams.
Remember, streaming on Twitch is all about connecting with your audience and providing entertaining or valuable content. Enjoy the process, stay engaged with your viewers, and continuously look for opportunities to improve your stream and grow your community.
Now that you’re live on Twitch, make the most of this opportunity to entertain, educate, and engage your audience. Good luck and have a great streaming session!
Interacting with Your Viewers
Interacting with your viewers is a crucial aspect of Twitch streaming. Engaging with your audience creates a sense of community, encourages viewer loyalty, and enhances the overall streaming experience. Here are some effective ways to interact with your viewers:
1. Greet and Acknowledge Viewers: Make it a habit to greet new viewers as they join your stream. Engage with them by mentioning their usernames and thanking them for tuning in. Regularly acknowledge and respond to viewer messages and comments to foster a sense of inclusion and make them feel valued.
2. Encourage Chat Participation: Actively encourage viewers to participate in the chat by asking engaging questions, seeking their opinions on various topics, or creating interactive polls. This encourages viewer interaction and makes them feel like an integral part of the stream.
3. Respond to Questions and Comments: Take the time to respond to questions, comments, and messages from your viewers. Provide thoughtful and relevant answers to their queries, and encourage discussion around the game or topic you’re streaming. This helps build a deeper connection with your audience and fosters a positive and engaging environment.
4. Utilize Chat Moderation: As your stream grows, it’s important to have chat moderators who can help manage the chat and enforce community guidelines. They can ensure a positive and welcoming atmosphere by removing any toxic or inappropriate messages and addressing any disruptions. Stay involved in chat moderation to maintain a healthy community and ensure that all viewers feel safe and respected.
5. Engage in Multiplayer or Collaborative Games: If you’re playing multiplayer games or participating in collaboration streams, consider involving your viewers in the gameplay. Invite them to join your game, create viewer tournaments, or collaborate with them on creative projects. This not only enhances engagement but also strengthens the bond with your community.
6. Host Q&A Sessions or Viewer Challenges: Allocate specific time during your stream for Q&A sessions where viewers can ask you questions about gaming, your experiences, or even personal interests. You can also create challenges or mini-games specifically designed for viewers to participate in while watching your stream. This adds an element of excitement and encourages active engagement from your audience.
7. Utilize Voice or Video Chat: Depending on your stream format, consider using voice or video chat platforms to interact with your viewers directly. This can include hosting live interviews, inviting viewers to join voice chat during gameplay, or featuring special streams where viewers can join you on video calls. This higher level of interaction enhances the personal connection between you and your audience.
Remember, interacting with your viewers should be authentic and genuine. Show a genuine interest in your audience, listen to their feedback, and respond thoughtfully. Building a strong sense of community and connection will help your stream thrive and create a loyal viewer base.
Now that you know how to interact with your viewers, let’s explore strategies for growing your Twitch channel and attracting more viewers.
Growing Your Twitch Channel
Building a successful Twitch channel requires dedication, consistency, and effective growth strategies. While it can take time to gain a substantial following, implementing the right tactics can help you attract more viewers and expand your Twitch community. Here are some tips to grow your Twitch channel:
1. Define Your Brand: Develop a unique brand for your Twitch channel that reflects your content, persona, and target audience. Clearly communicate your niche and value proposition to viewers, making it easy for them to understand what sets you apart from other streamers.
2. Promote Your Stream: Utilize social media platforms, gaming forums, and online communities to promote your stream. Share highlights or interesting moments from your streams, engage with relevant communities, and interact with other streamers to expand your reach and attract new viewers.
3. Create High-Quality Content: Focus on creating engaging and high-quality content that appeals to your target audience. Stream games or topics that you are passionate about, and aim to provide value, entertainment, or knowledge to your viewers. Strive to be entertaining, authentic, and unique in your approach.
4. Stream Consistently: Consistency is key when it comes to Twitch streaming. Establish a regular streaming schedule that your viewers can rely on, and stick to it. Consistency helps build viewer loyalty and attracts new viewers who appreciate a predictable streaming routine.
5. Network with Other Streamers: Collaboration with other streamers in your niche can be mutually beneficial. Host or participate in multi-streams, shout-out fellow streamers, and engage in co-streaming activities. This exposure can help you tap into new audiences and increase your visibility within the Twitch community.
6. Engage with Your Viewers: Actively interact with your viewers, as we discussed earlier, by responding to comments, asking for their opinions, or running interactive Q&A sessions. Building strong connections with your viewers can lead to loyal and supportive communities that actively promote your channel.
7. Utilize Twitch Features: Take advantage of Twitch features like raids, hosting other channels, and participating in community events. Engage with the broader Twitch community, participate in relevant hashtags, and get involved in conversations to increase your visibility and attract new viewers.
8. Optimize Your Stream Metadata: Pay attention to your stream metadata, including your stream title, category, tags, and video thumbnails. Use relevant keywords, attractive titles, and eye-catching thumbnails to increase the likelihood that your stream will appear in search results and attract more viewers.
9. Solicit Viewer Feedback and Implement Improvements: Actively seek feedback from your viewers and take their suggestions into consideration. Regularly evaluate your stream quality, content, and presentation to identify areas for improvement. By continuously refining your streams based on audience feedback, you can enhance the viewer experience and attract more viewers.
10. Attend Gaming Events or Conferences: Engaging in offline gaming events or conferences can provide opportunities to connect with fellow streamers, industry professionals, and potential viewers. Networking in person can help establish valuable connections and increase your visibility in the gaming community.
Remember, growing your Twitch channel takes time and effort. Stay dedicated, experiment with different strategies, and adapt as needed. Consistently provide value to your viewers, foster a supportive community, and always strive for improvement.
Now that you have the essential strategies for growing your Twitch channel, let’s wrap up this guide and send you off on your journey to Twitch streaming success!
Conclusion
Congratulations on completing this guide to starting and growing your Twitch channel! We’ve covered the essential steps and strategies to help you kickstart your streaming journey. From setting up your Twitch account and choosing the right hardware to configuring stream settings and interacting with your viewers, you now have a solid foundation for a successful Twitch channel.
Remember, building a successful Twitch channel takes time, dedication, and continuous improvement. Consistency, high-quality content, and strong viewer engagement are key ingredients for growth. Be patient, adapt to audience preferences, and always strive to provide a unique and entertaining experience for your viewers.
Don’t forget to leverage social media platforms, gaming communities, and networking opportunities to promote your stream and expand your reach. Engage with other streamers, collaborate whenever possible, and actively participate in the Twitch ecosystem to increase your visibility and attract new viewers.
As you embark on your Twitch streaming journey, be open to experimentation, learn from your experiences, and incorporate viewer feedback to refine and enhance your streams. Embrace your unique personality and have fun with your content, as passion and enjoyment are contagious!
Lastly, remember that building a supportive and engaging community is at the core of Twitch streaming. Treat your viewers with respect, foster positive interactions, and create a welcoming space for everyone to enjoy. Together, you can create an exceptional streaming experience and build long-lasting connections with your audience.
Now, armed with knowledge and inspiration, it’s time to go live and share your passion with the world. Good luck and have a fantastic Twitch streaming journey!

![How to Stream on Twitch Easily [Beginner-Friendly]](https://robots.net/wp-content/uploads/2020/10/Twitch-Featured-300x148.jpg)