Introduction
Sharing your Wi-Fi password between devices can be a tedious process. However, with the right tools and knowledge, you can easily share your Wi-Fi password from your iPhone to your iPad effortlessly. This can save you the hassle of manually typing in passwords and provide a seamless connection between your devices.
Whether you’re setting up a new device or simply want to connect your iPad to your iPhone’s Wi-Fi network, this step-by-step guide will walk you through the process. By following these instructions, you’ll be able to share your Wi-Fi password from your iPhone to your iPad in no time.
It’s worth noting that this guide assumes you have both Wi-Fi and Bluetooth enabled on both devices. Additionally, it is important to ensure that both devices are within close proximity to each other for a stable connection during the process.
So, let’s dive in and get started on sharing your Wi-Fi password from your iPhone to your iPad!
Step 1: Make sure Wi-Fi and Bluetooth are enabled on both devices
Before you begin the process of sharing your Wi-Fi password from your iPhone to your iPad, it’s crucial to ensure that Wi-Fi and Bluetooth are enabled on both devices. Here’s how you can do it:
- On your iPhone, open the Settings app.
- Tap on Wi-Fi and make sure it is turned on.
- Similarly, go back to the Settings app and tap on Bluetooth. Switch it on if it’s not already enabled.
- Repeat the same steps on your iPad, ensuring that both Wi-Fi and Bluetooth are turned on.
Enabling Wi-Fi and Bluetooth is essential as it allows the devices to establish a connection, which is crucial for sharing the Wi-Fi password. Without these features enabled, the devices won’t be able to communicate with each other effectively.
Once you have confirmed that Wi-Fi and Bluetooth are enabled on both your iPhone and iPad, you’re ready to proceed to the next step. It’s essential to double-check these settings before moving forward to ensure a smooth process.
Step 2: Connect the iPhone and iPad via Bluetooth
In order for the iPhone and iPad to share the Wi-Fi password, they must first be connected via Bluetooth. Following these steps will help you establish a Bluetooth connection between the two devices:
- On both your iPhone and iPad, go to the Settings app.
- Tap on Bluetooth.
- Ensure that Bluetooth is turned on for both devices.
- Wait for the devices to search for available Bluetooth connections.
- Once the devices detect each other, your iPhone’s name should appear on your iPad, and vice versa.
- Select the name of the device you want to connect to. For instance, if you’re using your iPhone to share the Wi-Fi password, select your iPad on the iPhone.
- On each device, you will be prompted to verify the Bluetooth connection. Tap “Pair” or “Connect” to establish the connection.
- Once the connection is established, you will receive a confirmation message on each device indicating a successful Bluetooth pairing.
By connecting the iPhone and iPad via Bluetooth, you are ensuring that they can communicate effectively during the Wi-Fi password sharing process. This connection is vital for establishing a secure and seamless data transfer between the devices.
Now that you have successfully connected your iPhone and iPad via Bluetooth, you’re ready to move on to the next step of enabling Personal Hotspot on your iPhone.
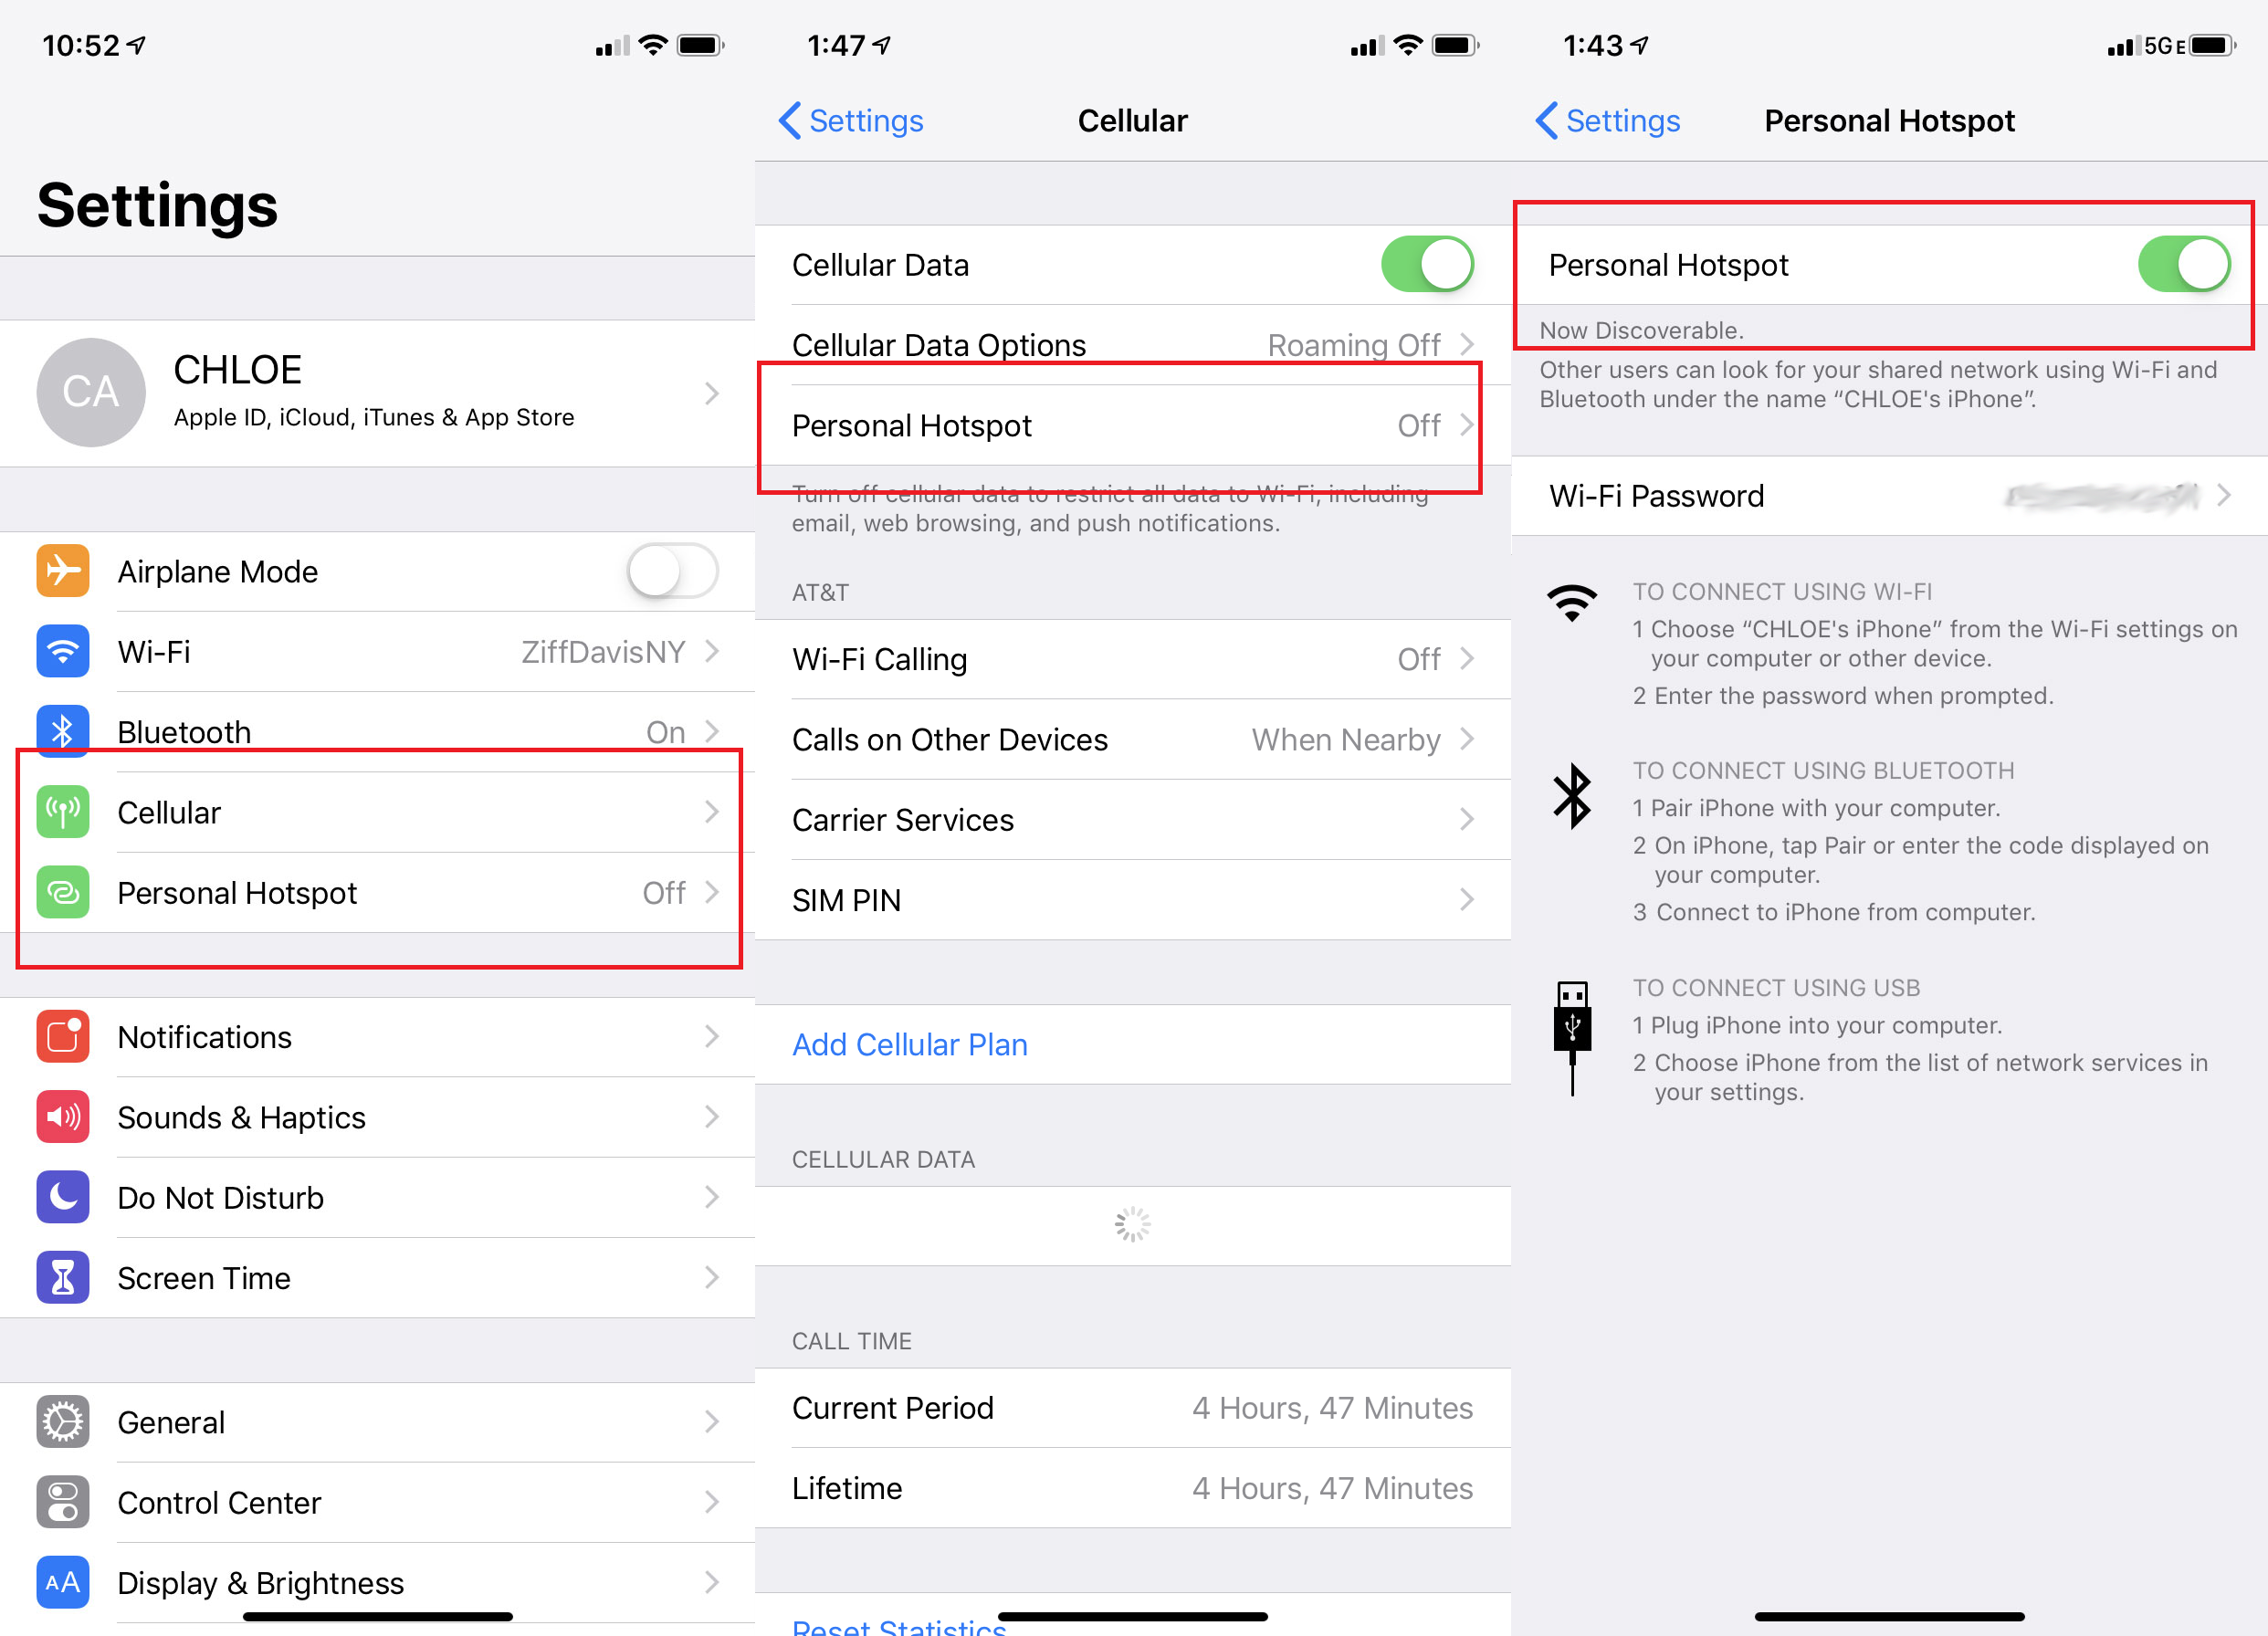
Step 3: Enable Personal Hotspot on the iPhone
To share the Wi-Fi password from your iPhone to your iPad, you need to enable the Personal Hotspot feature on your iPhone. Follow these steps to enable Personal Hotspot:
- On your iPhone, open the Settings app.
- Tap on “Personal Hotspot.”
- Toggle the switch to turn on Personal Hotspot.
- Make note of the Wi-Fi password displayed on the screen.
Enabling Personal Hotspot allows your iPhone to act as a Wi-Fi router, sharing its internet connection with other devices. By turning on Personal Hotspot, you create a hotspot network that your iPad can connect to in order to access the shared Wi-Fi password.
It is important to note that your mobile carrier may have different restrictions and limitations on the use of Personal Hotspot. Ensure that you have a suitable data plan that allows for hotspot usage or consult with your carrier if you have any concerns.
Now that Personal Hotspot is enabled on your iPhone, you’re ready to connect your iPad to the iPhone’s hotspot network and share the Wi-Fi password.
Step 4: Connect the iPad to the iPhone’s Personal Hotspot
Now that you have enabled Personal Hotspot on your iPhone, it’s time to connect your iPad to the iPhone’s hotspot network. Follow these steps to establish the connection:
- On your iPad, open the Settings app.
- Tap on Wi-Fi.
- Under “Choose a Network,” you should see your iPhone’s Personal Hotspot listed.
- Select your iPhone’s hotspot network to connect to it.
- Enter the Wi-Fi password that you noted down earlier while enabling Personal Hotspot on your iPhone.
- Tap “Join” to connect your iPad to the iPhone’s hotspot network.
After successfully connecting to your iPhone’s hotspot network, your iPad will establish a connection and join the network. This connection allows your iPad to access the internet through the iPhone’s mobile data.
It’s worth mentioning that the connection between your iPhone and iPad is now established through the Personal Hotspot, allowing for the sharing of the Wi-Fi password. With the iPad connected to the hotspot network, you’re now ready to proceed with sharing the Wi-Fi password from your iPhone to your iPad.
Next, let’s move on and learn how to share the Wi-Fi password between your iPhone and iPad.
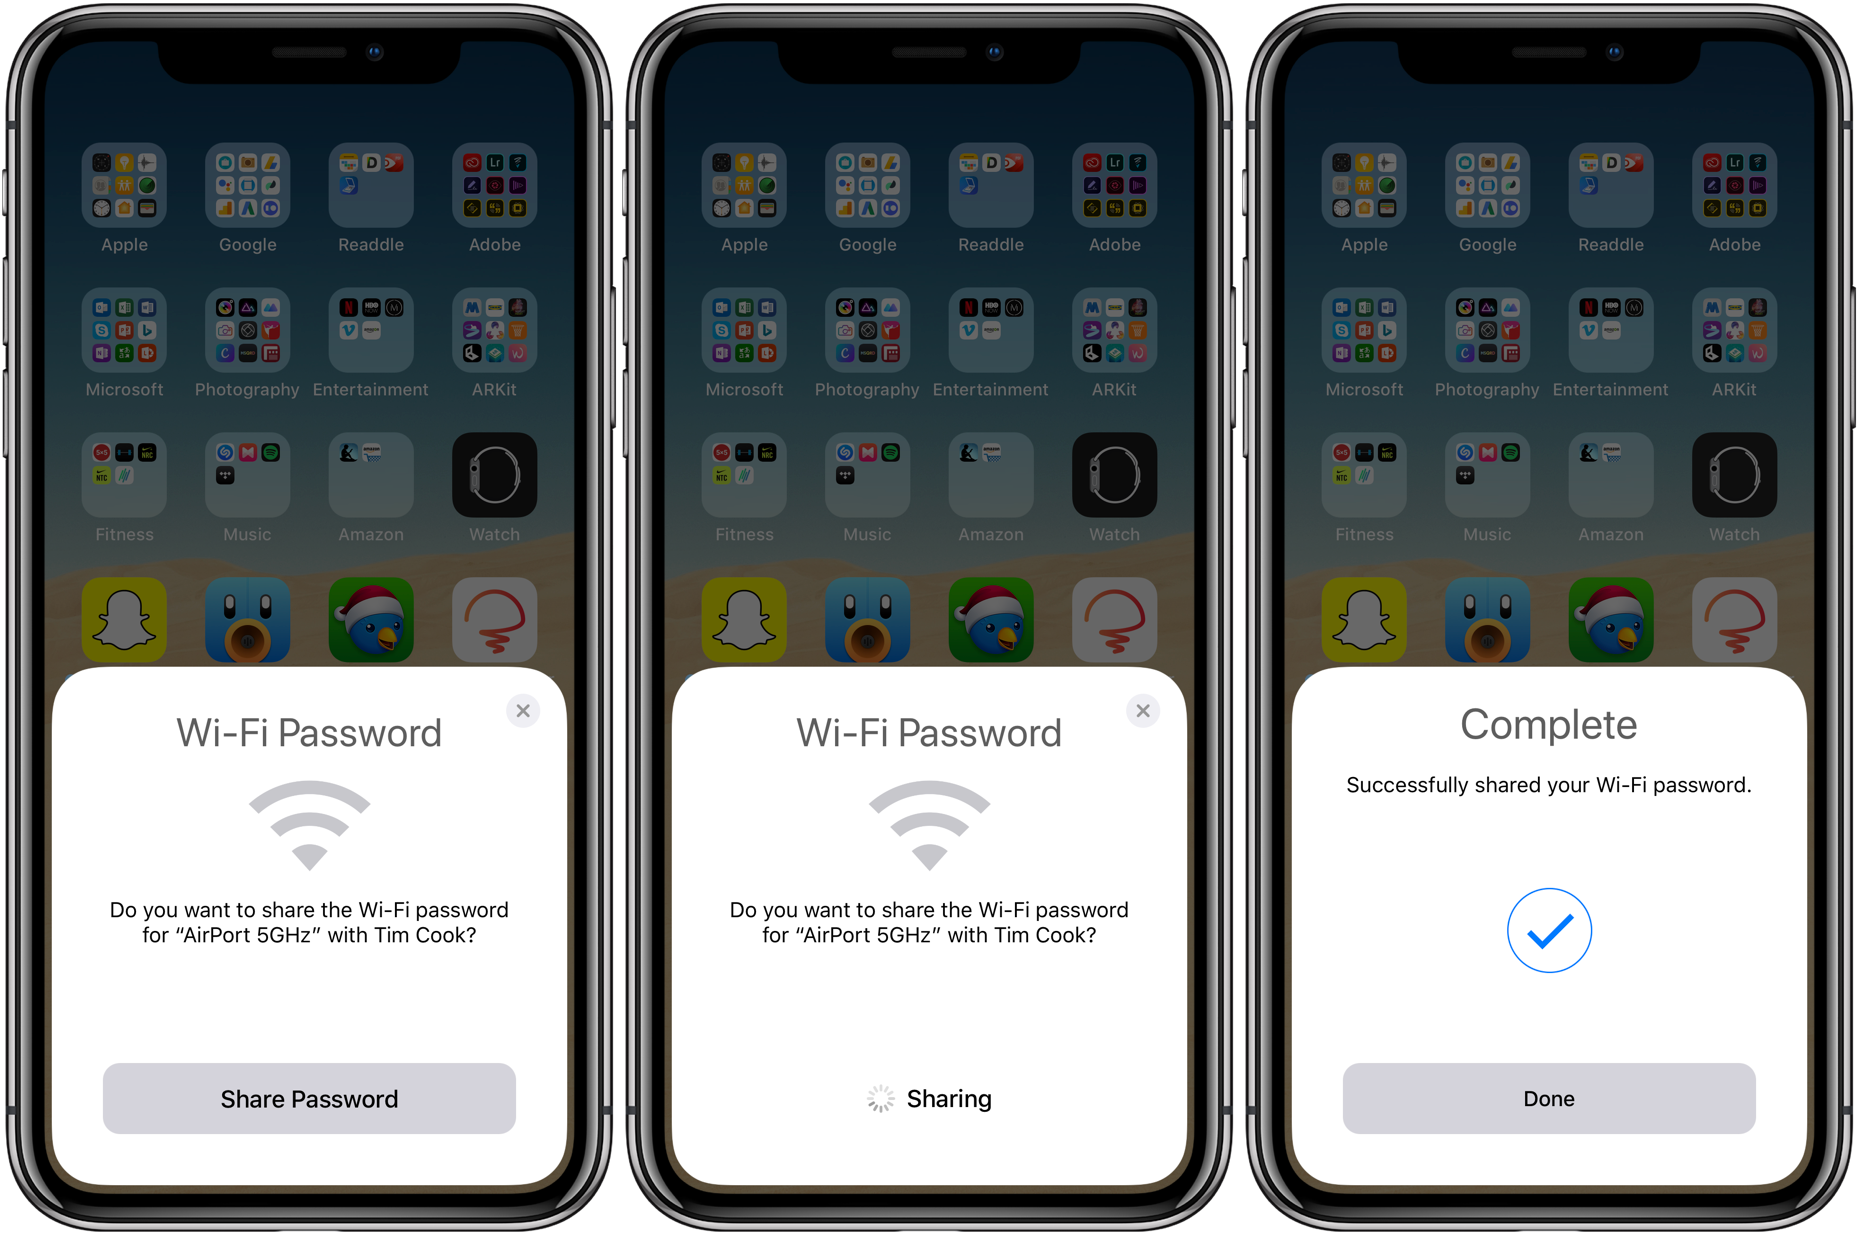
Step 5: Share Wi-Fi password from iPhone to iPad
With your iPad connected to the iPhone’s hotspot network, you’re now ready to share the Wi-Fi password from your iPhone to your iPad. Follow these steps to accomplish this:
- On your iPad, open the Settings app.
- Tap on Wi-Fi.
- Under “Choose a Network,” you should see your iPhone’s hotspot network listed.
- Next to your iPhone’s network name, you will see a blue “i” icon. Tap on it.
- A screen will appear showing detailed information about the network. Look for the “Share Password” option and tap on it.
- If prompted, verify your identity using Touch ID, Face ID, or your device passcode.
- Once verified, your iPhone will automatically share the Wi-Fi password with your iPad.
- Your iPad will then connect to the Wi-Fi network using the shared password.
By sharing the Wi-Fi password from your iPhone to your iPad, you eliminate the need to manually enter the password. This seamless process simplifies the connection setup and allows your iPad to join the shared Wi-Fi network effortlessly.
It’s important to note that the password sharing feature between iPhone and iPad only works when both devices are signed in with the same Apple ID and have the necessary keychain settings enabled.
With the Wi-Fi password successfully shared and your iPad connected to the Wi-Fi network, you can now enjoy a stable and uninterrupted internet connection on your iPad.
Congratulations! You have successfully shared the Wi-Fi password from your iPhone to your iPad.
Conclusion
Sharing your Wi-Fi password from your iPhone to your iPad can make the process of connecting devices quicker and more convenient. By following the step-by-step guide outlined above, you can easily establish a connection between your devices and share the Wi-Fi password seamlessly.
First, ensure that both Wi-Fi and Bluetooth are enabled on both your iPhone and iPad. This ensures that the devices can communicate effectively during the password sharing process.
Next, connect your iPhone and iPad via Bluetooth. This establishes a stable connection between the devices and allows for data transfer.
After that, enable Personal Hotspot on your iPhone. This feature turns your iPhone into a Wi-Fi router, allowing your iPad to connect to it and access the shared Wi-Fi password.
Once your devices are connected and the Wi-Fi network is established, you can then easily share the Wi-Fi password from your iPhone to your iPad. This eliminates the need to manually enter the password and makes the connection process smoother.
By following these steps, you’ll be able to effortlessly share the Wi-Fi password between your iPhone and iPad, saving you time and hassle.
Remember to ensure that both devices are signed in with the same Apple ID and have the necessary settings enabled for password sharing.
Now you can enjoy a seamless connection between your iPhone and iPad, making it easier to access the internet and stay connected on all your devices.
So go ahead and give it a try! Share your Wi-Fi password with ease and enjoy the benefits of a streamlined connection between your iPhone and iPad.